Feb 16, 2021
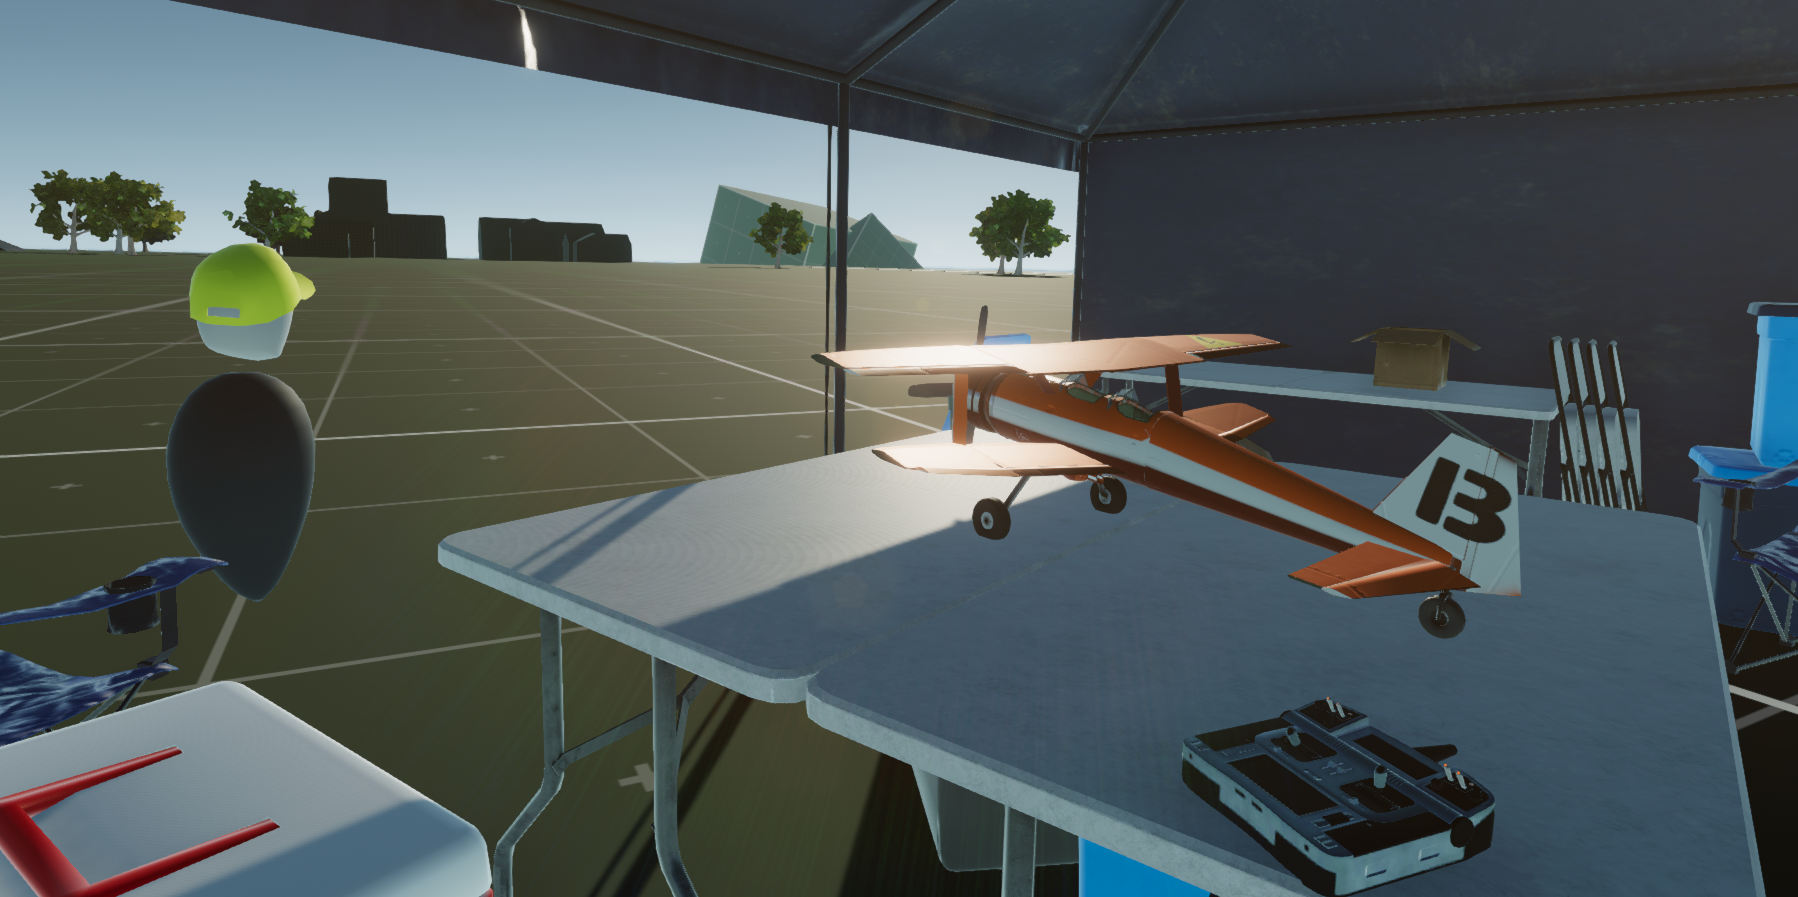
Balsa Model Flight Simulator - Irregular Corporation
Hi,
Continuing our Show-and-Tell series here, today I want to talk about the AI in the game.
This was an entirely new thing for me, because in previous projects, I hadn't done a lot with AI. KSP didn't have much in the way of autonomous behaviours, other than simple controllers for facial expressions and basic attitude control in spacecraft, so this was the first time I got to actually put together a fully-featured AI system that could control flying vehicles and actually make them do things. I thought it was pretty interesting, so read on to learn more about how that happened:

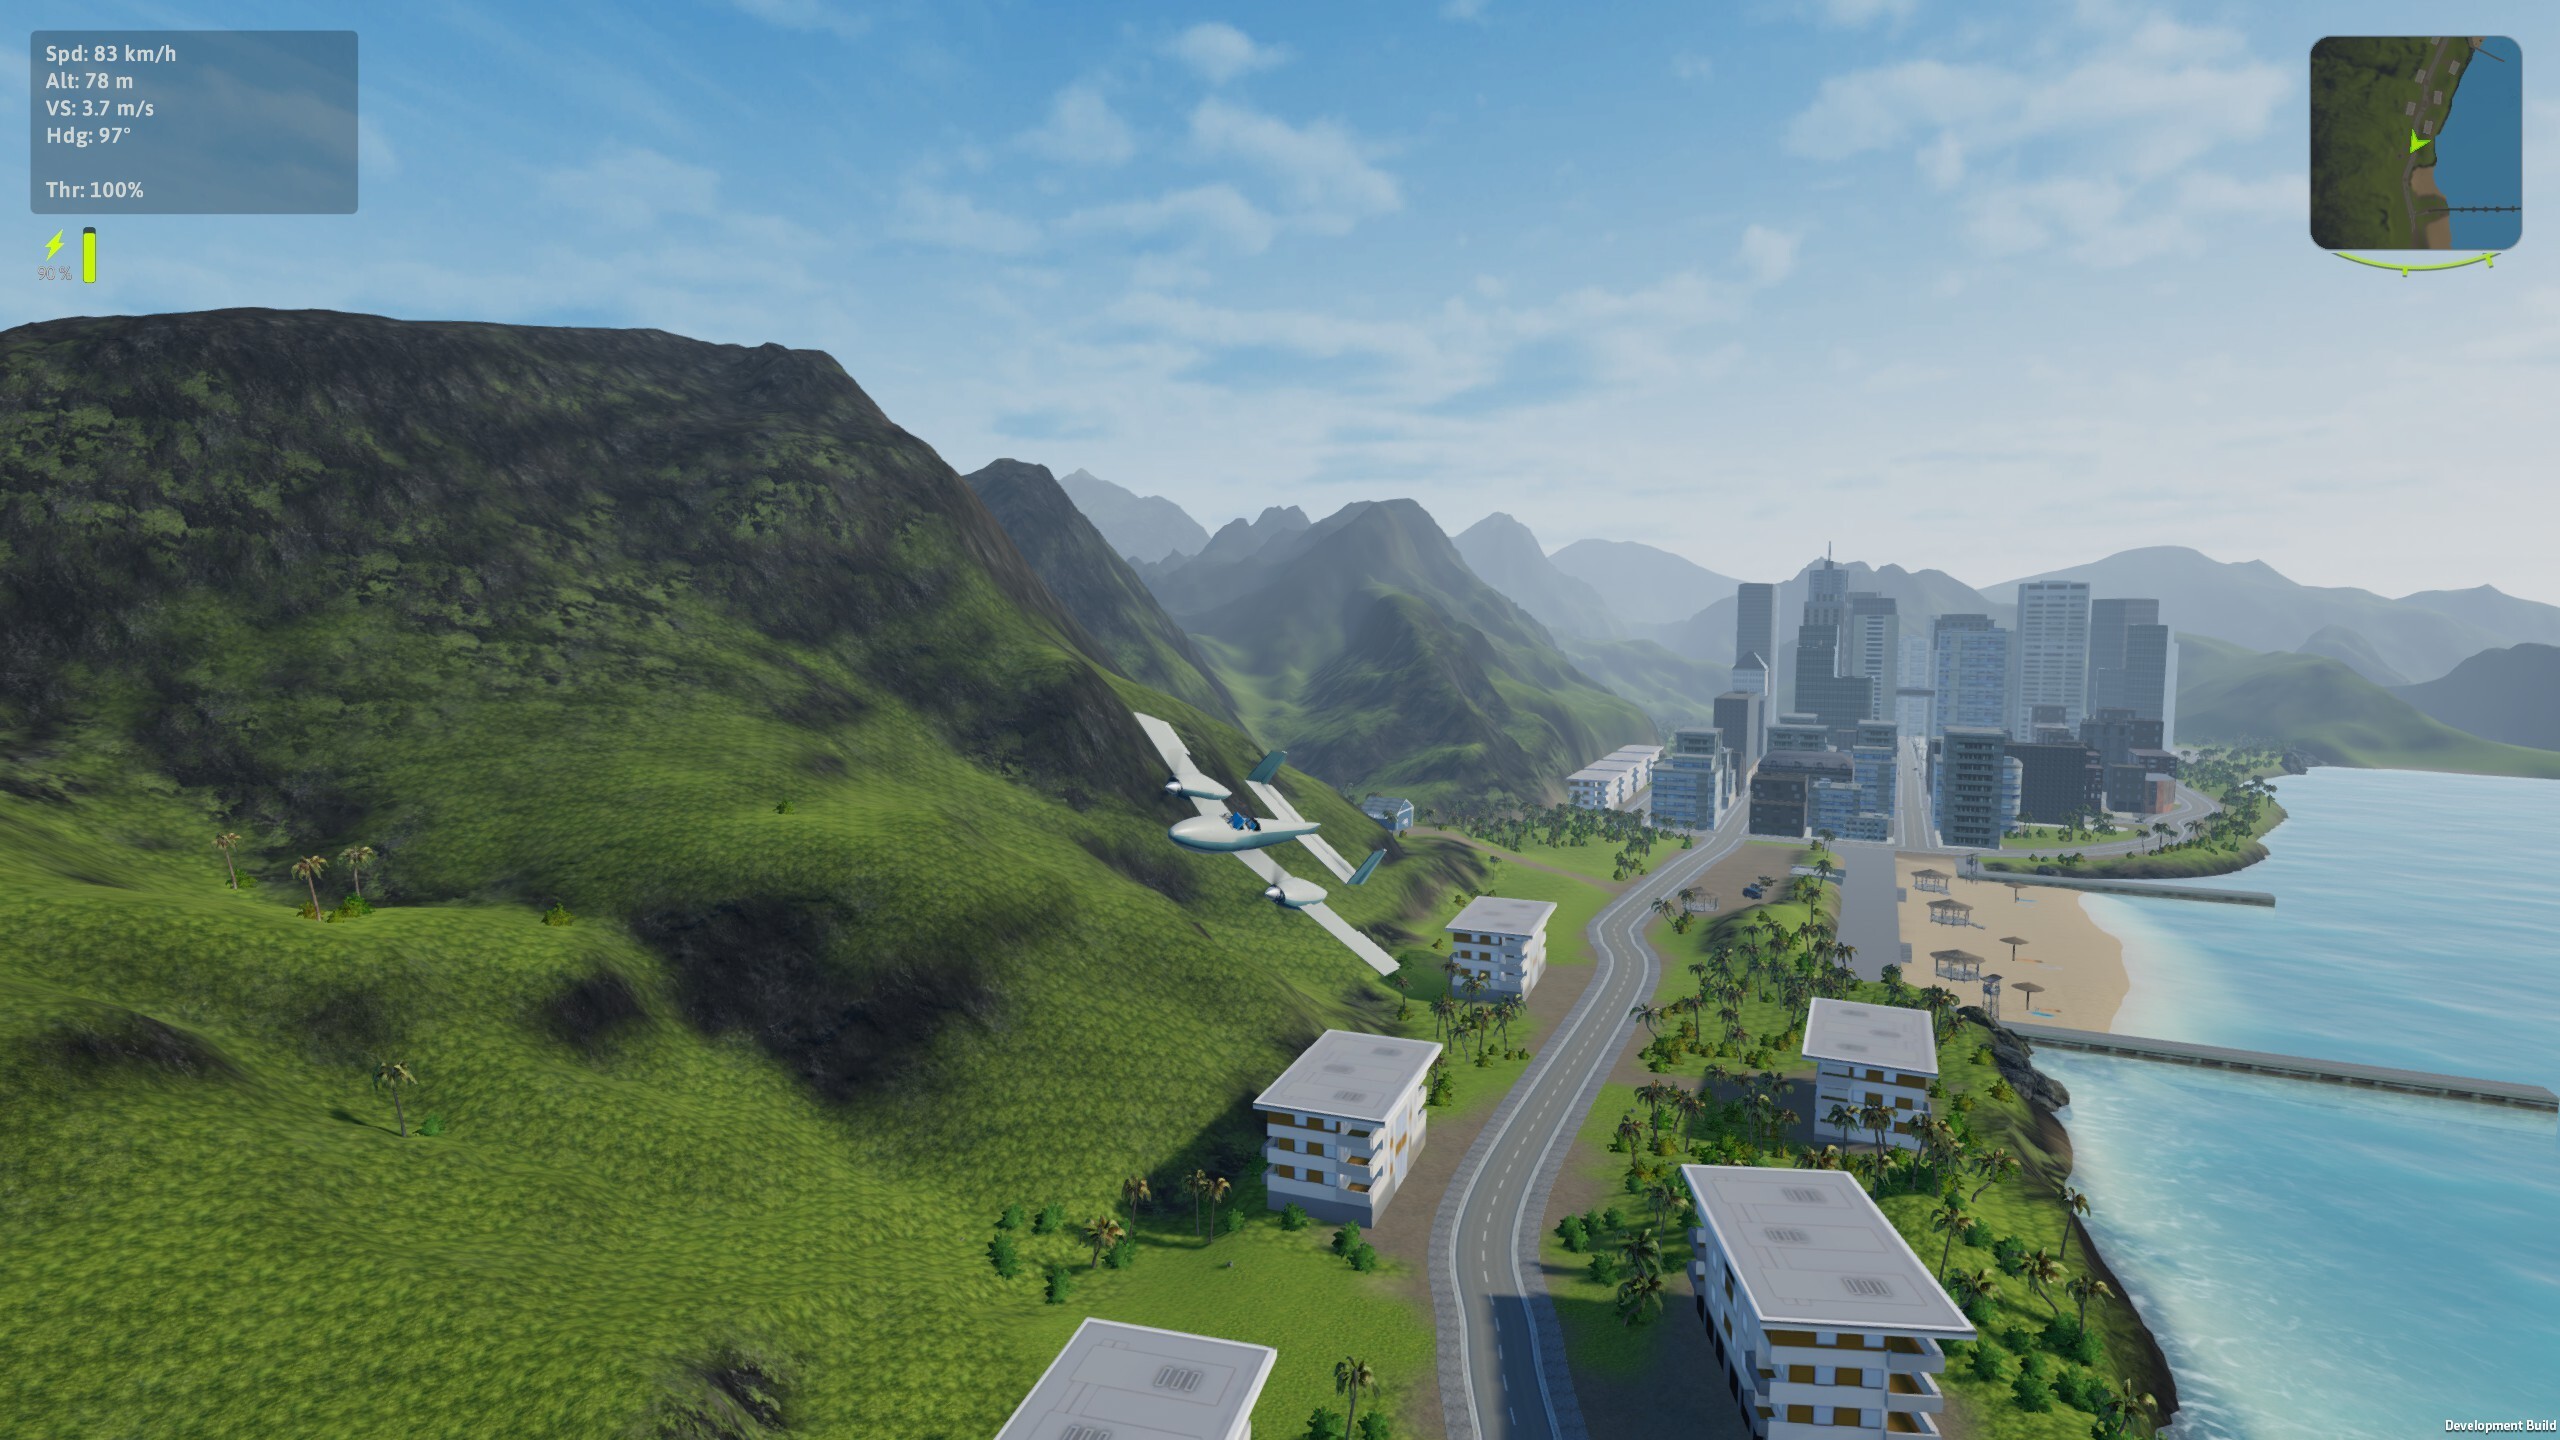
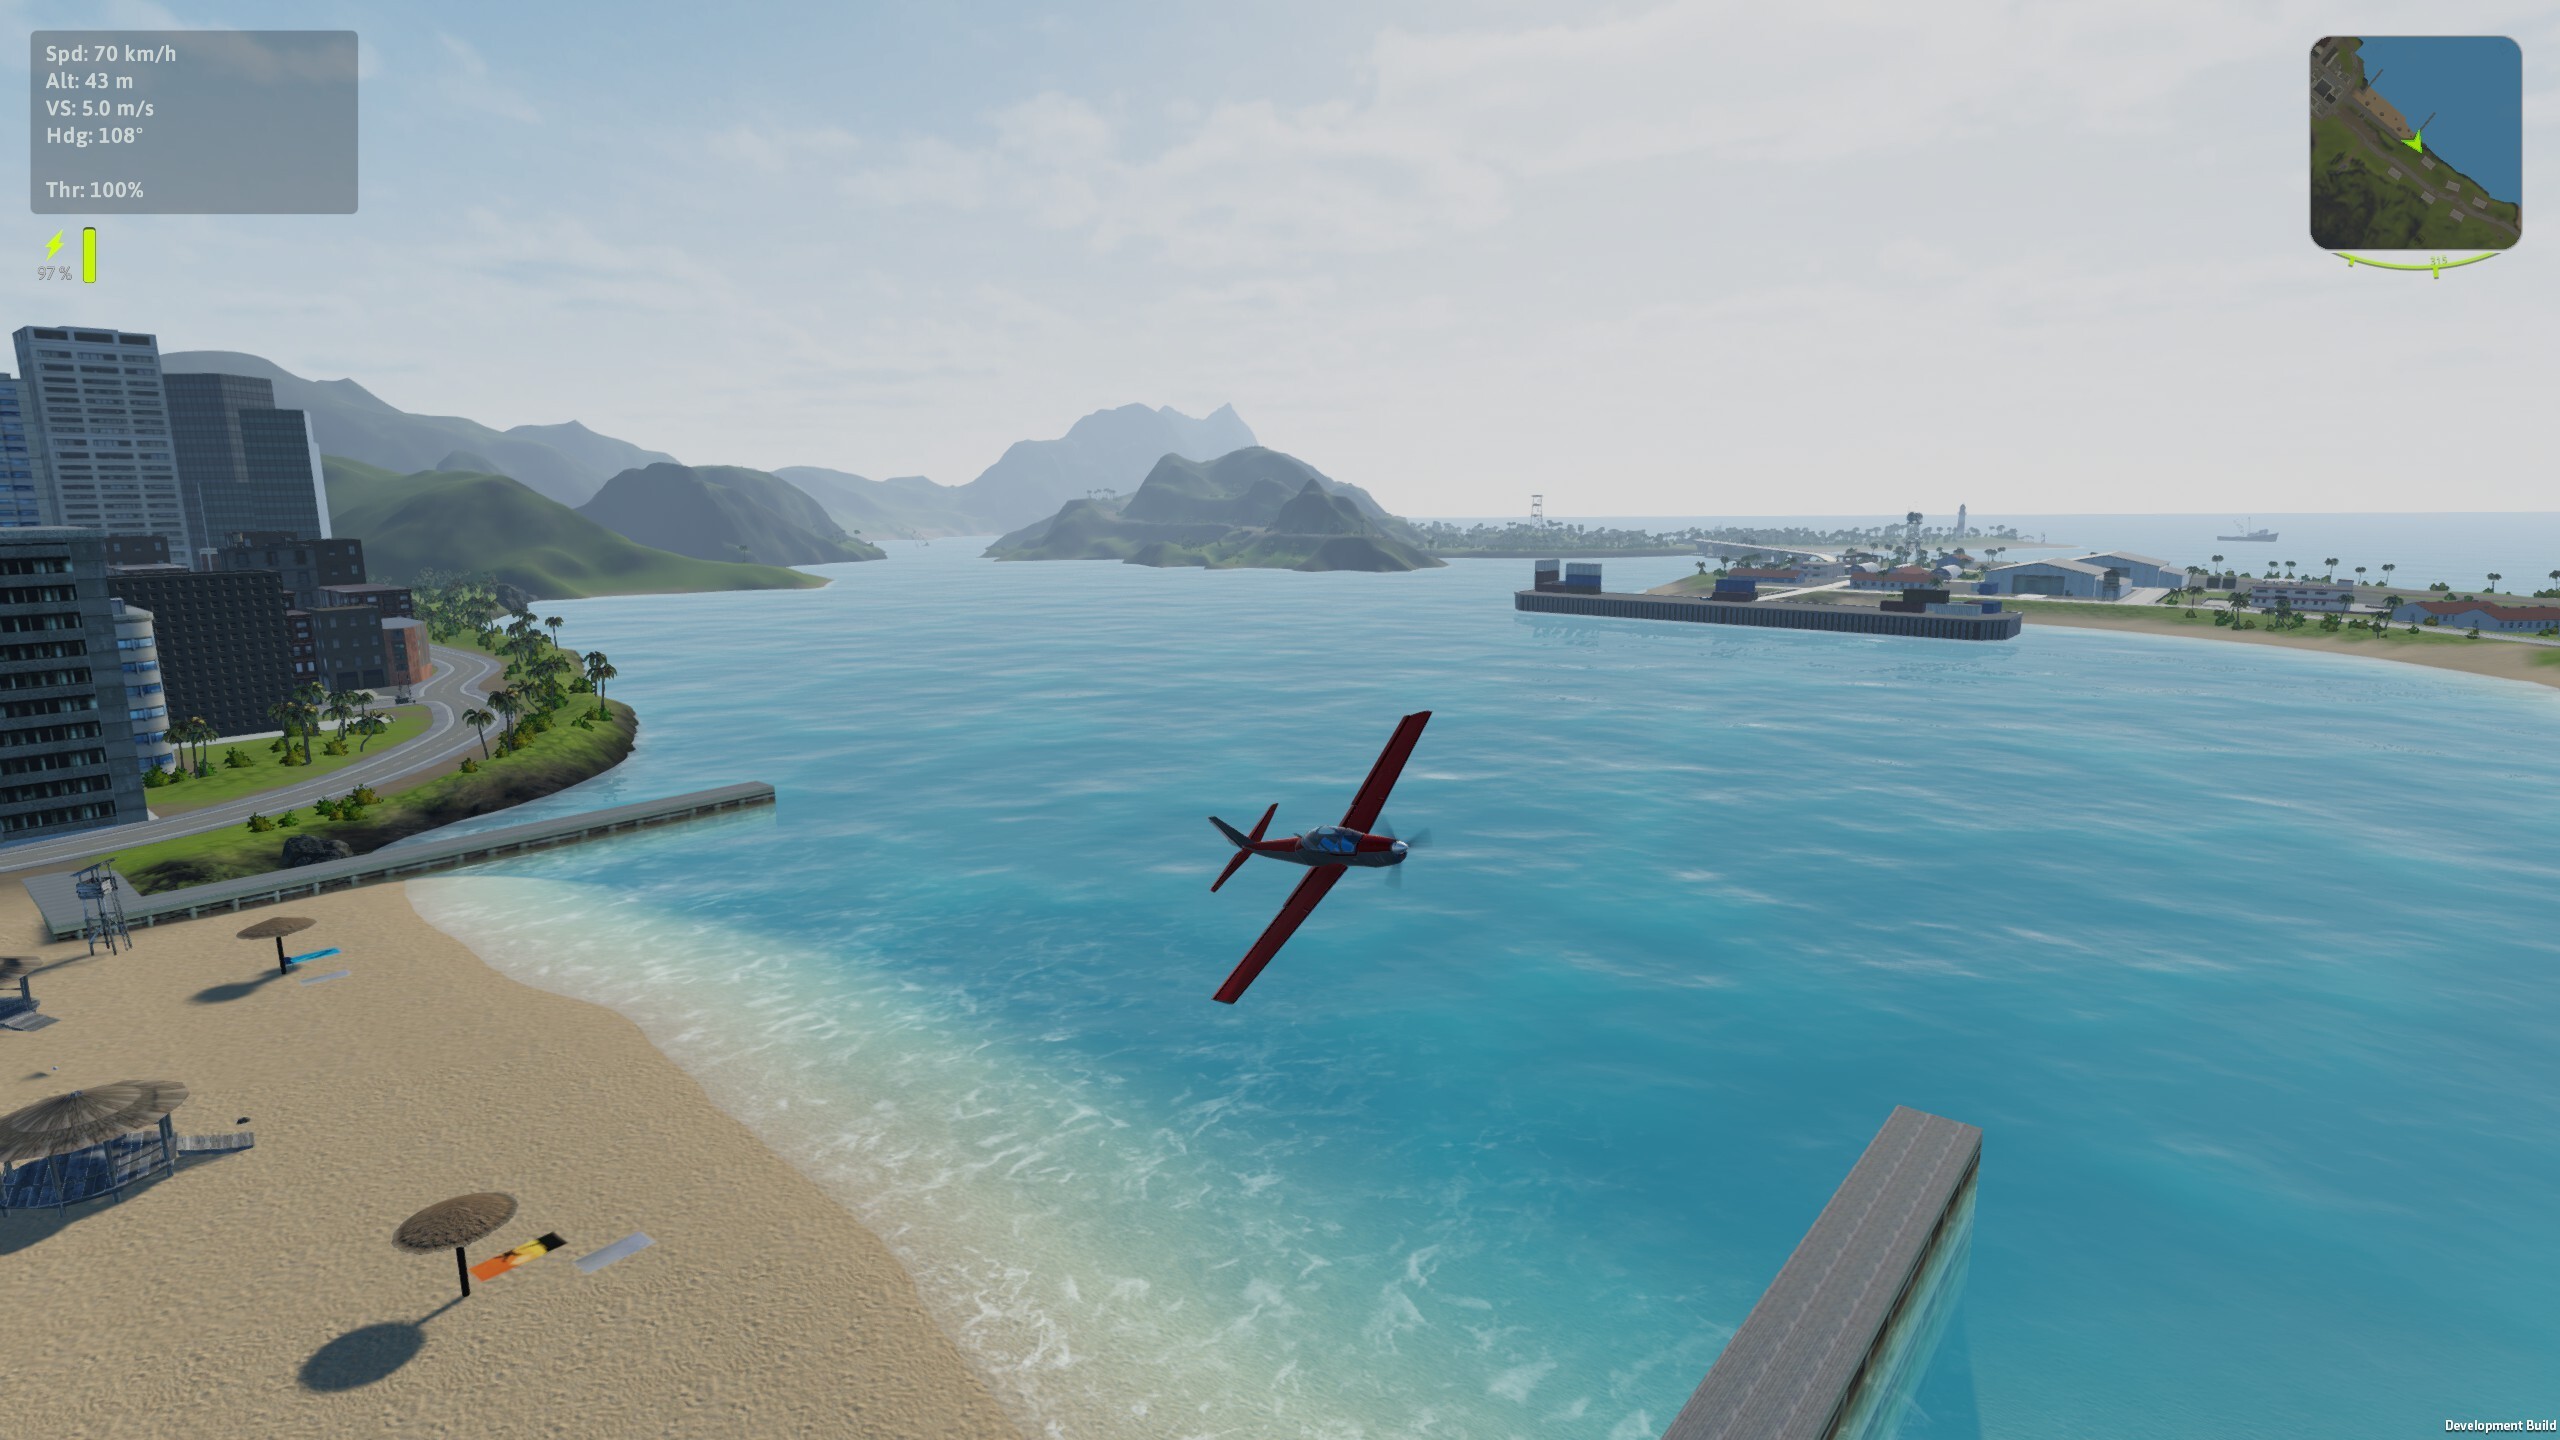
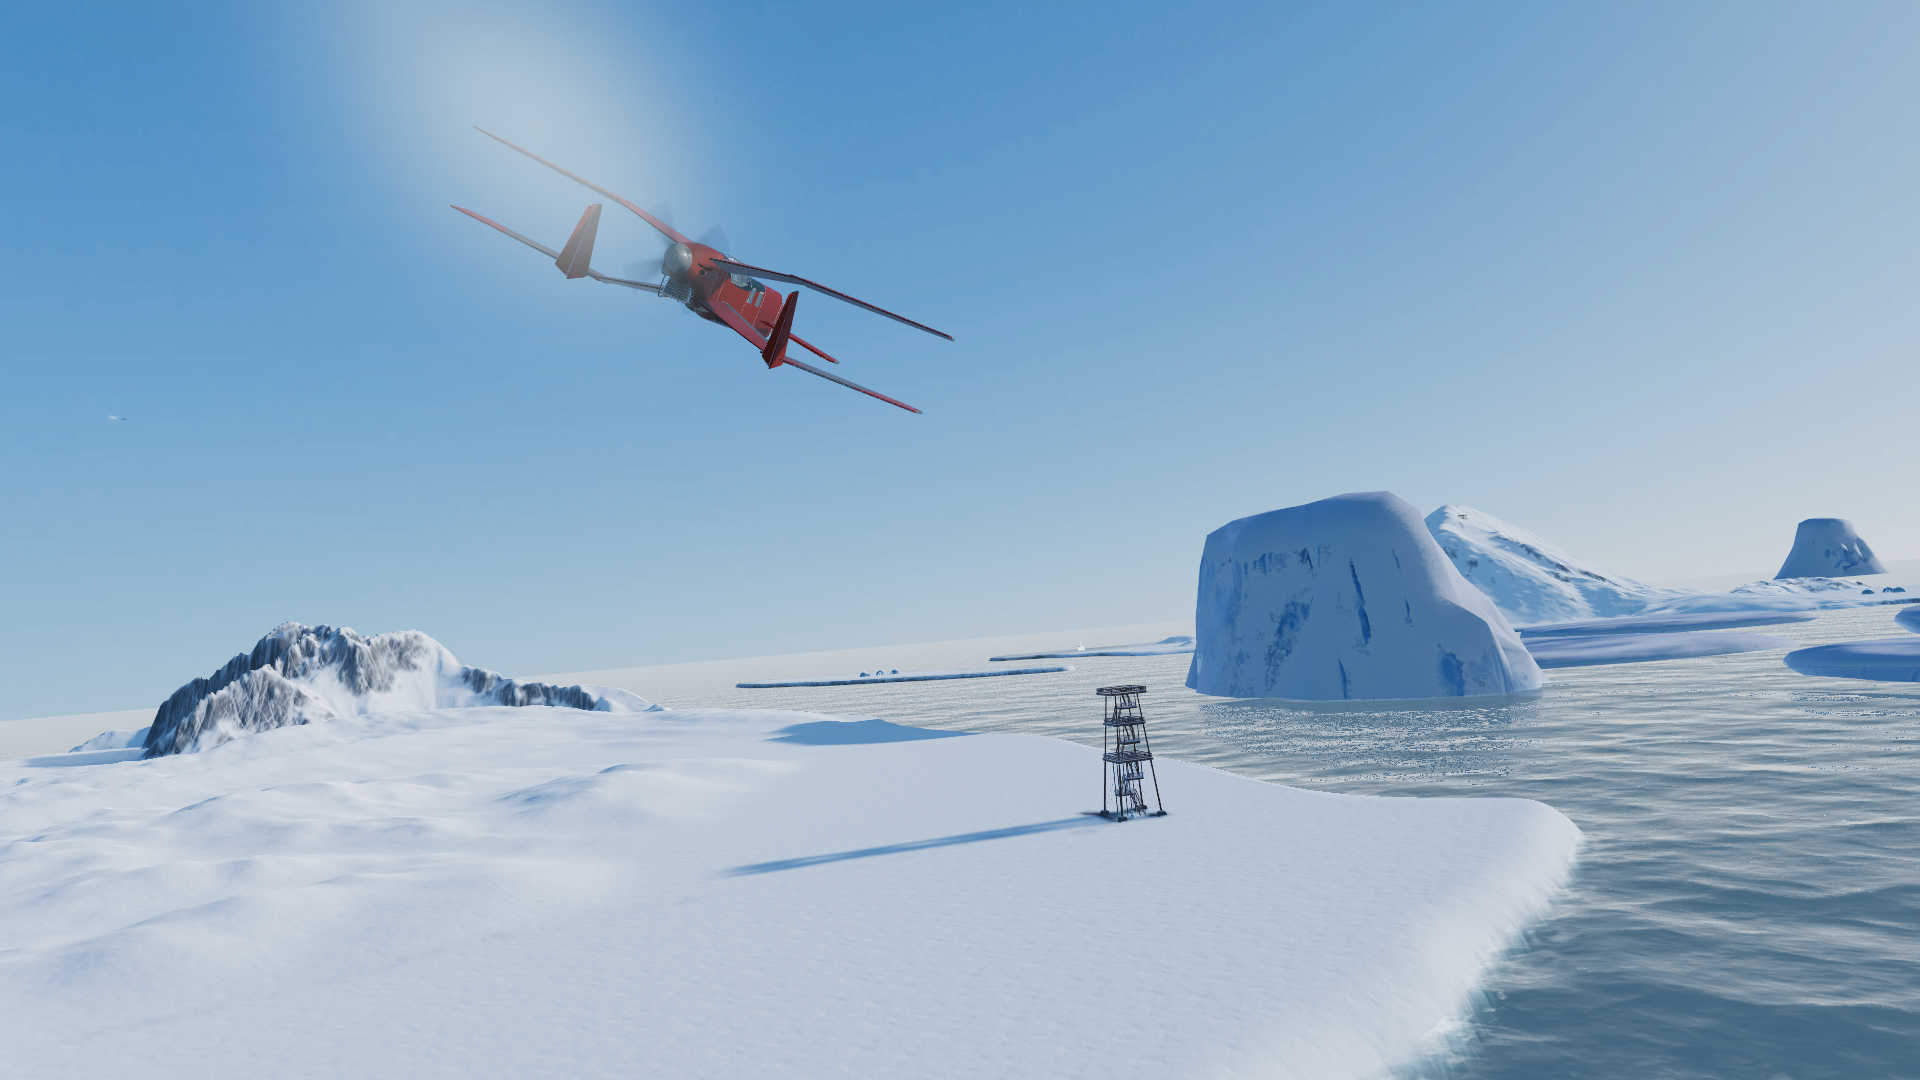
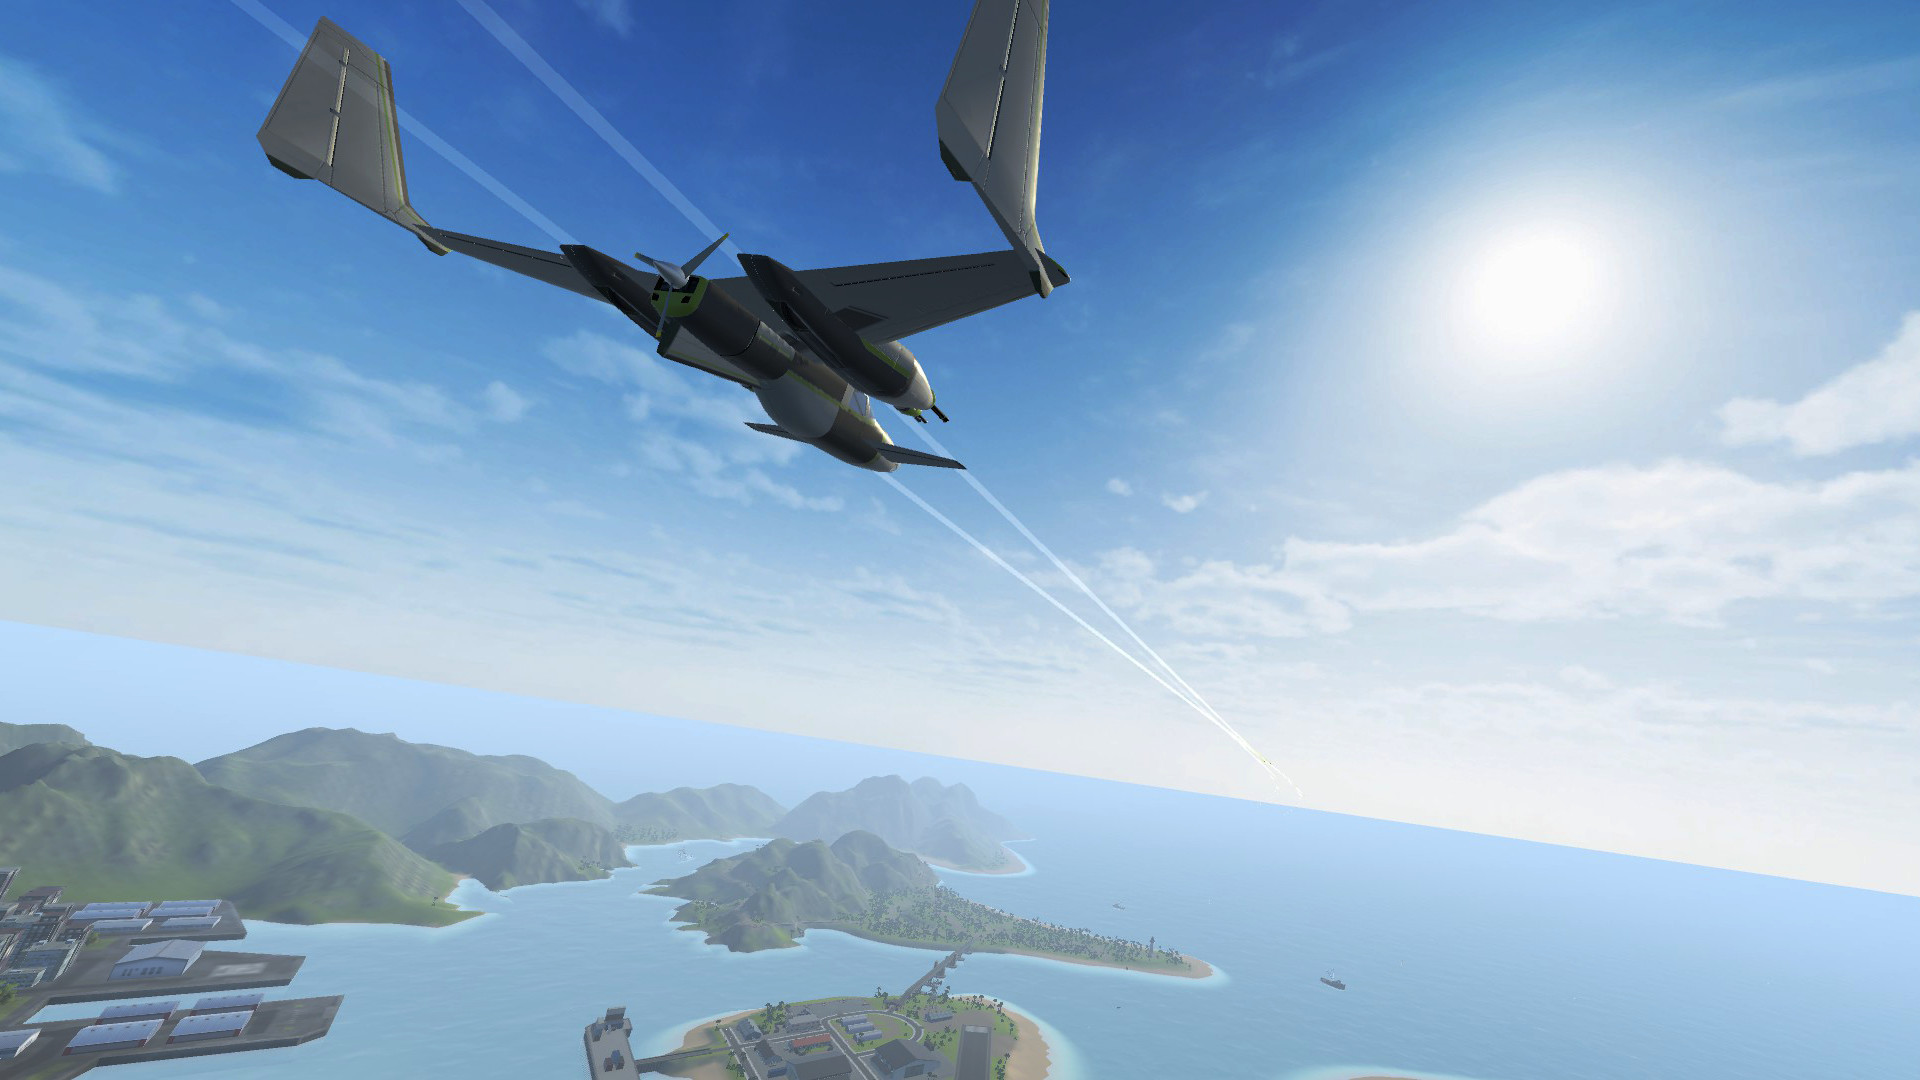
So the AI in Balsa needs to be able to pilot vehicles on its own, to make them appear like they are under intelligent control, and ultimately, they need to also be able to play against the player, as opponents. This means the AI needs to not only be able to fly, it also needs to direct them through race courses and missions routes, acquire and lock targets when in combat, then engage them and attack as well.
Add to that the fact that in Balsa, we don't even know what the vehicles actually look like, because they are made of parts, and don't have fixed performance stats, and the whole prospect seems pretty daunting.
The best way to deal with this sort of complex system though, is to just take it in steps. In the words of Adam Savage: "You don't have to know how to make the whole thing, you just need to know what the next step is."
So the way I took this on in Balsa was to split the AI into several layers. Each layer takes care of a different level of behaviour, receiving instructions from the layer(s) above and directing the layer(s) below. This way, the AI behaviour is broken down into several levels of abstraction, going from the most basic level of controlling the aircraft input state, to the most abstract levels, where the AI is just thinking in terms of tasks and mission objectives.
Each level does only one thing, and doesn't try to understand what the other layers are doing, so that makes their individual jobs much simpler, and my own job of putting all this together actually becomes doable. This wasn't done in one go either. It was gradually built up over several iterations over many months, each time adding more functionality over the things I had made previously.
I should mention also, the AI in Balsa does not 'cheat'. It doesn't move the vehicle over a vector path, and doesn't introduce any non-physical or impossible forces to the model. It is actually flying the plane, using the same input signals you use.
From a game developer's perspective, this might sound like a really convoluted way of doing things. Pretty much every game AI cheats in some way or another, and when it's tuned and balanced, it's very hard to notice that the AI is cutting some corners here and there.
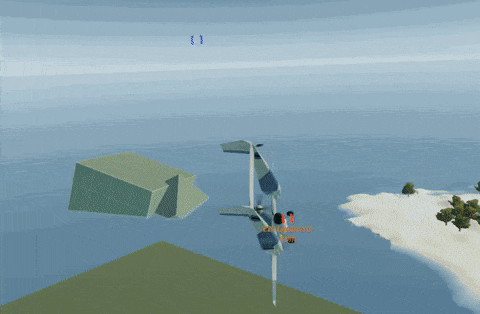
But doing it this way was a lot of fun to implement, and it lets some really cool things happen without us having to explicitly code them. For instance, if you shoot the wing off an enemy NPC, it may be able to continue flying (and fighting), because it's still doing what it can to maintain level flight. Some of the stock vehicles are actually pretty good at taking damage, in fact. However, it might just be too damaged to stay in control, and without us having to code it explicitly, it would just not be able to keep flying despite its best efforts.
A simpler NPC system, maybe one in which vehicles move through a predefined path, for instance, would have to be manually programmed to do this sort of thing. Here, the NPCs are flying using the same physics you experience, so anything that can happen to you in the simulation, can also happen to them.
This is all well and good, but how does this AI actually work? Time to get technical now.
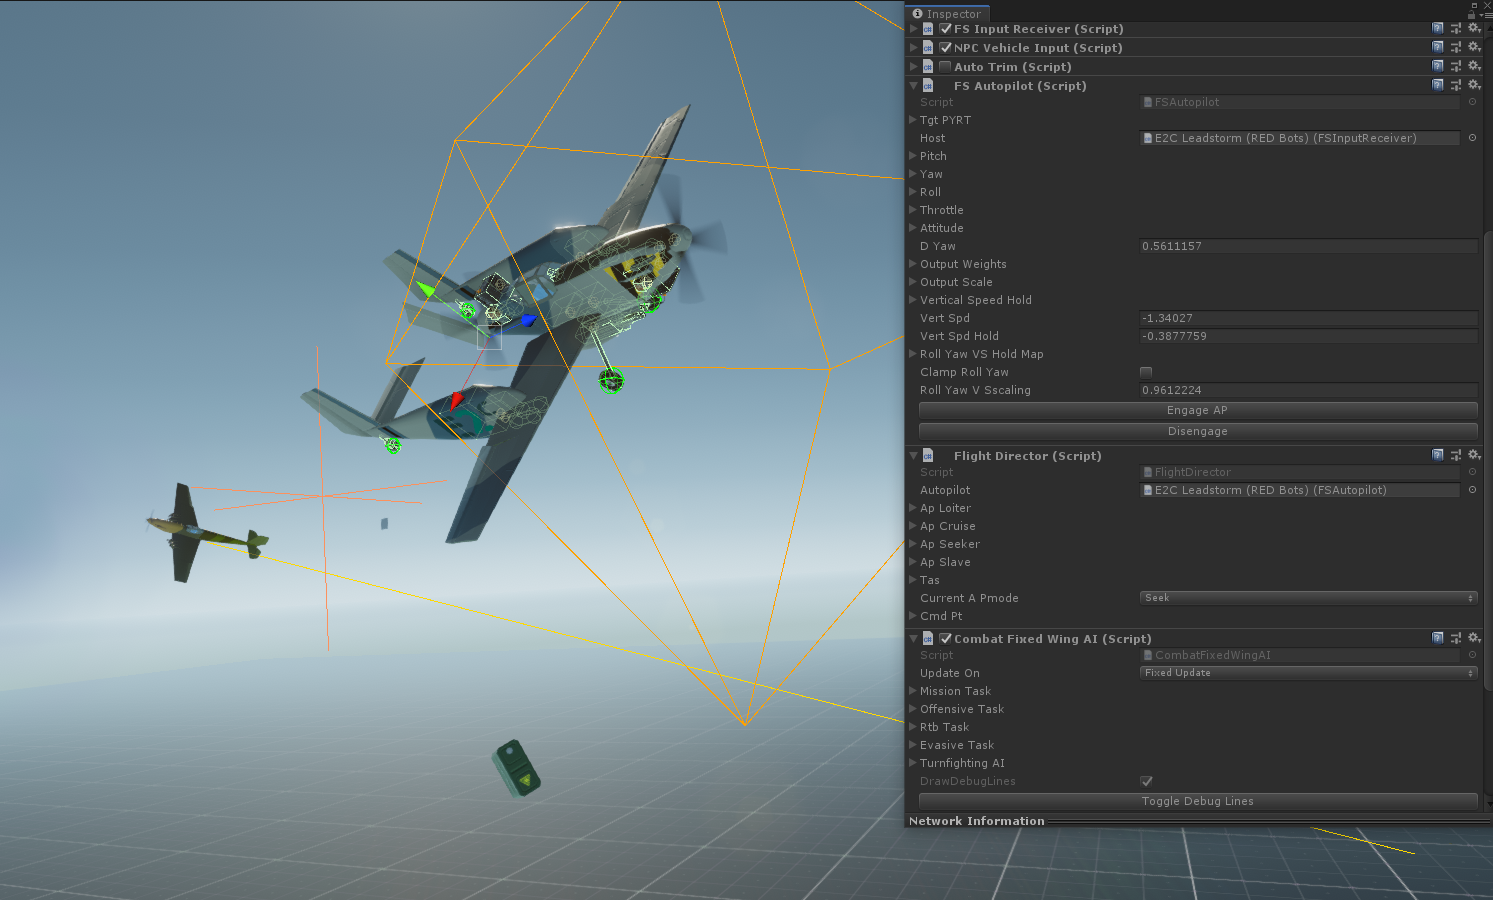
The first layer is what I called the Fly-By-Wire layer. It sits in the vehicle's input receiver pipeline, intercepting the input that is sent to the vehicle (in your own plane this comes from your transmitter, but NPC planes have a similar virtual thing as well), and modifies the commands that get sent down to the vehicle's parts (to move control surfaces, fire guns, throttle engines, etc).
In the Fly-By-Wire layer we use lots of Control Loop systems, or as they're more commonly known, PID loops. These are really cool bits of code that, when fed a 'target' signal (called the set point), a measured 'feedback' value, and some tuning parameters, will generate an output signal that tries to get the measured value to match the set point. You then tweak the tuning parameters to control how quickly the output gets there, how much it corrects for drifting error, and how much it tries to prevent overshooting and overcorrecting.
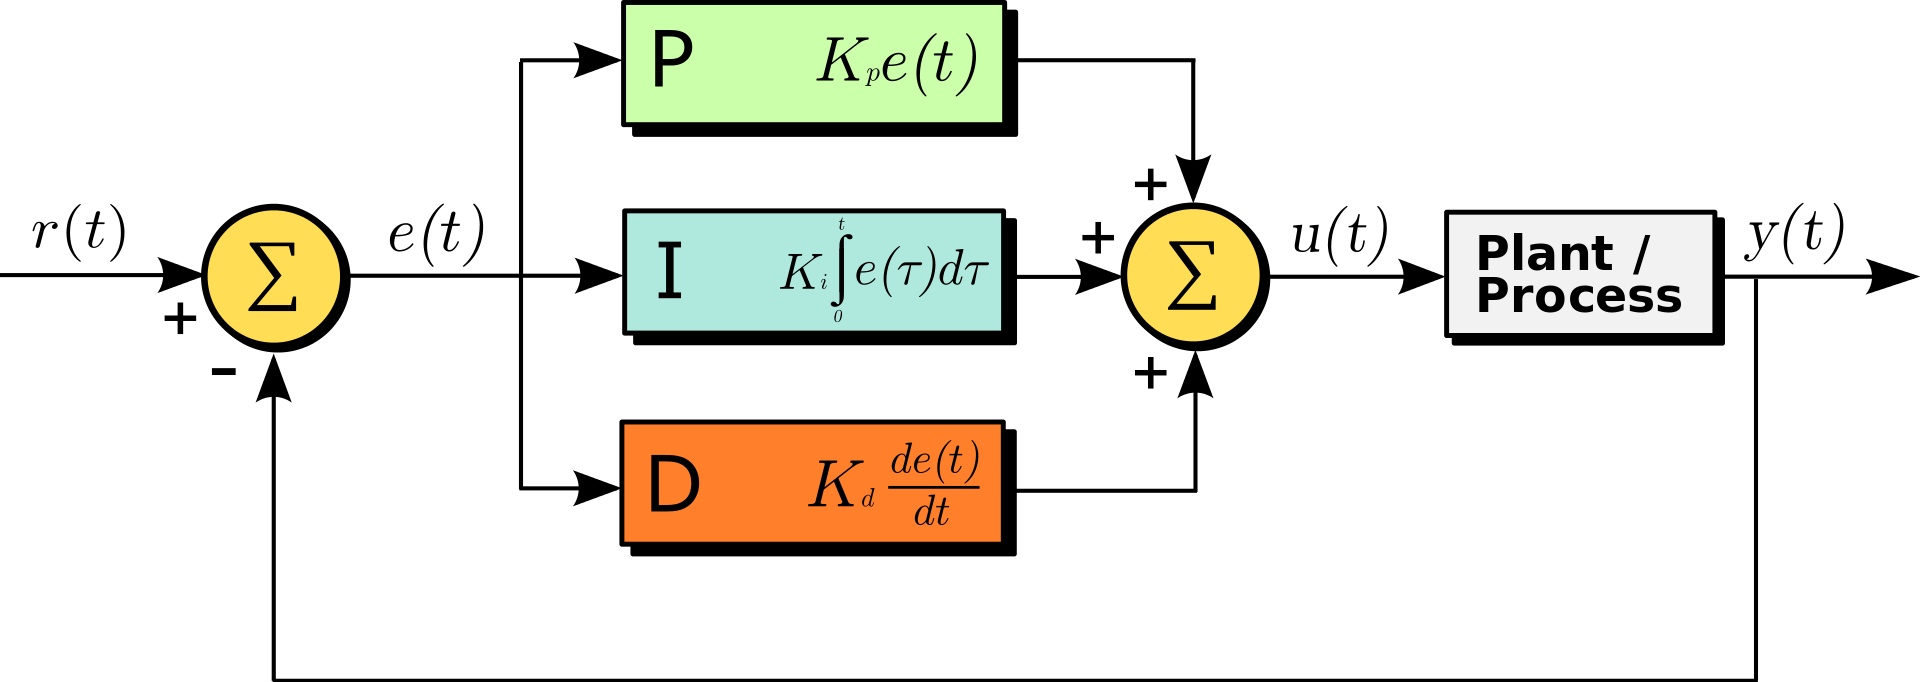
The beauty of PID loops is that they don't require you to have a complete understanding of what is actually happening inside the thing you are controlling. This makes them excellent for controlling complex things that have lots of unknowns in them, like a simulated aircraft flying around with physical forces and an unknown arrangement of parts.
We actually have multiple levels of PID loops in Balsa's Vehicle AI, and the first and most basic of these is the Autotrim system.
Autotrim isn't technically even an AI controller, because it actually runs on the player's own vehicle. It doesn't fully control it either; all it does is look at the aircraft's controls state as the input, and based on the vehicle's angular velocity (the feedback), produces an adjusted control output so that when you aren't telling it to pitch, roll or yaw, it will try to zero out any rotation on the vehicle.
If you know KSP, this might seem familiar. Back there this was called SAS, and it worked in pretty much the same way, although this time I had the advantage of actually knowing what I was doing a bit more, so I managed to make a cleaner and more reliable implementation.
Autotrim doesn't really qualify as AI, but I wanted to mention it because the first layer of the AI, called the Autopilot Layer, is based on the same principle. It reads in the vehicle's physics state, and outputs a control signal for the parts. The difference here is that, unlike Autotrim, the autopilot isn't just trying to zero out rotations, it is also trying to make sure your rotations get zeroed out with the vehicle pointing in the right direction.
The Autopilot layer is also a bit more involved than SAS was in KSP, because this is not a spacecraft in space we are trying to control, but a fixed-wing airplane in flight. That means we can't just tell it to apply full rudder if we want it to change heading. We need to teach it to do coordinated turns, using all control inputs at the same time.
This happens with a series of intermediate steps in the control routine, which ties in all three controls to work together, so that when the aircraft is told to turn to a given heading, it will bank into the turn, pull the nose up, and use the rudder to maintain a coordinated turn. I called that the roll-yaw and bank-and-yank stages of the autopilot, because that's what it actually does.
This is the very bottom layer of the vehicle AI. It receives the most basic of inputs (a target pitch, roll, yaw and airspeed value), and outputs a control signal that actually directs the vehicle's parts to move in response, just as you do as the pilot. It is very much like a real autopilot system in that sense. If you've played other flight sims, you might be familiar with heading hold, altitude hold and speed hold autopilot modes. That's sort of what we are doing here.
So ok, we have something that will steer the plane towards the direction we tell it to go, but where should it go? This is the job of the next layer of AI, called the Flight Director.
In Balsa, the Flight Director is the middle AI layer. It receives a target waypoint vector from higher AI modules, and uses that to set the autopilot's target attitude. Basically, the flight director gets told where to go, and in turn tells the autopilot how to get there.
It is also responsible for two additional things. One, It checks whether the plane has reached the given waypoint, and notifies the higher level AI about it (which usually causes it to be given a new waypoint).
Two, it also takes care of the Terrain Avoidance stage. This originally used to be a higher-level function of the AI, but I later had to move it down to the FD layer. More about that in a bit.
On top of the Flight Director layer, we have the NPC AI layer. This is what decides where the vehicle needs to go.
At this level, we really don't know and don't care about how the vehicle will get to the point we are telling it to go to. We don't care what the shape of the vehicle is, if it's flying right side up or inverted, none of that. That is the job of the lower layers, and at the NPC level all we care about is picking out a position in the world that we want to get to, and what speed we want to get there at.
The NPC layer uses targeting as well as scenery and mission nodes to orient itself, but this is assuming everything is great and going according to plan. What if there are enemies around? What if we run out of fuel and need to crash land? The NPC layer also deals with that sort of stuff.
This happens using what I called the Task Stack. It is a set of NPC-level behaviours (or states), which are prioritized, so that at any point only the most critical priority state is active, and the less important ones are on hold.
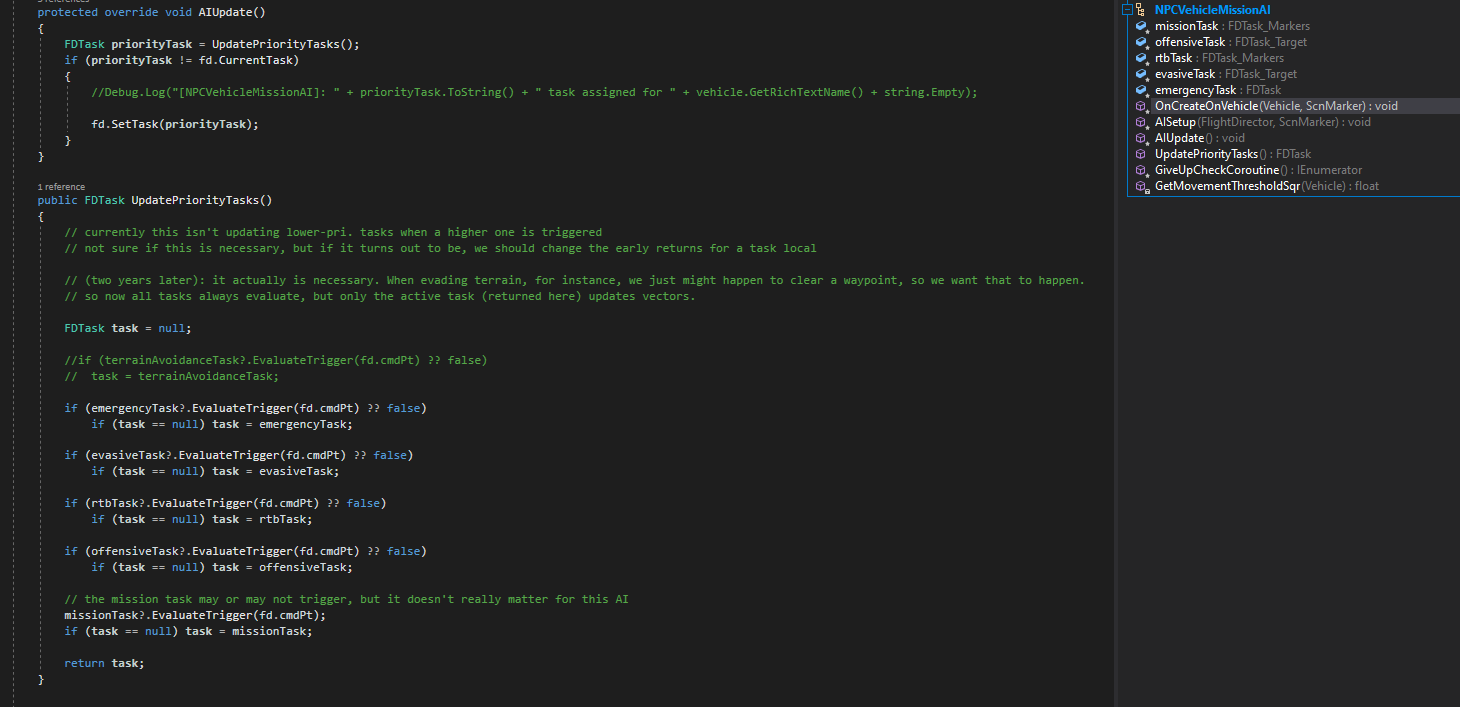
There are several different types of Tasks, which command the vehicle to do different things when given a destination (usually in the form of a Waypoint Marker) or a Target, which can be another vehicle, including yours.
So, imagine we are an NPC plane in a combat mission. Our first job is to fly the mission route. We start at a spawn position, and get given the first waypoint in a route by the NPC spawner.

Each waypoint has a link to the next waypoint on the route, so the Mission task directs the vehicle to fly to the current waypoint, and once it gets told (by the Flight Director) that it got there, it selects the next waypoint. When the route ends, it can either head to a new route, or find an exit route which ends at a despawn marker. That's the basic 'mission' of a combat NPC vehicle.
But this first job is also the least critical job. What if along the way we spot an enemy? If that happens, the combat version of the NPC AI will enable the 'offensive' behaviour, which is a higher-priority, target-seeker type task. It will direct the plane out of its mission route to attack the targeted enemy.
This offensive state actually has sub-states of its own, because to actually engage in aerial combat, we have a few different steps to go through. We aren't trying to ram the enemy, we want to shoot it with our guns, so after chasing down the target and getting close enough, we switch to an aiming sub-state, where instead of trying to reach the enemy's position, we try to match speeds and aim our weapons.

Aiming is trickier than it seems, because remember the AI isn't cheating here. It shoots with the same projectiles you do, so just like you, it needs to lead the target and compensate for bullet drop if it wants to get a hit.
Finally, when the AI sees a good aiming solution in front of it, it pulls the trigger and fires the weapons. This is yet another sub-state of the offensive behaviour, because ammo is just as finite for NPCs as it is for you, so we don't want to hold down the trigger and spend the entire ammo load on a single burst. The firing behaviour normally does short bursts, to save on ammo and make each shot count.
This took a lot of tweaking and tuning to get right, but in the end the combat NPCs in Balsa turned out quite capable of getting some hits in and scoring kills. In fact, I daresay they are slightly more accurate than the average Imperial Stormtrooper.
That's the Offensive task of the NPC AI, but there can be other more critical tasks in the stack, which take priority over all of that.
For instance, suppose that as we engage, we run out of ammo. At that point we might as well forget about engaging and just get out of the fight as fast as possible. This is called the 'return to home' task, and it can be triggered in this sort of situation.
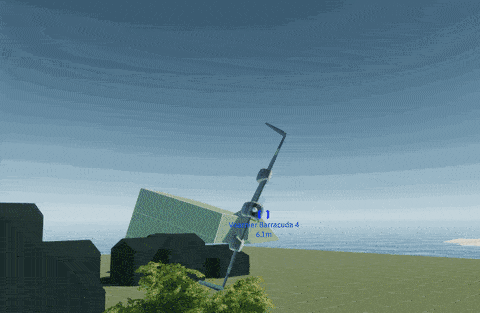
But suppose that as you head out, we get an enemy trying to shoot you down. This would trigger the Evasive task, and when active it will steer the plane not towards the target, but away from it.
There is also the Emergency task, which is meant to be used when crash-landing is the only remaining option.
These lower priority tasks are in place, but currently they are just empty behaviour slots, as they aren't fully implemented yet.
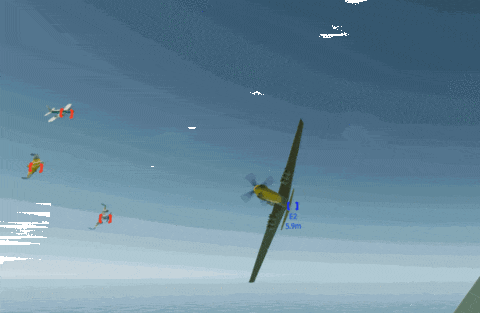
In practice, however, combat planes do already evade attackers pretty well. As they are trying to chase down their targets and the targets do the same in return, they get into some pretty compelling dogfights, with scissoring and turn-fighting manoeuvres and all.
And lastly, the lowest level task on the NPC layer used to be the Terrain Avoidance task. Like I mentioned earlier, this worked ok at first, but as the AI developed and new gameplay situations like racing were added, it had to be moved out of the task stack to the lower FD layer.
This was because with this system of priority behaviours, whenever the AI spotted an obstacle ahead, it would entirely forget anything it was doing to just steer away from the obstacle. This was certainly effective to avoid terrain and obstacles, but it resulted in very cowardly NPC vehicles, which were so afraid of crashing into anything, they would rather fly in circles than try to race you.
The new terrain avoidance module is much smarter. Instead of taking complete control, it will gradually apply a correction command, which gets incrementally more authoritative based on how close the obstacle is. And because the avoidance system isn't a task anymore, the task directions are still coming down from the AI layer, so even as the vehicle is steering away from the terrain, it doesn't forget what it was trying to do originally.
This is called 'soft-wall' avoidance, and it results in a much smoother, less dramatic and generally more efficient way of getting around obstacles. This makes the AI a lot better at racing, as most of the time, a small correction is all it needs to find a clear path.
This more or less covers how the AI in Balsa operates. It was one of the most fun parts of the projects to do, and I can spend hours watching the AI airplanes fly around and shoot at each other, tweaking and tuning it. Of course, like everything else, there's still lots of room to expand and improve, but as it stands I think it can already create some pretty fun gameplay and put up a respectable challenge for single player and PvE missions.
For me, this was the part of the project in which I learned the most, and it was surprising to me just how much knowledge I picked up from my seemingly unrelated hobby projects and even just watching lots and lots of YouTube videos from RC, electronics and robotics makers. I definitely recommend nerding out that way. It's very educational and entertaining, and much more often than I would have imagined, you end up finding real life uses for the stuff you learn.
There is actually one last layer for the whole NPC vehicle system, which is what gets them spawning into the world in the first place. This is actually part of Balsa's Scenario Logic system, and that is going to be the topic of my next post, so stay tuned for that. 😊
For now, thanks for reading, and see you on the next one!
Happy Flying!
Continuing our Show-and-Tell series here, today I want to talk about the AI in the game.
This was an entirely new thing for me, because in previous projects, I hadn't done a lot with AI. KSP didn't have much in the way of autonomous behaviours, other than simple controllers for facial expressions and basic attitude control in spacecraft, so this was the first time I got to actually put together a fully-featured AI system that could control flying vehicles and actually make them do things. I thought it was pretty interesting, so read on to learn more about how that happened:
So the AI in Balsa needs to be able to pilot vehicles on its own, to make them appear like they are under intelligent control, and ultimately, they need to also be able to play against the player, as opponents. This means the AI needs to not only be able to fly, it also needs to direct them through race courses and missions routes, acquire and lock targets when in combat, then engage them and attack as well.
Add to that the fact that in Balsa, we don't even know what the vehicles actually look like, because they are made of parts, and don't have fixed performance stats, and the whole prospect seems pretty daunting.
The best way to deal with this sort of complex system though, is to just take it in steps. In the words of Adam Savage: "You don't have to know how to make the whole thing, you just need to know what the next step is."
So the way I took this on in Balsa was to split the AI into several layers. Each layer takes care of a different level of behaviour, receiving instructions from the layer(s) above and directing the layer(s) below. This way, the AI behaviour is broken down into several levels of abstraction, going from the most basic level of controlling the aircraft input state, to the most abstract levels, where the AI is just thinking in terms of tasks and mission objectives.
Each level does only one thing, and doesn't try to understand what the other layers are doing, so that makes their individual jobs much simpler, and my own job of putting all this together actually becomes doable. This wasn't done in one go either. It was gradually built up over several iterations over many months, each time adding more functionality over the things I had made previously.
I should mention also, the AI in Balsa does not 'cheat'. It doesn't move the vehicle over a vector path, and doesn't introduce any non-physical or impossible forces to the model. It is actually flying the plane, using the same input signals you use.
From a game developer's perspective, this might sound like a really convoluted way of doing things. Pretty much every game AI cheats in some way or another, and when it's tuned and balanced, it's very hard to notice that the AI is cutting some corners here and there.
But doing it this way was a lot of fun to implement, and it lets some really cool things happen without us having to explicitly code them. For instance, if you shoot the wing off an enemy NPC, it may be able to continue flying (and fighting), because it's still doing what it can to maintain level flight. Some of the stock vehicles are actually pretty good at taking damage, in fact. However, it might just be too damaged to stay in control, and without us having to code it explicitly, it would just not be able to keep flying despite its best efforts.
A simpler NPC system, maybe one in which vehicles move through a predefined path, for instance, would have to be manually programmed to do this sort of thing. Here, the NPCs are flying using the same physics you experience, so anything that can happen to you in the simulation, can also happen to them.
This is all well and good, but how does this AI actually work? Time to get technical now.
The first layer is what I called the Fly-By-Wire layer. It sits in the vehicle's input receiver pipeline, intercepting the input that is sent to the vehicle (in your own plane this comes from your transmitter, but NPC planes have a similar virtual thing as well), and modifies the commands that get sent down to the vehicle's parts (to move control surfaces, fire guns, throttle engines, etc).
In the Fly-By-Wire layer we use lots of Control Loop systems, or as they're more commonly known, PID loops. These are really cool bits of code that, when fed a 'target' signal (called the set point), a measured 'feedback' value, and some tuning parameters, will generate an output signal that tries to get the measured value to match the set point. You then tweak the tuning parameters to control how quickly the output gets there, how much it corrects for drifting error, and how much it tries to prevent overshooting and overcorrecting.
The beauty of PID loops is that they don't require you to have a complete understanding of what is actually happening inside the thing you are controlling. This makes them excellent for controlling complex things that have lots of unknowns in them, like a simulated aircraft flying around with physical forces and an unknown arrangement of parts.
We actually have multiple levels of PID loops in Balsa's Vehicle AI, and the first and most basic of these is the Autotrim system.
Autotrim isn't technically even an AI controller, because it actually runs on the player's own vehicle. It doesn't fully control it either; all it does is look at the aircraft's controls state as the input, and based on the vehicle's angular velocity (the feedback), produces an adjusted control output so that when you aren't telling it to pitch, roll or yaw, it will try to zero out any rotation on the vehicle.
If you know KSP, this might seem familiar. Back there this was called SAS, and it worked in pretty much the same way, although this time I had the advantage of actually knowing what I was doing a bit more, so I managed to make a cleaner and more reliable implementation.
Autotrim doesn't really qualify as AI, but I wanted to mention it because the first layer of the AI, called the Autopilot Layer, is based on the same principle. It reads in the vehicle's physics state, and outputs a control signal for the parts. The difference here is that, unlike Autotrim, the autopilot isn't just trying to zero out rotations, it is also trying to make sure your rotations get zeroed out with the vehicle pointing in the right direction.
The Autopilot layer is also a bit more involved than SAS was in KSP, because this is not a spacecraft in space we are trying to control, but a fixed-wing airplane in flight. That means we can't just tell it to apply full rudder if we want it to change heading. We need to teach it to do coordinated turns, using all control inputs at the same time.
This happens with a series of intermediate steps in the control routine, which ties in all three controls to work together, so that when the aircraft is told to turn to a given heading, it will bank into the turn, pull the nose up, and use the rudder to maintain a coordinated turn. I called that the roll-yaw and bank-and-yank stages of the autopilot, because that's what it actually does.
This is the very bottom layer of the vehicle AI. It receives the most basic of inputs (a target pitch, roll, yaw and airspeed value), and outputs a control signal that actually directs the vehicle's parts to move in response, just as you do as the pilot. It is very much like a real autopilot system in that sense. If you've played other flight sims, you might be familiar with heading hold, altitude hold and speed hold autopilot modes. That's sort of what we are doing here.
So ok, we have something that will steer the plane towards the direction we tell it to go, but where should it go? This is the job of the next layer of AI, called the Flight Director.
In Balsa, the Flight Director is the middle AI layer. It receives a target waypoint vector from higher AI modules, and uses that to set the autopilot's target attitude. Basically, the flight director gets told where to go, and in turn tells the autopilot how to get there.
It is also responsible for two additional things. One, It checks whether the plane has reached the given waypoint, and notifies the higher level AI about it (which usually causes it to be given a new waypoint).
Two, it also takes care of the Terrain Avoidance stage. This originally used to be a higher-level function of the AI, but I later had to move it down to the FD layer. More about that in a bit.
On top of the Flight Director layer, we have the NPC AI layer. This is what decides where the vehicle needs to go.
At this level, we really don't know and don't care about how the vehicle will get to the point we are telling it to go to. We don't care what the shape of the vehicle is, if it's flying right side up or inverted, none of that. That is the job of the lower layers, and at the NPC level all we care about is picking out a position in the world that we want to get to, and what speed we want to get there at.
The NPC layer uses targeting as well as scenery and mission nodes to orient itself, but this is assuming everything is great and going according to plan. What if there are enemies around? What if we run out of fuel and need to crash land? The NPC layer also deals with that sort of stuff.
This happens using what I called the Task Stack. It is a set of NPC-level behaviours (or states), which are prioritized, so that at any point only the most critical priority state is active, and the less important ones are on hold.
There are several different types of Tasks, which command the vehicle to do different things when given a destination (usually in the form of a Waypoint Marker) or a Target, which can be another vehicle, including yours.
So, imagine we are an NPC plane in a combat mission. Our first job is to fly the mission route. We start at a spawn position, and get given the first waypoint in a route by the NPC spawner.
Each waypoint has a link to the next waypoint on the route, so the Mission task directs the vehicle to fly to the current waypoint, and once it gets told (by the Flight Director) that it got there, it selects the next waypoint. When the route ends, it can either head to a new route, or find an exit route which ends at a despawn marker. That's the basic 'mission' of a combat NPC vehicle.
But this first job is also the least critical job. What if along the way we spot an enemy? If that happens, the combat version of the NPC AI will enable the 'offensive' behaviour, which is a higher-priority, target-seeker type task. It will direct the plane out of its mission route to attack the targeted enemy.
This offensive state actually has sub-states of its own, because to actually engage in aerial combat, we have a few different steps to go through. We aren't trying to ram the enemy, we want to shoot it with our guns, so after chasing down the target and getting close enough, we switch to an aiming sub-state, where instead of trying to reach the enemy's position, we try to match speeds and aim our weapons.
Aiming is trickier than it seems, because remember the AI isn't cheating here. It shoots with the same projectiles you do, so just like you, it needs to lead the target and compensate for bullet drop if it wants to get a hit.
Finally, when the AI sees a good aiming solution in front of it, it pulls the trigger and fires the weapons. This is yet another sub-state of the offensive behaviour, because ammo is just as finite for NPCs as it is for you, so we don't want to hold down the trigger and spend the entire ammo load on a single burst. The firing behaviour normally does short bursts, to save on ammo and make each shot count.
This took a lot of tweaking and tuning to get right, but in the end the combat NPCs in Balsa turned out quite capable of getting some hits in and scoring kills. In fact, I daresay they are slightly more accurate than the average Imperial Stormtrooper.
That's the Offensive task of the NPC AI, but there can be other more critical tasks in the stack, which take priority over all of that.
For instance, suppose that as we engage, we run out of ammo. At that point we might as well forget about engaging and just get out of the fight as fast as possible. This is called the 'return to home' task, and it can be triggered in this sort of situation.
But suppose that as you head out, we get an enemy trying to shoot you down. This would trigger the Evasive task, and when active it will steer the plane not towards the target, but away from it.
There is also the Emergency task, which is meant to be used when crash-landing is the only remaining option.
These lower priority tasks are in place, but currently they are just empty behaviour slots, as they aren't fully implemented yet.
In practice, however, combat planes do already evade attackers pretty well. As they are trying to chase down their targets and the targets do the same in return, they get into some pretty compelling dogfights, with scissoring and turn-fighting manoeuvres and all.
And lastly, the lowest level task on the NPC layer used to be the Terrain Avoidance task. Like I mentioned earlier, this worked ok at first, but as the AI developed and new gameplay situations like racing were added, it had to be moved out of the task stack to the lower FD layer.
This was because with this system of priority behaviours, whenever the AI spotted an obstacle ahead, it would entirely forget anything it was doing to just steer away from the obstacle. This was certainly effective to avoid terrain and obstacles, but it resulted in very cowardly NPC vehicles, which were so afraid of crashing into anything, they would rather fly in circles than try to race you.
The new terrain avoidance module is much smarter. Instead of taking complete control, it will gradually apply a correction command, which gets incrementally more authoritative based on how close the obstacle is. And because the avoidance system isn't a task anymore, the task directions are still coming down from the AI layer, so even as the vehicle is steering away from the terrain, it doesn't forget what it was trying to do originally.
This is called 'soft-wall' avoidance, and it results in a much smoother, less dramatic and generally more efficient way of getting around obstacles. This makes the AI a lot better at racing, as most of the time, a small correction is all it needs to find a clear path.
This more or less covers how the AI in Balsa operates. It was one of the most fun parts of the projects to do, and I can spend hours watching the AI airplanes fly around and shoot at each other, tweaking and tuning it. Of course, like everything else, there's still lots of room to expand and improve, but as it stands I think it can already create some pretty fun gameplay and put up a respectable challenge for single player and PvE missions.
For me, this was the part of the project in which I learned the most, and it was surprising to me just how much knowledge I picked up from my seemingly unrelated hobby projects and even just watching lots and lots of YouTube videos from RC, electronics and robotics makers. I definitely recommend nerding out that way. It's very educational and entertaining, and much more often than I would have imagined, you end up finding real life uses for the stuff you learn.
There is actually one last layer for the whole NPC vehicle system, which is what gets them spawning into the world in the first place. This is actually part of Balsa's Scenario Logic system, and that is going to be the topic of my next post, so stay tuned for that. 😊
For now, thanks for reading, and see you on the next one!
Happy Flying!
Share: 


 [/img]
So internally, there are several ways you can approach this. One option is to use something called Blend Shapes, which is where you set up multiple versions of a 3D model, all having the same geometry, but with the model vertices in different positions.
Then in the game, you start with the base model, and you use these variant Blend Shape models to push around the vertices of the mesh towards these 'target' shapes.
This scheme also lets you combine multiple blends together, which basically adds them up to give you a new combined version of the mesh. Sometimes that works really well, other times... you end up with a gnarly mess.
Another approach is to use rigging, which is how 3D character models are animated. You set up an underlying skeleton, and each vertex in the model is assigned a value for how much the position and orientation of each bone will affect it. For our parts, this also works well, because unlike real life bones, these things don't actually have to be connected to one another, so you can use bones as a sort of 'anchor' to move parts of a model around, like say, the corners of a square wing panel.
So there's many ways to skin this cat, and the way we chose to implement this in Balsa was, well, both.
[img]{STEAM_CLAN_IMAGE}/33908629/c036182160a523944b6828ce5bf4ef2a3e0d9d96.png[/img]
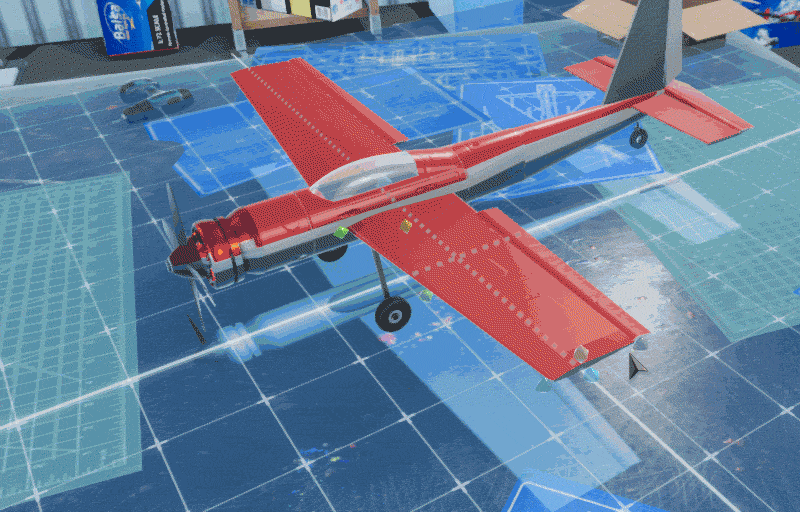
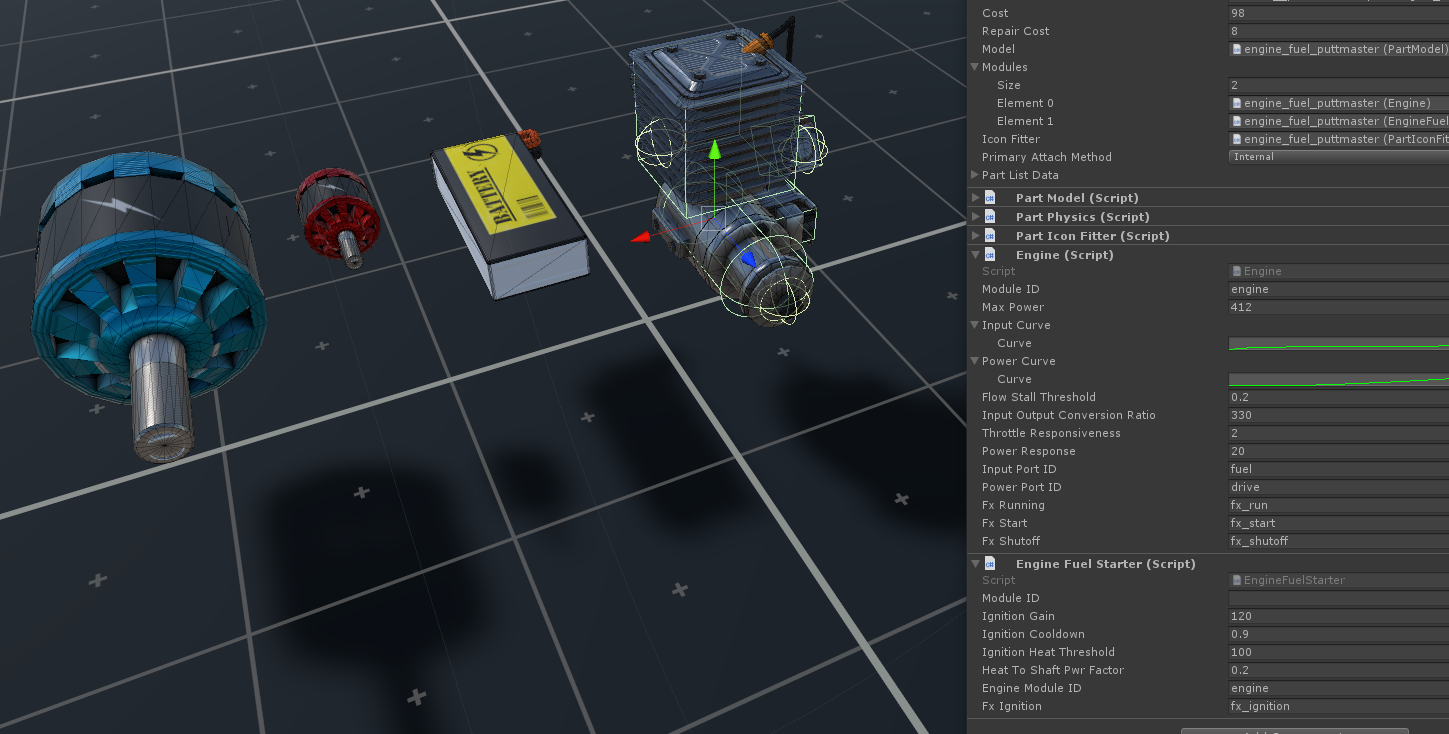
Parts in Balsa are put together using Modules. This is a concept that came up a bit late in the game for KSP, but this time, it was something I had in mind from the outset, so there is a lot more modularity to Balsa's Modules. For instance, while in KSP we would maybe have one module called Engine for all the engine functionality of a part, in Balsa engines are further split into more basic components. One is the engine core itself, which merely takes an input resource (like Fuel or Electric Charge) and converts it to an output resource (called Drive Power). That's all it does. Then we have a Starter module, which is different for Electric motors or Fuel engines and handles the ignition logic, but the common core is the same. Then there are other modules, like Engine sounds and effects, and so on.
[img]{STEAM_CLAN_IMAGE}/33908629/8bde2e822b4ccbee07692886de7c7b559c05d376.png[/img]
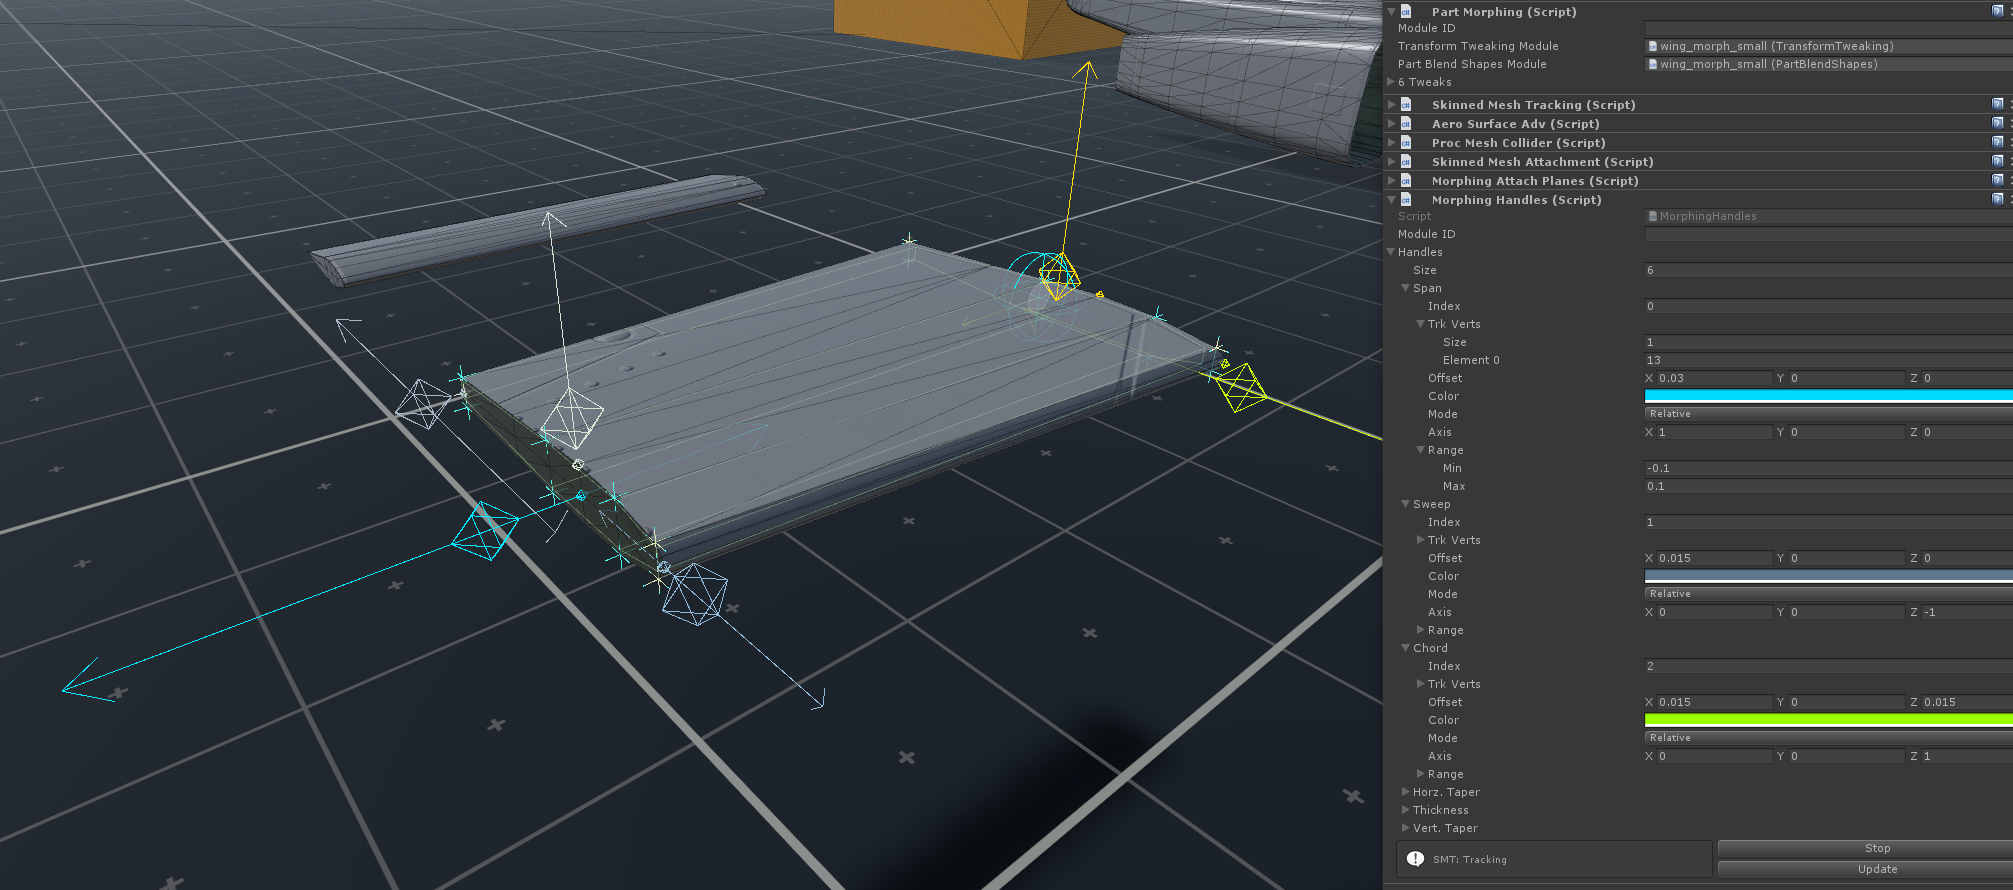
With Part Morphing, we do pretty much the same thing, but with actually even more modules. We have one module that controls morphing via bones and rigging, another module that controls blend shapes, and these are all set up to do their one job, and [i]only[/i] their job. Another higher-level module (called PartMorphing) is where the actual morph tweaks are defined --these are the options you see as sliders when you right click a part in game-- and those in turn contain the setup for which blend shapes and bone displacements to use when the 'master' tweak value is changed.
[img]{STEAM_CLAN_IMAGE}/33908629/de5c8d1553f82f733afecc82f3726c11af2479e7.png[/img]
Hopefully that wasn't too bad to get your head around, but the gist of it is that we end up with a really flexible system, where morphing parts can be set up in several different ways. This is really handy for us and also for mod makers, because all these tools are part of the Balsa SDK.
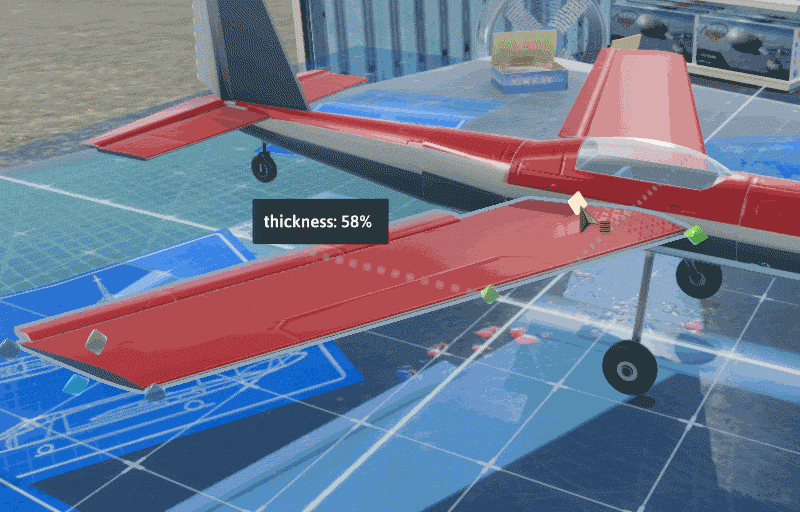
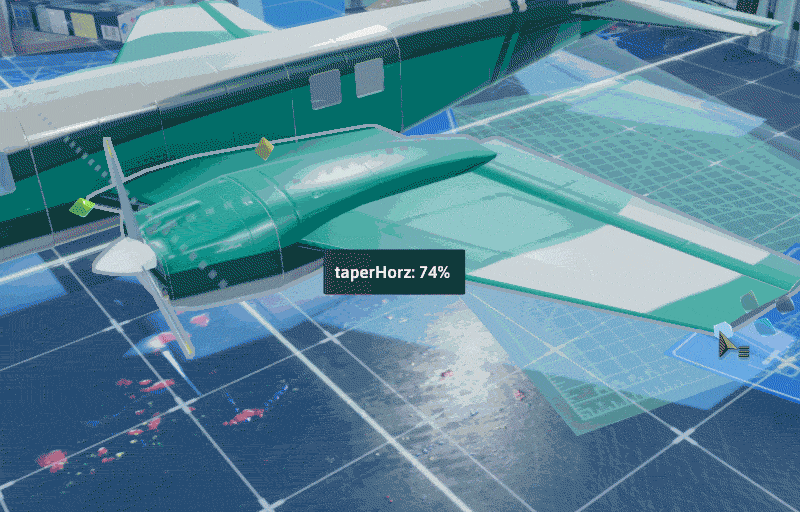
So then, we have our morphing parts, and we can control their shapes via in-game tweaks (and now, just recently, via 3D handles as well). But this doesn't actually mean anything to the game yet, and worse still, it actually creates a few new problems.
The first big problem we have now, is that even though the part model gets morphed, this is only visual. There are also invisible models (called collision meshes) in the game which are used for the physics. In normal character animation this normally doesn't matter too much, because game characters typically have simplified collision geometry (like a big cylinder or capsule that is roughly the size of a person), so you normally don't see it and don't care. But here, the vehicle editor actually relies on the physics to detect for instance, where you have the mouse cursor over a part. If the collision geometry isn't super accurate to the shape of a part, the whole vehicle editor breaks down.
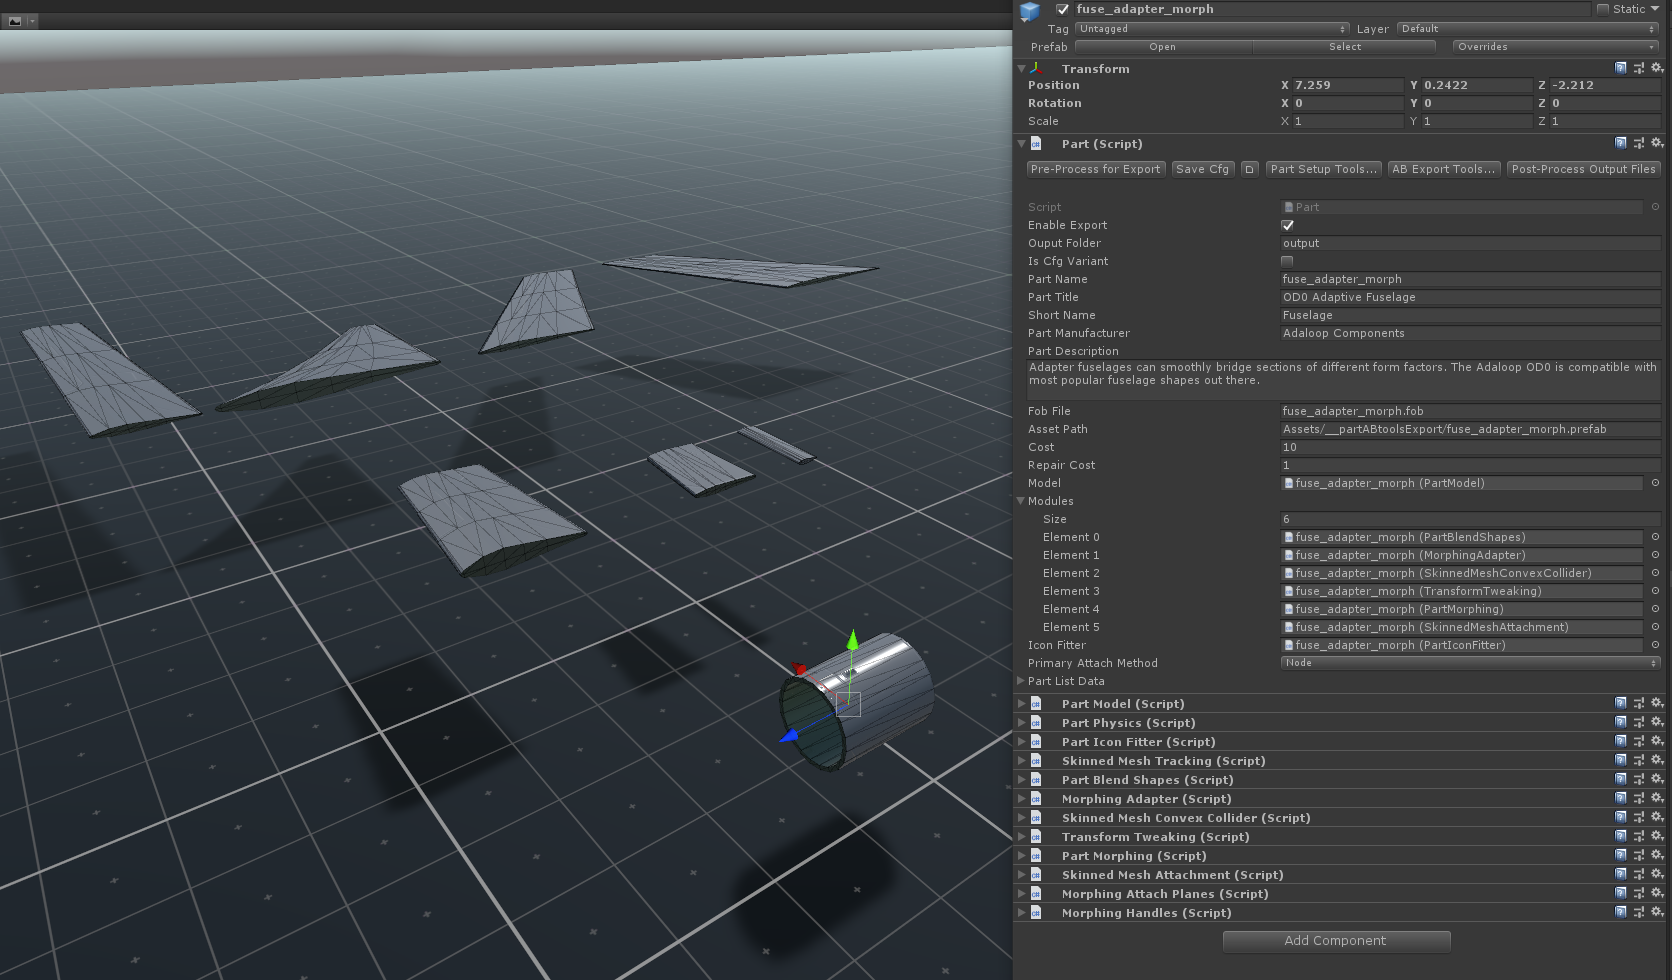
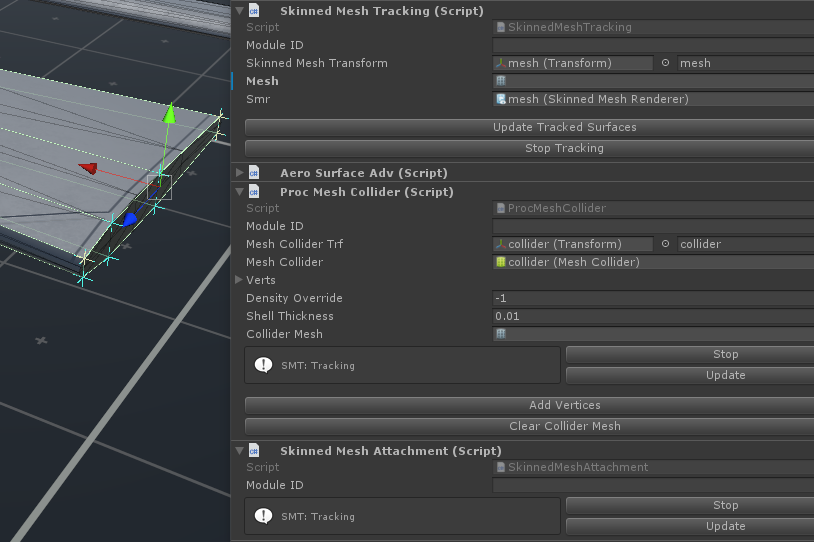
So to sort that (and other problems) out, what we did was set up a new modular system for morphing parts, which I called Mesh Tracking. This isn't a single module, but rather a collection of modules and module subtypes that all share access to the state of the morphed mesh, as it morphs.
[img]{STEAM_CLAN_IMAGE}/33908629/03acb02518dedf4b612d0ca331a8f954cf5fd2b1.png[/img]
Basically, a master tracker module keeps track of the mesh, and any time it gets modified, it lets the other submodules know about it. This is mainly for efficiency as all this mesh tracking stuff gets expensive on the hardware, so it's best if we only do it once for everything that needs it, instead of having each thing do that on its own.
So then on top of that, we can build all sorts of mesh-aware modules that do different things, using the concept of Mesh Tracking. This is done by simply storing a list of the vertices you want to track, and using the tracked mesh updates to look up where they are after each morph.
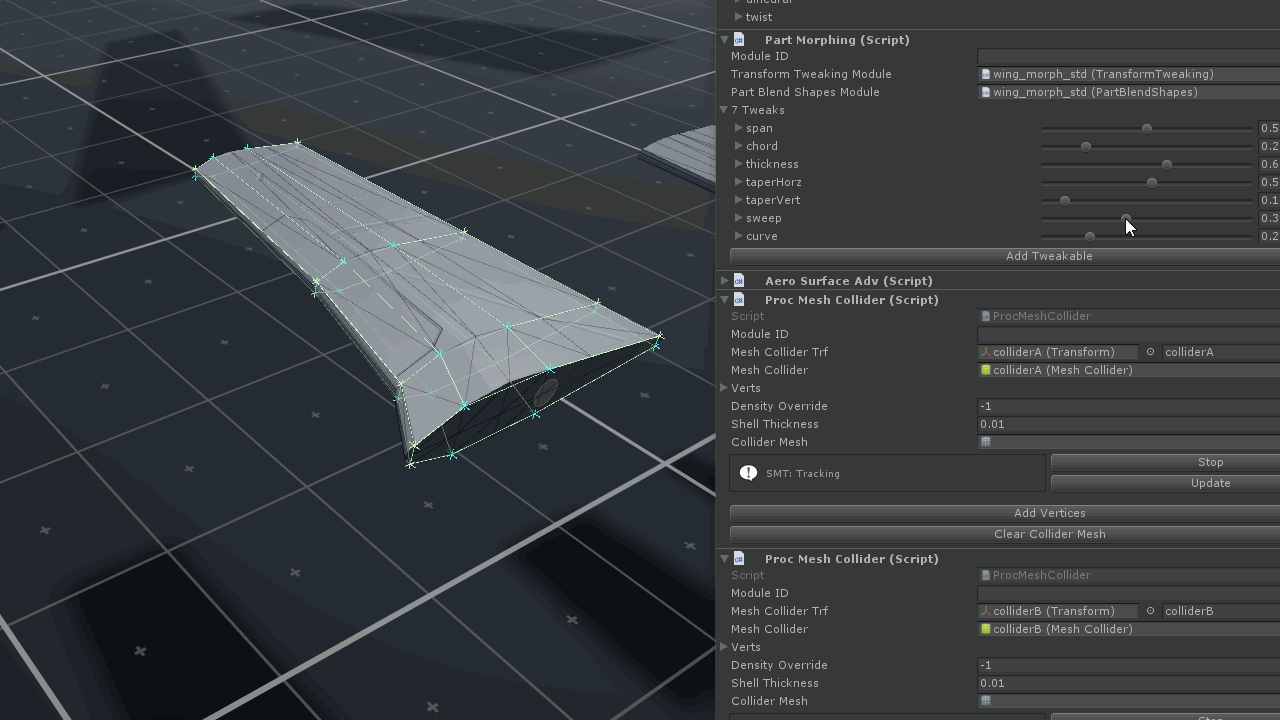
One very important one is called ProcMeshCollider, short for Procedural Mesh Collider. What that one does is keep track of a list of vertices on the model, which it then uses to create a lower-detail collision mesh. This is then guaranteed to always be accurate to the morphed part, because it gets created using the same vertices. The lower detail is a sort of byproduct of it, because we don't need to have it track all the verts of the original model, so we just pick enough to give us a good approximation of the general shape.
[img]{STEAM_CLAN_IMAGE}/33908629/948cb597234d00b26f906547d91e21bb2dca1601.gif[/img]
This modular approach is also great because it solves another problem, which is that collision meshes in PhysX can't be concave shapes (if you want good performance), they must be convex. Because these are all modules, we can sort that out by just having multiple ProcMeshCollider modules on the same part, each producing a convex piece of the model.
Now we have the visual and physical model of the parts set up to morph, which is great, but how should these shape-shifting wings simulate themselves in flight? The flight model also needs to get updated to account for the varied geometry of morphing wings.
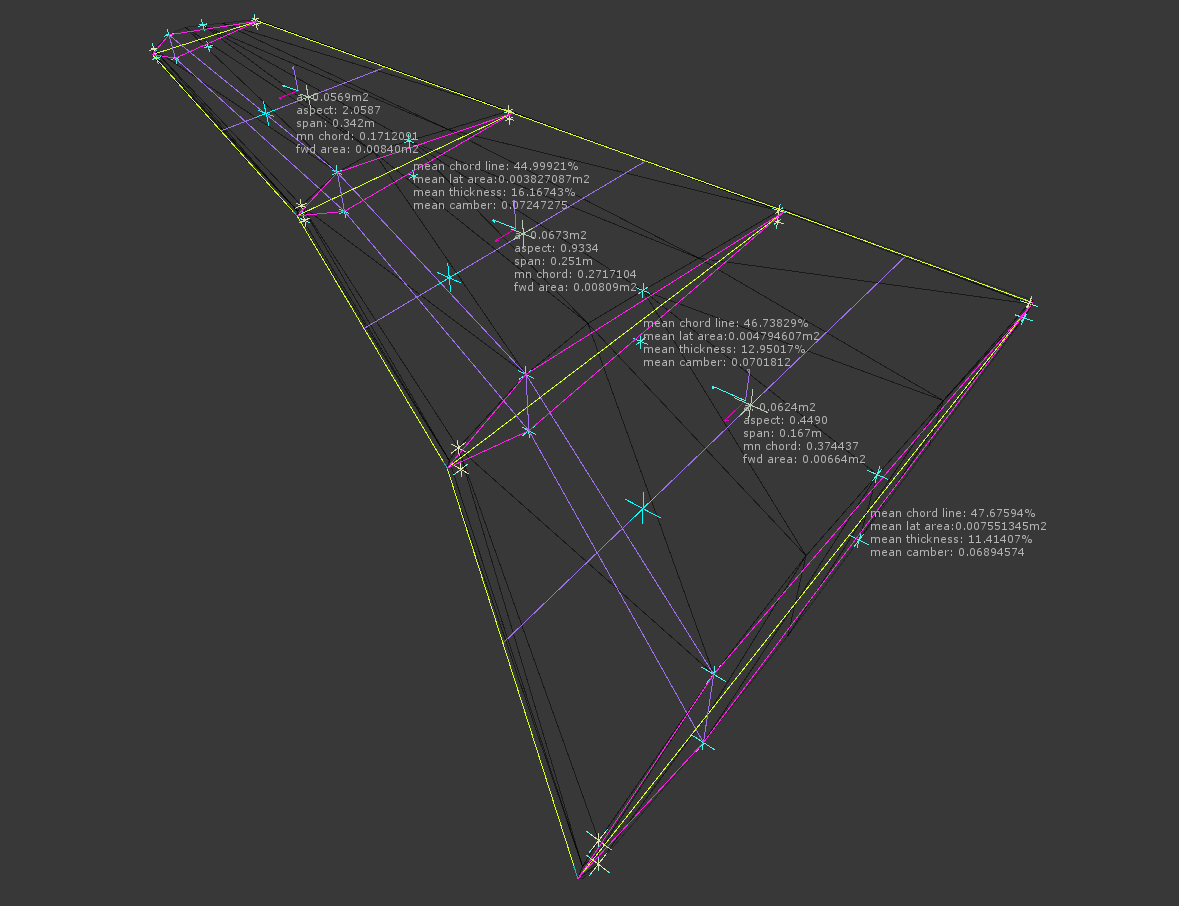
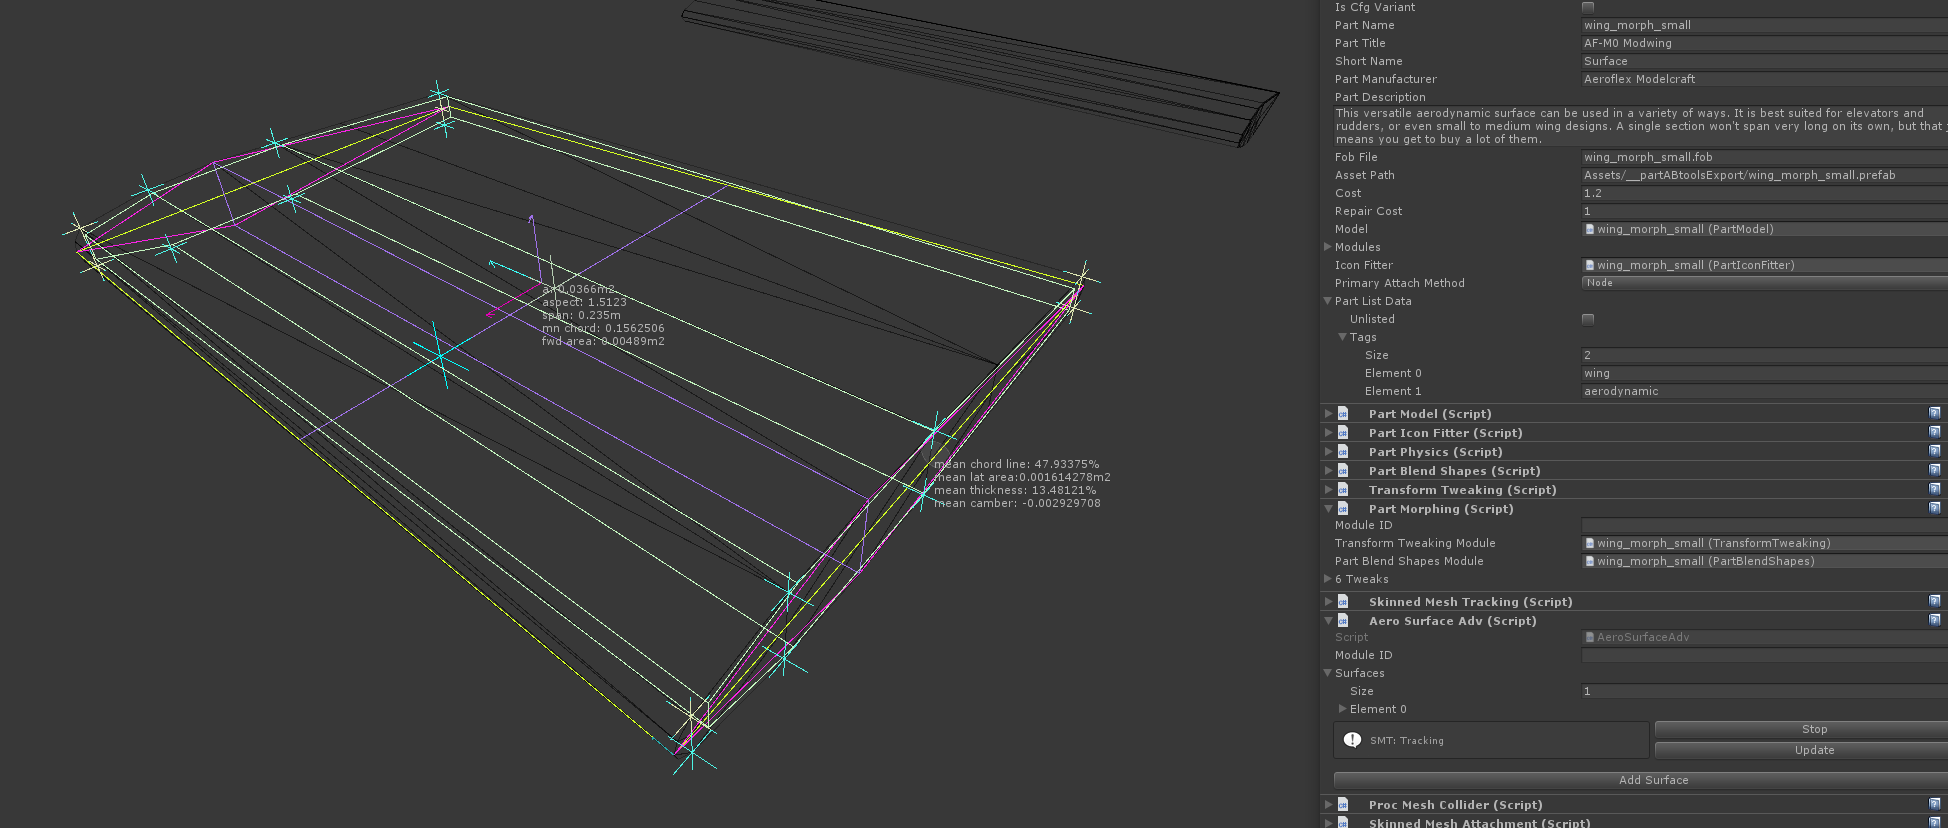
This is also done via mesh tracking. We have, as you might have guessed, yet another module, where aerodynamic surfaces are defined. Surfaces store a more specific set of tracked vertices on the mesh than the colliders, because for these, we really need to know not only where the vertex is, but also which part of the wing it's [i]supposed to be[/i].
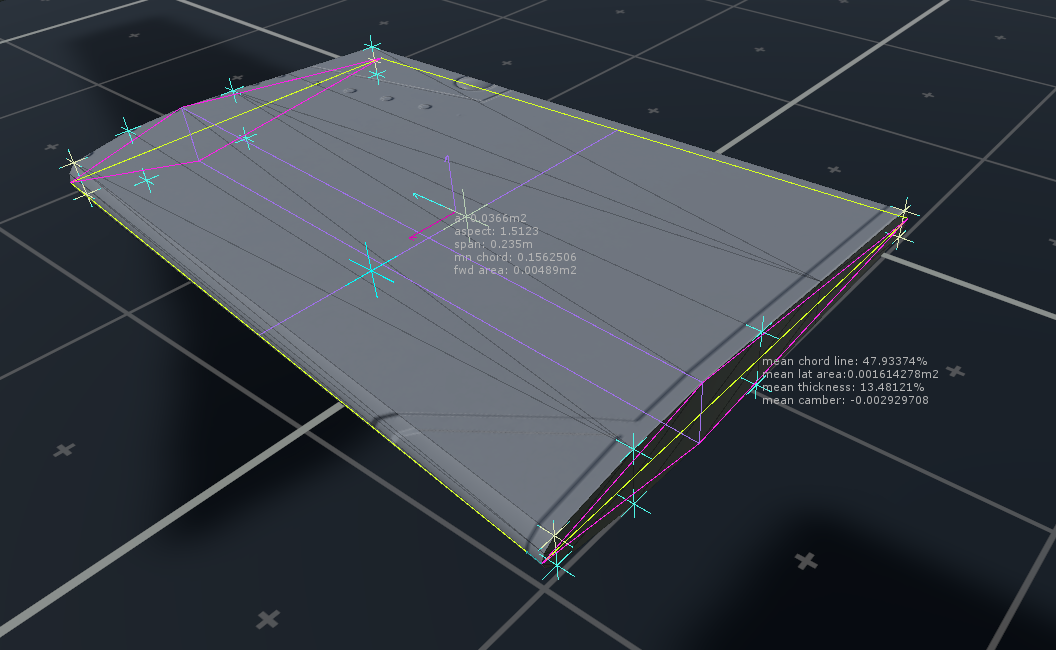
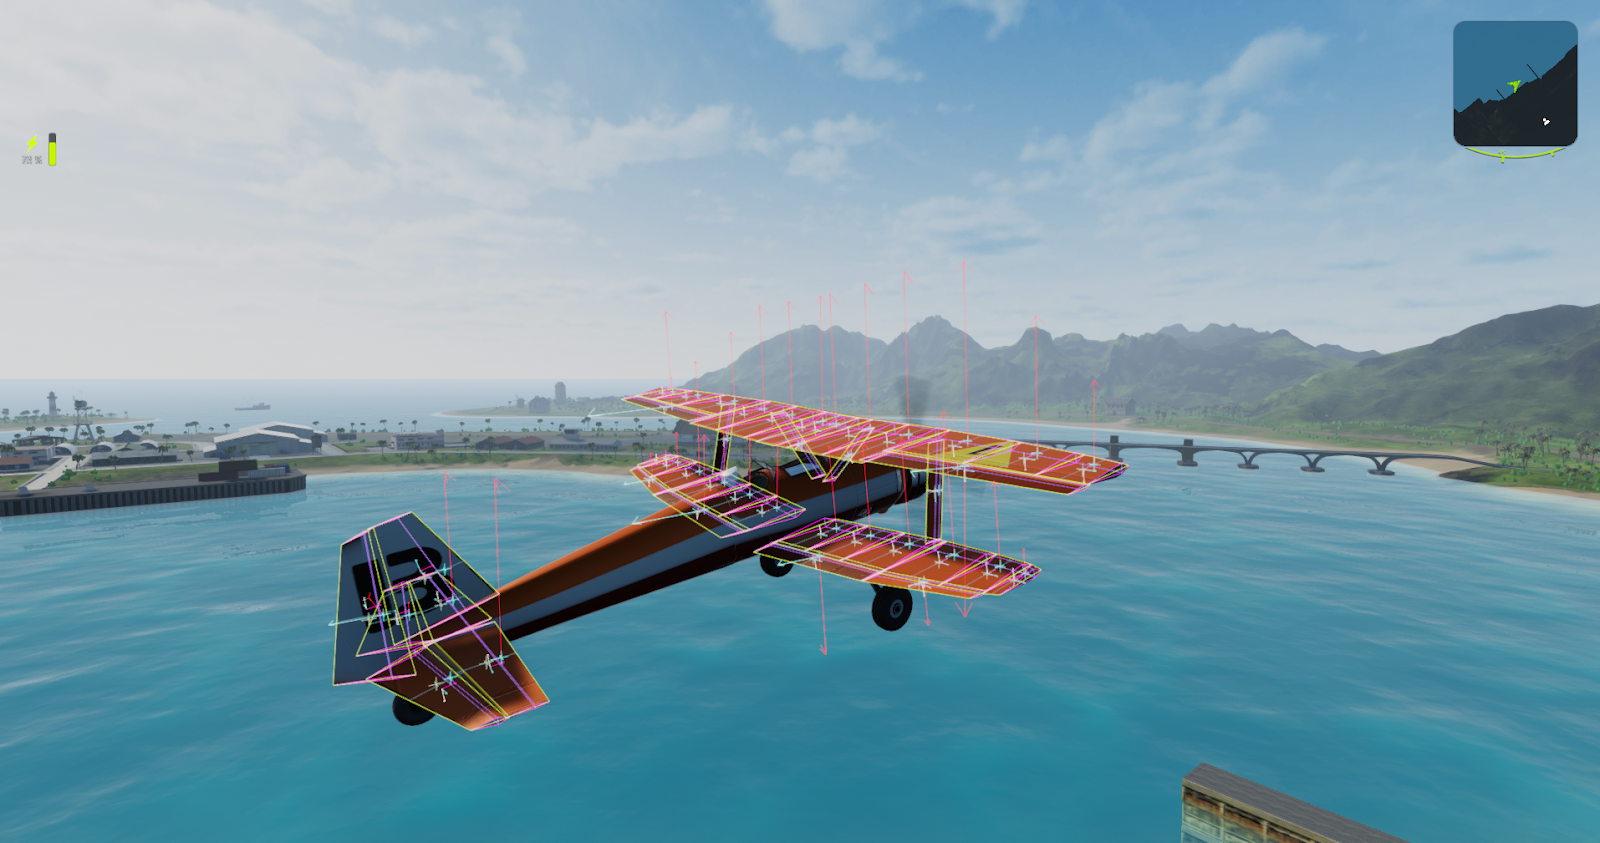
[img]{STEAM_CLAN_IMAGE}/33908629/f8076b9b6dbf9113cf947d770be307df6db2423d.png[/img]
So aero surfaces are set up using a little editor tool I put together, that basically walks you through a wizard type thing where you specify the vertex to be tracked for each of the eight required points to define the thing. These eight vertices are used to define three planes, which are then used to calculate the geometries for a 3D aerodynamic element. From that, we then figure out all the measurements needed to simulate that surface.
There are quite a few different measurements the game's flight model takes into account, and that might be a good topic for a future post, because it's pretty involved and this post is already pretty long. (And we're only about half-way there. Sit tight.)
So there are many more modules that use the tracked mesh data for their own things, which are interesting to talk about briefly:
One such module handles the system that keeps child parts of a morphing parent attached in place as the parent changes shape. This might seem really obvious when you see it working (because anything else would just be wrong), but it's actually pretty involved and is in fact another rabbit hole in its own right, if you want to fully nerd out on geometry and triangle coordinates and stuff. I might make another post on that one later.
[img]
[/img]
So internally, there are several ways you can approach this. One option is to use something called Blend Shapes, which is where you set up multiple versions of a 3D model, all having the same geometry, but with the model vertices in different positions.
Then in the game, you start with the base model, and you use these variant Blend Shape models to push around the vertices of the mesh towards these 'target' shapes.
This scheme also lets you combine multiple blends together, which basically adds them up to give you a new combined version of the mesh. Sometimes that works really well, other times... you end up with a gnarly mess.
Another approach is to use rigging, which is how 3D character models are animated. You set up an underlying skeleton, and each vertex in the model is assigned a value for how much the position and orientation of each bone will affect it. For our parts, this also works well, because unlike real life bones, these things don't actually have to be connected to one another, so you can use bones as a sort of 'anchor' to move parts of a model around, like say, the corners of a square wing panel.
So there's many ways to skin this cat, and the way we chose to implement this in Balsa was, well, both.
[img]{STEAM_CLAN_IMAGE}/33908629/c036182160a523944b6828ce5bf4ef2a3e0d9d96.png[/img]
Parts in Balsa are put together using Modules. This is a concept that came up a bit late in the game for KSP, but this time, it was something I had in mind from the outset, so there is a lot more modularity to Balsa's Modules. For instance, while in KSP we would maybe have one module called Engine for all the engine functionality of a part, in Balsa engines are further split into more basic components. One is the engine core itself, which merely takes an input resource (like Fuel or Electric Charge) and converts it to an output resource (called Drive Power). That's all it does. Then we have a Starter module, which is different for Electric motors or Fuel engines and handles the ignition logic, but the common core is the same. Then there are other modules, like Engine sounds and effects, and so on.
[img]{STEAM_CLAN_IMAGE}/33908629/8bde2e822b4ccbee07692886de7c7b559c05d376.png[/img]
With Part Morphing, we do pretty much the same thing, but with actually even more modules. We have one module that controls morphing via bones and rigging, another module that controls blend shapes, and these are all set up to do their one job, and [i]only[/i] their job. Another higher-level module (called PartMorphing) is where the actual morph tweaks are defined --these are the options you see as sliders when you right click a part in game-- and those in turn contain the setup for which blend shapes and bone displacements to use when the 'master' tweak value is changed.
[img]{STEAM_CLAN_IMAGE}/33908629/de5c8d1553f82f733afecc82f3726c11af2479e7.png[/img]
Hopefully that wasn't too bad to get your head around, but the gist of it is that we end up with a really flexible system, where morphing parts can be set up in several different ways. This is really handy for us and also for mod makers, because all these tools are part of the Balsa SDK.
So then, we have our morphing parts, and we can control their shapes via in-game tweaks (and now, just recently, via 3D handles as well). But this doesn't actually mean anything to the game yet, and worse still, it actually creates a few new problems.
The first big problem we have now, is that even though the part model gets morphed, this is only visual. There are also invisible models (called collision meshes) in the game which are used for the physics. In normal character animation this normally doesn't matter too much, because game characters typically have simplified collision geometry (like a big cylinder or capsule that is roughly the size of a person), so you normally don't see it and don't care. But here, the vehicle editor actually relies on the physics to detect for instance, where you have the mouse cursor over a part. If the collision geometry isn't super accurate to the shape of a part, the whole vehicle editor breaks down.
So to sort that (and other problems) out, what we did was set up a new modular system for morphing parts, which I called Mesh Tracking. This isn't a single module, but rather a collection of modules and module subtypes that all share access to the state of the morphed mesh, as it morphs.
[img]{STEAM_CLAN_IMAGE}/33908629/03acb02518dedf4b612d0ca331a8f954cf5fd2b1.png[/img]
Basically, a master tracker module keeps track of the mesh, and any time it gets modified, it lets the other submodules know about it. This is mainly for efficiency as all this mesh tracking stuff gets expensive on the hardware, so it's best if we only do it once for everything that needs it, instead of having each thing do that on its own.
So then on top of that, we can build all sorts of mesh-aware modules that do different things, using the concept of Mesh Tracking. This is done by simply storing a list of the vertices you want to track, and using the tracked mesh updates to look up where they are after each morph.
One very important one is called ProcMeshCollider, short for Procedural Mesh Collider. What that one does is keep track of a list of vertices on the model, which it then uses to create a lower-detail collision mesh. This is then guaranteed to always be accurate to the morphed part, because it gets created using the same vertices. The lower detail is a sort of byproduct of it, because we don't need to have it track all the verts of the original model, so we just pick enough to give us a good approximation of the general shape.
[img]{STEAM_CLAN_IMAGE}/33908629/948cb597234d00b26f906547d91e21bb2dca1601.gif[/img]
This modular approach is also great because it solves another problem, which is that collision meshes in PhysX can't be concave shapes (if you want good performance), they must be convex. Because these are all modules, we can sort that out by just having multiple ProcMeshCollider modules on the same part, each producing a convex piece of the model.
Now we have the visual and physical model of the parts set up to morph, which is great, but how should these shape-shifting wings simulate themselves in flight? The flight model also needs to get updated to account for the varied geometry of morphing wings.
This is also done via mesh tracking. We have, as you might have guessed, yet another module, where aerodynamic surfaces are defined. Surfaces store a more specific set of tracked vertices on the mesh than the colliders, because for these, we really need to know not only where the vertex is, but also which part of the wing it's [i]supposed to be[/i].
[img]{STEAM_CLAN_IMAGE}/33908629/f8076b9b6dbf9113cf947d770be307df6db2423d.png[/img]
So aero surfaces are set up using a little editor tool I put together, that basically walks you through a wizard type thing where you specify the vertex to be tracked for each of the eight required points to define the thing. These eight vertices are used to define three planes, which are then used to calculate the geometries for a 3D aerodynamic element. From that, we then figure out all the measurements needed to simulate that surface.
There are quite a few different measurements the game's flight model takes into account, and that might be a good topic for a future post, because it's pretty involved and this post is already pretty long. (And we're only about half-way there. Sit tight.)
So there are many more modules that use the tracked mesh data for their own things, which are interesting to talk about briefly:
One such module handles the system that keeps child parts of a morphing parent attached in place as the parent changes shape. This might seem really obvious when you see it working (because anything else would just be wrong), but it's actually pretty involved and is in fact another rabbit hole in its own right, if you want to fully nerd out on geometry and triangle coordinates and stuff. I might make another post on that one later.
[img]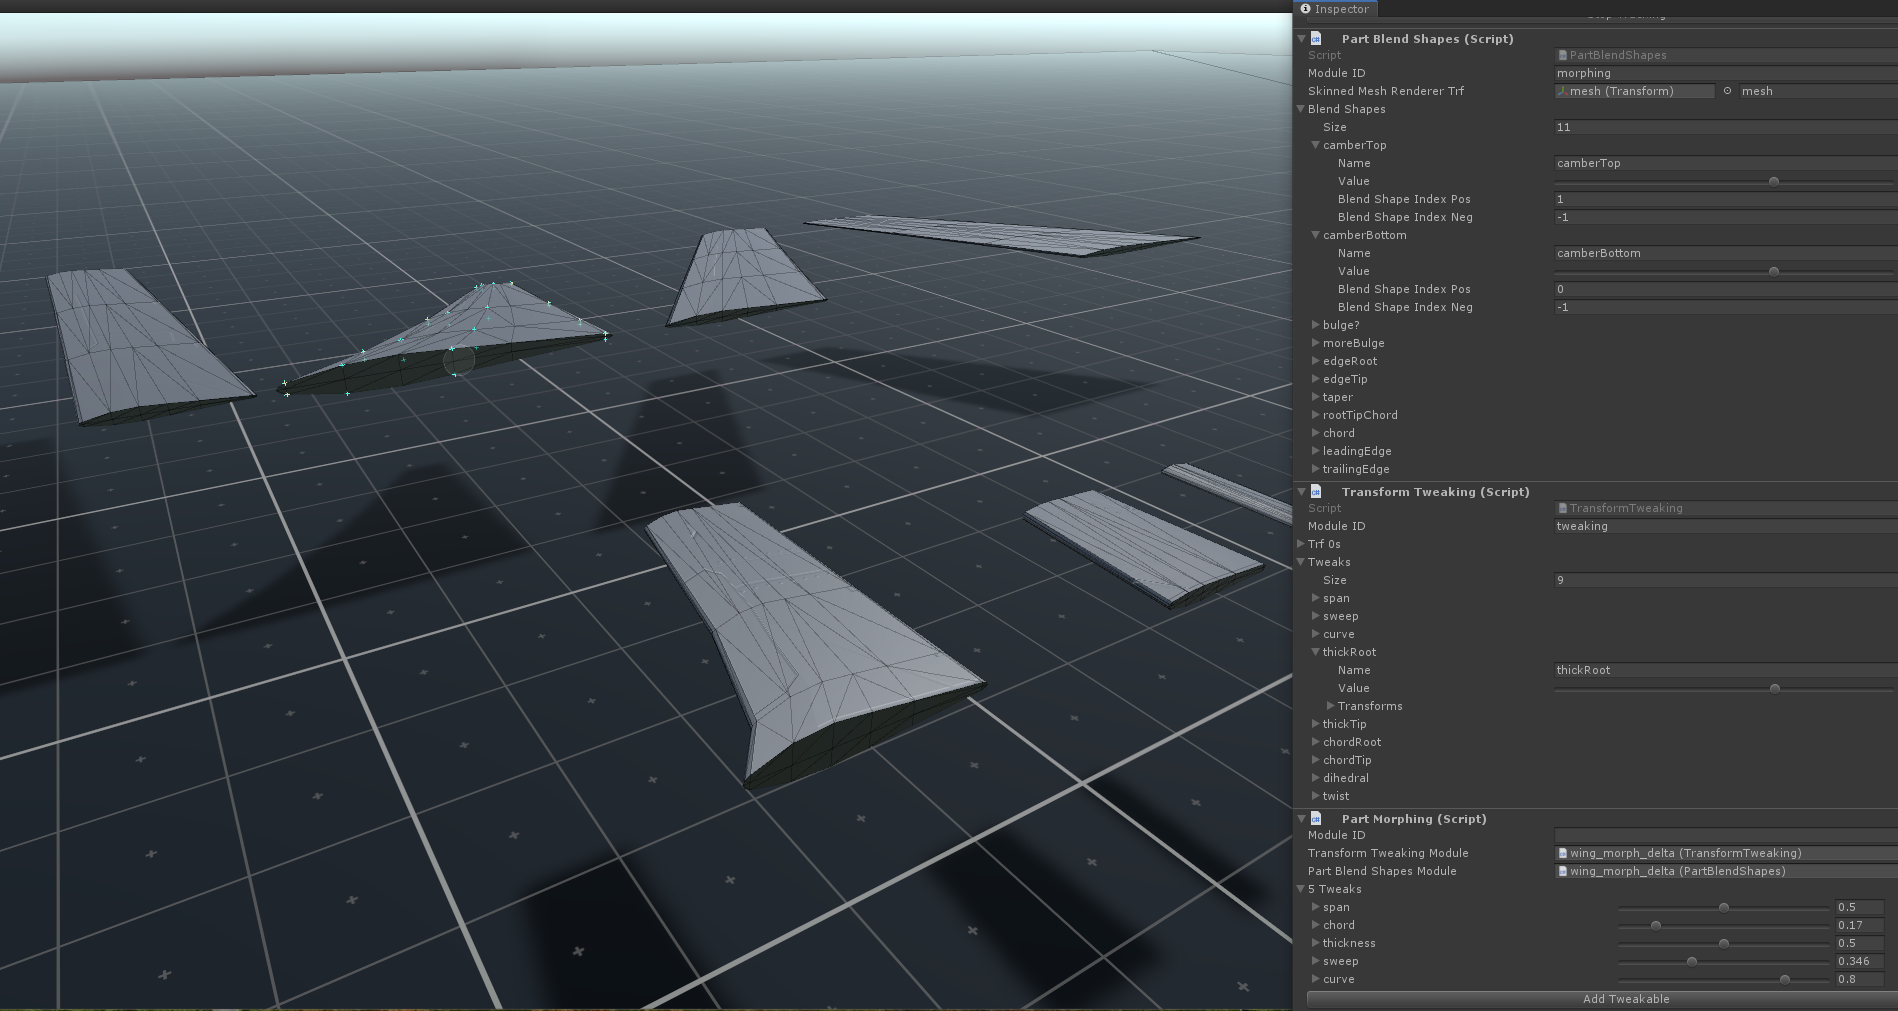

 !
!