It’s 2020, and Rainbow Six Siege has 52(!) operators. As each new year has tossed eight faces into the roster, who to pick has only gotten more complicated. Modern Siege is full of laser beams and smart glasses, but good team composition still requires the basics: fraggers, supports, roamers and anchors. No one operator fills each job perfectly. Sometimes, a situation calls for the light touch of Maverick’s blowtorch instead of Thermite’s blunt breaching charge.
We want to help you overcome choice paralysis and guide you toward the best operators for your playstyle. Here’s our full breakdown of the Rainbow Six Siege operators we recommend under the current meta.
The best Rainbow Six Siege operators, January 2020 log
With the introduction of Operation Shifting Tides, Year 4 ended with Kali and Wamai: operators that remix an old idea and bring something entirely new to the table. They’ve only been in the meta for a short time, but it’s clear that both can be very strong in the right hands. Shifting Tides also brings a rework to Theme Park that smartly compresses its layout and improves the viability of each defense site.
We’re weeks away from the Six Invitational, where Ubisoft will unveil its Year 5 plans and the first new operators of 2020. Rumors are already circulating that give us a hint at what’s to come, but we also have our own list of hopes and dreams.
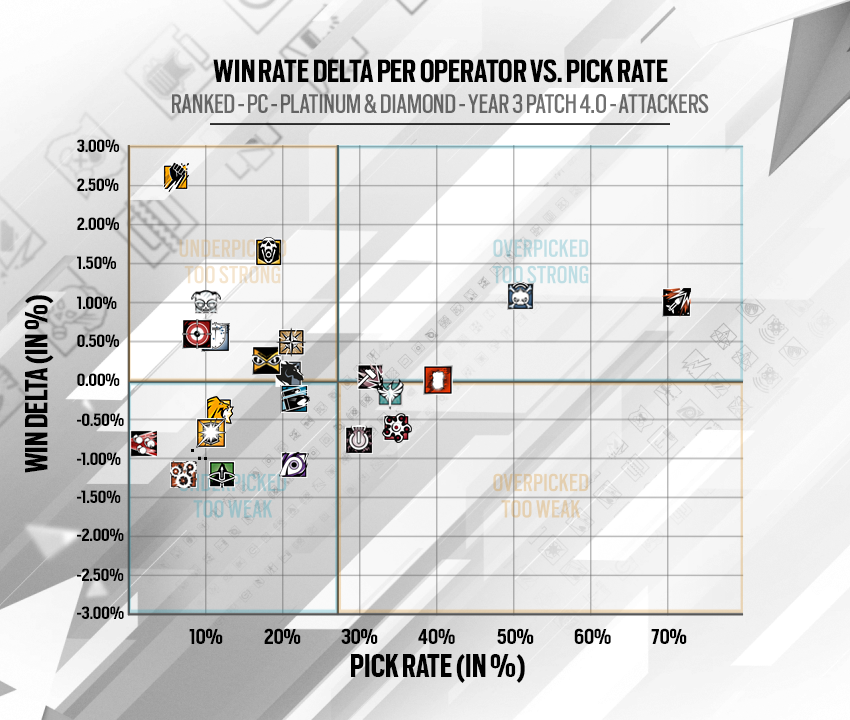
ATTACKERS
Thermite & Hibana
Thermite and Hibana are the bedrock of good team composition. They’re the two main hard breachers in Siege, and their ability to destroy reinforced walls is important to every match. A round of Siege is often won or lost based on how much of the defense the attackers were able to tear down, and these two cut the deepest. If you’re looking to give your team the best chance in most situations, take one of them. And a team with both of them isn't in a bad spot.
Very useful
Kali
Siege's second sniper confidently wields the new CSRX 300, a powerful bolt-action rifle with a scope that magnifies 5X or 12X. It only takes one torso shot to down enemies and a bullet can punch through seven walls. In a pinch, her LV Explosive Lance grenade launcher can take out anti-breach teach in the same way as Thatcher. Her Lances are a bit less reliable when facing the Bandit Trick, but they’re also great for destroying defender utilities like deployable shields, barbed wire, and Maestro’s Evil Eyes.
Her power comes with a big caveat: if you miss, you’ll probably die. That’s a lot to ask for you and me, but she’s a great fit for seasoned Counter-Strike AWP veterans.
Sledge & Buck
Sledge and Buck are two sides of the same coin, both accomplishing the same goal in different ways. They both excel at soft breaching: Sledge with his titular hammer, and Buck with his rifle-mounted shotgun. They’re both two-speed ops and both carry frag grenades, so the choice between them really comes down to the preference between Buck’s unmatched breaching speed and Sledge’s versatility. Bring one when you expect an enemy to pick an objective room with a soft ceiling, like Drug Lab on Theme Park.
Maverick
Maverick is a hard breacher like Thermite and Hibana, but his playstyle couldn’t be more different. He cuts through walls with the subtle hum of his blowtorch instead of the piercing boom of a breaching charge. He excels at exposing Bandit batteries and Mute jammers on reinforced walls, but he can also dominate as a stealthy flanker, opening smaller murder holes to catch enemies off guard while his teammates draw attention from elsewhere. His versatile kit makes him a solid pick in almost any situation, but his blowtorch does take practice to use efficiently.
Ash
Ash is FPS comfort food: a pure run-'n-gunner with a powerful rifle and a lot of breaching power. Her greatest strength is the R4-C, which boasts all-around great stats with low recoil. Paired with her breaching grenade launcher that allows her to quickly open soft walls, she excels as a rusher who can overpower weaker defender weapons.
Thatcher
The perfect wingman for a good attack, Thatcher sets ‘em up so Hibana and Thermite can knock ‘em down. His EMP grenades can be thrown on the outside of a wall to destroy or disable electronic devices in its large radius. Most often, this is used to counter the electric reinforcement of Bandit and Kaid so that a hard breacher can penetrate the defense. Operators like Twitch can accomplish this task in riskier ways, but Thatcher’s EMPs make the job trivial. Against a savvy team, your hard breachers will be useless without Thatcher's support.
Twitch
Twitch has what I consider to be one of the most thrilling roles in the game, because driving her shock drones is like its own metagame within Siege. It's hard to sneak the boxier, less maneuverable drone under the nose of a defense, and once it's there she needs to act fast: dismantling as many of the defenders gadgets as possible before the jig is up. The shock drone is a uniquely powerful way to gather intel while also hindering the enemy, and at the moment it’s the only gadget that can open Mira’s windows. But even when off the drone, Twitch sports a solid two-armor kit and the F2, one of the best weapons in the game.
Zofia
Zofia is a powerful support and fragger combo. Her double-barreled grenade launcher has both impact grenades and concussion rounds that daze opponents when launched nearby. Zofia brings more utility to the team at the cost of weapon power and speed, but it’s an easy tradeoff to work with. On almost any composition, she’s an easy pick.
Viable, but not essential
Gridlock
It’s almost been a year since Gridlock’s introduction, and she has since proven an effective support pick. Her Trax Stinger traps can completely canvass flanking routes to protect against roamers, but her utility is stacked with smoke grenades and a secondary shotgun. She boasts high survivability at the cost of speed. In the hands of a cautious player, she’s a safety blanket that stays alive long enough to set her traps and assist with the defuser plant.
Blackbeard
Blackbeard has always been a divisive operator in the community. Players can’t seem to agree on whether he’s overpowered nonsense or mostly useless, and it’s because his gadget is so situational. His two mounted rifle shields essentially give him two extra lives at the cost of speed and ADS time, and in the right hands he is absolutely terrifying. If he’s holding a long angle or attacking a window from outside, he always has the advantage. A nerf this year slightly lowered the health pool of his rifle shields while also giving some of his speed back, but he remains a great pick when playing towards his advantages.
Jackal
Jackal’s recent rework nerfed the effectiveness of his footprint-tracking Eyenox visor, but he remains good at hunting roamers, evidenced by his high ban rate in Ranked. Nobody’s location is safe from him, unless you’re the light-stepped Caveria. On the rare chance that you are allowed to play him, he also carries one of the game’s greatest assault rifles, the C7E, smoke grenades, and a secondary shotgun.
Ying
Ying is all about overwhelming defenders with more flash grenades than they know how to deal with. Her three candelas each expunge five flash grenades that can be rolled under a doorway, thrown into a room, or penetrate the other side of a soft surface. It’s a disorienting primer when pushing a site, with proper coordination. She’s balanced by the low fire rate of her primary LMG, the T-95 LSW.
Glaz
In Shifting Tides, Glaz is back to being the reliable sharpshooter he once was. The fire rate of his OTs-03 rifle has risen back up to its punchy consistency. The nerf to his smoke vision scope was partly reverted to make him an effective site pusher with an emphasis on caution. Enemies are highlighted in yellow at all times, but he needs to stand still to see through smoke.
Montagne
Montagne, lovingly known as Monty, is the attacker’s resident shield wall. His extending shield creates a barrier that few things can interrupt, so Monty is best used as a scout for spotting enemy locations while safely standing behind the shield. He doesn’t have many options when backed into a corner, but his powerful pistol can still contribute to a fight. The way shields interact with melee at close range is still inconsistent, so expect wonky behavior and occasional unfair deaths.
Nomad
Another counter to roamers, Nomad’s Airjabs are fired from a rifle-mounted launcher and, when triggered by an enemy, push them onto the ground. When it comes to planting the defuser, there’s no better support pick. Her Airjabs don’t deal damage, but they do knock over victims long enough to pick them off without a fight. Nomad’s true power is that she does not have a real counter on the defender side. If the defenders allow her to cover a site in Airjabs, the round is essentially over.
Lion
Lion was in a bad place for a long time, but a patch has finally reworked him into a reasonably powerful support operator. His full map scan has been tweaked to only ping enemies when movement is detected, similar to triggering Alibi's decoys. Defenders are still inclined to stand still during the scan, but it now it's over in a couple of seconds. He's far more balanced now and serves a real use, but he's still boring to play as.
Though brief, his new map scan is a powerful tool for dealing with roamers. Timed with breaches or a coordinated push, you're likely to catch a few enemies who are in a tight spot and are forced to move.
IQ
When it comes to enemy gadgets, nobody can provide more intel than IQ. With a communicative team, she can use her electronics scanner to warn friendlies of traps, expose certain roamers, and shoot Bandit batteries/Electroclaws through floors and ceilings. She lacks any other supportive utility, but powerful weapons and high speed gives her plenty of room to frag.
Finka
Finka’s adrenal surge ability is great for giving the team a boost to health and recoil before a fight. Even when randomly activated at the whim of Finka, her boost makes the team instantly tankier, which directly leads to more fights won. Her 6P41 LMG gets a huge power boost when combined with her recoil-reducing burst, but the Spear assault rifle remains one of the weakest in Siege.
Dokkaebi
Similar to Ying, Dokkaebi has a strong support ability overshadowed by her lack of competitive weapons. Her Logic Bomb is a powerful tool that makes every defender (minus Echo) emit a loud vibration sound from their phone. To anchors, it’s mostly a harmless annoyance, but the real value is how it reveals sneaky roamers. She can also hack the phone of a fallen defender to gain access to defender cameras for the rest of the round.
Her information warfare potential is unmatched, but her tradeoff is an awkward set of weapons. She can take either the Mk 14 DMR or BOSG slug shotgun. The Mk 14 is a middling DMR and the BOSG is more of a weird novelty. In Ember Rise, she received frag grenades and decreased visual recoil for her SMG-12, giving her new opportunities as a fragger.
Capitão
Capitão’s crossbow is a treasure trove of utility, bringing smoke bolts and fire bolts that aren’t countered by Jager’s ADS and are pinpoint accurate. A recent rework to his fire bolts drastically increase their area of effect and makes him much better at his job. The bolts deal less damage, but they've never been better for rooting out entrenched defenders.
With practice and coordination, he’s great for assisting a defuser plant. Where he falters is with his mediocre weapon choices. The M249 is a good LMG but the PARA assault rifle’s extremely low rate of fire gives it a choppy feel that isn't conducive to flick shots. Paired with a breacher that can open new angles for his crossbow to reach, he can disrupt a good defense.
Hard to make work
Nøkk
In her first six months, Nøkk has had a rough time finding a place in the meta. Her combination of Caveria’s footstep silencing and Vigil’s camera invisibility is undeniably useful, but she feels out of place as a 2-speed attacker without an assault rifle. Given her dismal win and pick rates, she’s a clear candidate for buffs in 2020.
Amaru
Amaru is a refreshing attacker focused on mobility. Her grapple hook technically allows her to traverse the map faster than anyone else, but it comes at too great a risk. The process of grappling through a window or hatch is loud and Amaru is helpless for a few moments after using it. If anyone is around to see her crash through a window, she’s toast. There is the occasional opportunity to use the hook cleverly, but it’s usually not worth the risk. Coupled with a slightly awkward loadout for most players, she’s hard to recommend.
Blitz
Blitz has seen a lot of changes in his lifetime, from his ability to sprint with his shield up to his ever-shifting eyeballs. Nowadays, his playstyle feels appropriately aggressive. If all were well with the technical side of things, he’d be easy to recommend. But there are too many issues with shield collision and melee that come up often playing Blitz. Whether he’s getting meleed through his shield or the flash effect isn’t working consistently, there’s too much working against his success at any given time. Make no mistake, you can kick ass with Blitz, but it's in spite of his broken state.
A 2019 nerf increased his cooldown between flashes from 2 seconds to a whopping 7. Chain flashing enemies into permanent blindness is no longer an option, so Blitz mains have to be sure the first flash does the trick. An Ember Rise nerf also raised his ADS time.
Fuze
The premise of Fuze's cluster charges make them seem powerful and exciting. In reality, experienced players have little issue avoiding these bouncing bombs, so instead, they’re best used as a way to destroy gadgets. But Fuze’s problem isn’t with his launcher, it’s with him. Even with his powerful assault rifle, he’s one of the only non-shield attackers with a one-speed rating. His slow running speed is definitely a factor to his low pick rate, but I’d argue the biggest hindrance is the extra noise that he makes. It’s important when attacking to make subtle movements to draw less attention to yourself, but the loud thud of Fuze’s boots can be heard a mile away. This is less of a problem for fellow one-speed Gridlock, who can cover her flanks with Trax Stingers.
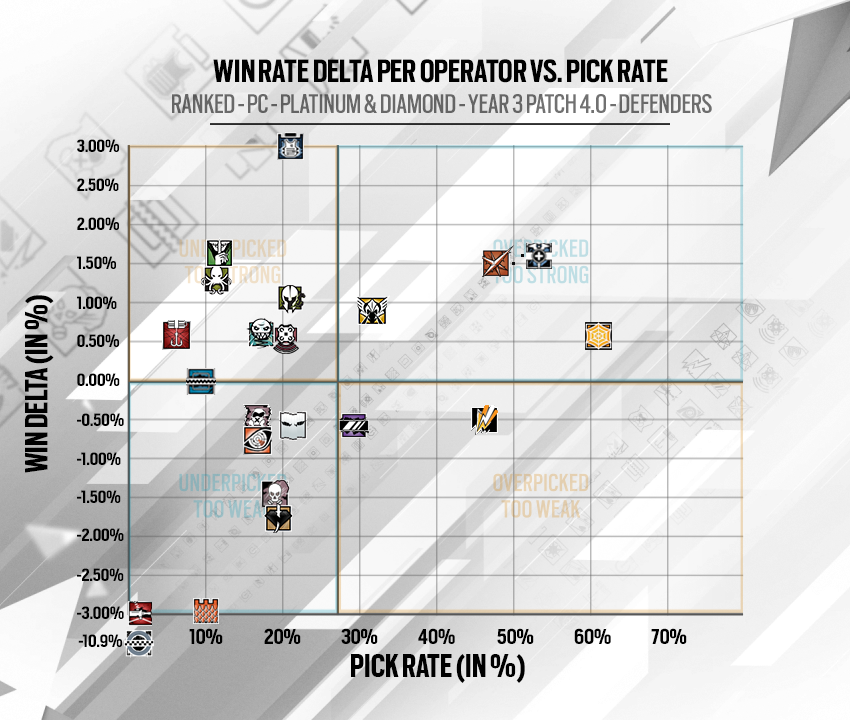
DEFENDERS
Bandit or Kaid
If hard breachers are the backbone of a good offense, Bandit and Kaid are the hammer that breaks that back in two. Their job is to thwart the attackers’ attempts to destroy reinforced walls and hatches. The pair both utilize electricity to shock away Thermite and Hibana’s explosives, but they go about it very differently. Bandit’s shock wire batteries are less versatile, but they’re quick enough to pull off the “Bandit Trick” and zap away a thermite charge before it can go off. Kaid’s Rtila Electroclaws can be stuck anywhere (including under hatches) and are harder to spot, but their arming time means he can’t play as many tricks.
The strength of both ops are mostly defined by their gadgets, but Bandit’s speed and nitro cell make him a smart pick in almost any situation. Kaid is a little more situational as a heavy anchor, but his ACOG-equipped TCSG12 slug shotgun is a long-range powerhouse. On objectives with multiple hatches, Kaid and Bandit pair well together to provide maximum security.
Mute
Mute isn’t the most exciting operator to play, but his impact can be immense. His signal jammers are extremely flexible, since they can be placed anywhere with enough room and cover an impressive distance. Placed next to walls, a jammer can fill the role of Bandit with slightly less effectiveness. On doors and windows, they’re great for jamming drones trying to sneak into the objective. If the enemy team is favoring Lion or Dokkaebi, placing jammers at common anchoring points will nip their gadgets in the bud. His flexibility and respectable kit makes him someone who’s never a bad idea to take along.
Very useful
Wamai
Wamai is a different flavor of Jäger. The South African defender throws frisbee-shaped MAG-NET traps that capture projectiles mid-flight, carries them to the device, and detonates whatever it caught. It doesn’t neutralize what it captures, but instead lets Wamai turn it against the attackers. He’s a wonderful remix of Jäger that encourages clever placement. Their functionality is more situational than the ADS, since attackers are more likely to discover and destroy a MAG-NET. Wamai gains more traps throughout the round, he’s best played as a light roamer or anchor.
In firefights, Wamai has the option of the AUG A2, an assault rifle borrowed from IQ (that’s right, a straight-up assault rifle on defense). He can’t slap an ACOG sight on it, but it’s still one of the most powerful weapons on the defender side. That, and his potential utility in every round makes him high-tier right out of the gate.
Mozzie
Mozzie has made a big impression on defense in his first year. His launchable Pest robots can be set as proximity traps to capture attacker drones or fired directly at them to nab them quickly. If you’re proactive, you can capture up to three and add a fleet of new cameras to your defense. He can also capture Twitch drones to turn their zappers on his foes. It’s an incredibly powerful gadget that splits the difference between Mute and Valkyrie. Mozzie’s high-powered Commando 9 rifle, nitro cell, and pocket shotgun give him tons of utility, which makes him a natural pick on most defenses.
Pulse
Pulse is Siege’s OG information gatherer, and dozens of operators later, he remains one of the best. As long as every new op has a beating heart, Pulse will be able to see it with his scanner. He’s best utilized alongside a nitro cell, waiting for an attacker above and blowing it at their feet from below. He has no automatic way to callout the heartbeats he sees, so he can fall a little flat if the teammate isn’t on mic.
Mira
There are two eras of Siege: before Mira, and after Mira. When she released, her Black Mirror gadget opened up defenders to new strategies that powerfully lock down an objective. Merely placing her one-way bulletproof rectangle on a soft wall is a powerful deterrent because Mira is likely on the other side, watching for an opportunity to step over and strike.
Placing her mirrors in smart locations can take valuable time away from the attackers, but she also sports a powerful kit. Her Vector unloads its full mag in 1.5 seconds, but the fire rate and controllable recoil ranks it high among defender weapons. Her secondary shotgun (matching Jackal’s) lets her remodel walls without help from teammates and she even gets a nitro cell to further capitalize on her one-way information stream.
Rook
Rook is often only described as a great operator for beginners. While that’s true, he’s also just a great pick for most situations. His armor plates buff everyone’s health a bit and ensure that you’ll enter DBNO if you’re not shot in the head. For the already beefy three-armor anchors like Rook, the buff is appreciated but overall minimal. For one-armor roamers like Alibi or Caveira, the extra health can save their lives. Rook also sports the accurate MP5 (ACOG-compatible) and impact grenades that let him reliably set up a defense with rotation holes. He’s not a must-pick by any means, but can hold down the fort and help his friends survive.
Jäger
Jäger is a rare example of a defender without any obvious downsides. His gadget, the ADS, can be placed on walls and floors to zap away many different kinds of grenades and gadgets as they fly into a room. In the same way that Thatcher is a good companion for hard breachers, Jäger helps take away the advantage attackers try to achieve in altering an objective room. Nothing takes the wind out of an Ash’s sails like throwing in a few flash grenades before a rush just to have them zapped away. But just as important to his role is his 416-C Carbine, a powerful assault rifle that can challenge attackers at short to long distances. Good Jägers can lay down their ADS turrets and already be on the prowl as a roamer before the round even starts.
Valkyrie
In the game of information warfare, Valkyrie is a top dog. Her three Black Eye cameras can be placed anywhere and provide clear color picture and near-360 degree views of the map. Players are accustomed to hunting down her cams, but the best Valkyries mix up their hiding places and even toss them outside after the round starts. Giving the entire team three new vantage points is an incredibly valuable ability. As a counterbalance, her SMG is one of the weakest in the game. In the hands of a master and a team with good communication, Valkyrie remains indispensable.
Viable, but not essential
Goyo
Goyo's Volcan shields are a double-edged sword, and a very sharp one at that. His special deployable shields hide a red charge that explodes into a spread of fire when shot (or blown up by a grenade). Similar to Mira's Black Mirrors, anyone can use the shield if they're positioned correctly. But unlike a Black Mirror, a Volcan shield can roast you to death in seconds.
Positioned well, the Volcan shield is an effective way to deny a hallway or door to enemies. But if Goyo finds himself retaking an objective the attackers have taken over, there's a good chance his own gadget will get him killed. Even in the best circumstances, he's a risk. But his loadout choices of the Vector SMG and TCSG slug shotgun (plus a nitro cell) give him a ton of flexibility as a roamer or anchor.
Warden
Warden is 3-armor anchor designed to hard counter some of the attackers’ best support operators. His Glance Smart Glasses can see through the effects of flash grenades and smoke, abilities previously only held by Glaz and Ying. He’s a great answer to a team favoring flash/smoke entry, but his weak weapon selection drags his power level down.
He has a choice between Valkrie’s MPX or Smoke/Mute’s M590A1 shotgun. His slow speed makes positioning with a shotgun unreasonable in most cases, so you’re best off with the MPX, which happens to be the weakest SMG in the game. Go for headshots or lose most of your fights. For secondaries, he can bring the high recoil SMG-12 or Clash’s reliable P10-C pistol. He’s a niche pick, and that’s fine.
Maestro
Maestro has cemented himself as Siege’s ultimate anchor. His two Evil Eyes are bulletproof cameras that can also shoot laser beams that can destroy gadgets and sting enemies. The durable cameras are a great help even without the lasers, but only Maestro can operate them.
His informational benefits are crucial, but his true power is the Alda LMG, the only of its kind on defense. It boasts some of the strongest stats on defense, and easily the largest capacity without having to reload. He can take on multiple opponents without needing a breather. He excels at locking down the fort and knowing where the enemy is coming from.
Kapkan
Kapkan still feels inessential, but that doesn’t mean he can’t make a difference. His trip mines mounted on doors and windows are easier than ever to step into. The punishment for doing so is a harsh 60 health drop, which either kills you if you’re already damaged or puts you in a vulnerable spot for the rest of the round. His VSN SMG has some of the best balance between recoil and damage, plus his option of impact grenades or nitro cell adds some flexibility to how you want to play him. Any careful player can spot his traps easily, but he’s a fun pick against a team that favors rushing.
Alibi
Alibi is one of the more unique defenders of Siege. She places three “Prisma” decoys that project a full-sized fake Alibi that can fool enemies from afar. When the decoy is shot or walked through by an attacker (or their drone), their location is pinged for the next few seconds. It’s sometimes hard to tell if the decoys make a difference, but I still fall for them occasionally. It all depends on the situation: spread across an objective the decoys can be useful as alarms, and while roaming a crafty Alibi can use them to cover her tracks.
Caveira
Caveira is, by far, my least favorite operator to fight against. Her Silent Step ability dampens the sounds of her movements drastically, and her Luison pistol is deviously powerful. The worst part of getting bested by her is what happens after. If she’s able to pull off an interrogation, spotting every enemy on the map for a few seconds, it can easily win a round right then and there. Thorough droning and teamwork is the only way to reliably take her down. Experienced Cavs can interrogate enemies, stay undetected, and waste time for the attackers. If you let her get the better of you, good luck.
Doc
Playing Doc is like taking a more active role as Rook. His stim pistol can deliver three doses of 40 health from a distance, or self-apply. He can overheal for a total of 140 health, but the boost will deplete over time. He carries the same MP5 and P90 options as Rook, so he’s also a great anchor to take along. Since Doc usually stays near the objective, he’s best utilized after a fight or when roaming teammates come back to get healed. His stim pistol can also go to waste if he dies early in the round, so it’s a shame that it has become as a roaming spawn peeker that can erase damage with his self-heal.
Echo
Before Maestro, Echo was the only defender who spends the round mostly on cameras. His Yokai drones can jump up and stick to the ceiling to enter a cloaked mode. From there, it can fire sonic bursts that disorient opponents and interrupt gadget use. His utility used to rely solely on his one drone, but a buff earlier this year gave him a second one to greatly expand his horizons. He takes a lot of practice to balance his time between droning and anchoring, but a proficient Echo can hold back a few attackers while fighting them off.
Ela
In 2020, Ela sits somewhere in the middle of the pack. Her Grzmot mines are traps that concuss and hinder attacker aim, but if you’re not nearby to capitalize on their detonation, they’re just fancy alarms. Her Scorpion SMG is powerful at close range, but a high-recoil mess from a distance. There are better options for pure roamers, but her mines are a great tool against rushes and late-round attacker pushes.
Smoke
A popular pick with high level players, Smoke is an anchor that takes finesse to maximize. His remote-activated poison smoke canisters are the best way to stop a defuser plant without exposing yourself. Though, they require good aim and precise timing.
Lesion
Lesion’s Gu mines provide a blanket of security across the map that can greatly disrupt (but mostly annoy) attackers. The mines are hard to notice when cloaked and force attackers to take a moment to remove the needle. Lesion becomes more useful the longer he lives, since he earns more mines over time for a total of seven. The real highlight of his kit is the T-5 SMG, which has great control, a high fire rate, and average damage. He also has the unique ability to see the status of his traps through walls. With that valuable information, Lesion can easily ambush anyone unlucky enough to hit a trap.
Vigil
Vigil is a stealthy roamer with somewhat opposite abilities to Caveira. Cav is strong when sneaking up on enemies but is foiled when spotted by drones. Vigil can’t silent step, but can activate a backpack jammer that makes him disappear on cameras. Drones can still detect when he’s nearby, so enemies can still surmise where he’s hiding, but it gives Vigil a solid chance at fending them off. His K1A SMG hits hard and is controllable at longer ranges, so it feels kind of like Jäger’s 416-C. Like Cav, Vigil can now use his ability on a shorter cooldown; a bonus especially handy when multiple drones are trying to pin down his location.
Frost
Frost sets bear traps that snare enemies and take them immediately into a DBNO state. They can be saved by a teammate, but more often an enemy will finish the job. Her Welcome Mats are the most obvious trap in the game and can easily be disabled, especially after a 2019 nerf that lowered their health to 60. This is by design: it’s high risk versus high reward, but because of this her utility often goes to waste. In a fight her strange WW2-era SMG is alright, but its extremely low fire rate makes accuracy more important.
Hard to make work
Clash
Clash is the only operator on defense with a shield, and it’s a really weird one at that. Her full-body shield can shoot taser bursts at enemies that slow them down temporarily. Unlike Monty, Clash’s shield can be meleed to knock it away and open her up for attack. She can’t shoot unless she puts away her shield, a process that takes longer than ever after a series of nerfs. After balancing, Clash is a useful support operator in the right circumstances, but a terrible anchor the rest of the time.
When a teammate is grouped up with you to help take out the attackers you’ve slowed, Clash can work as intended. But the rest of the time, you’re fumbling around slowing people without a good way to take them out yourself. She’s the very definition of “hard to make work,” but if you can pull it off, it’s a fun role to play.
Castle
The reality of Castle’s bulletproof barricades is that they often hinder the defenders as much as the attackers. As even Ubisoft has said, he can be good with a coordinated team but is simply a nuisance otherwise. That doesn’t mean you can’t play him right: the barricades can be an effective blockade as time winds down in a round. Ubi has talked about reworking Castle in the past, but who knows what that will be a reality.
Avoid completely
Tachanka
No matter how good the memes or how extravagant the cosmetics, Lord Tachanka just kinda sucks. His stationary turret is poison to surviving a round, the turret shield has hitbox issues, and the damage output of the thing isn’t even that impressive. Off the turret, Tachanka is just a slower Kapkan. A recent leak suggests that a Tachanka rework is coming in 2020, but I’m still holding my breath. The goal seems to be to maintain the character while changing everything he does. Good luck with that! {-}7