Experiment 07 is here! This experiment comes with a bunch of bug fixes and general improvements this time around. Full patch notes can be found below!
Loading times Improvements
We’ve done some more optimisation on the way Robocraft X loads the world. Previously, the Main Menu would appear nice and quick, but loading into Creative Mode or a Community Game would take a while each and every time you try to enter.
Seeing how frequently everyone goes in and out of games, we wanted to make this a little less frustrating. Now, we’ve condensed a couple of different scenes into one larger one, making the transition to and from the menu a little easier to manage. Getting into the Main Menu for the first time will be a bit slower than before but entering any game should be much, much quicker!
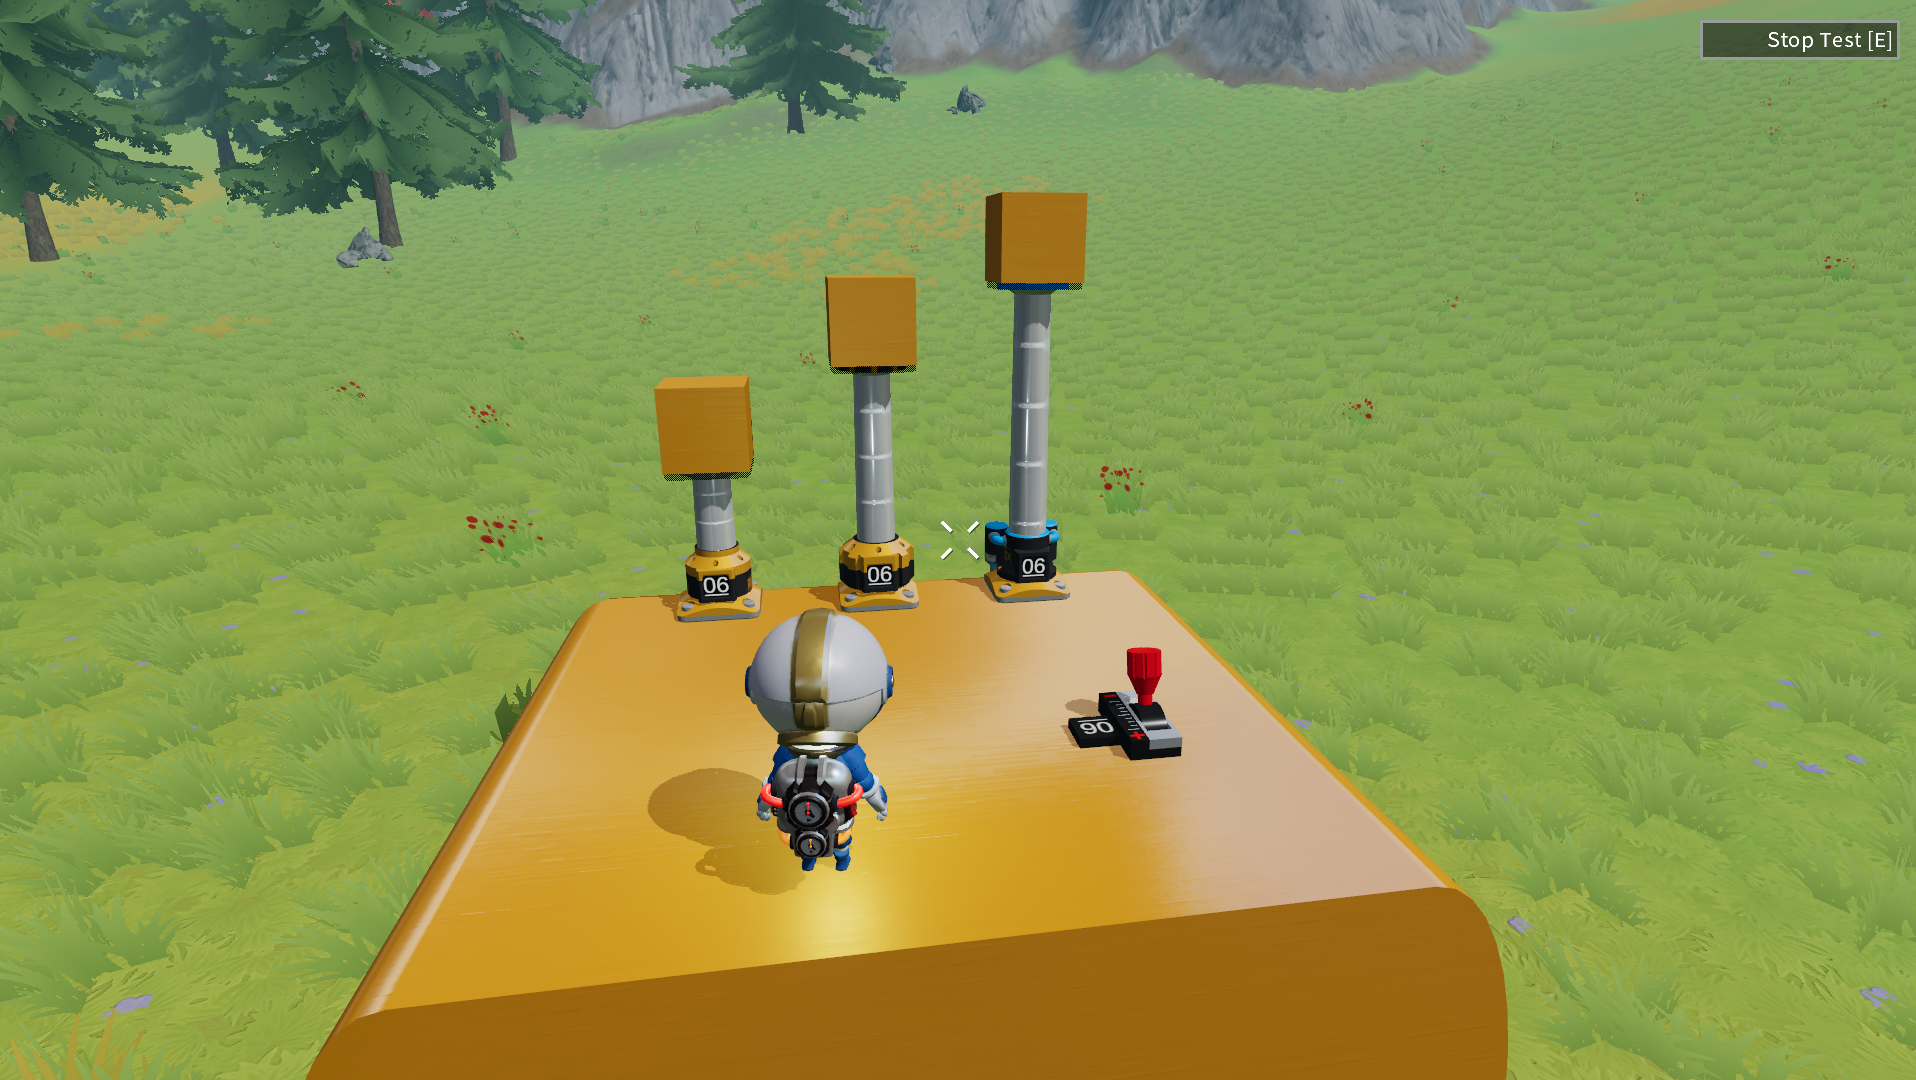
Piston Collision Fixes
Pistons now have collision on the middle section! As we mentioned in Experiment 06, the expandable cylinder of Pistons had no collision at all. We’ve now resolved the issues that were holding us up and these parts should now collide correctly. This also fixes a couple of reported bugs, mainly:
Pneumatic Pistons passing through other parts
This one is still happening sometimes but should be greatly improved. Please let us know if you still run into any issues with them
Pneumatic Pistons not always extending correctly if they were set to extend as soon as the simulation started
Collision and Density Changes
In previous experiments we were scaling down the collisions on parts slightly to allow them to be placed correctly in stasis. We then scaled them back up to the correct size in simulation, but this lead to some errors, both with connections not always working in stasis and collisions being a bit off on scaled objects.
We’ve gone back and changed this so that everything is always ‘the correct size’. This does mean that a few important things have changed. The first is that getting blocks to slot together smoothly when falling isn’t always going to work as well now. If this becomes a serious issue down the line, we’ll look into other ways of solving this.
The second is that parts that are in extremely enclosed spaces (like sliding doors or platforms that rise out of the ground) are going to get stuck a bit more when using flat/corner pieces and when Oily Cubes are not used. Again, there should be ways to achieve the same behaviour, just with slight tweaks but we can revisit this change if necessary.
We also spotted a few miscalculations with certain cube masses and densities. These have been corrected but they caused a couple of issues in specific games and may affect a few more out there.
A couple of the Community Games were already affected by these changes so we’ve made a few tweaks to get them back up and running. We apologize for the inconvenience of this and we aim to avoid breaking existing content as much as possible but there are times where we have to bite the bullet and make changes that will be better in the long run.
If the creators of these games would like to update and resubmit their own tweaked versions then we’ll be happy to put them back in. The changes are:
Logging Truck - Unfortunately these changes rendered this save a bit too hard to quickly fix so we’ve removed this for now.
Spaceship Escape - The table that rises up in one of the rooms needed a bit of smoothing to prevent it getting stuck and the gate mechanism was tweaked to allow it to open smoothly
Woking Train - The sliding door has been changed to use pistons to prevent it getting stuck
Way Out - The container around the gate in the right pathway has been expanded a bit to prevent it getting stuck
Harcore Course - The first set of Rubber doors got stuck so they have been tweaked slightly
Stop the Train - Door mechanism on the second carriage was tweaked to prevent it getting stuck
Through the Wall - Unfortunately we’ve removed this game for the time being as we couldn’t get a quick solution to stop the wall falling apart.
Claw Machine - The claw was getting stuck in the starting location so we’ve made the hole a little bigger
Monorail - Unfortunately this has been removed as a lot of the tight turns and twists are causing issues
Robotic Bowling - Release mechanism was getting stuck so this has been tweaked slightly
Maze of Mediocrity - The doors have been altered to use Pneumatics to prevent them getting stuck
Hard Parkour - Doors that needed to be manually pushed were getting stuck, so they now have a bit more room around them
Lack of New Parts
Earlier on we showcased a couple of new Infinitum parts. Unfortunately, we ran into more issues with this new type of collision than we anticipated so we’ve made the call to drop them from the build Today. The other improvements and tweaks are fantastic additions on their own so we didn’t want to hold everything back. We’ll be working hard to optimise the new parts and get them out to you as soon as we’re comfortable with their performance.
New Community Games
The following games have been added/updated:
Save The Goal by JoshJammer (Updated)
Fort Anomaly by Cyber_Dragon_123
Futuristic Train by Gigashoton
GroundMole Mk1 Test by ZimA
Checkmate by My_Hard1Disk
Down Below! by My_Hard1Disk
Escape in 90 seconds by My_Hard1Disk
Funicular by My_Hard1Disk
Hockey Table by My_Hard1Disk
Mini Golf by My_Hard1Disk
The Escapeship by Paprika
New Console Commands and Info Panel
We’ve added a couple of new console commands for you to play around with. We’ve also added a little bit of debug information into a new Info Panel, for those of you who want a little more stats with your experimenting. The new Info Panel can be opened with F3 and can have some more info displayed by toggling one of the new console commands (which we’ll get to in a moment).
SetMaxSimFrames - This command allows you to tweak how often physics changes are updated. Setting this to a lower number should improve overall performance, but lower the quality of physics interactions. Higher numbers will likely have a drastic impact on your framerate so do be careful with this one.
ShowDebugDisplayExtraInfo - Setting this value to true will enable extra info in the F3 panel regarding simFrames, position and input.
TeleportPlayerAbsolute - This one allows Leo to teleport to a fixed place. This can be handy for getting out of tight places or quickly navigating your gigantic build. Entering 0,0,0 will teleport Leo back to middle of the map.
TeleportPlayerRelative - This command allows Leo to teleport relative to his current position. For example, entering 0,1,0 will teleport Leo one unit upwards from where he is.
Other Changes
Unfortunately, some of the new APIs we’ll be using are not supported on 32-bit operating systems. This means that we need to take the plunge now and stop supporting 32-bit OS to pave the way for multiplayer, as we’ve already started laying some of the core groundwork.
Bug Fixes
Levers can no longer be interacted with through objects
Loading a save file with over 100 “labelled” parts should no longer trigger an error and these save files should now load as expected
Connections between scaled and sloped/curved cubes should no longer fail. Please note that the collision of the scaled cubes themselves will still need a bit more work in some cases
We’re gearing up to really focus on launching the very first MVP pass of multiplayer as soon as possible. We’ll reveal more at a later date, along with any other new features or fixes we add! As always, keep sharing your impressive creations.
We’ve just put live a build with a massive installment of new Community Games and a few updates to existing ones. Alongside this, we’ve had a re-shuffling of the ordering to better adjust for these additions.
The following are the games which have been added/updated:
Through the Wall - Cyber_Dragon_123 (updated)
Domino Rush - MadProsCons (updated)
Gold Rush - JapeEgg
Claw Machine game - KURA3000
Way Out - Paprika
Pinball Machine - Rawxas
Stop the Train - Spacecam
Marble Maze - Puggle1019
Robo Boxing - BRindustries
Manual or Mechanical - Hard1Disk
Claw Machine - Air-N
Auto Crane - Hard1Disk
Extreme Aerobics - Zergur Vorghiz
Highlift Crane - ichhasefubball
Super Slide - Zergur Vorghiz
Coin Dozer - MDJ
Ball Collector - Herperlerpicus
Hungry Hippos - JoshJammer
Pong - Nomade
Mono Rail Ride - Herperlerpicus
It’s amazing to see new builders submitting their creations and known-builders continuing to submit and tweak their creations, we look forward to all the games that will be sent our way in the future!
Experiment 07 is still in development, and is making great progress, we’ll let you know more closer to the launch date. Until then, a big thank you from all of us at Freejam for the continued support and dedication to Robocraft X.
Hi Experimenters, We’ve just released a small update for Experiment 06. This updated increases the tolerance on all joints’ breaking point! This means that all of the functional joints (Hinges, Axles, Pistons etc.) will now be roughly 3-4 times harder to break when bending at an unsupported angle and roughly twice as harder to break just by pushing it along that unsupported angle. This is only a temporary increase while we work on improving joint breaking altogether but we’ve heard more than a few complaints regarding the limitations of the strength of the current parts and we wanted to make things a bit more enjoyable short term. We’ll share more info on the changes to join breaking when we get there. But for now, keep on building and sharing your amazingly massive builds! The Robocraft X Team
Robocraft X Experiment 06 is now live! You can download it by clicking the following URL Download Robocraft X Experiment 06 Now! We’ve pushed Experiment 06 live! This update brings another batch of parts, some bug fixes and other improvements along with another batch of community games. Read the full changes below.
New Parts
We have another 7 new parts for you to build with in this experiment; Telescopic Joint, Servo Piston, Stepper Piston and Damped Spring are headlining, with Pneumatic versions of the Hinge, Axle and Pistons being added as well!
Pistons
Both of these motorised parts start out as a single block and allow for a 4 block extension. With no Lever, the Servo Piston will simply extend (when possible) as soon as simulation starts, it will then stop when it reaches its maximum distance. Levers allow you to set the length of the extension, with 0 being neutral. Setting the Lever to -1 will extend the Piston in whatever direction it is facing, while 0, or anything above, will retract it.
Stepper Pistons extend to their maximum position with the speed set to match the Lever position, in the same way the Stepper Motor Axle and Stepper Motor Hinges operate. Setting these to 0 will stop them in their current position, while negative signals extend and positive signals retract.
Pneumatic Parts
The Pneumatic Hinge, Axle and Piston all work the same way as their Servo counterpart with one major change. Servos have incredibly high torque but operate slowly while Pneumatic parts have the added benefit of air pressure. This allows them to output the same levels of torque but at breakneck speeds!
Damped Spring
The Damped Spring is the first ‘suspension’ part in RCX. This spring will start out at maximum range when simulation starts. Any weight on this spring will then push the spring inwards. If the weight isn’t too much to handle then the spring will attempt to push back out to its starting position. These are perfect for spring loaded devices and simple vehicle suspension!
Telescopic Joint
The Telescopic Joint is essentially a free moving, unpowered piston. This part will extend outwards, up to 4 blocks. This Joint will retract and extend as the part rotates and gravity takes effect.
Changes to Servos
As we mentioned in the last Experiment’s patch notes; Servos were not quite working as we wanted them to when handling collisions. We’ve made some changes that now allow Servos to ‘struggle’ when they (or something they are moving) hit something. Instead of snapping too soon or clipping straight through the other object, the Servos will now attempt to push through the object and, if it fails, will stop consuming power, but remain in the same position attempting to move until something changes.
There is a small overlap of parts before this happens so there may be some visual issues that we still need to resolve. And certain objects may still pass through until we get the values just right, but this should generally be much more reliable. Parts with smaller colliders (such as scaled triangles or edges) may still clip through but we’ll keep an eye on this and see what kind of changes we need to make.
These changes also impact the new Pistons in the same way, preventing parts being pushed into, or through, others.
Character Movement Improvements
Leo has had a little bit of training to improve the way he handles slopes, jumping and leaving flight mode in stasis. While sliding down slopes, or generally just standing on curved edges, Leo would previously enter his ‘falling’ state a little too easily. This made it much harder to handle jumping puzzles and would reduce his jump distance. This should no longer happen and Leo should be able to jump smoothly from any surface, with the right amount of force!
This also addresses some similar issues when driving around in an enclosed space, like a small 3x3 cockpit with a space in the middle where Leo would constantly “fall”.
The final change is that holding Shift while in flight mode will toggle Leo back to walking when he reaches the ground. Previously you’d need to double tap Space to turn this mode off but we felt that this wasn’t the best experience.
Community Games
The following games have been added/updated:
Logging Truck by SpaceCam
Maze of Macaroni by JapeEgg
Plinko by JapeEgg
Woking train by Gigashoton
Connect4 by LoKoreeza
Skyline Joy Ride by Zhang (edit)
Hardcore Course by Bossanator666
Monorail by electroshock777 (edit)
Structural Smash by Cyber_dragon_123 (edit)
Island Hopper by Chopin37
Robotic Bowling by Combativ
Other Changes
We’ve updated the sound effect that plays when placing parts in invalid locations. This should communicate the behaviour a little better Updated any references to “Build Games Mode” in Community Game descriptions
Bug Fixes
We’ve fixed a few errors related to large quantities of Servos and moving lots of Servos at once that could be triggered entering simulation Fixed a bug that reset the inventory count of some parts to the max value after leaving simulation Fixed a bug with “resting” objects on the end of Axles and other joints that would cause them to remain idle instead of falling down. This shouldn’t have an impact on anything else but please let us know if some things stop behaving as expected Fixed another couple of instances of joints (particularly large Hinges) losing their connections. This should be the last of these issues but please do let us know if anything else crops up
Known Issues
One issue we’re highlighting with the new extendable parts is that there currently isn’t any collision on the ‘middle section’. This means that Leo, or any objects, will be able to pass right through the cylinder of any extended Piston or Telescopic Joint. We really wanted to get these powerful new parts out to you ASAP and felt that this wouldn’t be an issue that blocks the use of the parts themselves. We’re still working hard on getting this functionality in but it will likely be ready for experiment 07 instead.
These new parts add another level of depth and creative possibilities. As always, we’re really looking forward to seeing how you put these new parts to use and we’ll continue to include the amazing games you come up with.
Experiment 05 is here, and while it may not be as massive as 04 at first glance, we’ve still got a lot to shout about! Read the full list of changes below:
Servos & Steppers
We have 4 extremely powerful new parts for you to play with! The Servo Hinge, Servo Axle, Stepper Motor Hinge and Stepper Motor Axle are here.
These parts are all motorised variants of their joint counterpart and as such, require a power source, can be assigned signal channels and can be controlled by Levers. We’ll go into the details below with some practical examples.
Servo Hinge & Servo Axle
These start in a ‘neutral’ position, much like their counterparts, and will rotate to a target angle/rotation. In the case of Hinges, this will be 90 degrees in either direction. With Motors, this will be 180 degrees clockwise/anti-clockwise.
If these parts are powered, but not assigned to a Lever, they will start to move to their “+1” target as soon as you exit stasis. This means that the Hinge will start rotating 90 degrees in one direction, and the Motor will start rotating 180 degrees. These parts will only consume power while they are actively moving. As soon as they reach the target, they stop consuming power but remain fixed in place! These can be great for things such as doors, where you only want a fixed level of movement.
If there is a Lever present then you will be able to control the angle/rotation with perfect precision. As the Levers and Servos both start in ‘neutral’, moving the Lever to any position will cause the Servo to match that position. Setting a Lever to +0.5 for example, would cause a Hinge to move 45 degrees in that direction before stopping. Moving the Lever back to neutral will move the Hinge back to 0 degrees.
Stepper Motor Hinge & Stepper Motor Axle
Steppers work a little differently to Servos but the basic concept is the same. They still consume power while in motion, but with one big distinction. Instead of moving to a target angle/rotation, these parts will ‘step’ towards their end rotation while active.
Levers will instead control the speed of these steps. This means that setting a Lever to +1 will cause a Motor to rotate 180 degrees as fast as it can, where it will then stop and stay. Setting it to +0.5 will cause it to take twice as long to rotate 180 degrees. Setting the Lever to neutral will simply stop the Stepper in its current position! This is great for timers, like setting up a handle to knock over the first domino in the sequence or lock a door by moving something in front of it!
New Joints
We have a couple of new joints for you as well. The Ball Socket and Universal Joint offer even more freedom when connecting two objects together.
The Ball Joint offers full 3-axis rotation between the connected parts while the Universal Joint slightly restricts this to 2-axis.
More Community Games
We’ve added loads more of the games shared on our Discord to the “Community Games” menu. Thanks again to everyone who’s been working hard on creating these amazing games and we look forward to what you all make next! Along with a new “Tutorial03” and “Tutorial04”, the new games are:
Skyline Joy Ride by Zhang
Monorail by electroshock777
Jumble Parkour by MadConsPros
Structural Smash by Cyber_dragon_123
Billiards by My_Hard1Disk
Hard parkour by Milouch
Maleo by NullPersona
Open Sesame by My_Hard1Disk
Other Changes
We’ve made some small changes to the messaging in the Main Menu. “Play Games” and “Build Games” have now been renamed to “Community Games” and “Creative Mode”. These buttons have also been swapped around so that creative mode is the front runner.
The music for stasis/simulation has had a bit of an overhaul as well. The background music in Stasis is now a slower, more distorted version of our beloved soundtrack to drive home the “stasis time” concept. Switching to simulation causes this track to speed right back up to the version you’re all used to. The switch itself should be smoother and more distinct now as well.
We’ve added in a small “saving” indicator in the bottom right of the screen while playing to let you know it’s been 20 seconds and the schedules autosave has been triggered. You’ll still save on exit as well, there just won't be time to show this icon.
New players will have a slightly more populated default game save now! Anyone that doesn’t already have a save file in “C:\Users\[USER]\AppData\LocalLow\Freejam\RobocraftX\Games” will be given a new “default” save with some examples to play around with.
We’ve made some more optimisations to the save feature itself, which should help us futureproof and avoid any incompatible files as we continue to make changes. This shouldn’t have any noticeable impact but please do let us know if your old save files suddenly stop working.
We’ve also done some optimisation on the Community Games screen to load your pool of games a little faster. Instead of loading the entire directory in one swoop you’ll now see games pop up one at a time.
Bug Fixes
Fixed an error related to parts with channels that could trigger an error when entering simulation multiple times in the same session
Fixed some errors related to conductivity clusters that could be triggered in specific saves when entering simulation multiple times in the same session
Fixed a bug that caused parts (joints in particular) to lose their connectivity when loading a game save
Heavy objects that enter the ‘resting’ state (Not moving for a few seconds) will no longer fail to wake up - This was most noticeable in the form of a bug with the Motors spinning extremely slowly in cases. This also addresses a couple of other bugs where parts would jitter/slide around
Motors that snap due to carrying too much weight will no longer continue to spin
The error dialogue should now correctly appear in all cases when an error occurs. This should make it clearer when there is a problem to report.
Tyre bounciness has been reduced slightly
Parts that are scaled to extremes in one axis will no longer have their material incorrectly scaled
Known Issues
We have one known issue with the Servos that we wanted to give you a heads up on. If a Servo moves its connected blocks into another cluster of blocks, there’s a high likelihood that these will simply clip into each other rather than causing the Servo to snap. This can also lead to strange ‘self propelled’ builds in other cases when Servos try to push the same object in opposite directions.
We don’t believe this is critical enough to delay this build at this stage but we’re working hard on a fix that we’ll deliver as soon as we can.
We can’t wait to see all of the new games you create. We’ll keep including as many as we can so be sure to share them over on our official Discord! Experiment 06 is just around the corner, so keep your eyes peeled.
Hi Experimenters, We've released a new update where we've added a tutorial level to the game to try and help people better understand gameplay, we'll aim to add some more of these as we go. We made changes to the way Leo jumps on slopes to make it smoother.
Alongside these changes we've also added one more Community Game Hexapod Robot by KURA3000! and updated Bridge of Pain by Radyjko8.
We aim to get Experiment 05 released soon, which will include servos and a few more bug fixes!
Bug Fixes
We've submitted a fix to connections which should address the issue of cubes sometimes falling apart during building or reloading save files.
Update on Known Issues
Load times when opening the Play Games screen on older hard drives - We're still working on some more optimisations so this will likely ship with Experiment 05
Collision/Material issues with scaled parts - Potential fixes are being tested and will likely be released with Experiment 05
Scaling non-primitive shapes - We'll roll the fix for this in with Experiment 05
Motors losing torque/power in some games - We've made some good progress on this
Issues entering simulation a second time in some games can cause a lock up This one is still under investigation but we have some save files to work with.
Thanks to everyone who has been reporting these issues, we really do appreciate it.
A lot of you have been doing amazing work over the weekend and made some of your own games! We're really impressed with what we've seen and we're adding them into the game for everyone to enjoy.
We've changed the location of where the local save is stored, as Steams update system cleans the save folder when it updates the game, the change we made will prevent updates overriding local save data, however will result in this one time deletion of your local save data. In order to keep your Save File, you'll need to save it to an external location and then copy it to C:\Users\[USER]\AppData\LocalLow\Freejam\RobocraftX\Games Unfortunately if you get the update before doing the steps above, you will lose your local save data, we apologise for any inconvenience this may cause.
We fixed a bug with the command console, so the command console will no longer stop functioning after you reload a save
Known Issues
Load times when opening the Play Games screen on older hard drives - We'll be working on some optimisations for this over the next few days
Joints falling apart after loading saved games - We've made some progress on this and will aim to get a fix live ASAP
Collision/Material issues with scaled parts - Under investigation
Scaling non-primitive shapes - We're working on a fix for this
Motors losing torque/power in some games - Under investigation
Issues entering simulation a second time in some games can cause a lock up - Under investigation
We have yet another massive update for you all! First of all we’re officially switching from unlisted to listed! This means that RobocraftX will now appear in store searches and generally be easier to find and share! We’ve still got a long road ahead to Alpha and beyond but thanks for supporting us this far and we hope you continue to enjoy this journey with us. Here is the full rundown of everything new in this experiment!
Saving & Loading
The first pass of saving and loading is here! It is now possible to save your progress while in “Build Games” mode. Saving will automatically happen whenever:
You enter simulation to test out your creation.
Every 20 seconds
Whenever the client is closed
You will also be able to manually save your build when you quit the game via the pause menu.
In this experiment, only one save will be written to. This can be found under “RobocraftX_Data\StreamingAssets\Games\Player” however, and can be copied/renamed to allow for multiple local save files! We’re hoping everyone will create some amazing things and upload/share their saves while we continue to work on cloud saving/loading. We’ve even written a guide on how to do this! Save and Loading Guide.
Speaking of loading; any time you enter the “Build Games” mode, you will load up your current save file and carry on exactly where you left off. If you are keeping multiple save files in the Player directory, you’ll need to make sure the one you want to load is first alphabetically.
There is also a new “Play Games” mode in the main menu. We’ll cover the new menu flow below but the TL;DR is that in this experiment, this new screen will allow you to load up any local save to play around with!
Build Games / Play Games
The Build Games mode works exactly the same as “build mode” in previous experiments. Instead of loading directly into an empty world each time you load up the client, you will be able to click this button to load your current save file and continue building where you left off. All of the current inventory parts are available in this mode and can be used to create amazing games, cars, contraptions; you name it!
Play Games is the start of our UGC content sharing platform where you will be able to download and play game modes from other experimenters. In this experiment, the Play Games mode will allow you to view all of your local save files, with a bunch curated by us, in a neat little grid. Each game mode will have a name and thumbnail. Selecting a game mode will take you in for a more detailed look.
From here, you can click PLAY and get right into the action. There are a few big changes in Play Games mode and we’ll cover some of the finer details as we go! The biggest changes are: Certain inventory is restricted to Build Games now, such as Infinitum You can only build within certain areas of the game (we’ll cover this in the next section) Parts that are already present cannot be removed (we wouldn’t want you to destroy the game world)
Spawn Points
Spawn Points are here! These unique parts can be placed like most other blocks. Spawn Points are one of the first ways of setting up “rules” for your game modes. If a Spawn Point is present when a save is loaded through “Play Games”, then Leo will appear inside it. As long as you are in stasis, you will be confined to the Spawn Point and will only be able to place parts within its boundaries. As soon as you leave stasis and enter “play” mode, the Spawn Point will dissolve and the simulation will begin! Returning to stasis will place you back in the Spawn Point with your creation. Spawn Points currently come in 4 sizes!
Player (3L x 3W x 3H): This Spawn Point has just enough room for our little Leo and can be used in game modes where you do not want the player to build anything
Small (16L x 10W x 10H): This Spawn Point has a reasonable amount of wiggle room so you can build something small to use in the game you’ve loaded
Medium (26L x 14W x 14H): A standard size Spawn Point with more building freedom
Large (36L x 20W x 20H): A massive Spawn Point that can contain multiple builds or maybe even something a bit well... larger
If no Spawn Point is present, Leo will spawn in the same location he was in Build Games. If multiple Spawn Points are present, Leo will choose one at random. In later experiments these will be a requirement and can also be assigned to specific players or teams.
Any building or changes done in Play Games will not be saved.
Channel Configuration
While conductivity is an extremely powerful tool, we understand that things can get a bit confusing and complicated when you have to rout power and signals with non-conductive blocks through larger builds. Configurable channels open up so many more possibilities! Levers and motorised parts can both have their channel configured. Each Lever that is placed will now be assigned its own channel, in increments of 1, from 01 to 99. This means that a Lever on channel 1 will only send signals out to objects receiving on the same channel. Motors that are placed will automatically be assigned to the highest available channel (if there is one). So if you have two Levers assigned to channel 01 and 02, new Motors will be assigned to channel 02 by default. If you have no Levers at all then new Motors will be assigned to the ‘?’ channel. This special channel ignores all input and allows the motorised part to work as if no Lever is present.
Aiming at any signal sender or receiver will change the crosshair to a scrollable signal configuration cursor. While this cursor is present, scrolling the mouse wheel will change the signal assigned to the part.
Primitive Block Scaling
We all know that placing 100 cubes one by one for that huge build can get tedious. We also know that the current pool of primitive shapes is still a little rigid when it comes to building certain things so we’ve introduced Non-Uniform Primitive Scaling (or NUPS)!
With NUPS you can create huge blocks in as little as 2 clicks! Simply hold the placement button (Left Mouse Button) and start dragging in the first two axis (Left/Right and Up/Down) and the ghost cube will show where this newly scaled part will appear when placed. Releasing the placement button will then allow you to scale on the third axis (Forward/Back). Clicking the placement button one more time will finalise the placement. This then places one single block of the desired size and shape!
The number of parts required for a NUPS placement is directly proportional to the size of it though. This means that the giant 10x10x10 cube shown above may be one single cube, but it still requires 1000 individual cubes to build. If you don’t have enough parts, you will be shown a red ghost cube and, in a later update, the number of parts required and a small on-screen warning during the scaling. Weight, conductivity and connection points still work the same with scaled parts. All of our current primitive shapes (cubes, edges, slopes, sphere etc.) can be scaled with this tool. Functional parts cannot be scaled yet, but in a later experiment you will be able to uniformly scale them too!
Part Count Increase
To give everyone enough freedom to try out NUPS, we’re increasing the part count again! We’re giving 99,999 of each primitive shape for this experiment, while joints and other functional parts are staying at 999 and Spawn Points will be limited to 100 for now. Please note that these will most likely be reduced again when cloud based inventories are implemented. To accommodate this change, any time you have over 999 of a part in the inventory or hotbar, you will instead see them displayed rounded down to the nearest thousand.
This isn’t an ideal solution in the long run but it stops things getting cluttered while we work things out.
New Part - Nuclear Reactor
This new part functions as a virtually limitless source of power! A single one of these can provide power for over a gazillion (roughly) seconds longer than a standard Lithium Battery. Due to their incredible output, they are only available in Build Games and are recommended as a power source for the games themselves and contraptions within.
Changes To Motors & Levers
Motors have had a bit of an overhaul to make them work better. Whenever a Lever is connected to a Motor, a few things will be different now.
Firstly, if the Lever is between neutral and full power, it will now apply all of it’s torque correctly, but the speed will be relative to the Levers position now. Previously the Lever position only affected the torque itself so it wasn’t quite working as expected.
Secondly, Levers in neutral now apply braking force to their Motors! In the last experiment a neutral Lever would simply not provide any torque, but this led to Motors not really slowing down or stopping naturally. If a Lever is in neutral, any moving Motors will brake in an attempt to reach a state of ‘no movement’.
Finally, all of the Levers on the same channel will now average their total output. Previously they would be totalled, meaning that a lever on +0.5 and +1 would just be capped at +1. Now, it is possible to really finely manage Motor torque with multiple Levers!
Part Balancing
All Parts
Mass of all primitive parts is now x100 less
Rubber, Oily & Glass Cubes
All shape densities reduced to 0.0125 from 2
Mass of these cubes is now only 2.5x that of Aluminium, down from 4x
Battery
Mass reduced to 0.015 from 5
Density reduced to 0.015 from 5
Tyre
Mass reduced to 0.087 from 17.5
Density reduced to 0.0125 from 2.5
Axle Small
Mass reduced to 0.015 from 5
Density reduced to 0.015 from 5
Joint Break Angle reduced
Joint Break Distance reduced
Axle Medium
Mass reduced to 0.03 from 10
Density reduced to 0.015 from 5
Joint Break Angle reduced
Hinge Small
Mass reduced to 0.015 from 5
Density reduced to 0.015 from 5
Joint Break Angle reduced
Joint Break Distance reduced
Hinge Medium
Mass reduced to 0.045 from 15
Density reduced to 0.015 from 5
Joint Break Angle reduced
Motor Small
Mass reduced to 0.015 from 5
Density reduced to 0.015 from 5
Joint Break Angle reduced
Joint Break Distance reduced
Maximum Torque reduced to 4.5 from 200 (in line with mass and other changes)
Motor Medium
Mass reduced to 0.045 from 15
Density reduced to 0.015 from 5
Joint Break Angle reduced
Maximum Torque reduced to 4.5 from 800 (in line with mass and other changes)
Maximum Velocity increased to 20 from 15
Energy Consumption increased slightly
Lever
Mass reduced to 0.0005 from 0.05
Density reduced to 0.0025 from 0.25
The mass/density changes should make using all materials feel a little smoother as we felt there was too large of a difference, which could discourage their use. The mass reduction across the board should create better physics interactions.
All of the joint breakage changes are simply to bring them in line with their visuals as we noticed certain parts could handle much more weight than intended which lead to some odd visual issues.
The Motor changes are in line with the changes to torque outlined a little earlier in these patch notes.
Other Changes
Player mass reduced by x100 in line with the other mass changes
The 3rd person camera can now be zoomed in and out with Alt+Scroll Wheel
Improved physics interactions between the player and moving objects which should prevent any insane launch speeds
When hovering over items in the inventory for more than one second, a more detailed description will appear
Improved messaging at the top of the screen which shows the current state and mode you are in
The key to start/stop simulation has changed from Enter to E
Audio added for grabbing and dragging Levers
Tyres now have their own audio to prevent horrible screeching and bouncing on cars
Infinitum primitives are now only available in Build Games. They are intended for construction purposes and as such are recommended for use in game building.
Bug Fixes
Opening the Inventory in the same second you switch to simulation will no longer leave you unable to play
BuildBlock console command has been removed - This was just a test command that was accidentally left in
Fixed a visual issue on the Tyre
Audio improvements for collisions and scraping to make them less intrusive
The Lever ghost cube now correctly displays the handle
Glass cubes no longer cast shadows
With so many new possibilities we’re hoping everyone is able to create and share amazing game modes.Thanks again for all of the support so far! Keep an eye on on YouTube channel and sub Reddit for more RCX 101 Tutorial videos and content in the coming weeks where we’ll explain some of these new parts and concepts in greater detail. If you want to support the development of Robocraft X further, please share it with your friends and leave a review on Steam.
We've released a second hotfix which addresses some of the issues with Motors not performing as expected. This mainly fixes contraptions that were not able to generate enough torque to spin heavier parts. We'll be making more tweaks to the Motors in the next experiment as well so look forward to those!
We’ve released a small hotfix for Experiment 03. Below is a full list of the changes and bug fixes.
Part Count Increase
As those of you who follow the Reddit page will know, we often highlight amazing community creations that genuinely impress us with a “Community Highlight” flair. Some of these have been built with the standard block limit and some have modified their client to bypass this limit.
While we have no issues with players modding the game at this stage, as the limit is mostly there as a safeguard to prevent odd behaviour, poor performance and in extreme cases even crashing. We know a lot of machines can handle all these extra parts and physics calculations so those of you who are doing this are likely aware of the impact.
We’re also aware that this may feel unfair to those of you who are keeping within the intended limits and restricts your creativity, which is something we never intended. So, for the rest of Experiment 03 we’re going to increase the count of all parts to 999! Giving everyone tonnes more freedom and a fairer chance build truly outstanding things.
Please be aware that this will only last for another experiment or two, while we work on getting accounts, player progression, save/load and inventory fully implemented. When these are all in place, players will be given their starting account with a base inventory and the means to earn more parts though a free, in-game progression system and these values should no longer be modifiable.
Please also note that this may lead to more issues being uncovered and bigger performance hits while we continue to optimise and smooth things out over time.
Bug fixes
The ‘ClearAllParts’ console command will no longer forget that the lever handle is actually part of the lever, leading to issues with simulation not resetting correctly.
Fixed an issue preventing Glass reflection from working as intended
Fixed a visual issue with the normal mapping of Infinitum cubes
Users that were getting stuck on the initial loading screen should now be able to play again
Thanks for your continued support. Don’t forget to leave us a review on Steam! We want honest opinions and constructive feedback to help us push this game in the right direction.