Oct 1, 2023
Knights Province - kromster80
Animations are super important in Knights Province. The game is meant to be playable in different styles, but one of the bigger focuses are - chill, laid-back experience where players can enjoy building their towns and interact with others towns (including AI). Animations help to reach and support that goal in several aspects:
Setting the Scene - Animations help create the right vibe in the game. They make the town and its people seem alive and active, adding a lively feel to the game world.
Reinforcing the idea that Building Stuff Feels Good - The game is all about taking your time to build a town, and animations make that process enjoyable to watch. Seeing buildings go up, trees and grain grow, and resources being moved around and processed keeps the game engaging and satisfactory.
Feedback that Works - Animations give feedback to players about execution of their orders. When you tell a building to be built, animations show the progress. It's a clear way to show what's happening.
Explaining How Things Work - Animations make it easier to understand complex game parts, like management and processing of resources. Seeing resources being gathered or worked on helps players grasp how the game economy works.
To sum up, animations are a big deal in Knights Province. They're not just there to look cool - they make the game feel relaxed, enjoyable, and engaging, exactly what the game aims to be.
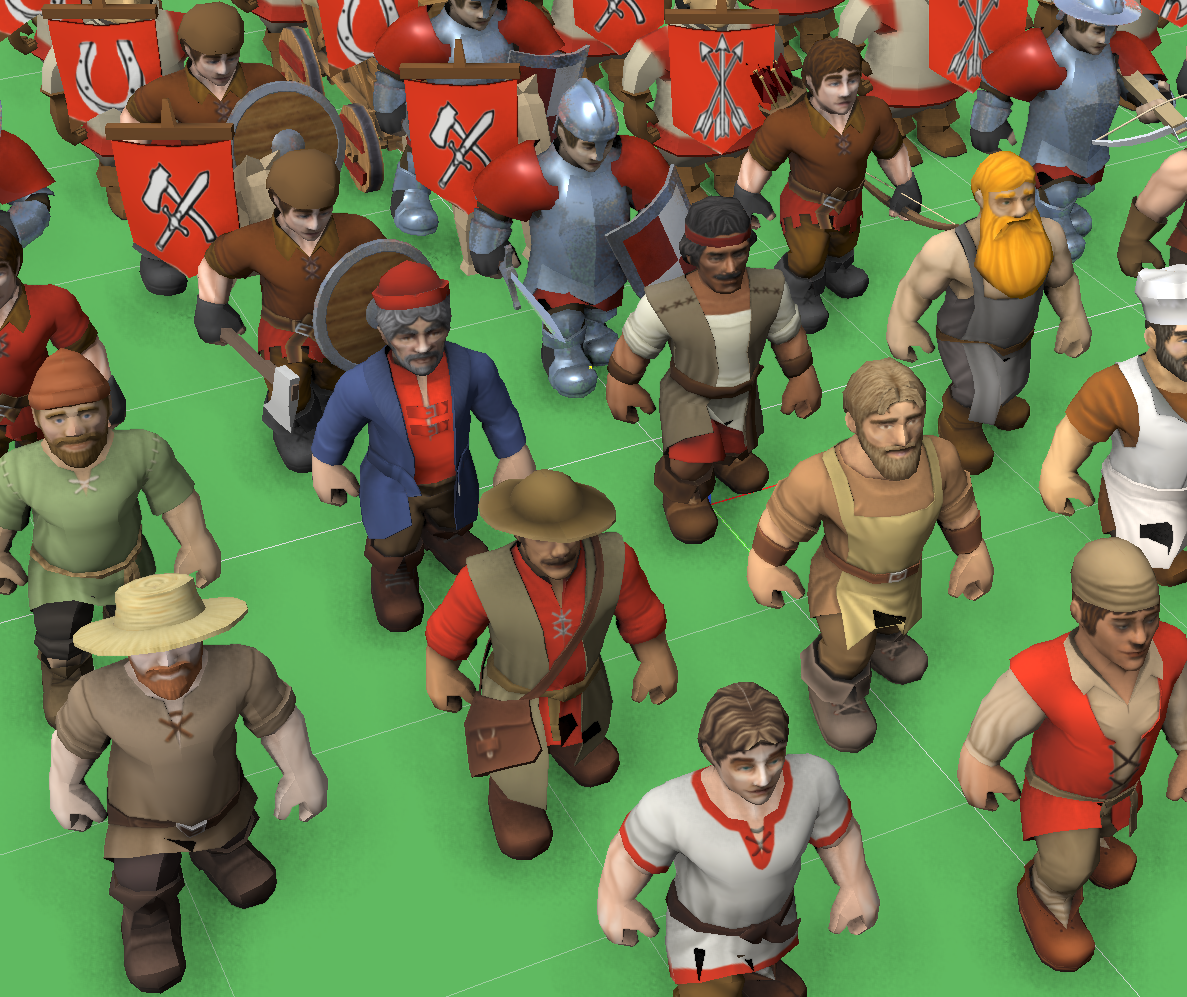
Stepping one step down the abstraction ladder, it helps to categorize and describe what animations are there and which ones make the bigger impact (bang for buck). The most important ones are the units. They form up the majority of interactive and animated entities in the game. Each unit type has its own distinct look, tools and loads they carry and activities they do. Of course there are many other unit-less animations, but those ones are in a relative minority. We’ll focus on units for this article.
Breaking down an animated unit in the game, it consists of four parts: the unit model, rig (equipment), animation, and optional distorts.
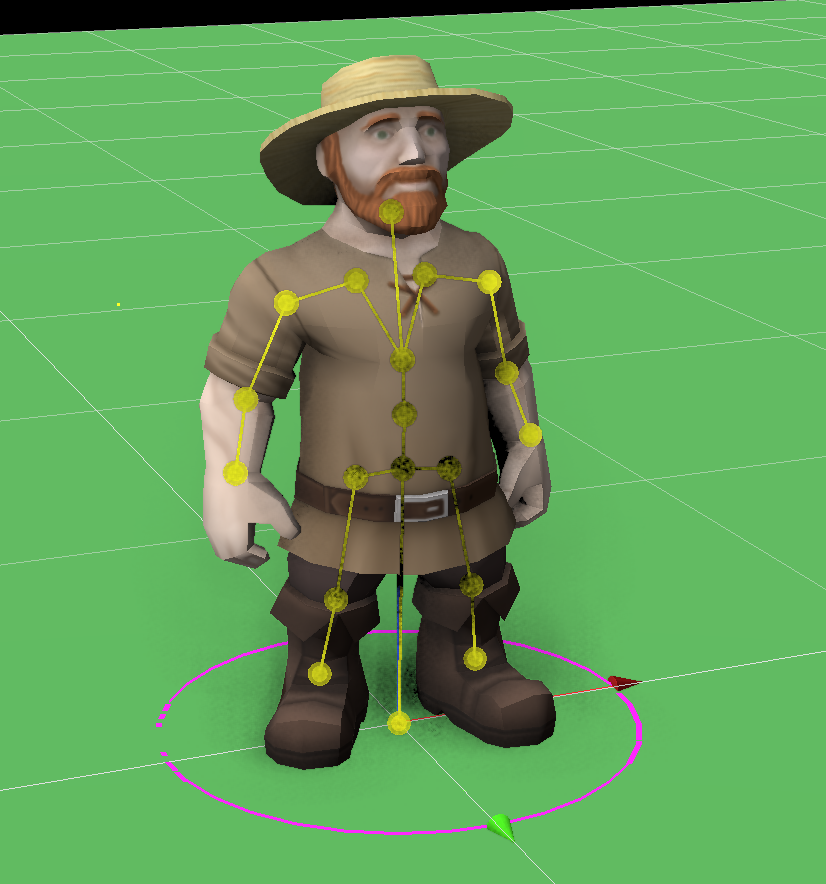
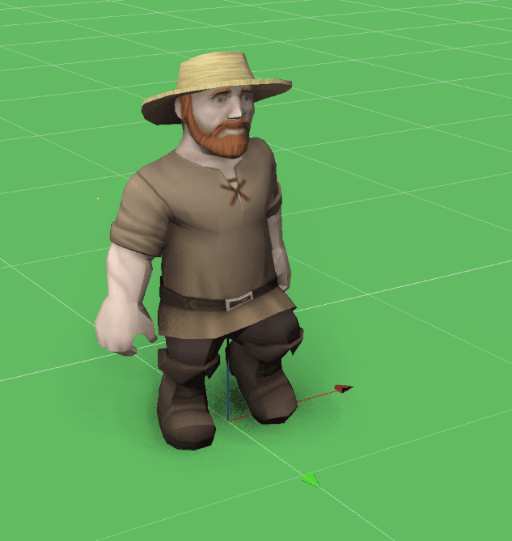
Unit Model - The unit model is the visual representation of the unit in its base form. It includes the 3D character model, textures, and basic skeletal structure. This is the starting point for all animations and is what the player sees as the character. Typical unit starts his life in so-called A-pose:
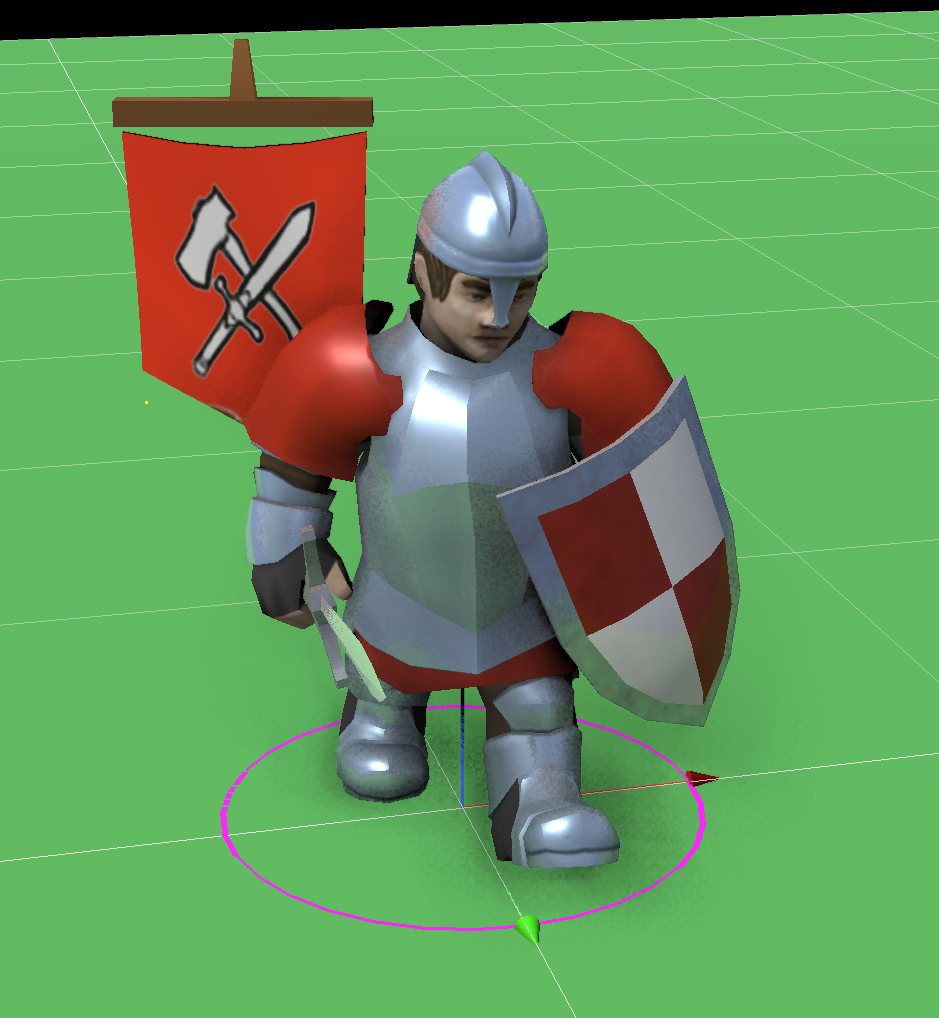
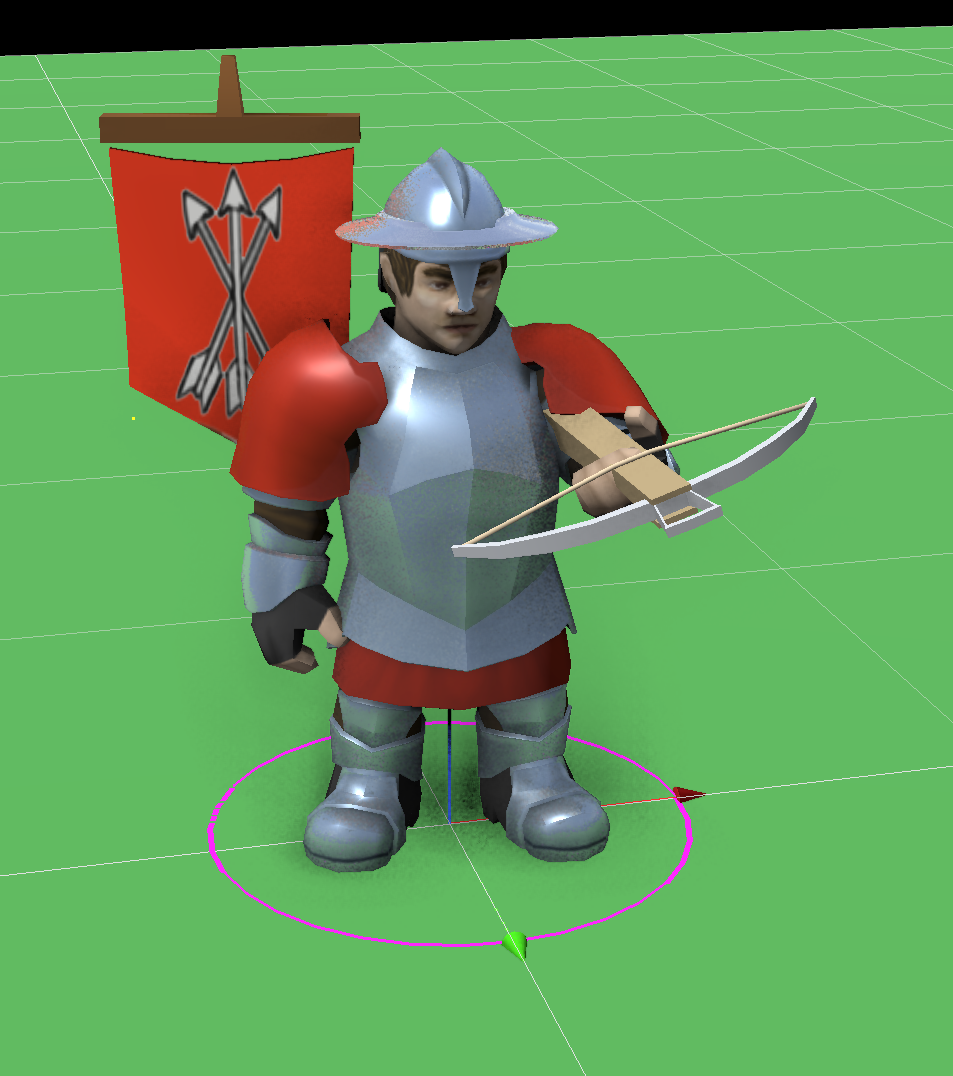
Rig (Optional) - The rig in KP is a description of how different auxiliary parts get added to the unit - like a carry, work tools, interaction objects, etc. While optional, more than half of the unit`s time is spent having some rig applied. One additional use of the rigs is that due to game being still in development, rigs allow to easily take a base unit (e.g. Swordsman) and replace his default rig (sword and shield) with a rig containing a cap and an arbalet, thus making him look like a new unit (Arbaletman).
Animation - Animations are the movements and actions that bring the unit model to life. These include walking, attacking, working, or any other actions the unit can perform within the game. Animations are crucial for gameplay dynamics. Most of the animations are looped, meaning that they can be repeated seamlessly.
Distorts (Optional):
Distorts are additional alterations applied to the unit animation. They include changes in skeletal animation values and boundaries. For example Porter carrying a heavy load needs to have his arms bent to hold the load and slightly different walk animation so that it’s clear that the load is indeed heavy and a burden.

While the unit model and animation are essential, the rig and distorts add an extra layer of sophistication and visual appeal to the animated units within the game.
All 4 components working together allow one basic walk animation to be adapted to several dozens of uses.
Now, there’s a new spin on that system - in-house work animations. They have kept me intimidated since the beginning, since I’m not that experienced with skeletal animations and I didn’t spend a proper amount of time analyzing the requirements. It all seemed just too big and fuzzy. Now, finally, I have had enough time and focus to address the thing. Analyzing the problem is the first thing to do. While looking and acting very similar to the unit animations, in-house animations have several key differences:
Combining Several Skeletal Models - while some animations are very simple (e.g. idle units just chilling and looking sides) there are also quite complex animations involving independently animated mechanisms (e.g. Tailors spinning wheel, or Brewers cider press).
Working with Tools and Objects - units need to change tools they hold and some of the tools that the unit needs to work with require special treatment. One such example is a baker’s rolling pin, it needs to be making good contact with both of the baker’s hands. Dough had to be in the equation too.
Non-Looped Animations - some of the animations are just intermediary between others, e.g. a unit walking out of his house into the working areas. It starts in one place and ends in another, without rewinding back. Others are seemingly looped, but without interpolation between last and first frame (e.g. Mill blades, always rotate on and on) which technically makes it non-looped, just really well aligned.
Non-Animations - it is rather handy to use the same mechanism for non-animated elements. For example, it’s much more handy to model the Brewery ladder as a straight standalone object and then move it into place tilting the right amount by all three rotation axes.
Special Non-Skeletal Animations - waving house flags are a good example of such animations that are much easier to be made without skeletal structure. They use a special shader for that and are not part of the in-house animations focus, same as burning particle effects.
Knowing the approximate set of requirements, it was time to evaluate possible solutions. Biggest problem seemed to be creating unit animations. Main requirement was a standalone tool focused on one thing that it does well. Preferably free or open-source, or at least not very expensive:
AccuRIG - a tool for automatic rigging of the skeletal models (here, the term “rig” is used in it’s industrial standard meaning - it refers to the creation of the skeleton and setting up vertex weights for the bones that affect those vertices). The tool features a big set of sample animations, some of which could be suitable for the Knights Province. Unfortunately, not all animations could be found in the stock library, and the resulting rigged model format and set of bones were quite unwieldy for the game’s needs.
Cascadeur - is a groundbreaking 3D skeletal animation tool. One of Cascadeur's standout features is its advanced physics-based animation system. Using principles of physics and biomechanics, Cascadeur can generate organic and lifelike movements that adhere to the laws of physics by specifying just a few key poses. Demo reel looks amazing. Its UI is quite sophisticated and not easy to grasp and use efficiently without spending time learning it though. The resulting rigged model format and set of bones are also not fully compatible with the game’s needs.
Both Lightwave and Blender - could be used, but both are mature complex tools with overwhelmingly large sets of features and it would have taken more time to learn them.
After tinkering with distorts, it appeared that the task was not so complicated. I could take an idling unit animation, fold its arms and make it look around. Voila - idle Baker looking out of his Mill! That ought to do it for simple animations, but more unique ones still required an animation to be created from scratch.
Choosing to develop custom animation tools presented a compelling alternative. Such an approach would allow to tailor the animation tool’s features and capabilities to the specific needs of Knights Province (which are quite minimalistic). It would keep unneeded features out (and keep the UI clean of their clutter). Third important point is WYSIWYG - animations would look exactly the same in the tool used to create and alter them as in the game. Moreover, the process of creating personalized animation tools offers a valuable learning experience and better understanding of the animation workflow.
Armed with the KISS principle (keep it simple, stupid), two separate tools were planned and made, each one focusing on one aspect of the games animations creation process:
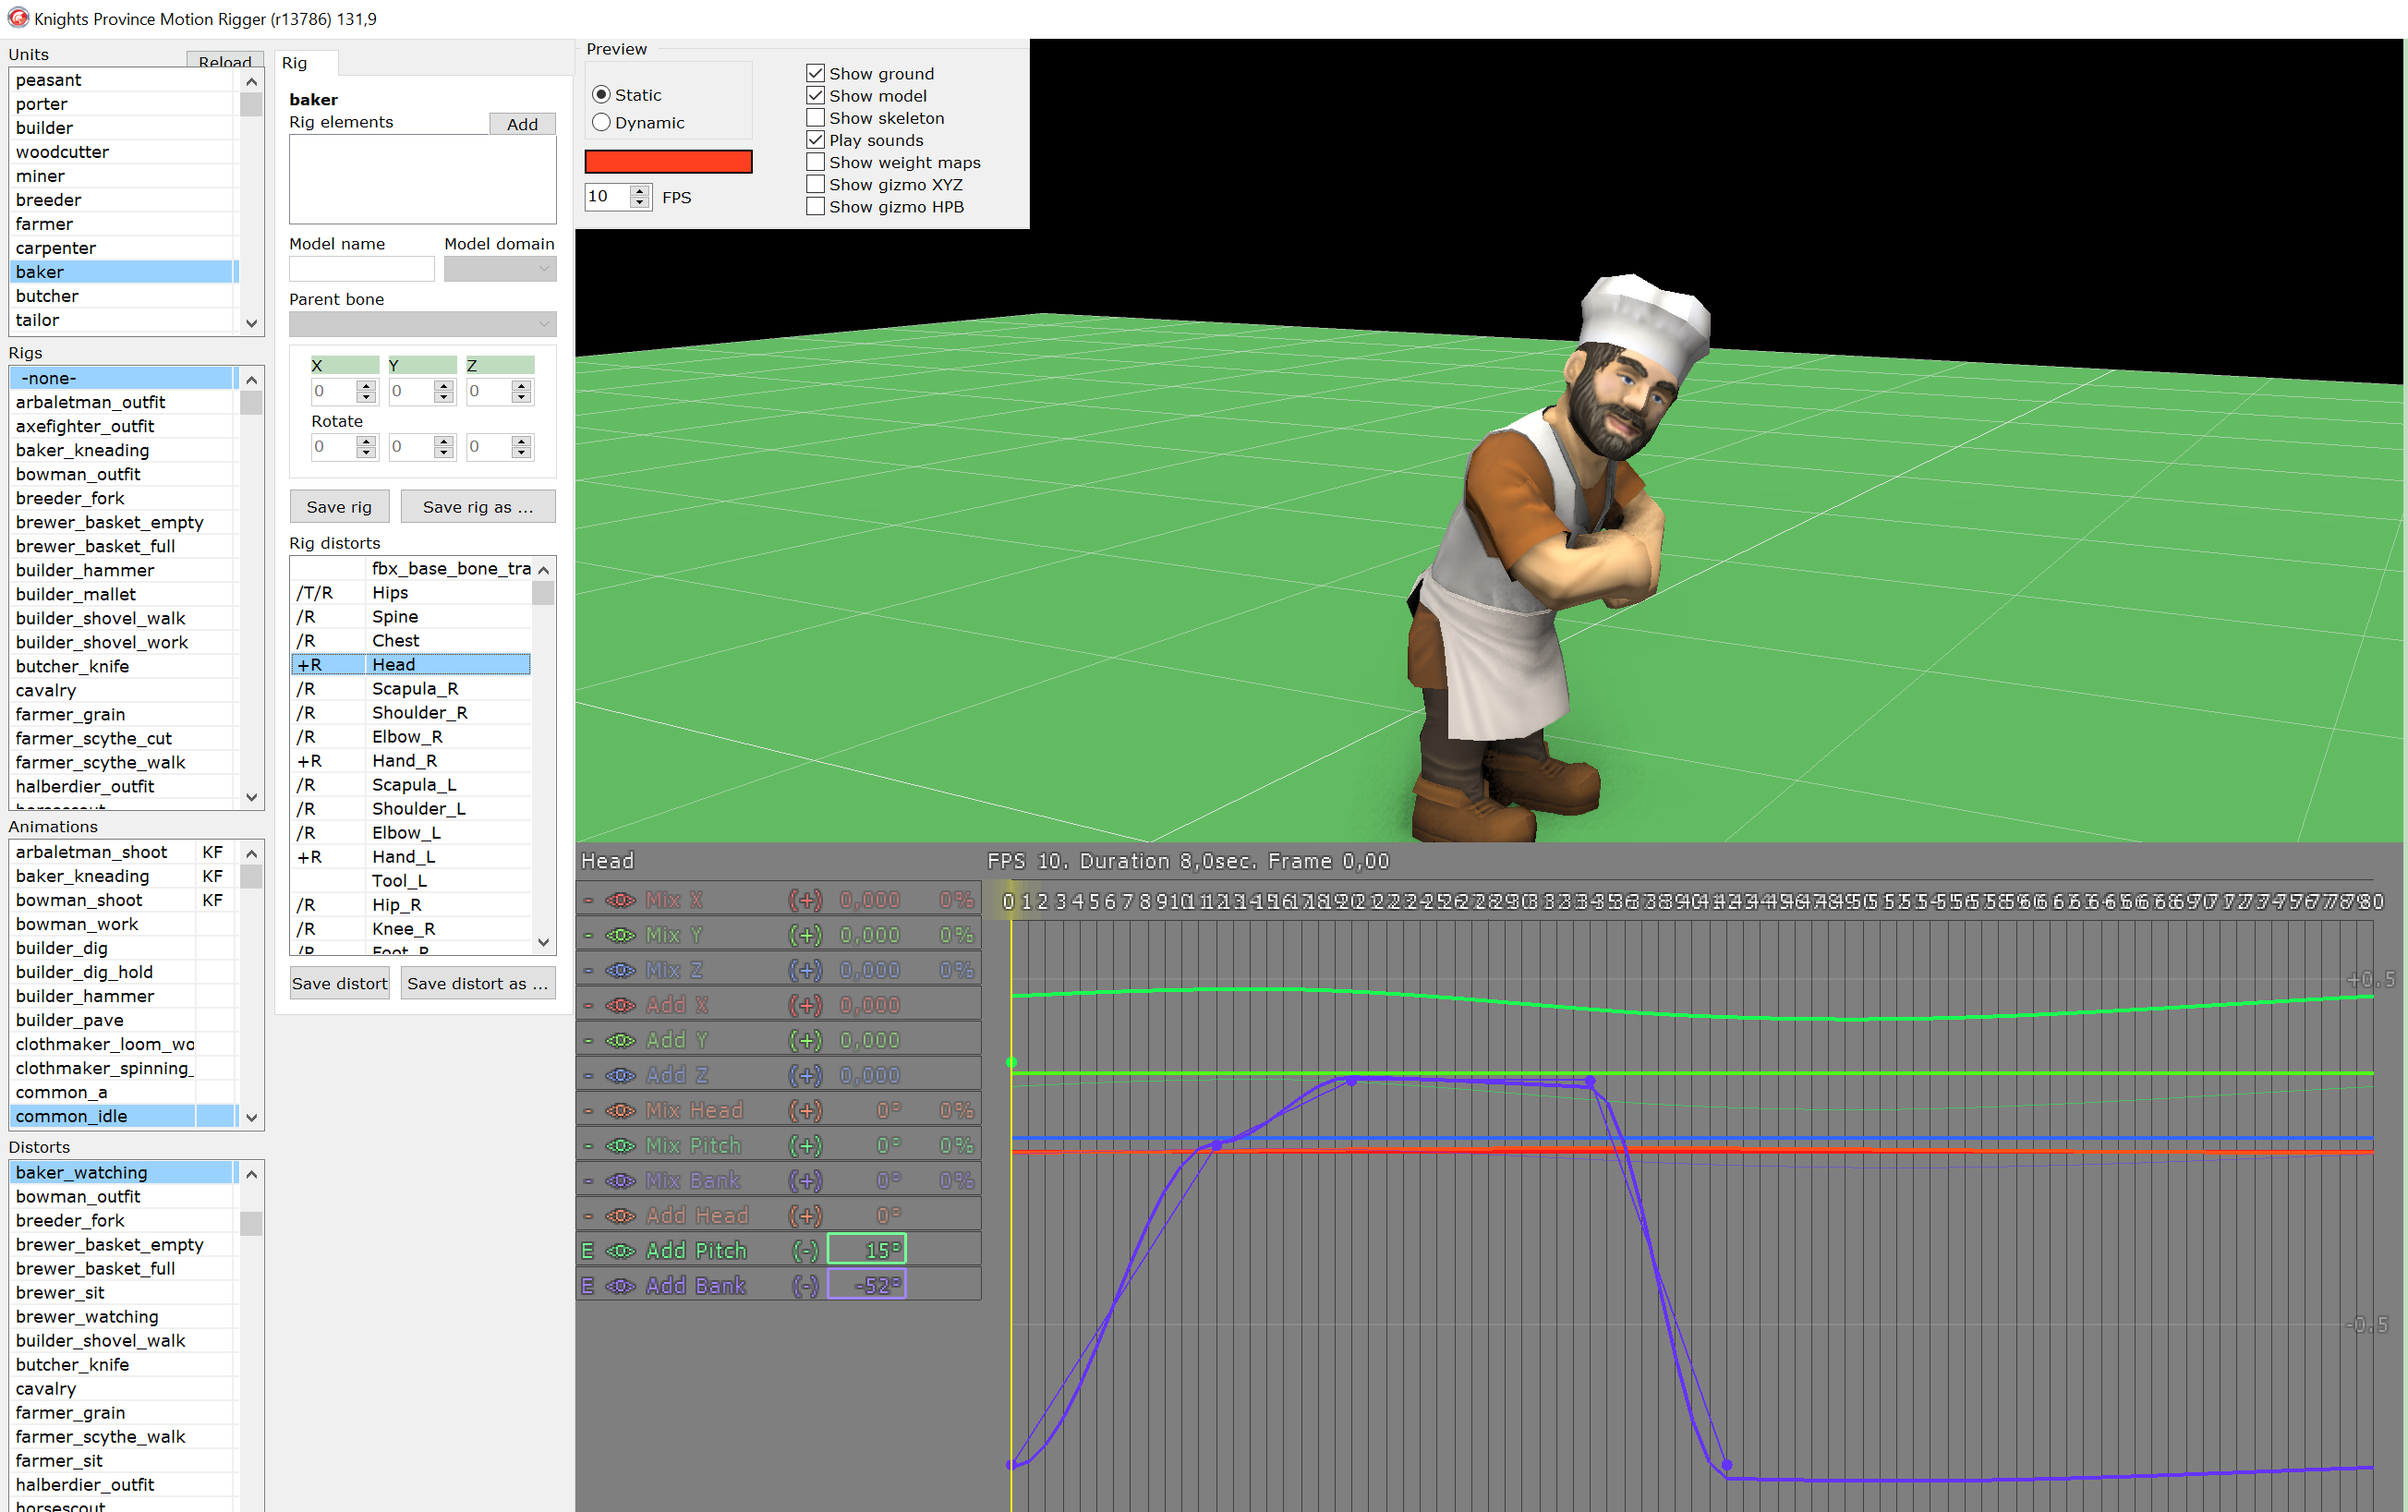
Motion Rigger - a tool allowing to interactively set up Rigs and Distortions (since both are closely related and co-dependent). Handy for cases where base idle unit animation is almost enough, but the base unit’s pose needs to be changed to a leaning one and the head movement added.
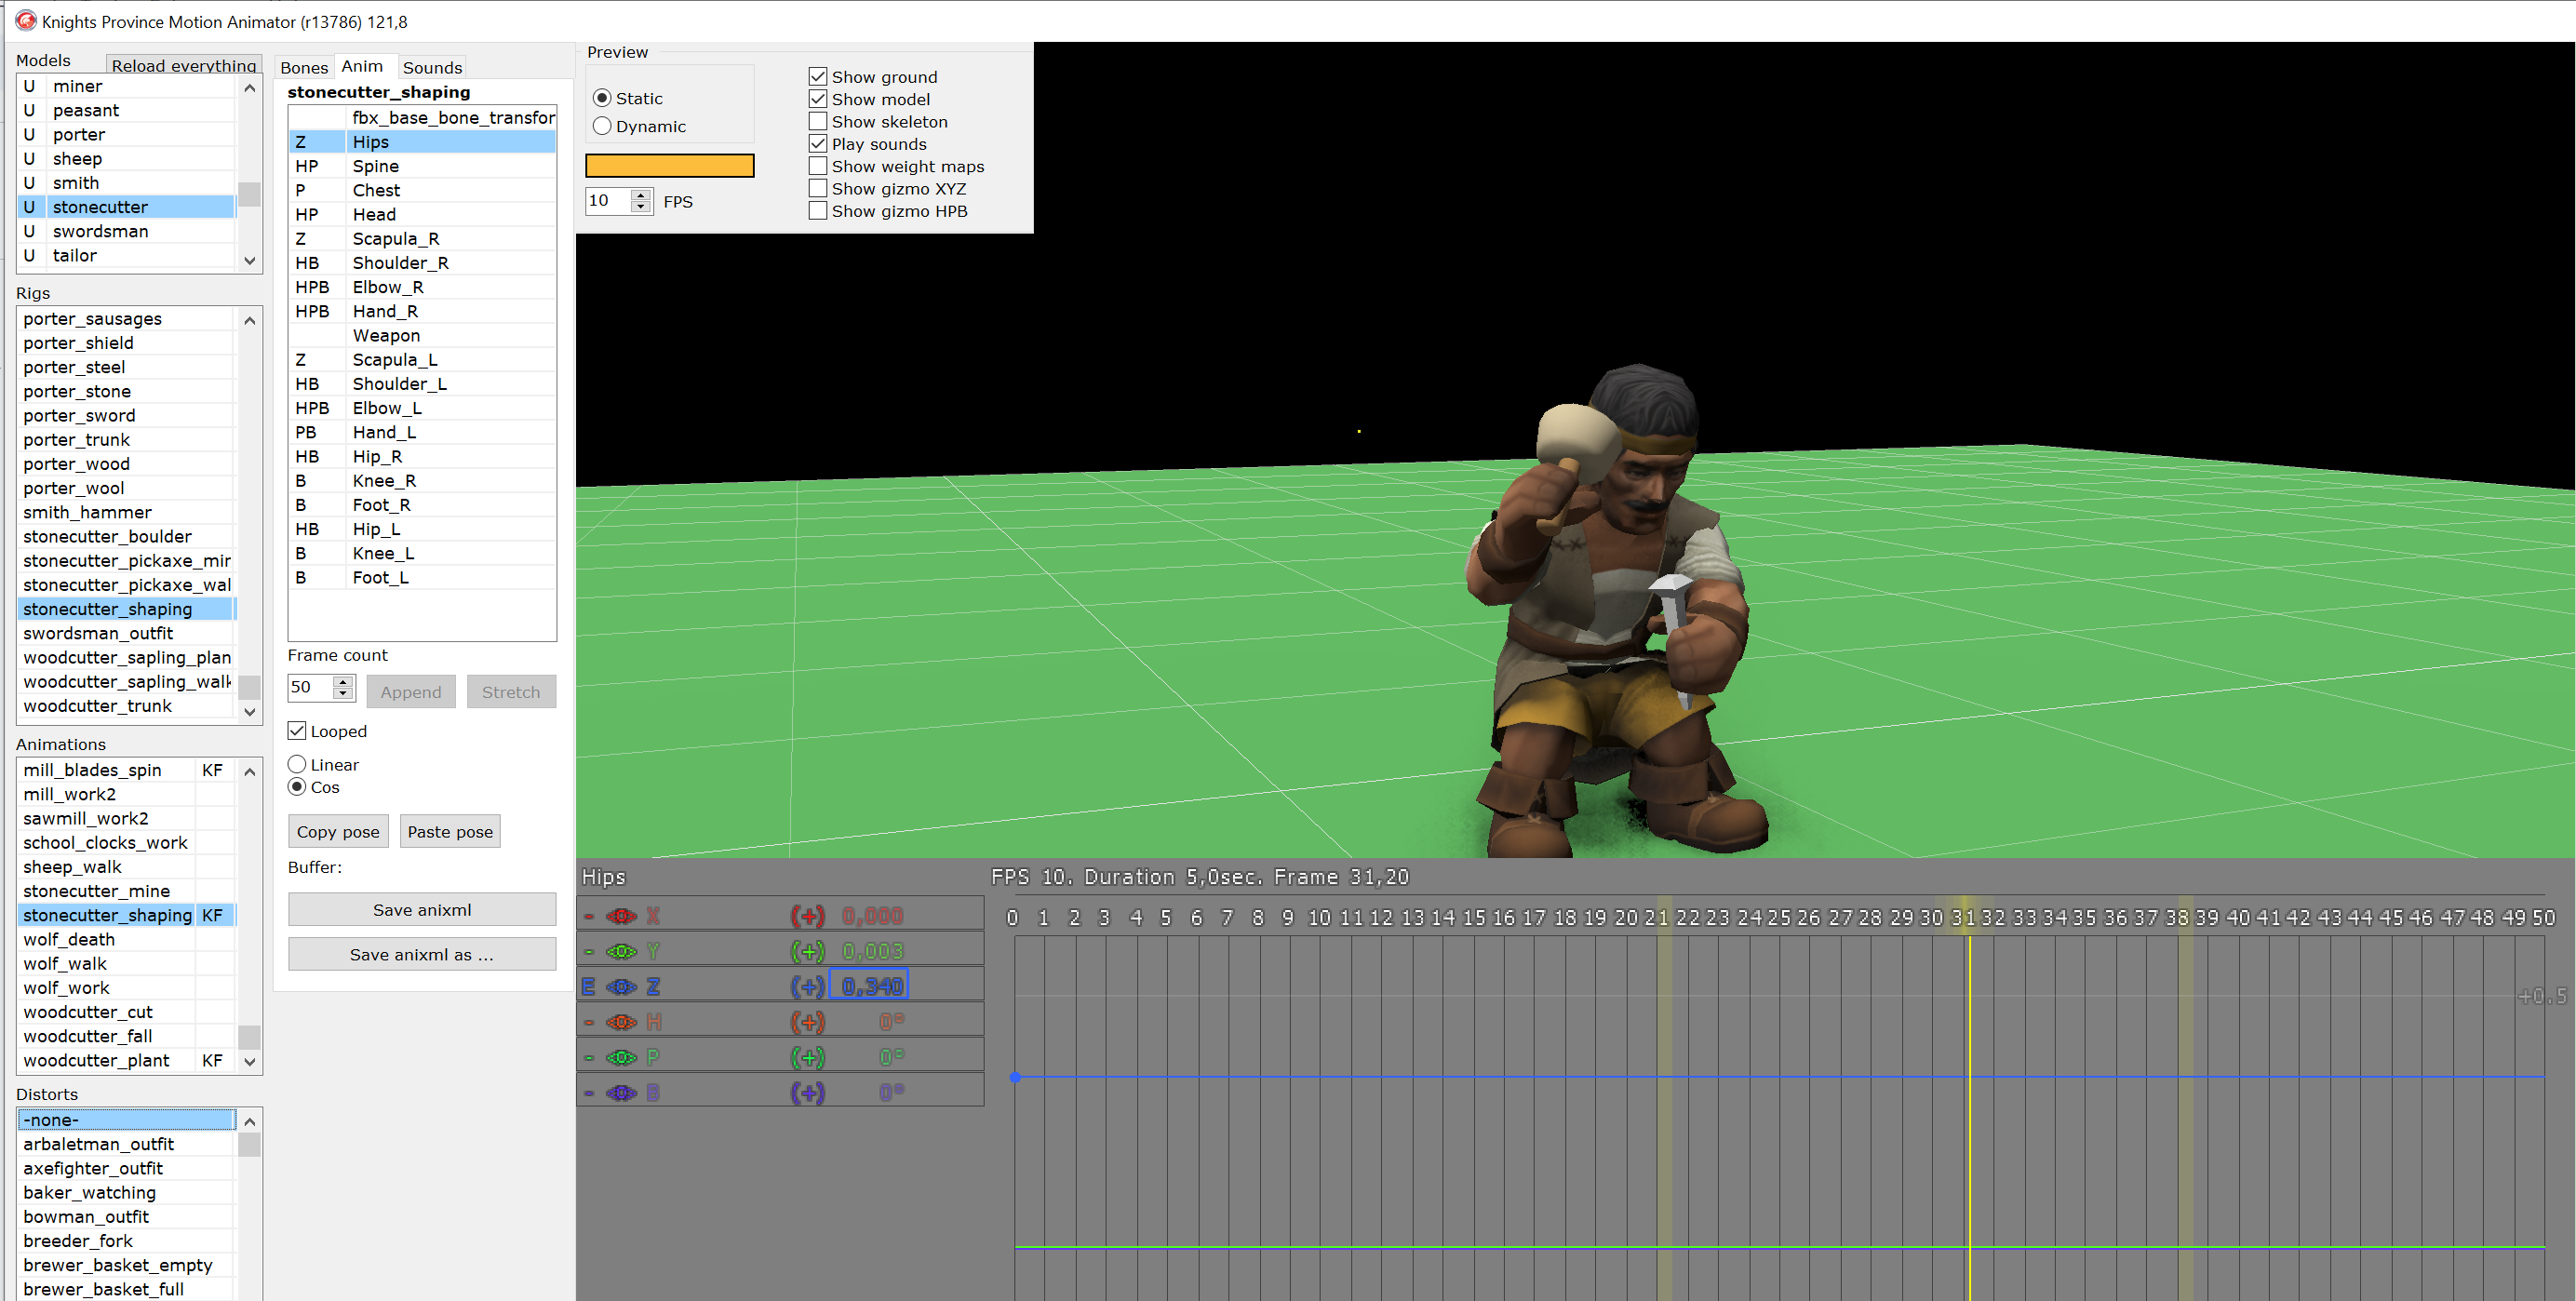
Motion Animator - a tool for creation of new animations from scratch. Sometimes it is just simpler to create something from a blank slate. A good example is Stonecutters animation of sitting on a stool and shaping a boulder with a hammer and chisel into smaller stones.
Most of the time creating these tools was spent in two big areas:
Creation of UI - one of the main UI elements in both tools is the timeline. It’s there to control the skeleton bones movements over the animation length. This is done with keyframes - frames where exact bone orientations are set (majority of the time bones only rotate, they don’t change their length or offset). Orientation between keyframes is interpolated. Thus, allowing to set up a whole animation with just a few key poses (for both animations and distorts).
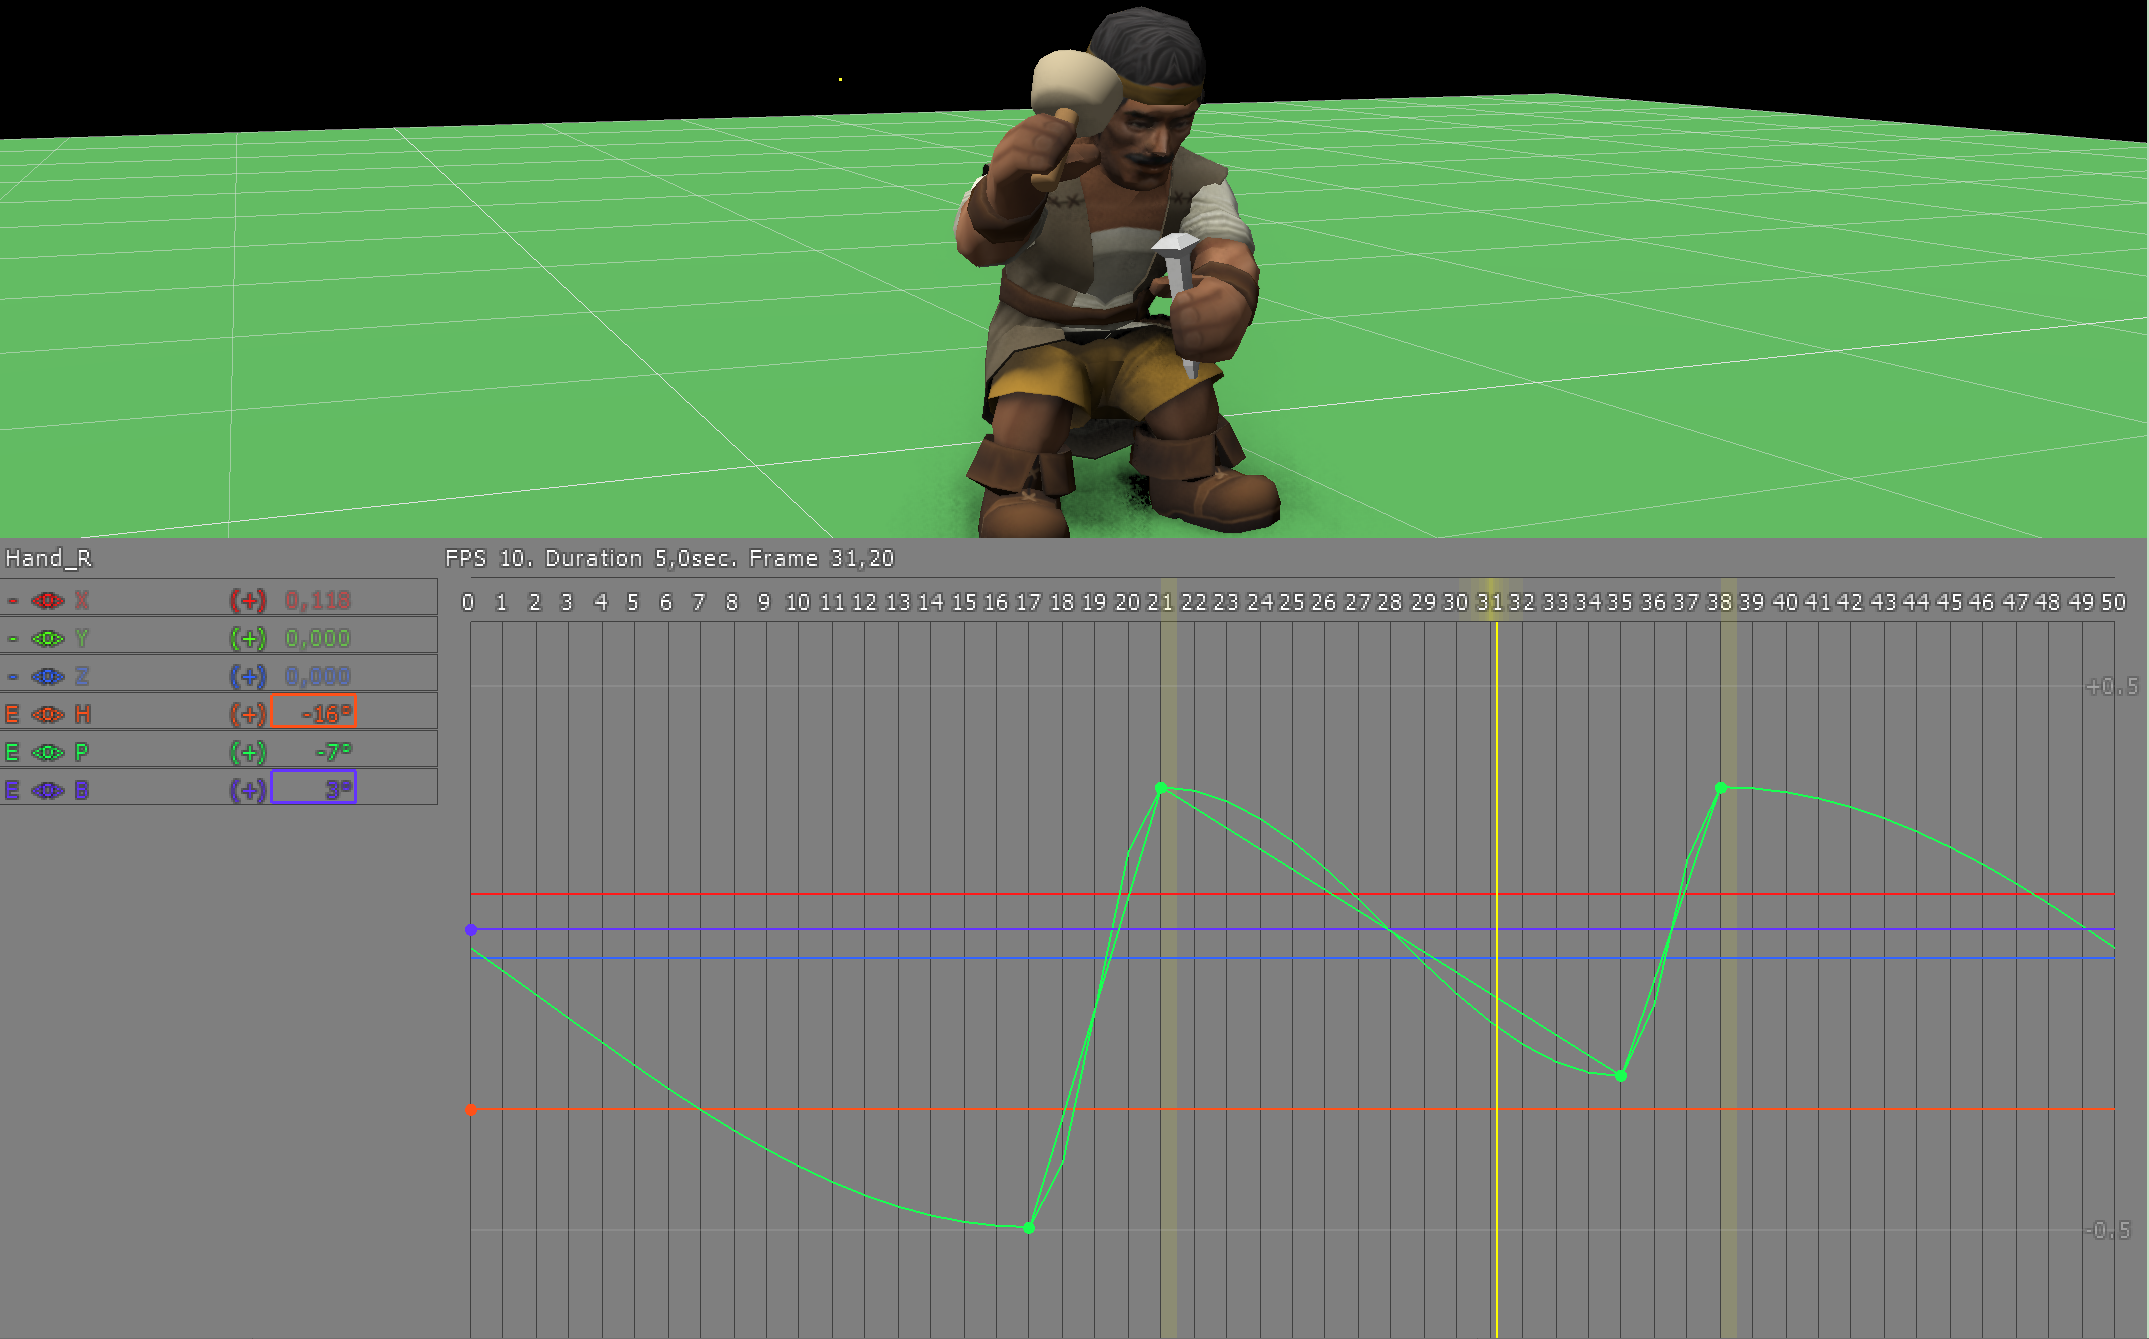
Timeline was created using games GUI elements with slight modification and expansion. For example, the lines themselves are based off of the game results charts. It would be next to impossible to make it in the VCL, which is good for simple interfaces, not the interactive charts. Overall I’m very happy about how it turned out. Knights Province GUI library is a powerful tool.
Creation of the Underlying Algorithms and Data Structures - animations sound easy on the surface, but there are several caveats. Firstly there’s groundwork required to allow for storage of the animation data with new keyframes information. Game’s older animation format used md5-like text files with aux data on a side. It was time to switch to something more structured and orderly - like XML. Another rework was concerning rigs and distorts - they were stored in the same file and processed in one flow, which is incorrect, since they are not really dependent on each other. Skeletal models handling had to be made more abstract, since before that it was assumed to be handling only units (with full skeletons). Game’s animation library itself was reworked and optimized, removing duplicate walk and idle animations (which the game had plenty of). Animations timing was also retouched, so that e.g. projectiles (and their sound effect) could be launched the instant the unit animation says so, but be “delayable” as the game engine needs it (to make archers act in slight dissonance).
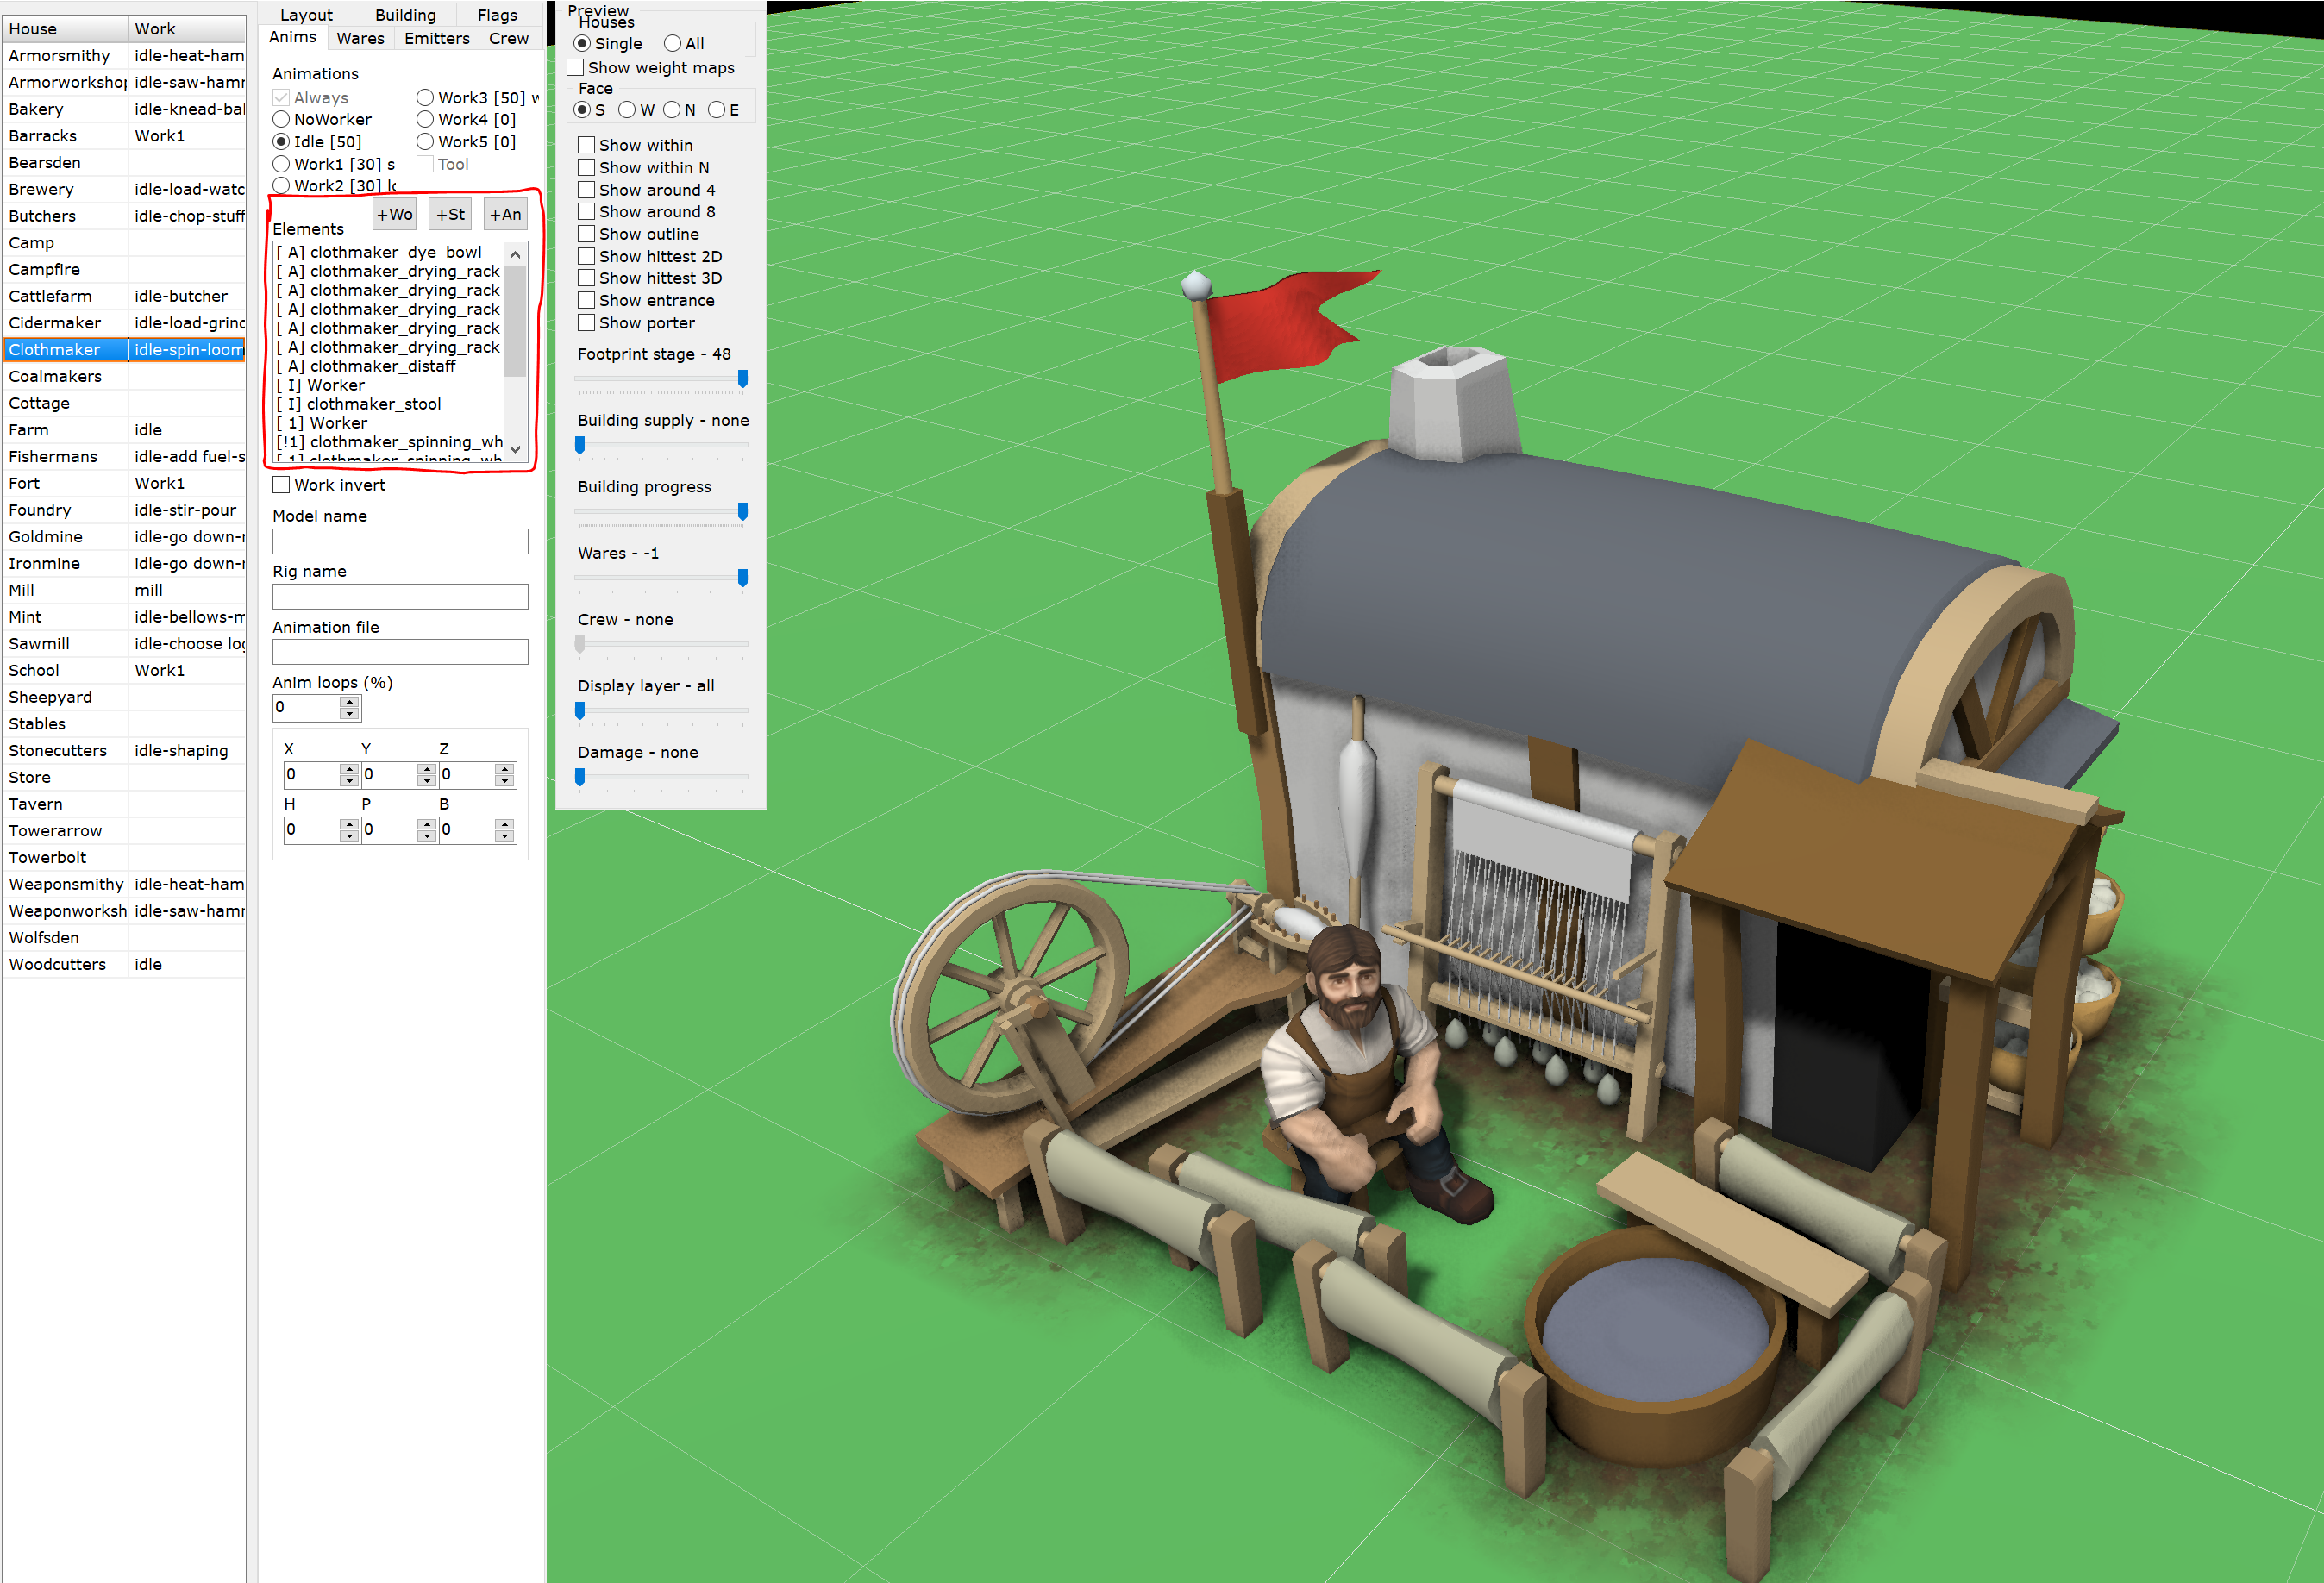
To top it all off, there’s the PreviewHouse tool that was upgraded to allow it to set up and position workers, static and animated elements tied to certain house animations (which were refactored as well).
Creating the tools is one thing, creating the workflow is another level. Thanks to the tools sharing a lot of code and elements, being WYSIWYG and easily tweakable, the workflow came out naturally. Now the doors are open and the main limiting factor of animating the game to the brim is creativity (and time). Small note, mounted units are still an open question, but that’s a call for a future Krom.
Whole thing took around 5 weeks and ~400 commits. That’s a big hunk of work. Am I happy with the result - absolutely! Tools are simple, yet effective enough, allowing to create and tweak animations WYSIWYG, being fully modifiable and expandable. Now I’m feeling confident about in-house animations implementation, workflow and tools - they are here to stay.
Knights Province began its life almost exactly 10 years ago now with first semi-serious pre-production renders being made in the 3rd decade of September 2023 followed shortly by first code work. What a huge and never ending journey it led up to this day and beyond! On that note, I’m happy to reveal that Alpha 12 release is nearing!
Setting the Scene - Animations help create the right vibe in the game. They make the town and its people seem alive and active, adding a lively feel to the game world.
Reinforcing the idea that Building Stuff Feels Good - The game is all about taking your time to build a town, and animations make that process enjoyable to watch. Seeing buildings go up, trees and grain grow, and resources being moved around and processed keeps the game engaging and satisfactory.
Feedback that Works - Animations give feedback to players about execution of their orders. When you tell a building to be built, animations show the progress. It's a clear way to show what's happening.
Explaining How Things Work - Animations make it easier to understand complex game parts, like management and processing of resources. Seeing resources being gathered or worked on helps players grasp how the game economy works.
To sum up, animations are a big deal in Knights Province. They're not just there to look cool - they make the game feel relaxed, enjoyable, and engaging, exactly what the game aims to be.
Stepping one step down the abstraction ladder, it helps to categorize and describe what animations are there and which ones make the bigger impact (bang for buck). The most important ones are the units. They form up the majority of interactive and animated entities in the game. Each unit type has its own distinct look, tools and loads they carry and activities they do. Of course there are many other unit-less animations, but those ones are in a relative minority. We’ll focus on units for this article.
Breaking down an animated unit in the game, it consists of four parts: the unit model, rig (equipment), animation, and optional distorts.
Unit Model - The unit model is the visual representation of the unit in its base form. It includes the 3D character model, textures, and basic skeletal structure. This is the starting point for all animations and is what the player sees as the character. Typical unit starts his life in so-called A-pose:
Rig (Optional) - The rig in KP is a description of how different auxiliary parts get added to the unit - like a carry, work tools, interaction objects, etc. While optional, more than half of the unit`s time is spent having some rig applied. One additional use of the rigs is that due to game being still in development, rigs allow to easily take a base unit (e.g. Swordsman) and replace his default rig (sword and shield) with a rig containing a cap and an arbalet, thus making him look like a new unit (Arbaletman).
Animation - Animations are the movements and actions that bring the unit model to life. These include walking, attacking, working, or any other actions the unit can perform within the game. Animations are crucial for gameplay dynamics. Most of the animations are looped, meaning that they can be repeated seamlessly.
Distorts (Optional):
Distorts are additional alterations applied to the unit animation. They include changes in skeletal animation values and boundaries. For example Porter carrying a heavy load needs to have his arms bent to hold the load and slightly different walk animation so that it’s clear that the load is indeed heavy and a burden.
While the unit model and animation are essential, the rig and distorts add an extra layer of sophistication and visual appeal to the animated units within the game.
All 4 components working together allow one basic walk animation to be adapted to several dozens of uses.
Now, there’s a new spin on that system - in-house work animations. They have kept me intimidated since the beginning, since I’m not that experienced with skeletal animations and I didn’t spend a proper amount of time analyzing the requirements. It all seemed just too big and fuzzy. Now, finally, I have had enough time and focus to address the thing. Analyzing the problem is the first thing to do. While looking and acting very similar to the unit animations, in-house animations have several key differences:
Combining Several Skeletal Models - while some animations are very simple (e.g. idle units just chilling and looking sides) there are also quite complex animations involving independently animated mechanisms (e.g. Tailors spinning wheel, or Brewers cider press).
Working with Tools and Objects - units need to change tools they hold and some of the tools that the unit needs to work with require special treatment. One such example is a baker’s rolling pin, it needs to be making good contact with both of the baker’s hands. Dough had to be in the equation too.
Non-Looped Animations - some of the animations are just intermediary between others, e.g. a unit walking out of his house into the working areas. It starts in one place and ends in another, without rewinding back. Others are seemingly looped, but without interpolation between last and first frame (e.g. Mill blades, always rotate on and on) which technically makes it non-looped, just really well aligned.
Non-Animations - it is rather handy to use the same mechanism for non-animated elements. For example, it’s much more handy to model the Brewery ladder as a straight standalone object and then move it into place tilting the right amount by all three rotation axes.
Special Non-Skeletal Animations - waving house flags are a good example of such animations that are much easier to be made without skeletal structure. They use a special shader for that and are not part of the in-house animations focus, same as burning particle effects.
Knowing the approximate set of requirements, it was time to evaluate possible solutions. Biggest problem seemed to be creating unit animations. Main requirement was a standalone tool focused on one thing that it does well. Preferably free or open-source, or at least not very expensive:
AccuRIG - a tool for automatic rigging of the skeletal models (here, the term “rig” is used in it’s industrial standard meaning - it refers to the creation of the skeleton and setting up vertex weights for the bones that affect those vertices). The tool features a big set of sample animations, some of which could be suitable for the Knights Province. Unfortunately, not all animations could be found in the stock library, and the resulting rigged model format and set of bones were quite unwieldy for the game’s needs.
Cascadeur - is a groundbreaking 3D skeletal animation tool. One of Cascadeur's standout features is its advanced physics-based animation system. Using principles of physics and biomechanics, Cascadeur can generate organic and lifelike movements that adhere to the laws of physics by specifying just a few key poses. Demo reel looks amazing. Its UI is quite sophisticated and not easy to grasp and use efficiently without spending time learning it though. The resulting rigged model format and set of bones are also not fully compatible with the game’s needs.
Both Lightwave and Blender - could be used, but both are mature complex tools with overwhelmingly large sets of features and it would have taken more time to learn them.
After tinkering with distorts, it appeared that the task was not so complicated. I could take an idling unit animation, fold its arms and make it look around. Voila - idle Baker looking out of his Mill! That ought to do it for simple animations, but more unique ones still required an animation to be created from scratch.
Choosing to develop custom animation tools presented a compelling alternative. Such an approach would allow to tailor the animation tool’s features and capabilities to the specific needs of Knights Province (which are quite minimalistic). It would keep unneeded features out (and keep the UI clean of their clutter). Third important point is WYSIWYG - animations would look exactly the same in the tool used to create and alter them as in the game. Moreover, the process of creating personalized animation tools offers a valuable learning experience and better understanding of the animation workflow.
Armed with the KISS principle (keep it simple, stupid), two separate tools were planned and made, each one focusing on one aspect of the games animations creation process:
Motion Rigger - a tool allowing to interactively set up Rigs and Distortions (since both are closely related and co-dependent). Handy for cases where base idle unit animation is almost enough, but the base unit’s pose needs to be changed to a leaning one and the head movement added.
Motion Animator - a tool for creation of new animations from scratch. Sometimes it is just simpler to create something from a blank slate. A good example is Stonecutters animation of sitting on a stool and shaping a boulder with a hammer and chisel into smaller stones.
Most of the time creating these tools was spent in two big areas:
Creation of UI - one of the main UI elements in both tools is the timeline. It’s there to control the skeleton bones movements over the animation length. This is done with keyframes - frames where exact bone orientations are set (majority of the time bones only rotate, they don’t change their length or offset). Orientation between keyframes is interpolated. Thus, allowing to set up a whole animation with just a few key poses (for both animations and distorts).
Timeline was created using games GUI elements with slight modification and expansion. For example, the lines themselves are based off of the game results charts. It would be next to impossible to make it in the VCL, which is good for simple interfaces, not the interactive charts. Overall I’m very happy about how it turned out. Knights Province GUI library is a powerful tool.
Creation of the Underlying Algorithms and Data Structures - animations sound easy on the surface, but there are several caveats. Firstly there’s groundwork required to allow for storage of the animation data with new keyframes information. Game’s older animation format used md5-like text files with aux data on a side. It was time to switch to something more structured and orderly - like XML. Another rework was concerning rigs and distorts - they were stored in the same file and processed in one flow, which is incorrect, since they are not really dependent on each other. Skeletal models handling had to be made more abstract, since before that it was assumed to be handling only units (with full skeletons). Game’s animation library itself was reworked and optimized, removing duplicate walk and idle animations (which the game had plenty of). Animations timing was also retouched, so that e.g. projectiles (and their sound effect) could be launched the instant the unit animation says so, but be “delayable” as the game engine needs it (to make archers act in slight dissonance).
To top it all off, there’s the PreviewHouse tool that was upgraded to allow it to set up and position workers, static and animated elements tied to certain house animations (which were refactored as well).
Creating the tools is one thing, creating the workflow is another level. Thanks to the tools sharing a lot of code and elements, being WYSIWYG and easily tweakable, the workflow came out naturally. Now the doors are open and the main limiting factor of animating the game to the brim is creativity (and time). Small note, mounted units are still an open question, but that’s a call for a future Krom.
Whole thing took around 5 weeks and ~400 commits. That’s a big hunk of work. Am I happy with the result - absolutely! Tools are simple, yet effective enough, allowing to create and tweak animations WYSIWYG, being fully modifiable and expandable. Now I’m feeling confident about in-house animations implementation, workflow and tools - they are here to stay.
Knights Province began its life almost exactly 10 years ago now with first semi-serious pre-production renders being made in the 3rd decade of September 2023 followed shortly by first code work. What a huge and never ending journey it led up to this day and beyond! On that note, I’m happy to reveal that Alpha 12 release is nearing!
Share: