Clouzy! - keking26
Hey everyone! Yeray from the Tinymoon team here! We have some exciting news to share: our official release date announcement!


Clouzy! will be officially launching on February 24, 2022 on Steam, Epic Games Store, and Xbox!

We can’t wait to finally share Clouzy with you all! As always, thank you for all of the love and support you’ve given us since the beginning. If you want to join our community, feel free to join our Discord. We’d love to hear from you all as we get closer and closer to launch!
Police Simulator: Patrol Officers - wladi | astragon


Hey everyone,

Quite recently we released The Operation Anti-Drug Update, which introduces some new game features like drug dealers. It also adds Brickston as the third playable district to our open-world map. How we created the map including road and building generation is what we want to focus on in this article.

We are Jonas Reich and Philipp Brasin, two Tech Artists from the team at Aesir Interactive, and we would like to take this opportunity to show you how we approached the creation of the open-world environment and how we integrated Houdini in our custom procedural content pipeline inside Unreal Engine 4.

Going Procedural

After developing the Windstorm games, we already had some experience with open-world level creation at Aesir Interactive. Those games were mostly set in the countryside without any traffic or NPCs taking a stroll. We knew that we'd have to up our game for PS:PO if we wanted to fill a densely populated city with content that allows interesting exploration on foot while still being large enough to allow travel by car.

Creating big cities like this from scratch usually requires big level design and environment art teams consisting of dozens of people. We always planned with a relatively small team, so leveraging procedural workflows was the obvious choice. The goal was to use smart tools that would allow us to work as efficiently as possible and enable content creation with as few repetitive or mundane tasks as possible.

Visual Prototypes

During prototype development, our environment artists still placed everything manually. They could play around with ideas and still scrap everything without having to wait for tools to be adjusted to their needs.

We created two levels during this time:
  • A small prototype game map to showcase gameplay and atmosphere for a prototype meant to be submitted to the German funding body FilmFernsehFonds Bayern
  • An art vision scene without gameplay which had more refined visuals that acted as target visuals
Creating these maps helped us to determine how we wanted our artists and level designers to work and which steps in the process we wanted to simplify.

1: The art vision scene

Functional Prototypes

In parallel with these art prototypes, we already familiarized ourselves with the unique challenges of generating roads and buildings for Police Simulator: Patrol Officers by developing throwaway prototypes that were scrapped and completely redone shortly before we went into full production.

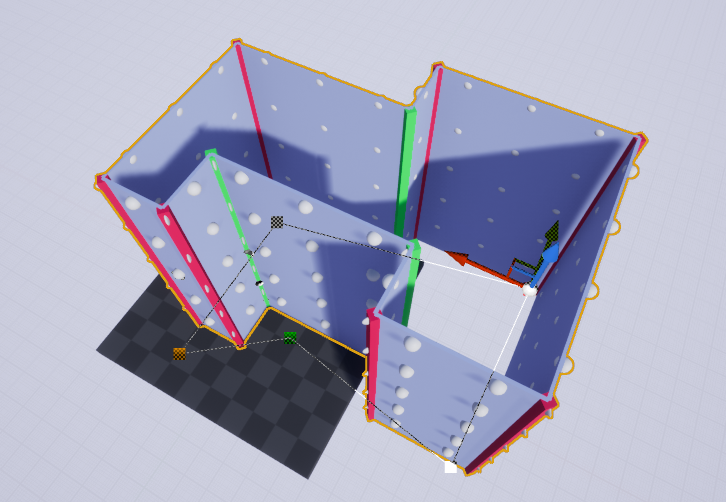
2: Prototype for generating building topology with module attach points (white spheres) from a UE4 spline outline


3: Graybox building shapes generated from Houdini. This version of the generator used Houdini-generated geometry instead of instanced static meshes.

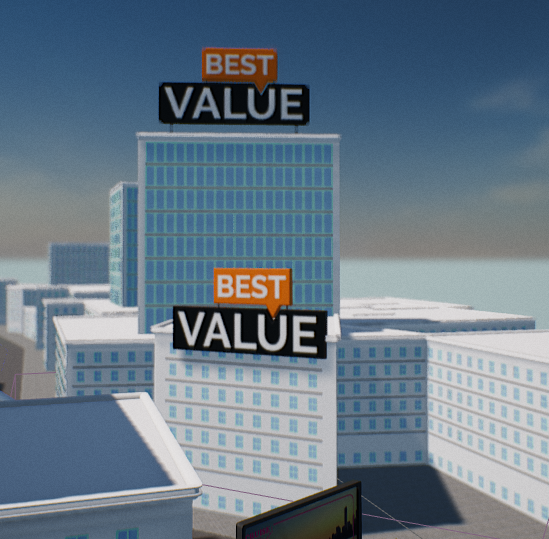
4: In-engine prototype for roads and bridges

Some of the features we tested here, such as the roads with elevations and bridges, were dropped to reduce the complexity of the tools and to allow a focus on what was essential for our gameplay purposes and scope.

Grayboxing and Planning

Going procedural naturally allowed us to iterate road layouts quite a bit. Still, the generation times of our Houdini generators were long, so we had to approximate the city with grayboxing tools for faster iteration times. To visualize these first design steps, we used HDAs that converted 2D drafts created in Photoshop to 3D models in real in-game size.

Trying out different road layouts was possible within minutes, which gave us a better feeling of the dimensions, scale and density of roads and buildings required for aesthetic and gameplay purposes.

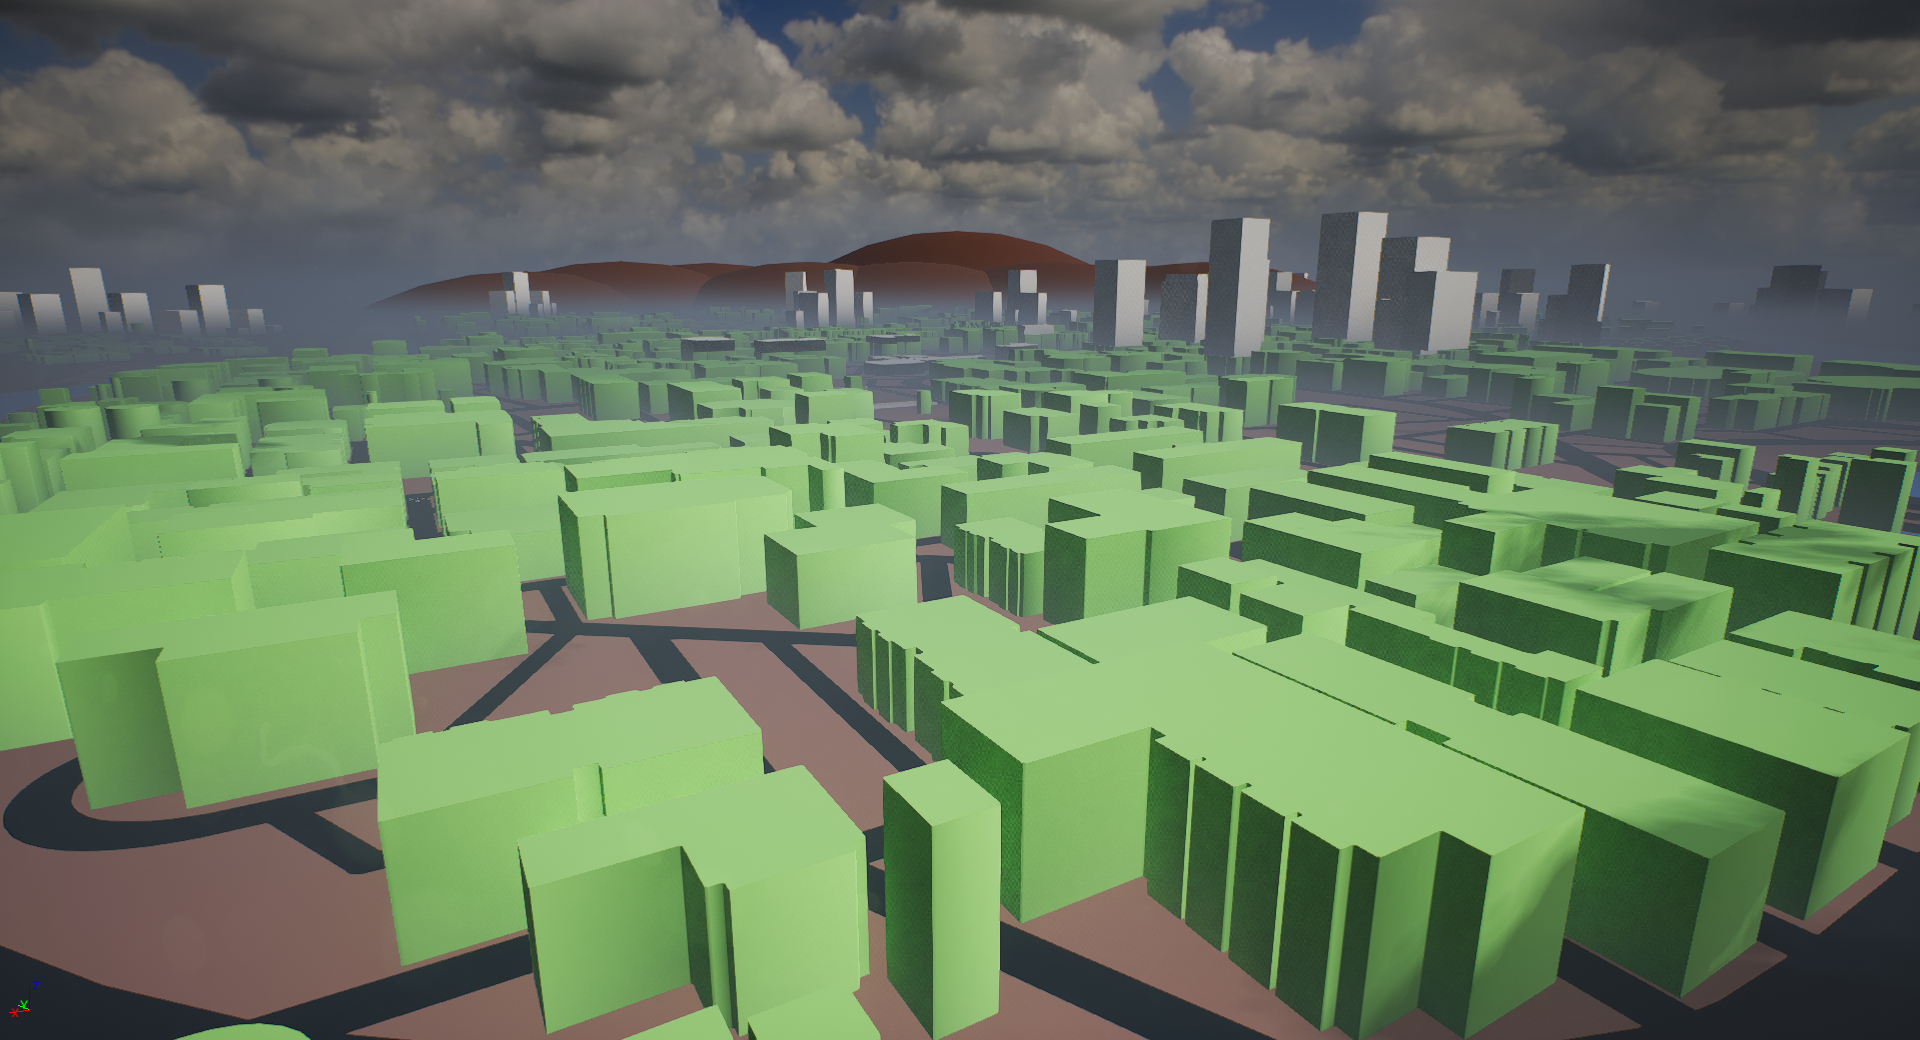
5: Graybox map generated from photoshop draft

6: Driving around in the graybox map to get a sense of scale

A different grayboxing tool was created to layout neighborhood and district areas using simple spline curves. The volumes generated from this tool were not only used for planning the layout but could also be loaded into our main generators to load area-dependent pools of materials and props.

7: The neighborhood area editor inside UE4

Road Generation

Let’s take a closer look at the first of our two big Houdini tools: The road generator is the source of all ground meshes (roads, sidewalks, curb stones, etc.) and the node network required for traffic simulation (see Road Generator Outputs below).

Road Generation Part 1: Road Editing and Rebuilding
Roads can be edited by our level designers using simple spline HDAs to get a preview of the road layout. This preview includes the rough topology of the roads (lane widths, shape, etc) as well as some meta data (connections to other roads, etc).

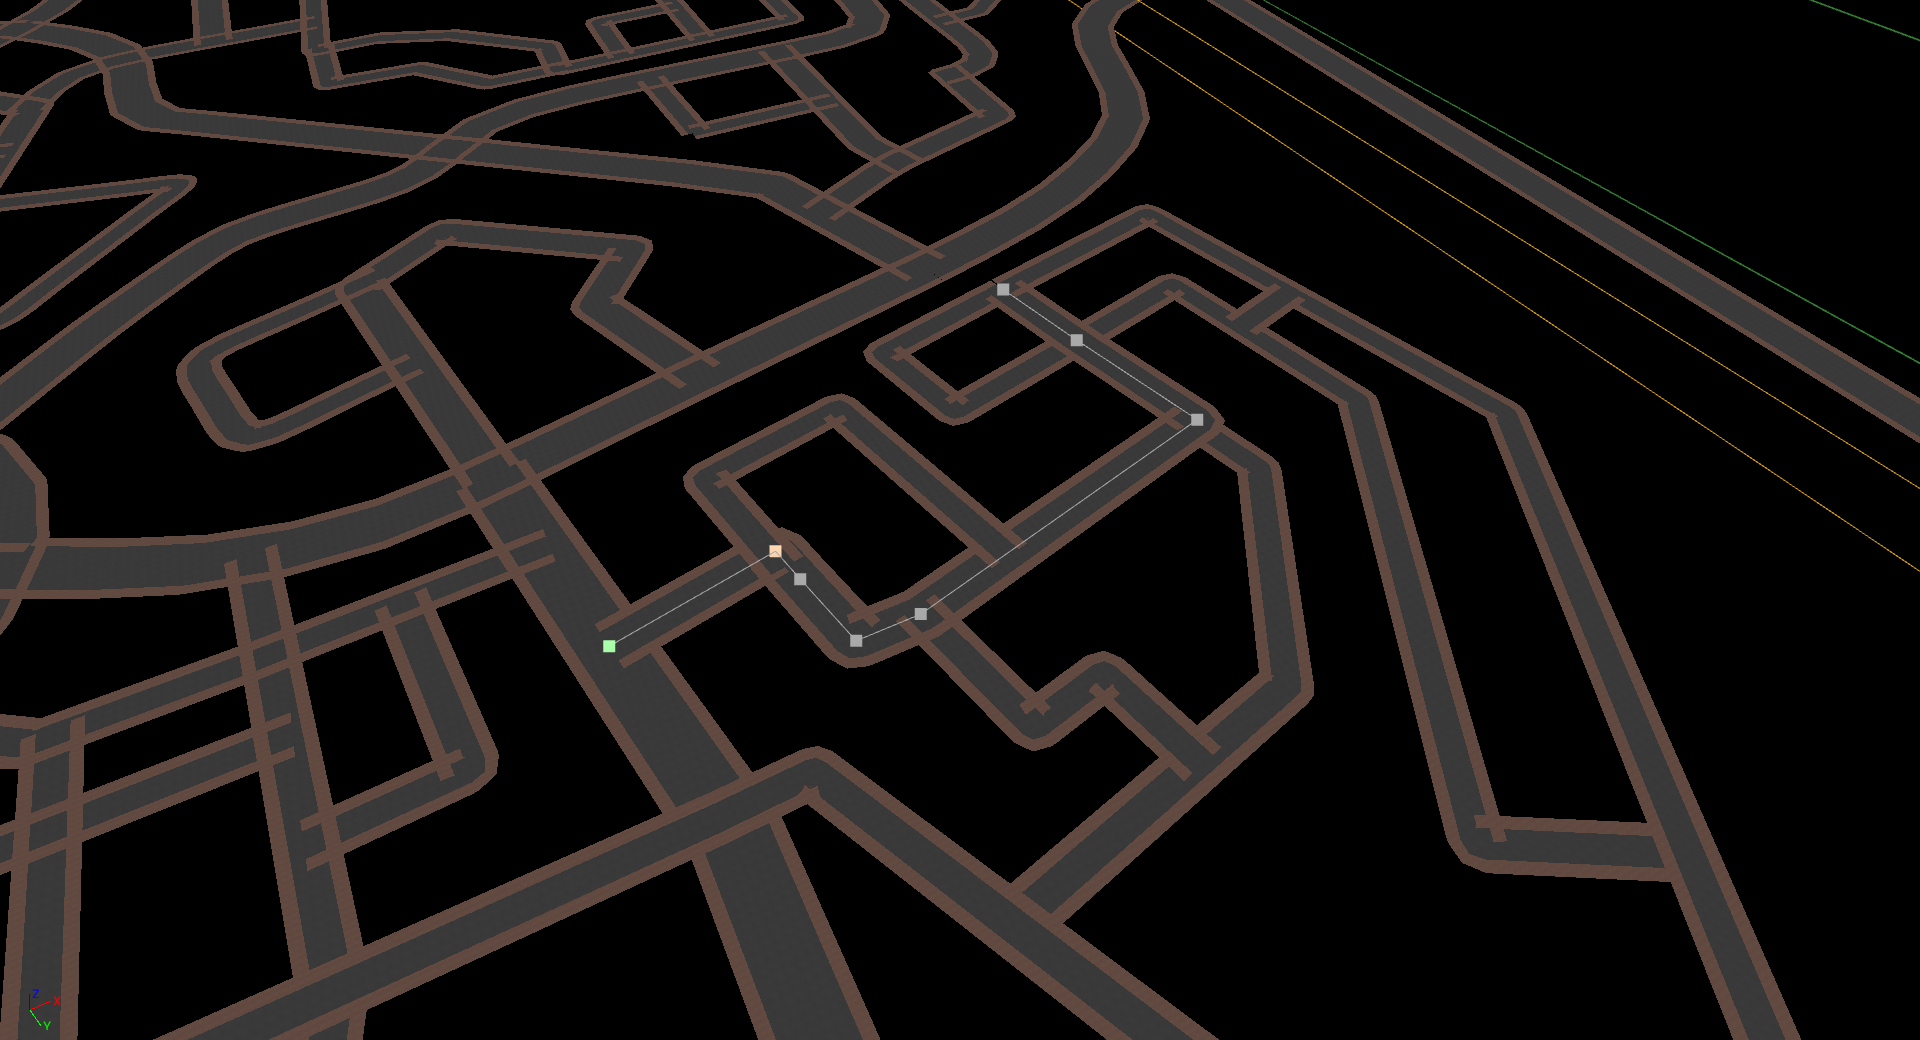
8: Preview road meshes. You can see the spline control points of the road that is selected

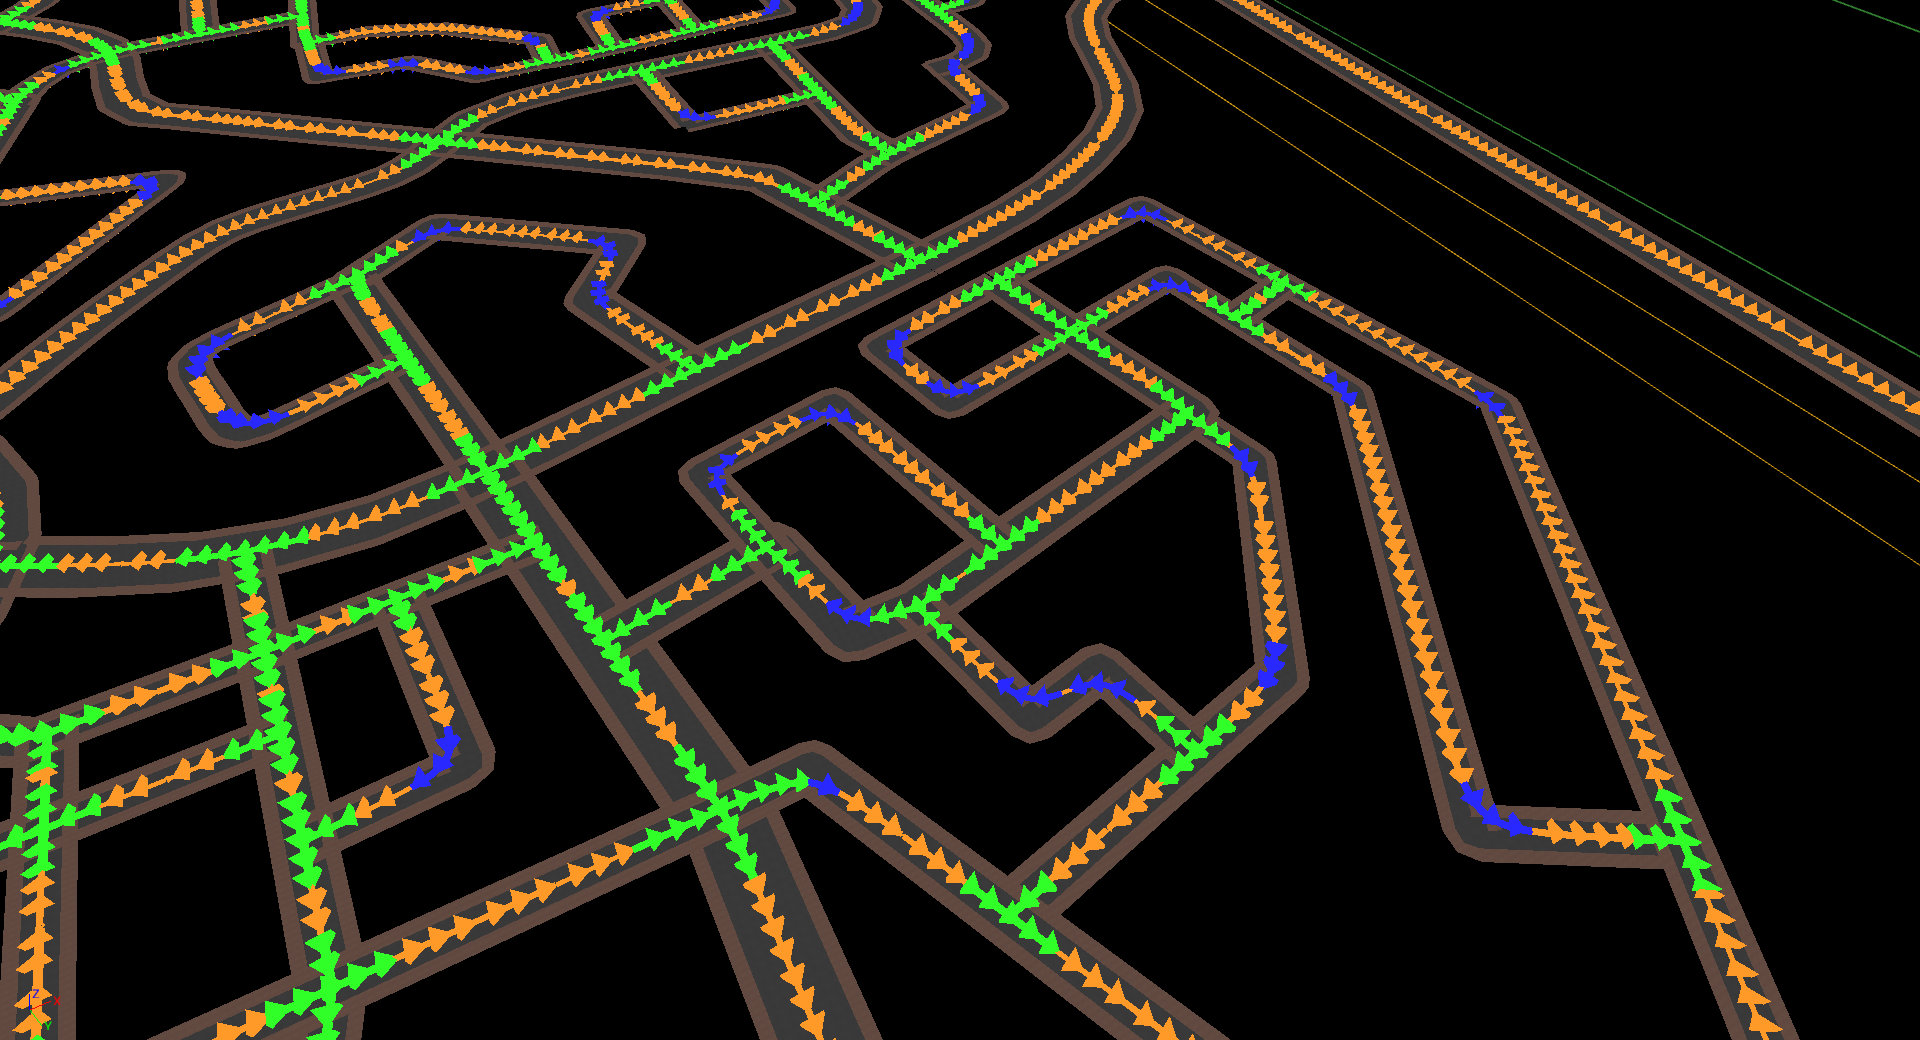
9: The road network preview shows color codes for intersections and sharp turns that help to check if the input splines are valid

There are a couple of restrictions for how roads can be connected, such as not allowing two oneway streets to be placed in a way in which traffic would cause a face-to-face collision. This preview helps level designers find mistakes early in the process, with fast iterations due to short generation times for the entire map.

Road Generation Part 2: Inside Houdini
The road generator consists of multiple geo-level HDAs which were split in a way that allowed the separation of different problem areas of the road generation. The first one of these generators takes care of generating all geometry for the roads and sidewalks. This is one of the more complex steps of the entire pipeline because we’re generating unique shapes for each intersection.

We decided early on that restricting ourselves to a finite set of
intersections with predetermined angles and lane configurations would not cut it because we considered this to be too limiting to our level designers.

Of course, there are still limits to how many roads you can connect, but those restrictions also apply to real-world intersections, so this is not a problem for us.

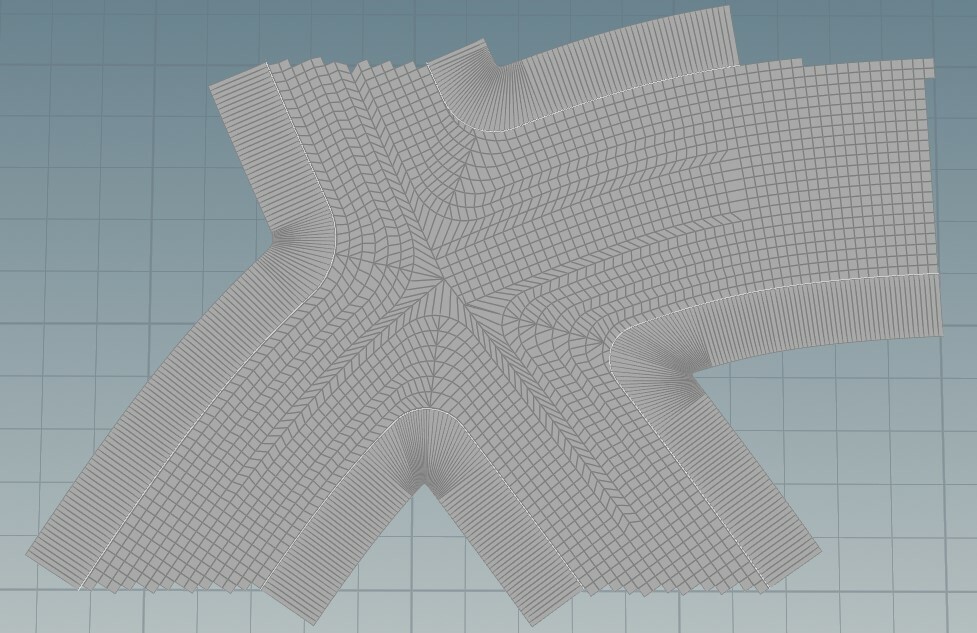
10: The detailed topology of two mesh chunks connecting roads of different sizes. Grid size: 5x5m

The intersections require the most complex geometry wrangling by far. Connecting them with road strips is relatively simple in comparison. After this is done, we have the basis for the next two parts of the generator:

On the one hand we need to generate some more geometry for all the areas between sidewalks. They are filled with ground meshes and strips of curbstones alongside the road edges. All these ground meshes are further refined by adding mesh decals and vertex colors for natural-looking wear and tear.

On the other hand, we have a complex traffic simulation in the game that needs to know the placement of roads, lanes, parking spots, etc. This data is also generated within Houdini. It is organized in a directed graph that contains meta information on speed limits and markup for traffic control objects such as signs and light signals.

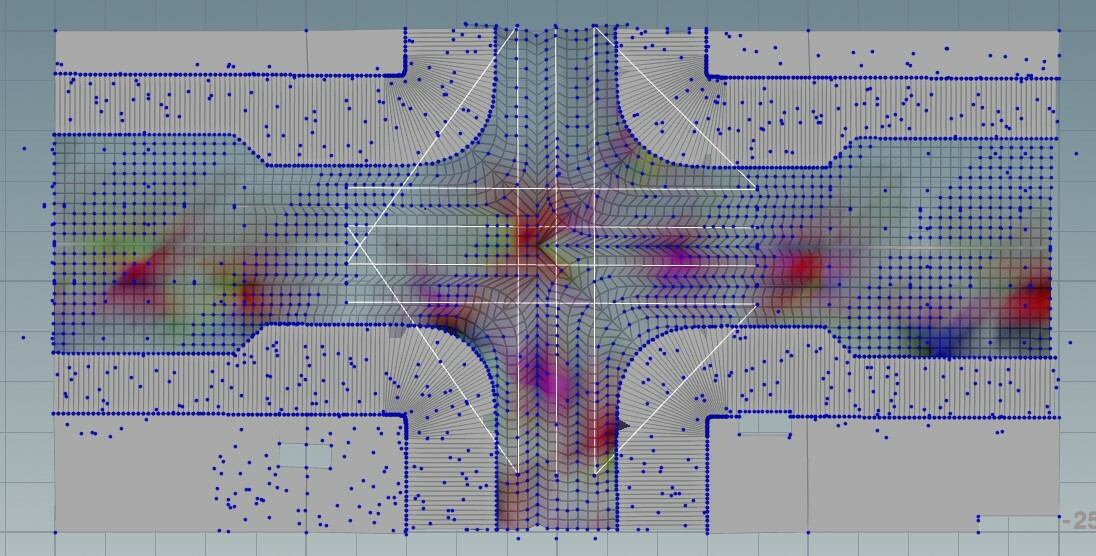
11: Final output of two chunks with instance points and traffic system data. It also contains meta information such as LOD class, navigation area class and more

Finally, we also scatter a bunch of props alongside the roads: Anything that is gameplay relevant like fire hydrants, signage or crosswalks come first, followed by beautification props including trees and trash cans. Not all the props are placed procedurally though: We always decide on a case-by-case basis whether it makes sense to include additional rules in our generators. For most cases it can be broken down like this: If any of the following questions can be answered with yes, it’s placed with Houdini - otherwise we go for manual placement.
  • Is it connected to the traffic system?
    • e.g. traffic lights, trees, signs
  • Does it visually align with streets and/or have very simple placement rules?
    • e.g. street lights
  • Do we need more than 50-100 instances in the level?
    • e.g. trees
Placement is realized with instancing point attributes to instruct Unreal Engine 4 which assets to place in which locations.

Road Generation Pt 3 - Road Generator Outputs
Let's take a look at the outputs of the road generator inside Unreal Engine! The generated meshes are divided into 50 by 50 meter chunks which are themselves grouped into streaming levels - we settled on a streaming level size of 150 by 150 meters, so there’s 9 Houdini chunks in one UE4 streaming level.

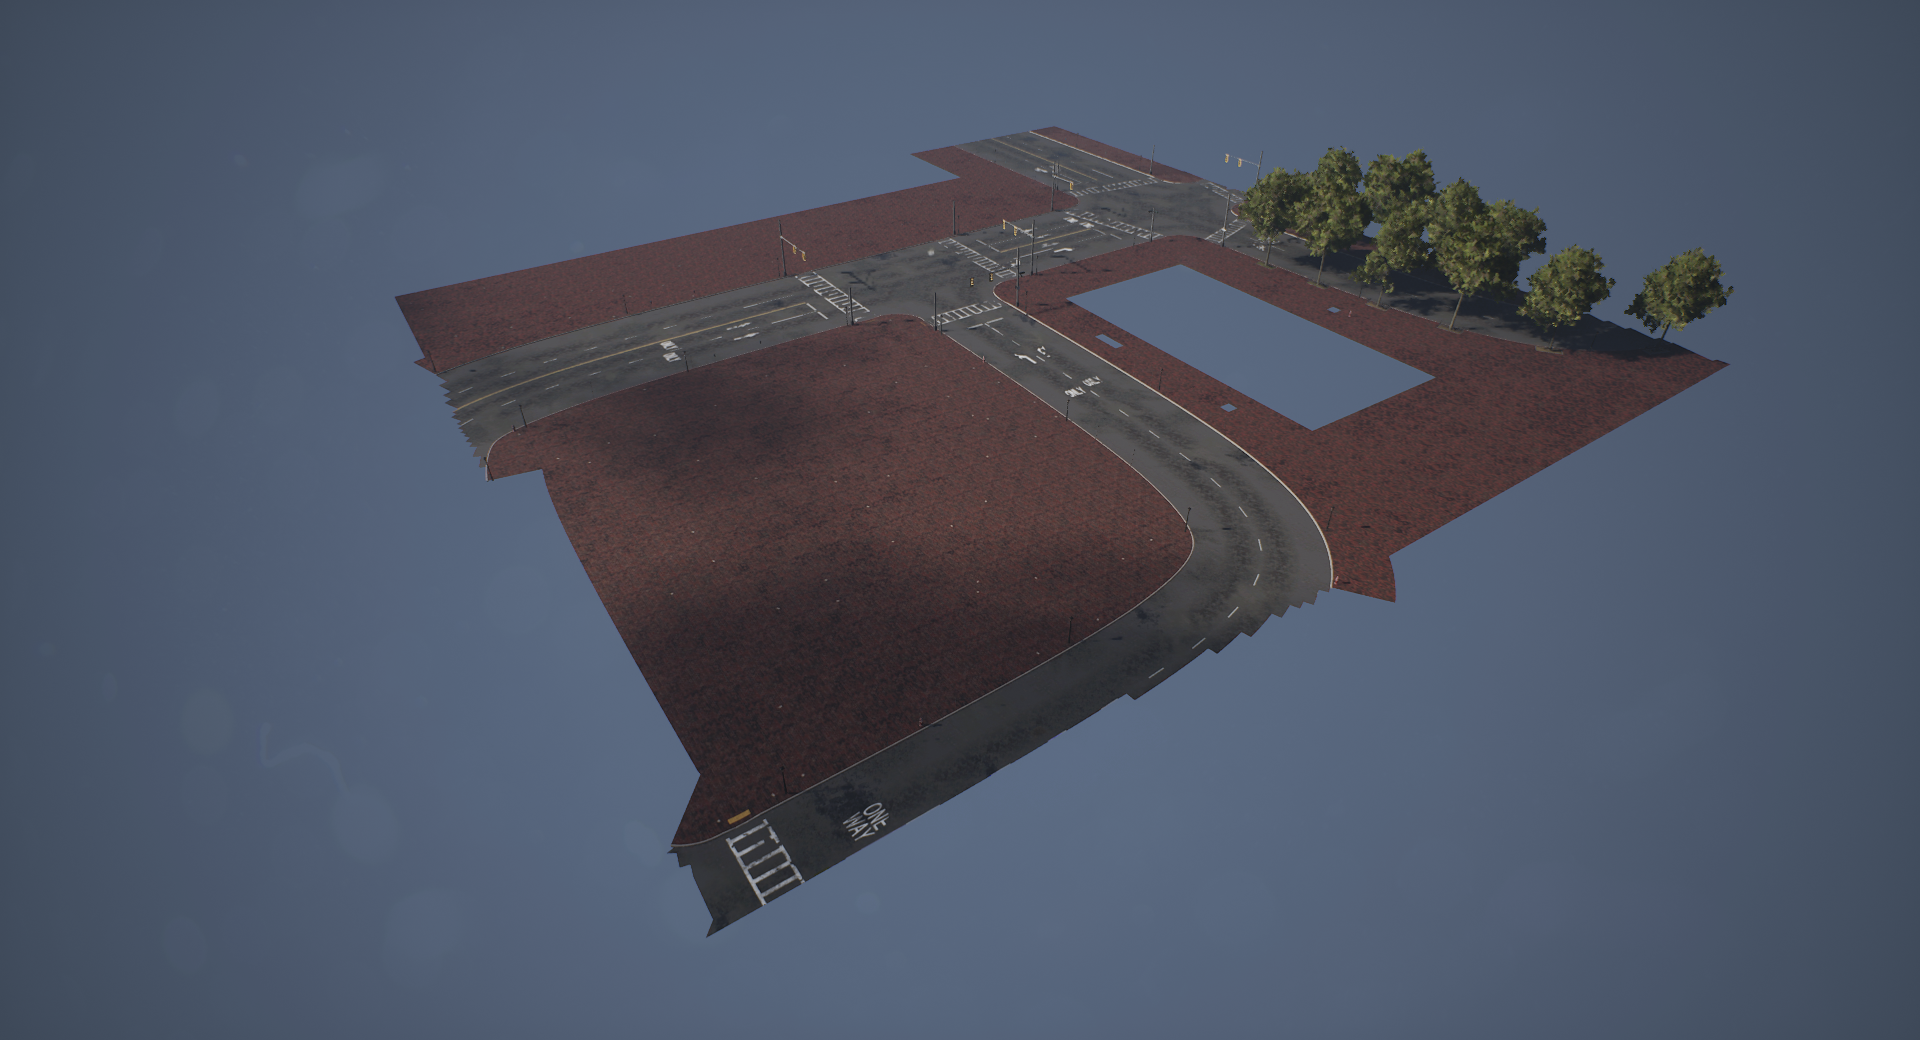
12: All of the Houdini-generated geometry and placed props for a single streaming level inside UE4

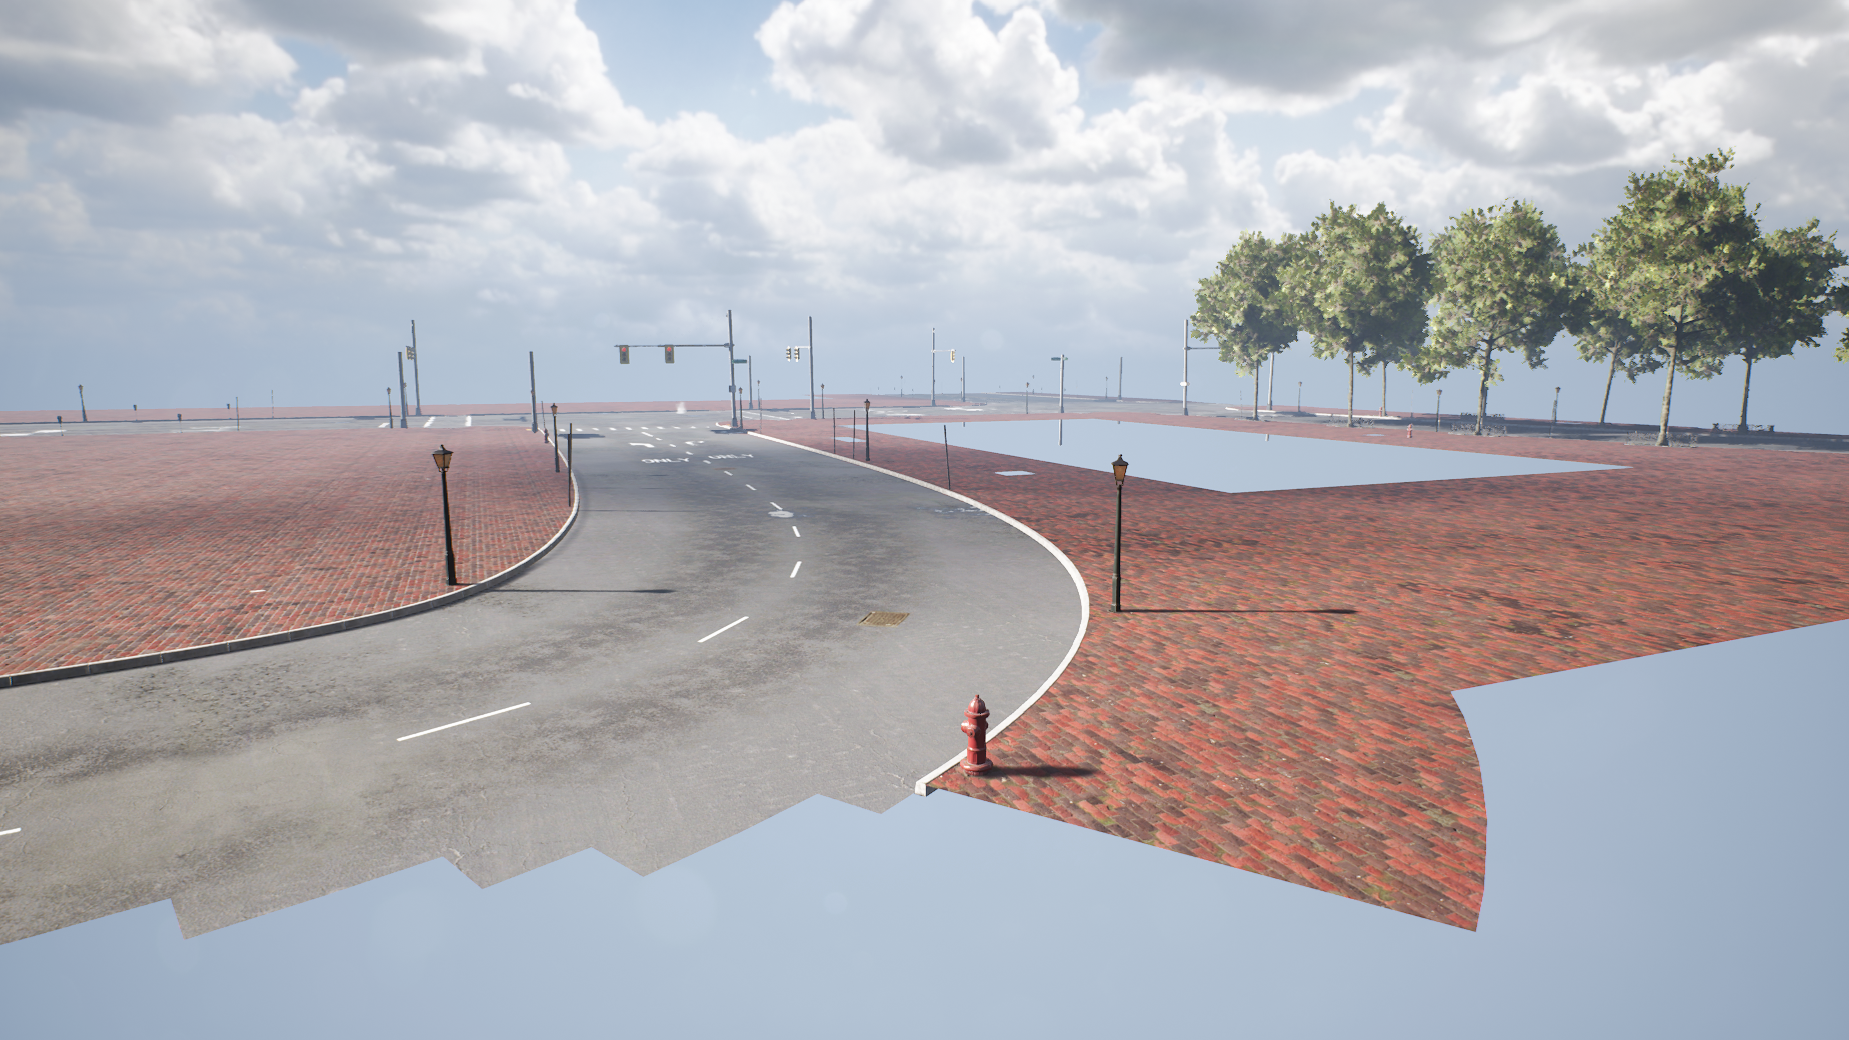
13: The same streaming level up-close. Here you can see a bunch of props placed by Houdini.

The props placed by the road generator get additional meta information via UE4 properties and actor tags including their relation to the traffic node network. The prime example for this is our traffic light blueprint. We use the same blueprint for all traffic lights in the game so the blueprint needs to know the amount and orientation of lanes that it controls to adjust its components accordingly.

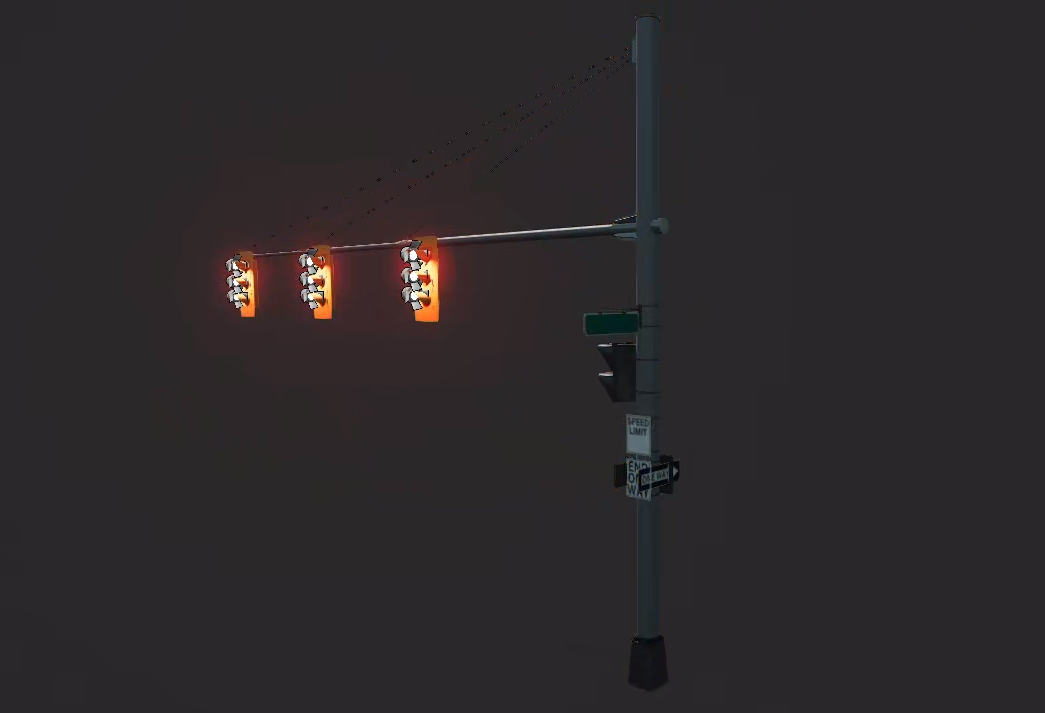
14: A traffic light blueprint actor as shown in the editor

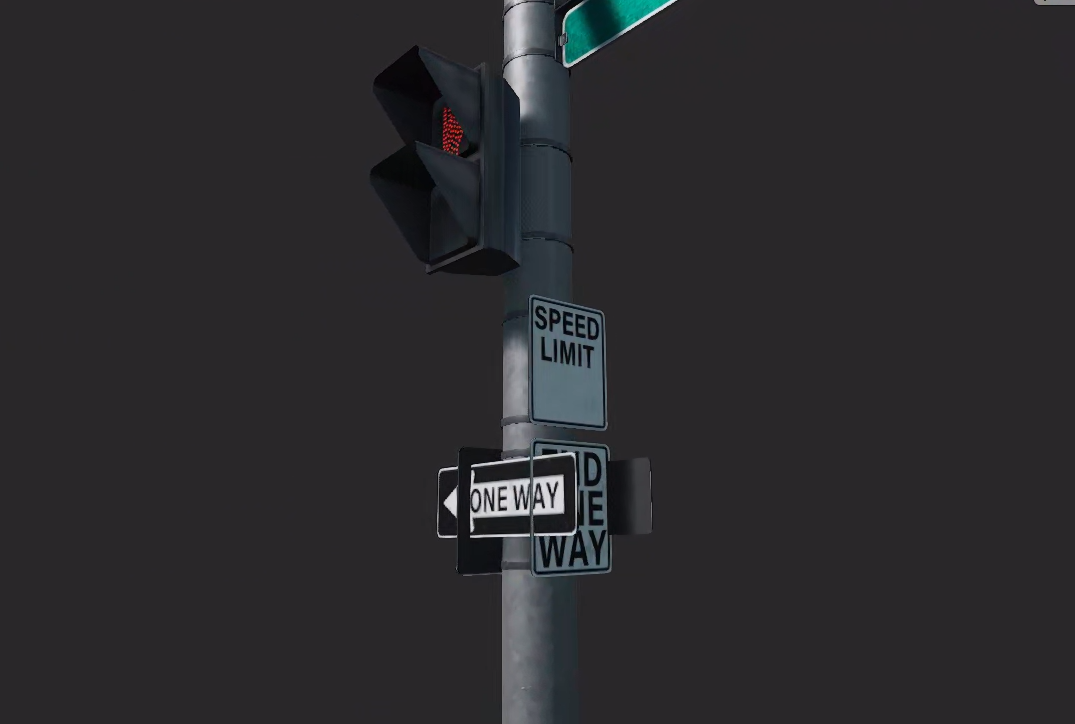
15: The same blueprint with all of the possible signs activated at the same time

Depending on the lane count of the adjacent road, the blueprint can automatically extend the poles and add appropriate meshes and light components. Signage and pedestrian traffic lights that are attached to the same pole are also added on-demand based on the properties passed from Houdini.

16: A traffic light at the exit of a one-way street combined with a pedestrian crossing

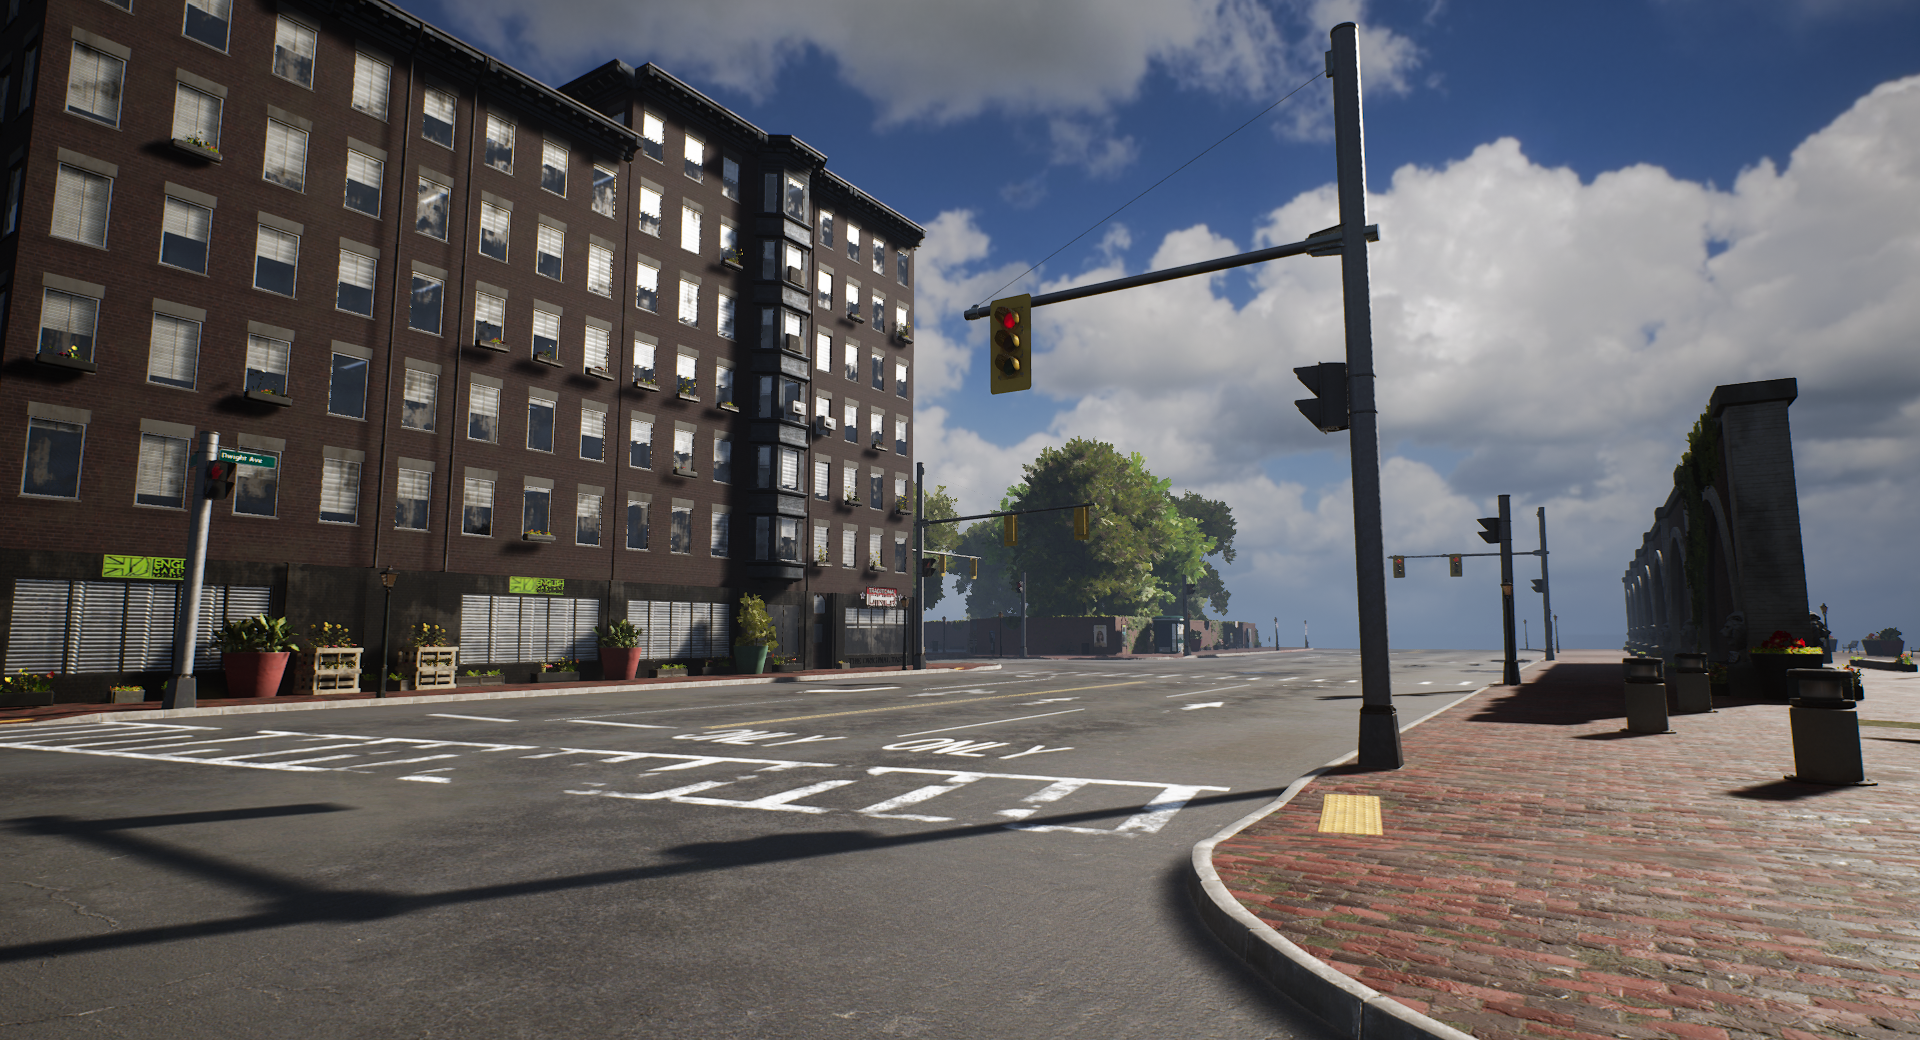
17: A traffic light at the entry of a two-way street with a single incoming lane, also combined with a pedestrian crossing

The json serialized traffic system graph created alongside the static mesh geometry is imported to UE4 in order for it to be usable for our traffic system. We also created a custom editor mode that lets us inspect and edit the imported data to be able to debug it more easily.

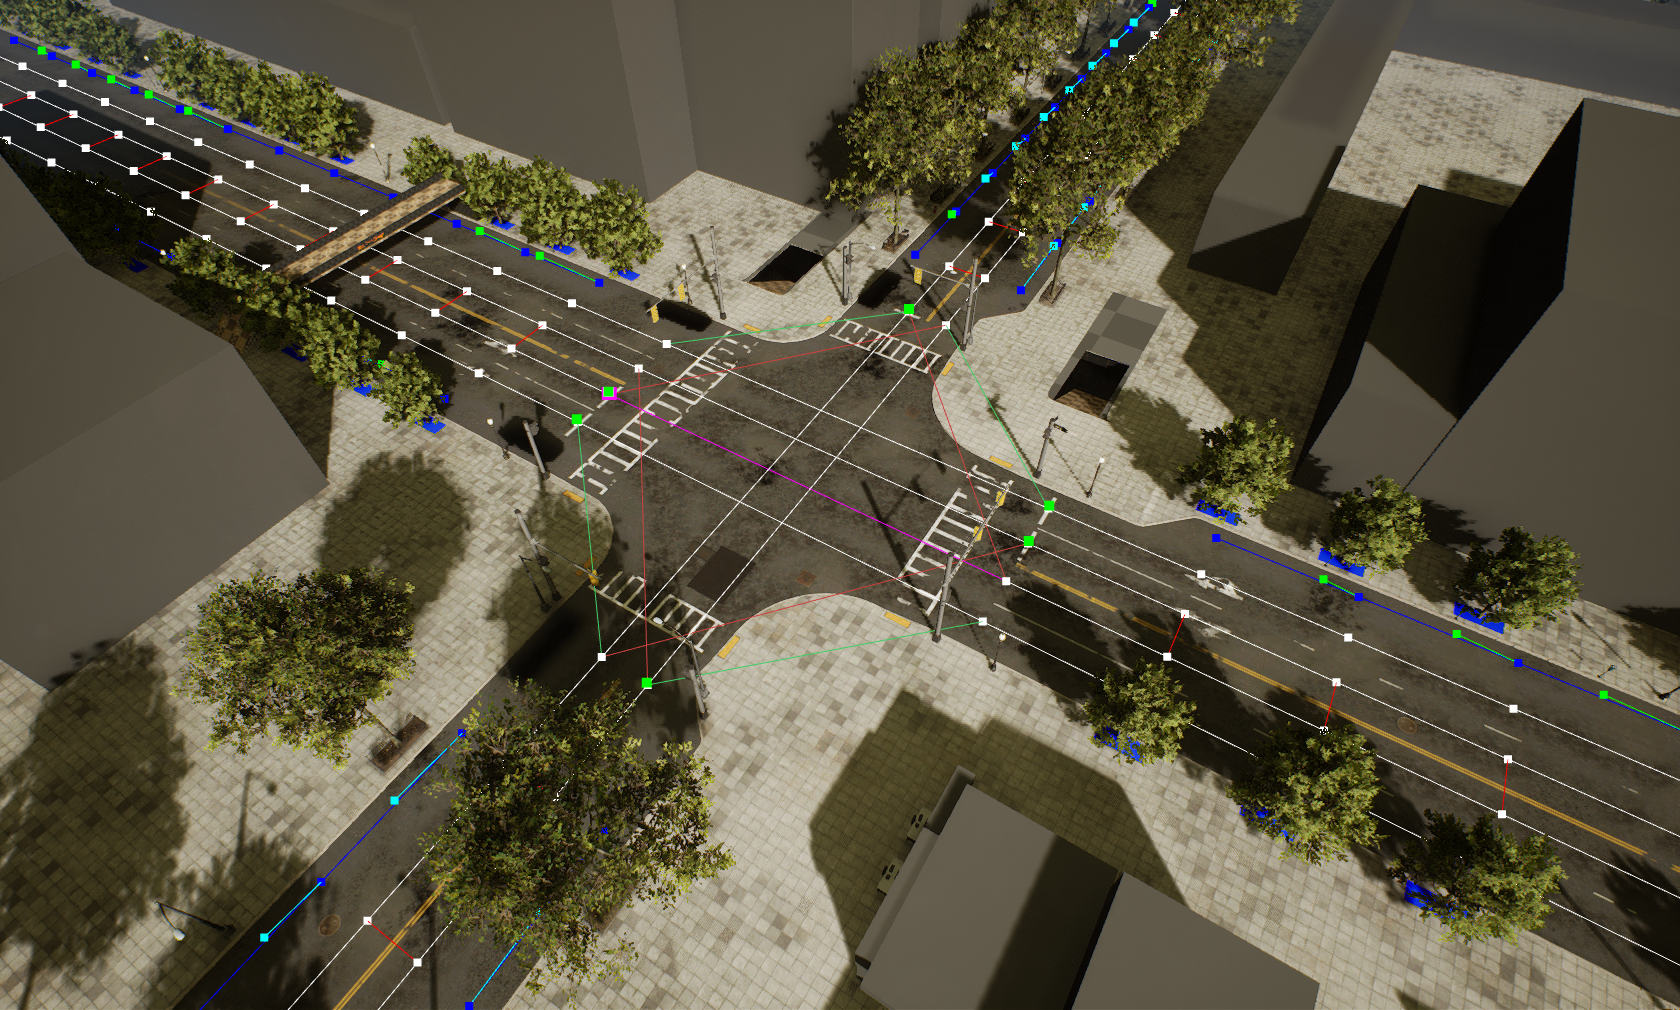
18: Debug visualization showing the traffic node network of an intersection in our feature testing map

Overall, the generation time inside Houdini for everything related to the roads is around 2.5 hours with an additional 10 hours for importing and processing all of the data in the UE4 editor. Because of these long run times we have an automated schedule to run the pipelines outside of regular working hours and on weekends, so that the artists' workstations are not blocked by Houdini pipelines checking out streaming levels.

Building Generation

Building Generation Part 1: Instancing
The building generation can skip some of the steps required for road generation, simply because the buildings can be generated one by one without influencing neighboring buildings. As a result, we only need a single HDA with one HDA instance per building. The building generator also takes a different approach for geometry generation: Instead of generating all geometry with Houdini we instance prebuilt tileset pieces in UE4 using instancing points.

This approach has three main advantages:

  1. Rendering can be optimized to use hierarchical instanced static meshes (HISMs) to reduce draw calls
  2. Artists have more control over building geometry and can go crazy with unique details without making the generator overly complex
  3. Development time and execution time of the HDA is a lot faster because of decreased complexity across the board
Building Generation Part 2: Tilesets
All pieces of a building are usually placed together in a folder with all its materials and some data assets that define tilesets.

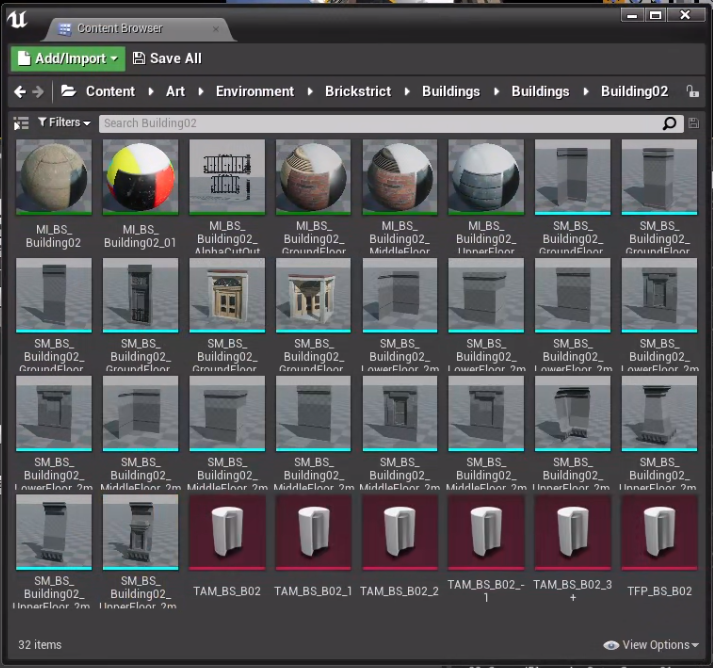
19: All assets required for a building tileset, excluding attachments

Each tileset can vary in size compared to other tilesets because artists can configure which tilesets may be mixed and matched. To accomplish this, we use these Tilesest Asset Maps (TAMs) that define which pieces may be used together. The asset map defines a base piece size, so we can create a snap-grid from this smallest unit. We then configure floor ranges that use a custom expression syntax to group floors and walls together, which allows for having different meshes and even heights for different floors.


20: Tileset Asset Map (TAM)

The example from the screenshot uses indexing similar to python array indexing. Positive numbers count from the bottom, negative numbers count from top:
  • 1: 1st floor (we use the US-American style of counting floors, so this would be the ground floor in British English)
  • 2: 2nd floor
  • 3+: 3rd floor and everything above
  • -1: topmost floor (overrides previous rule)
The artists can then assemble the floor range asset maps that reference all of the available meshes, materials and blueprints for each of these floor ranges.

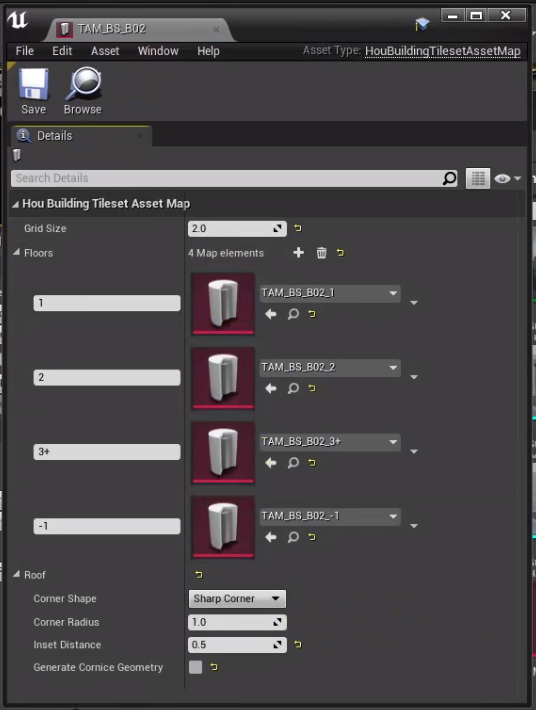
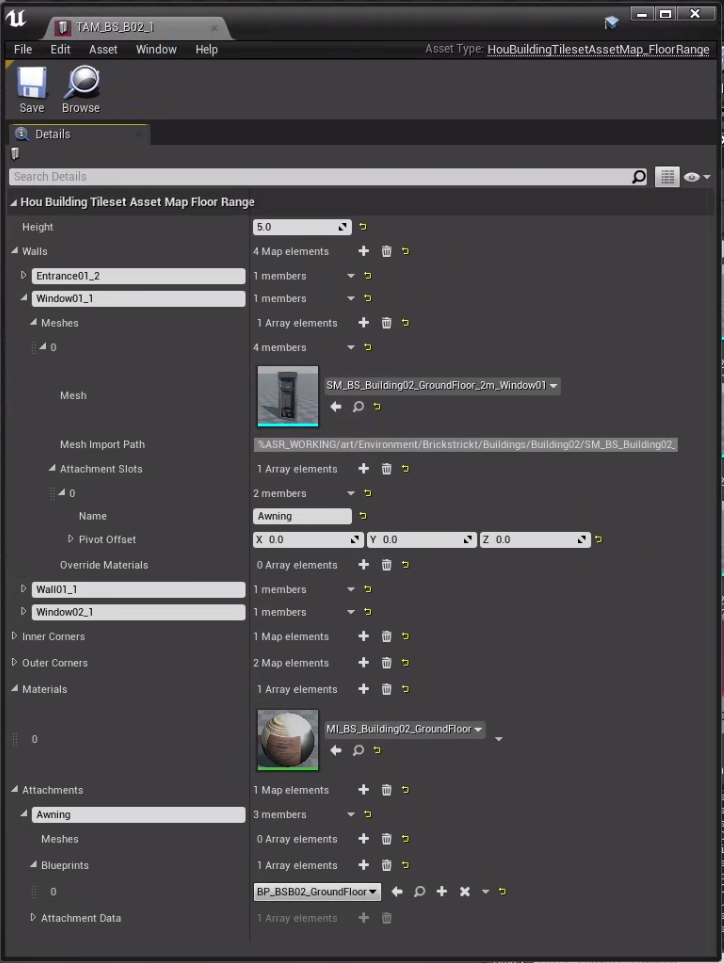
21: Tileset Asset Map (TAM) - Floor Range

Finally, a last Tileset Fill Pattern (TFP) file is created that references a single asset map. The tileset fill patterns define how often and with which patterns the assets should be placed within a single floor. Separating the fill patterns from the asset maps makes it possible to create multiple configurations for how assets should be distributed from the same collection of assets.


22: Tileset Fill Pattern (TFP)

All the tileset files are automatically exported to json text files that can be referenced inside the Houdini HDAs using a custom variable syntax. In the screenshot above you can see a Houdini Path in the first line:

In the screenshot above you can see a Houdini Path in the first line:
%UE4_HOUDINI_INPUT/Buildings/Tilesets/TFP_BS_B02.json

Notice the variable %UE4_HOUDINI_INPUT at the beginning of the path. We set up environment files and added utility functions both for Houdini and UE4 to resolve them, so the paths can be used across workspaces and programs. In this case the variable refers to a folder that contains generic data files, exported from UE4, and acts as input to Houdini. We also have variables for the UE4 project root, working files, and many other commonly used directories.

This setup allows us to resolve project file paths independently from the working directory of the current Houdini session.

The environment file also contains a UE4_CURRENT_MAP entry that is set automatically by our UE4 Houdini plugin and makes it possible to access content for the currently loaded level in the UE4 editor. For
example, %HOUDINI_ROOT%/%UE4_CURRENT_MAP%/Buildings/BuildingOutlines.bgeo contained a geo file with all building outlines of the current level.

This environment variable system is not used exclusively for the buildings, but for all other HDAs that need to exchange data via applications. Small systems like this really paid off by keeping the way we exchange data simple and consistent.

Building Generation Part 3: Inside Houdini
The HDA for the building generator is created on the object level and contains multiple sub-objects that are attached to each other for different parts of the building:

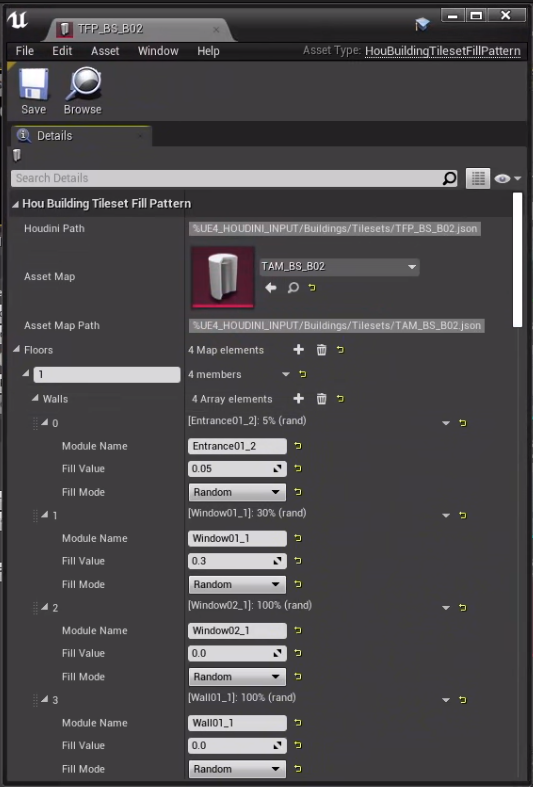
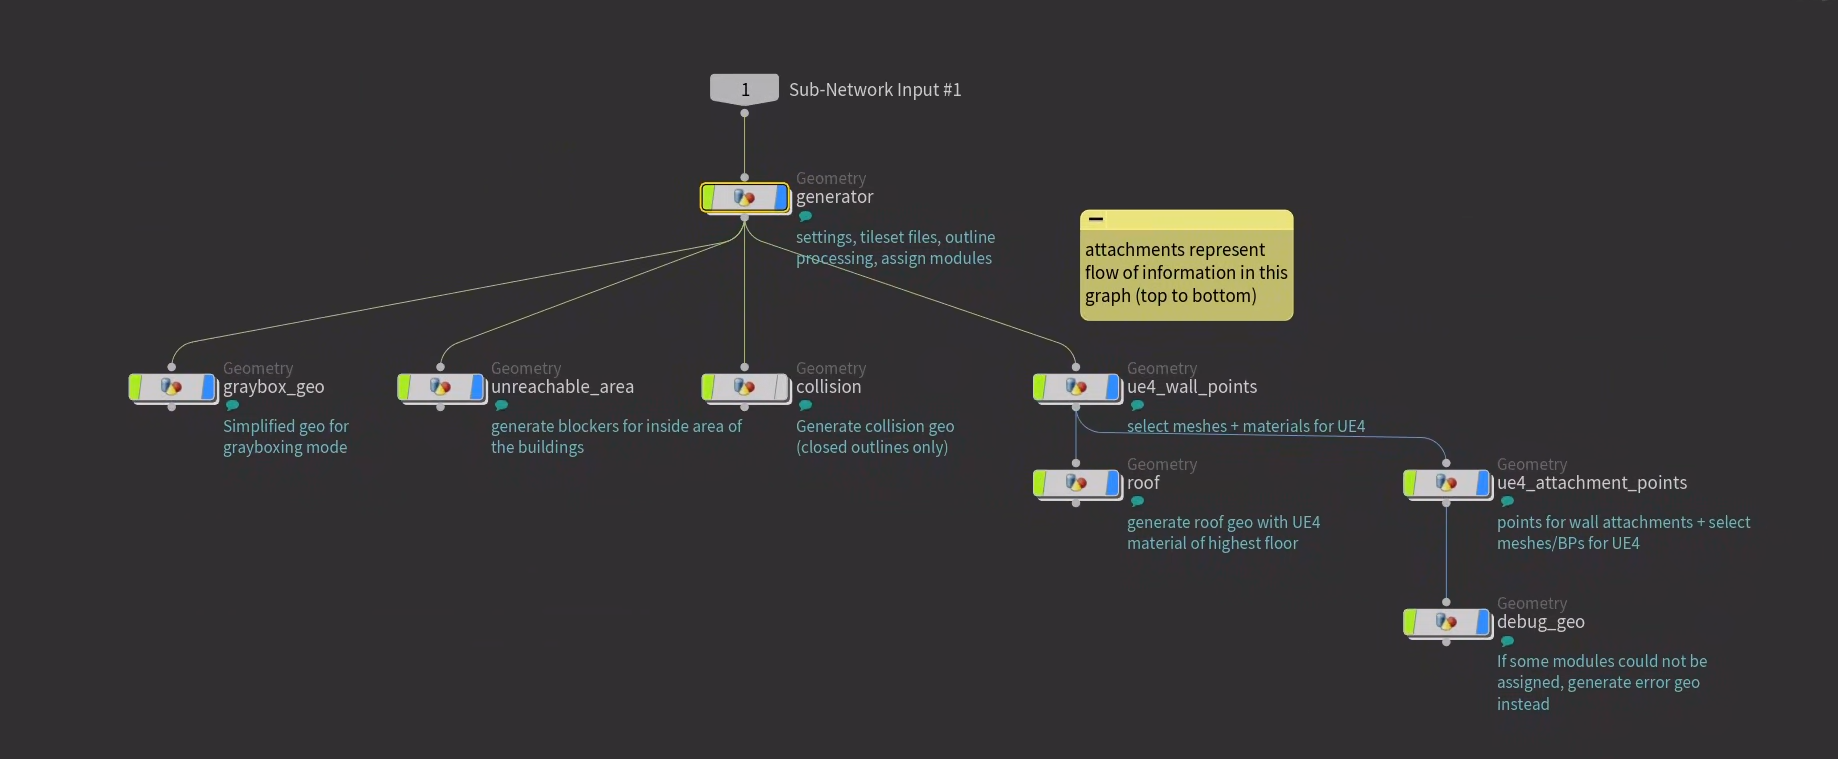
23: Overview of the building generator graph on object level

The base idea of this hierarchy is pretty simple: We start the generation with a core generator that creates a grid of points where potential building pieces may be placed. Then other Houdini objects (see image above) are attached to this “armature” that actually uses the points to add…

  • instanced static meshes for the main building modules (walls, doors, windows, etc)
  • instanced static meshes or blueprints for additional attachments like flower pots, AC units, etc
  • generated static mesh geometry for the roof, graybox previews, debug info
  • generated collision geometry
As most of the building geometry in UE4 consists of instanced static meshes and blueprints, the buildings in Houdini consist only of the roof and the instancing points.

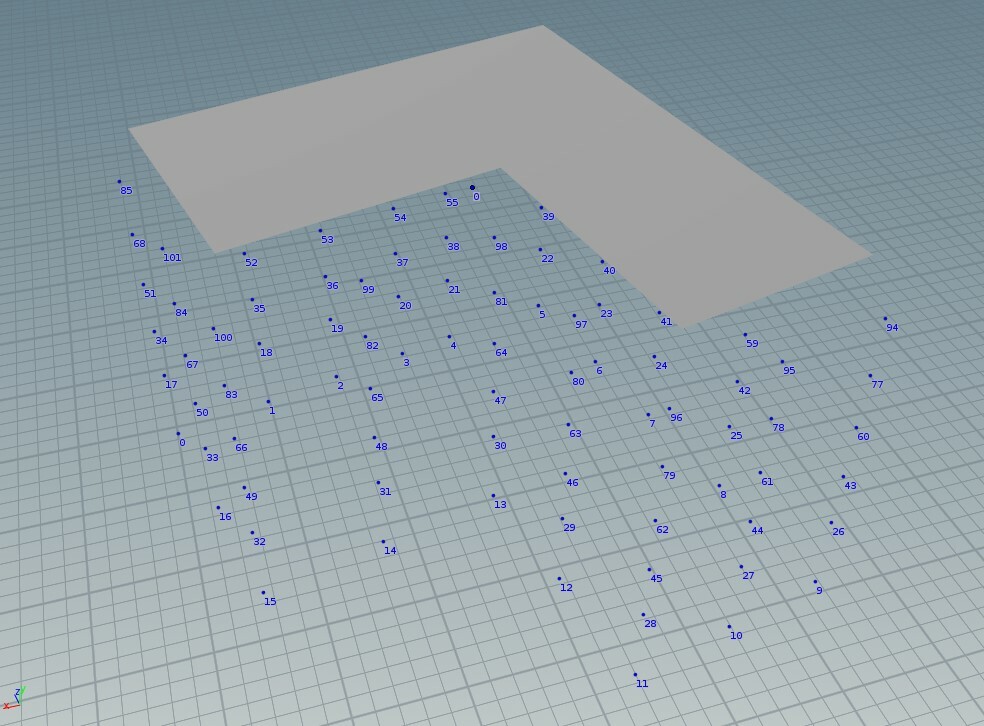
24: What buildings look like in Houdini (instancing points and generated roof geometry)

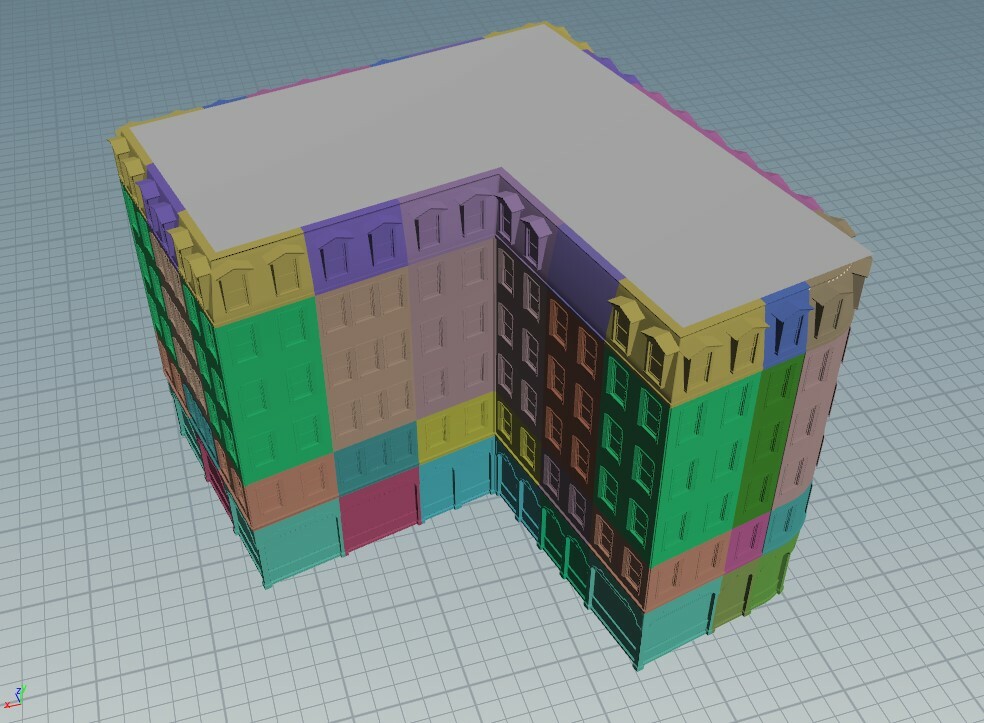
25: The same building with a debug visualization that shows the different modules

Building Generation Part 4: Using the Tools
To speed up the initial placement of buildings, we added a new mode to the grayboxing HDA mentioned above which already contains outlines for potential buildings. Level designers can simply select an area with a polyline and new editable buildings are placed for all contained outlines.

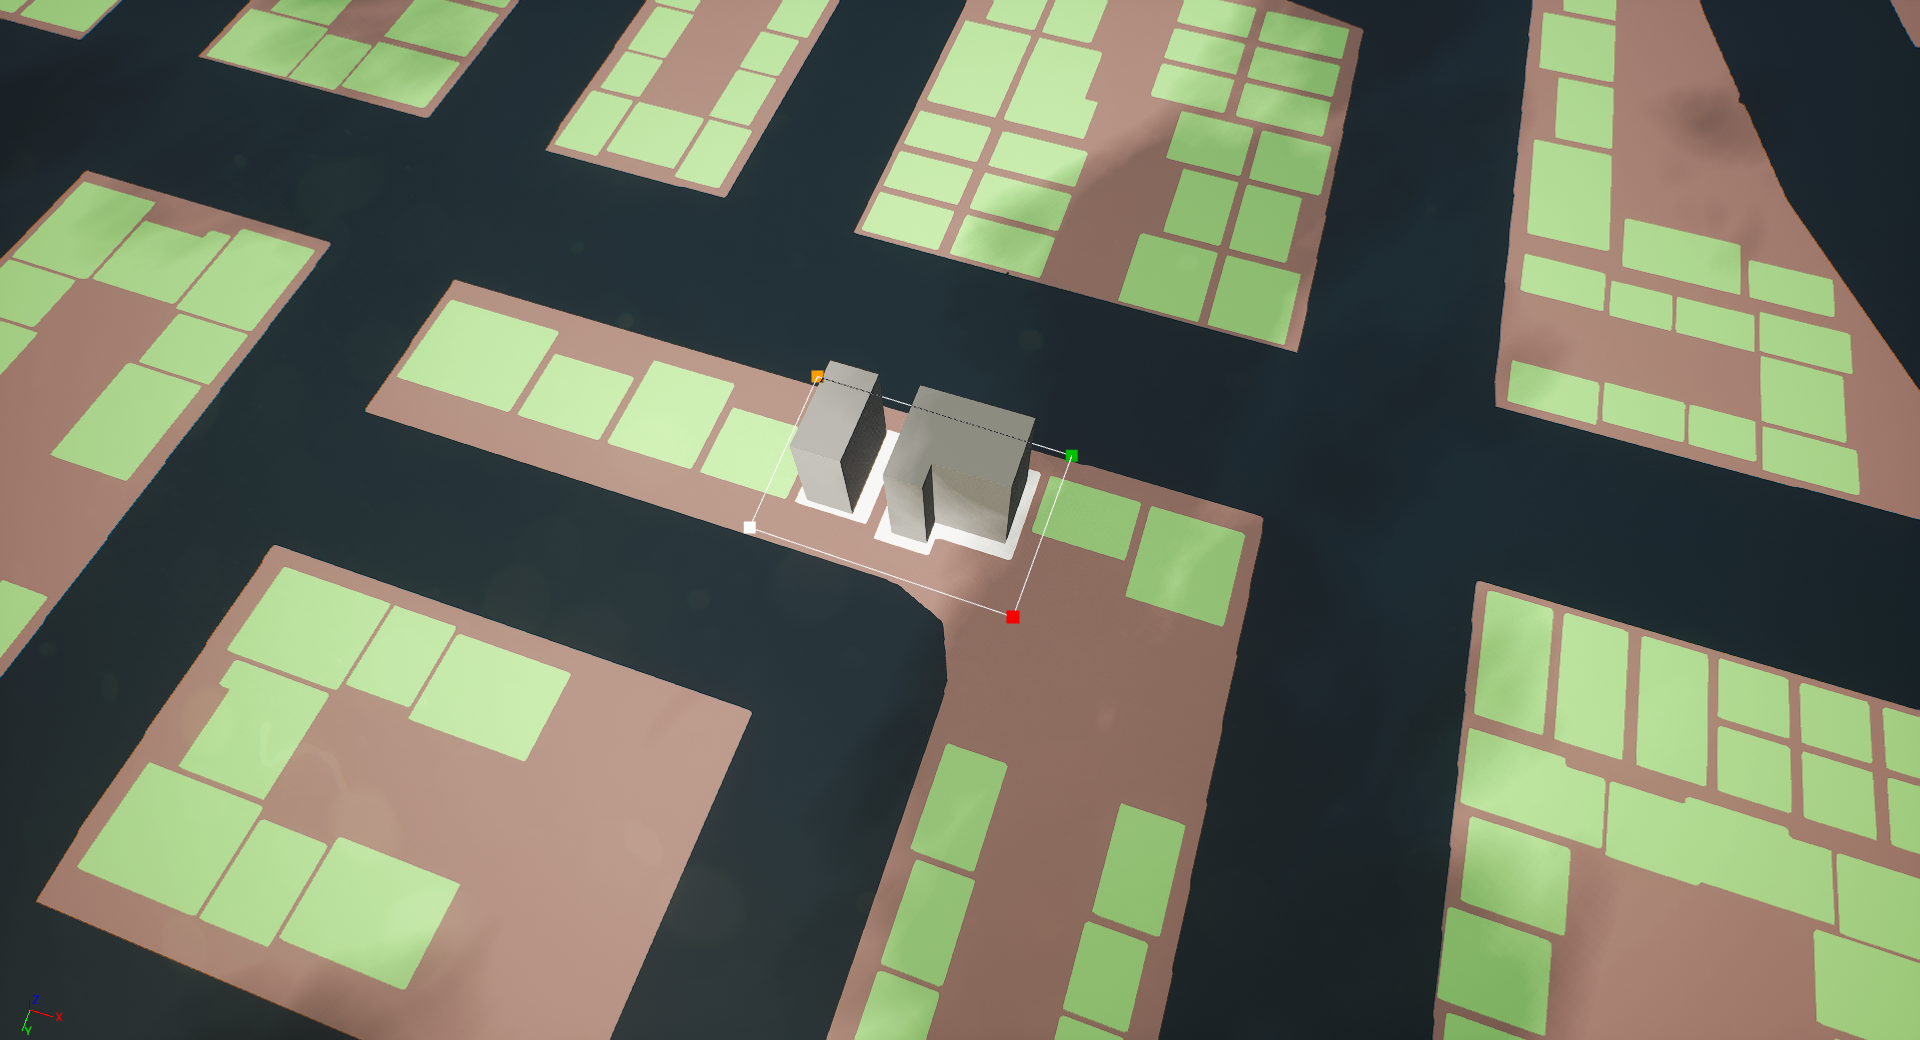
26: Selecting an area on the graybox ground plan to generate two buildings from the ground shapes

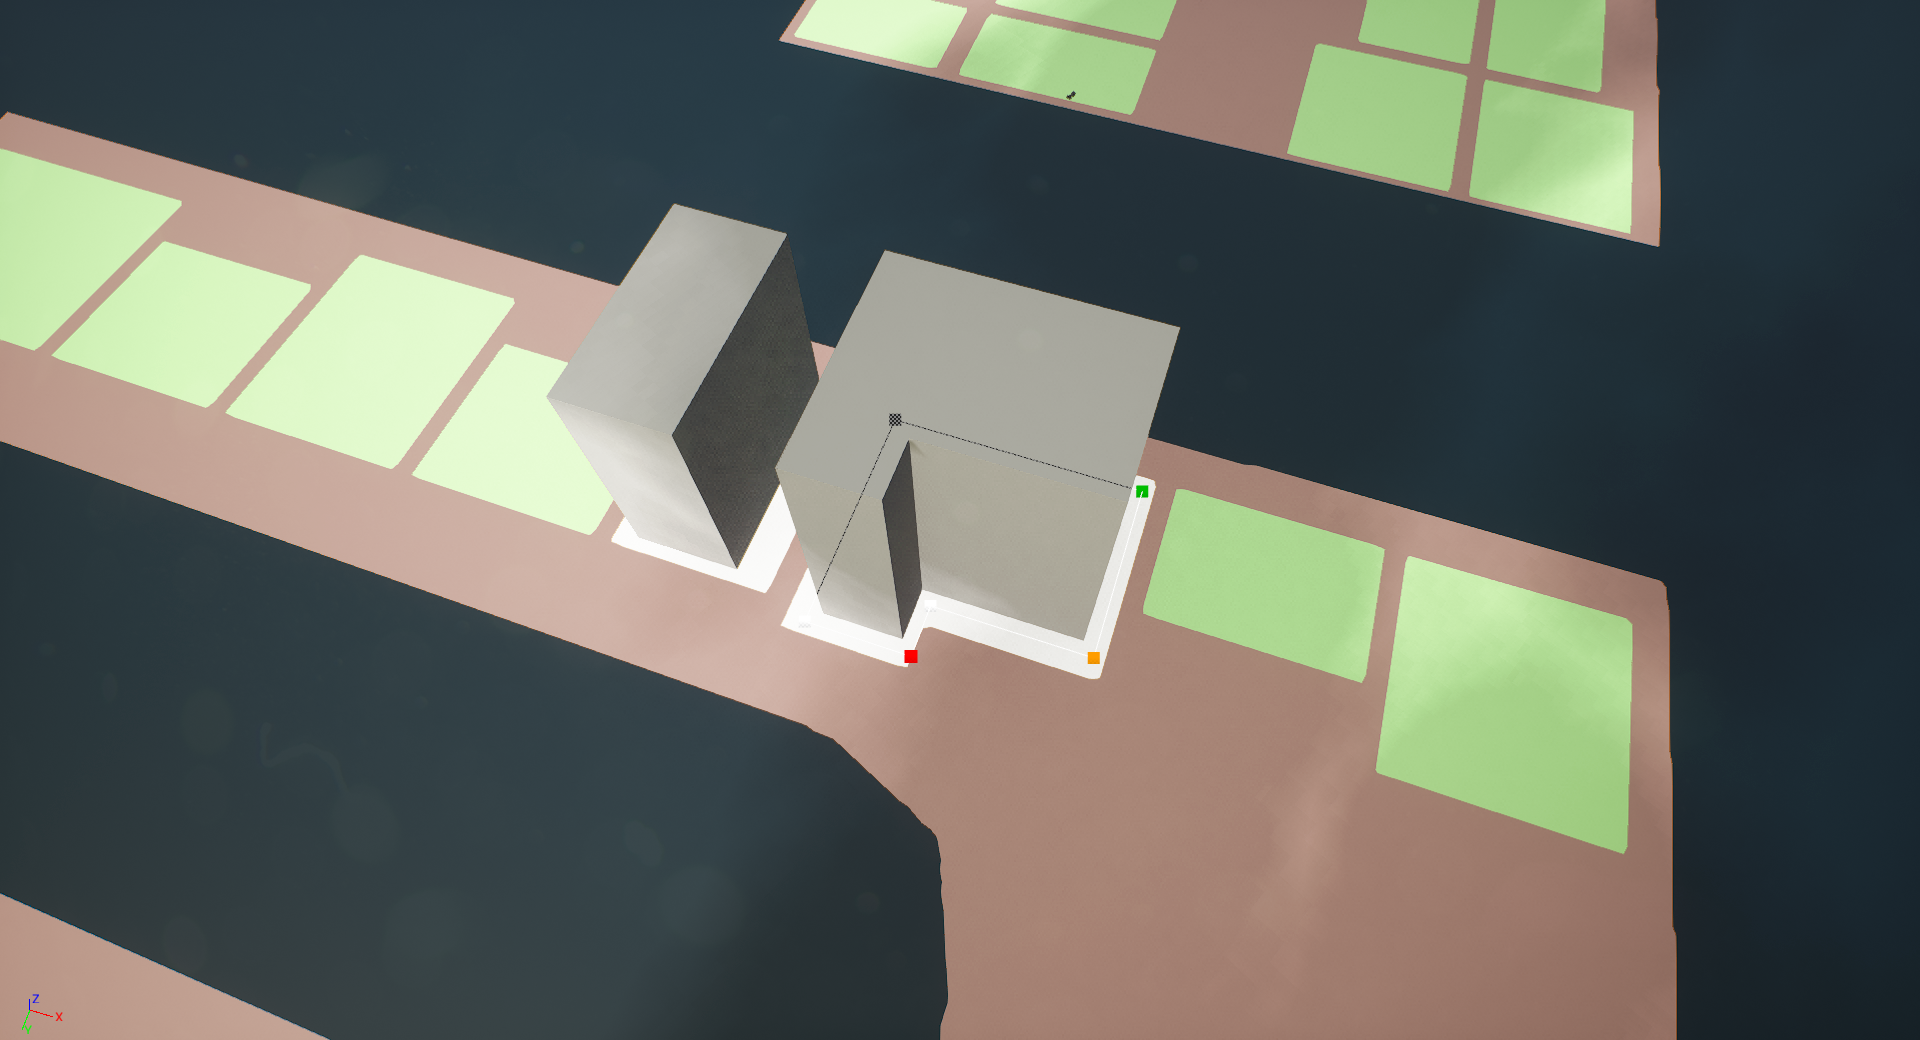
27: Both buildings are unique actors that can be selected and edited individually

Buildings are initially generated in a grayboxing mode that takes less generation time and therefore allows faster iteration of the ground outlines and building height.

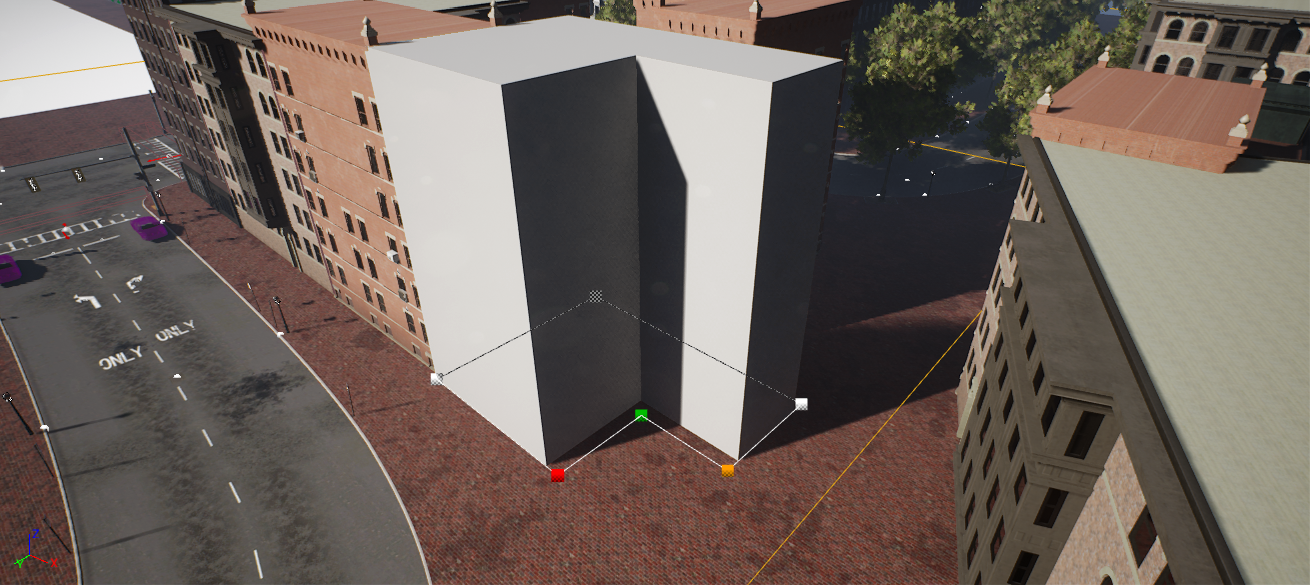
28: Editing the outline of a building in grayboxing mode

Artists can then switch over to the actual tilesets in which all of the meshes and blueprints from the UE4 data assets are instanced. A random tileset is assigned automatically, based on the area in which the building's origin resides, but any of these settings can be manually overridden.

These areas are defined with the area grayboxing tool mentioned above in the “Grayboxing and Planning” section.

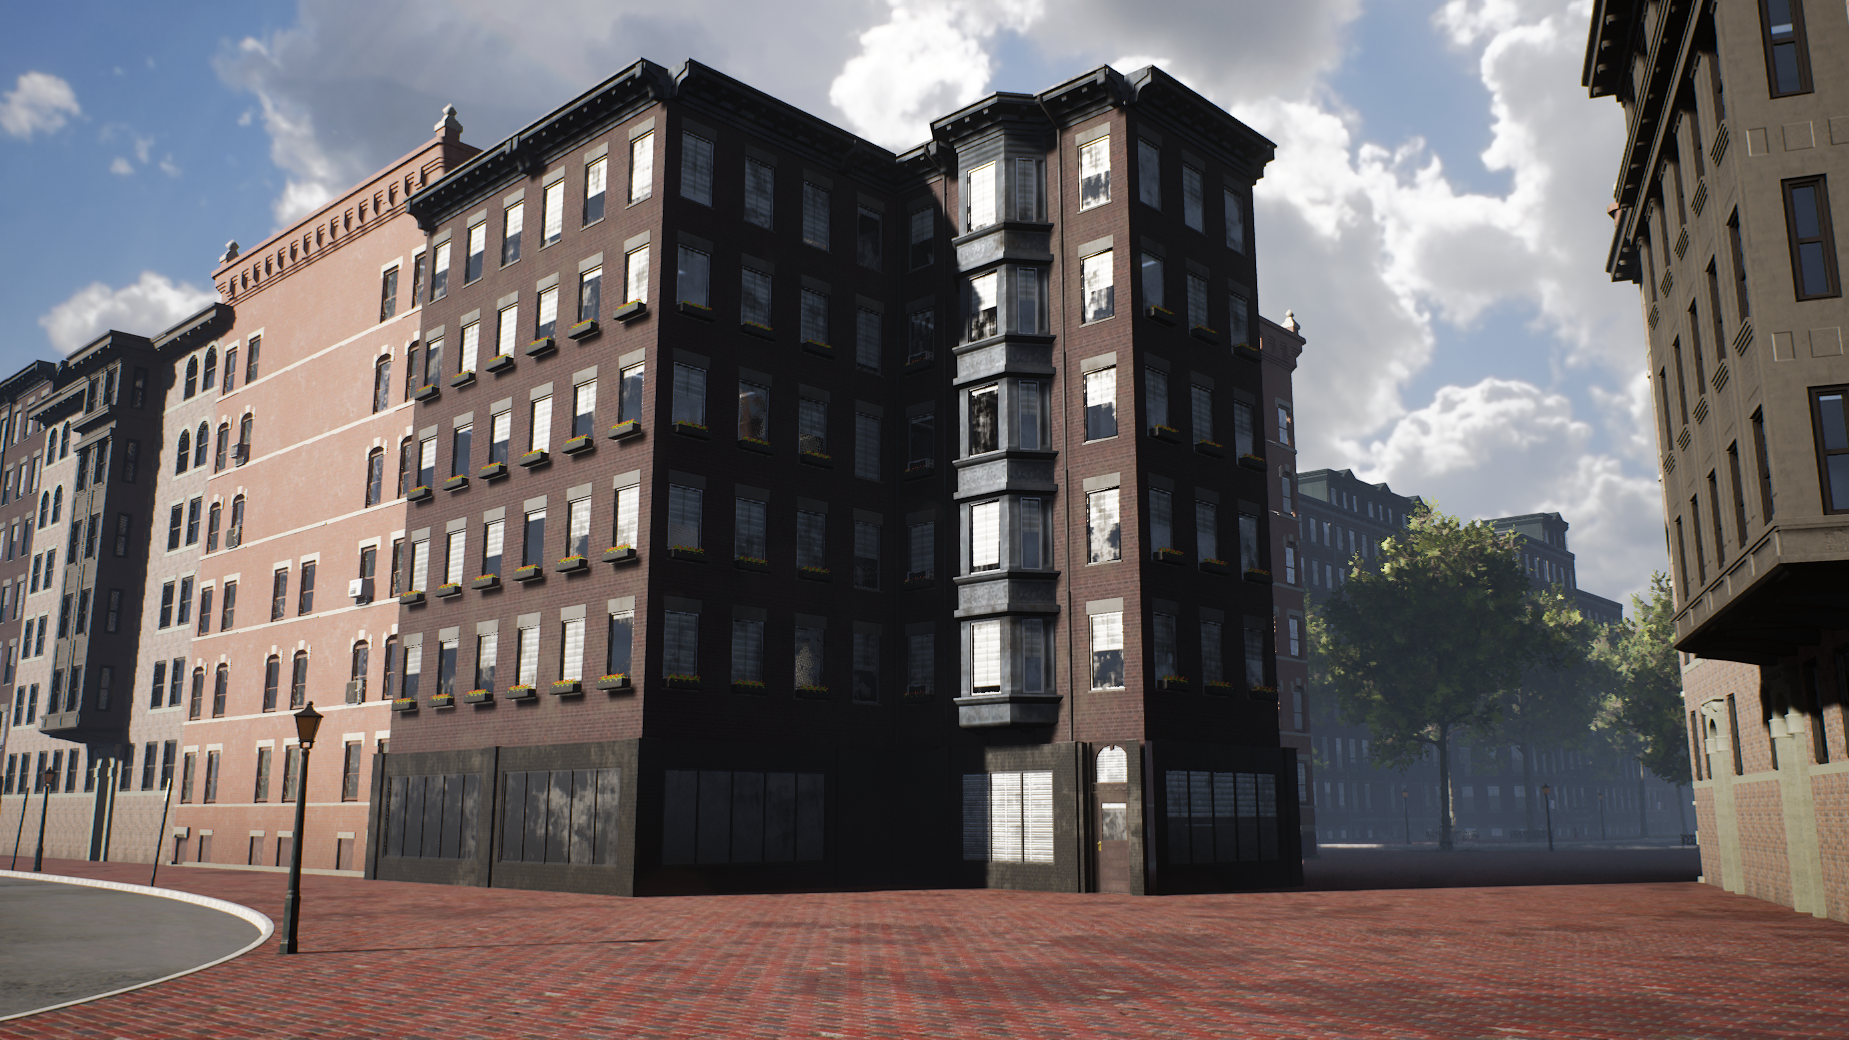
29: Tileset variant A

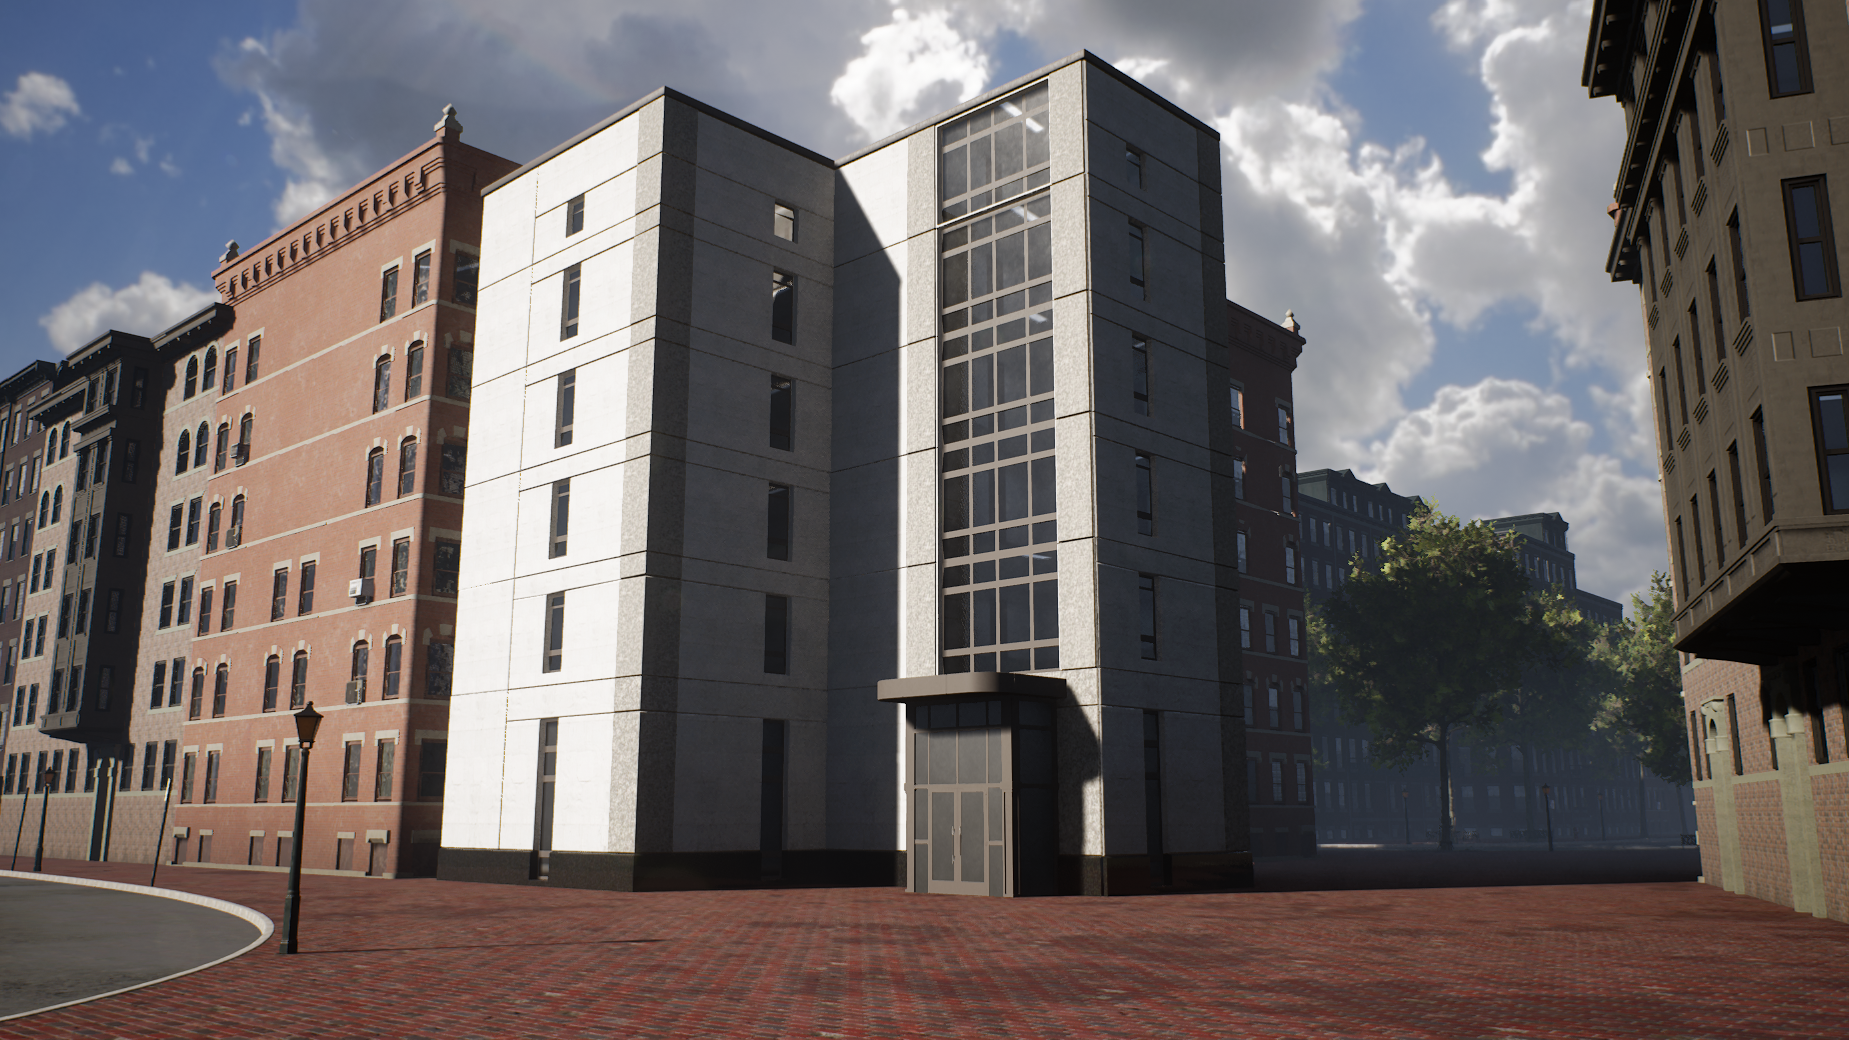
30: Tileset variant B

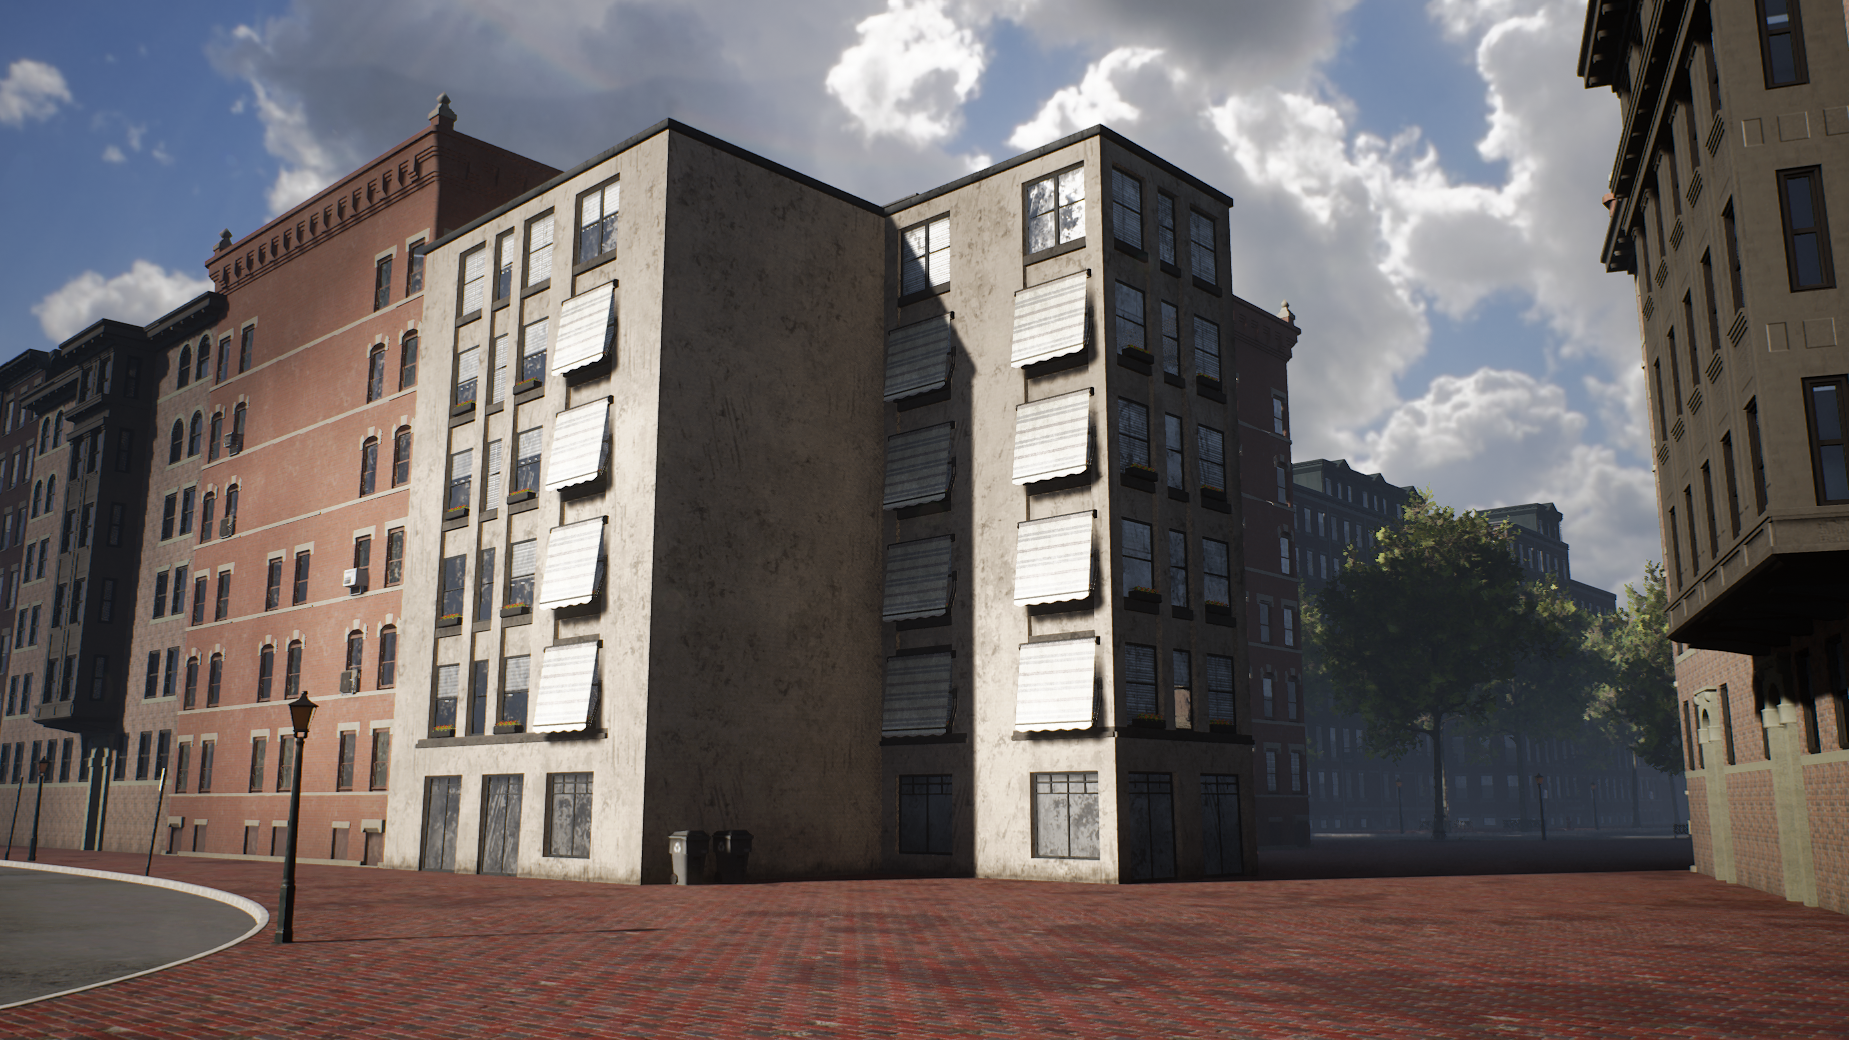
31: Tileset variant C

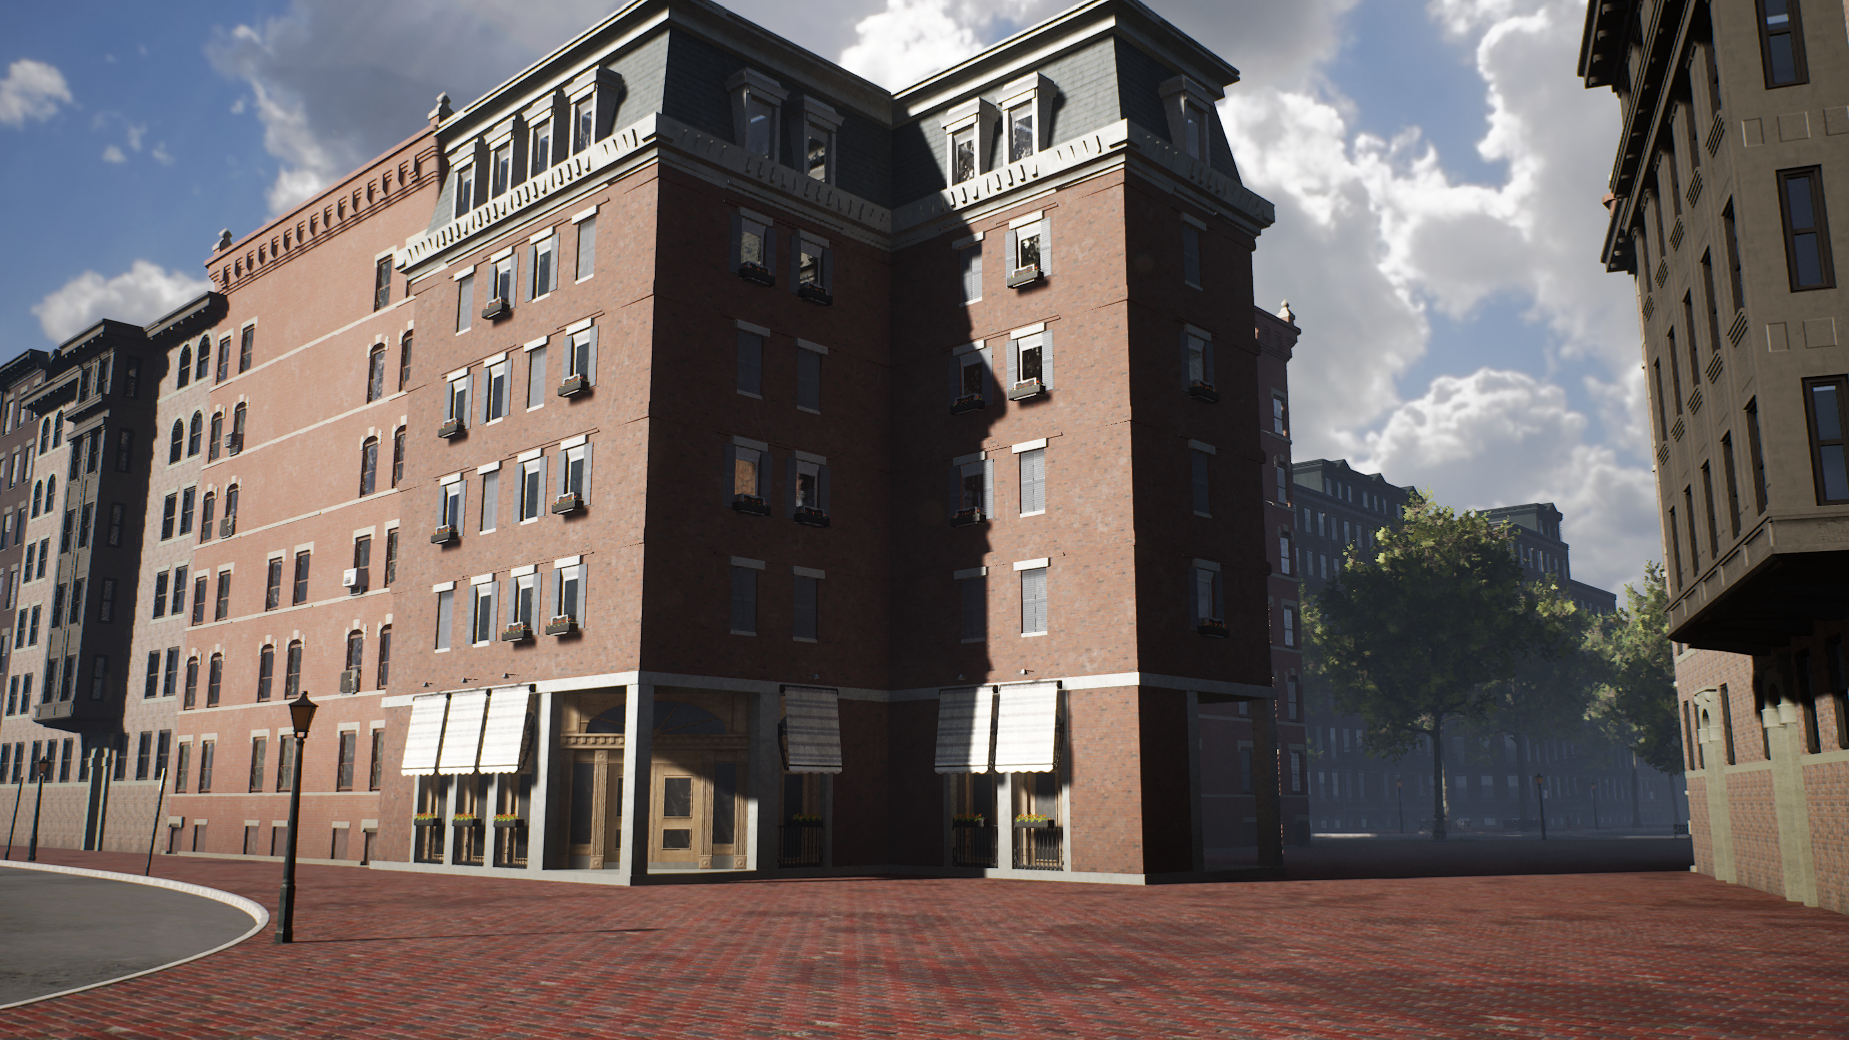
32: Tileset variant D

Sometimes the outline has to be tweaked a little bit after changing the tileset - after all, meshes with different base grids will result in slightly different outline shapes. From this point on it usually makes sense to make some adjustments to the walls and adjust the number of floors to make the building blend in a bit better with its environment.

In all cases the generated buildings are just the foundation for manual beautification. Of course the tools already offer many creative decisions and our target was always to reduce the manual work required, but some props still need to be placed manually to make the level feel more organic and recognizable.

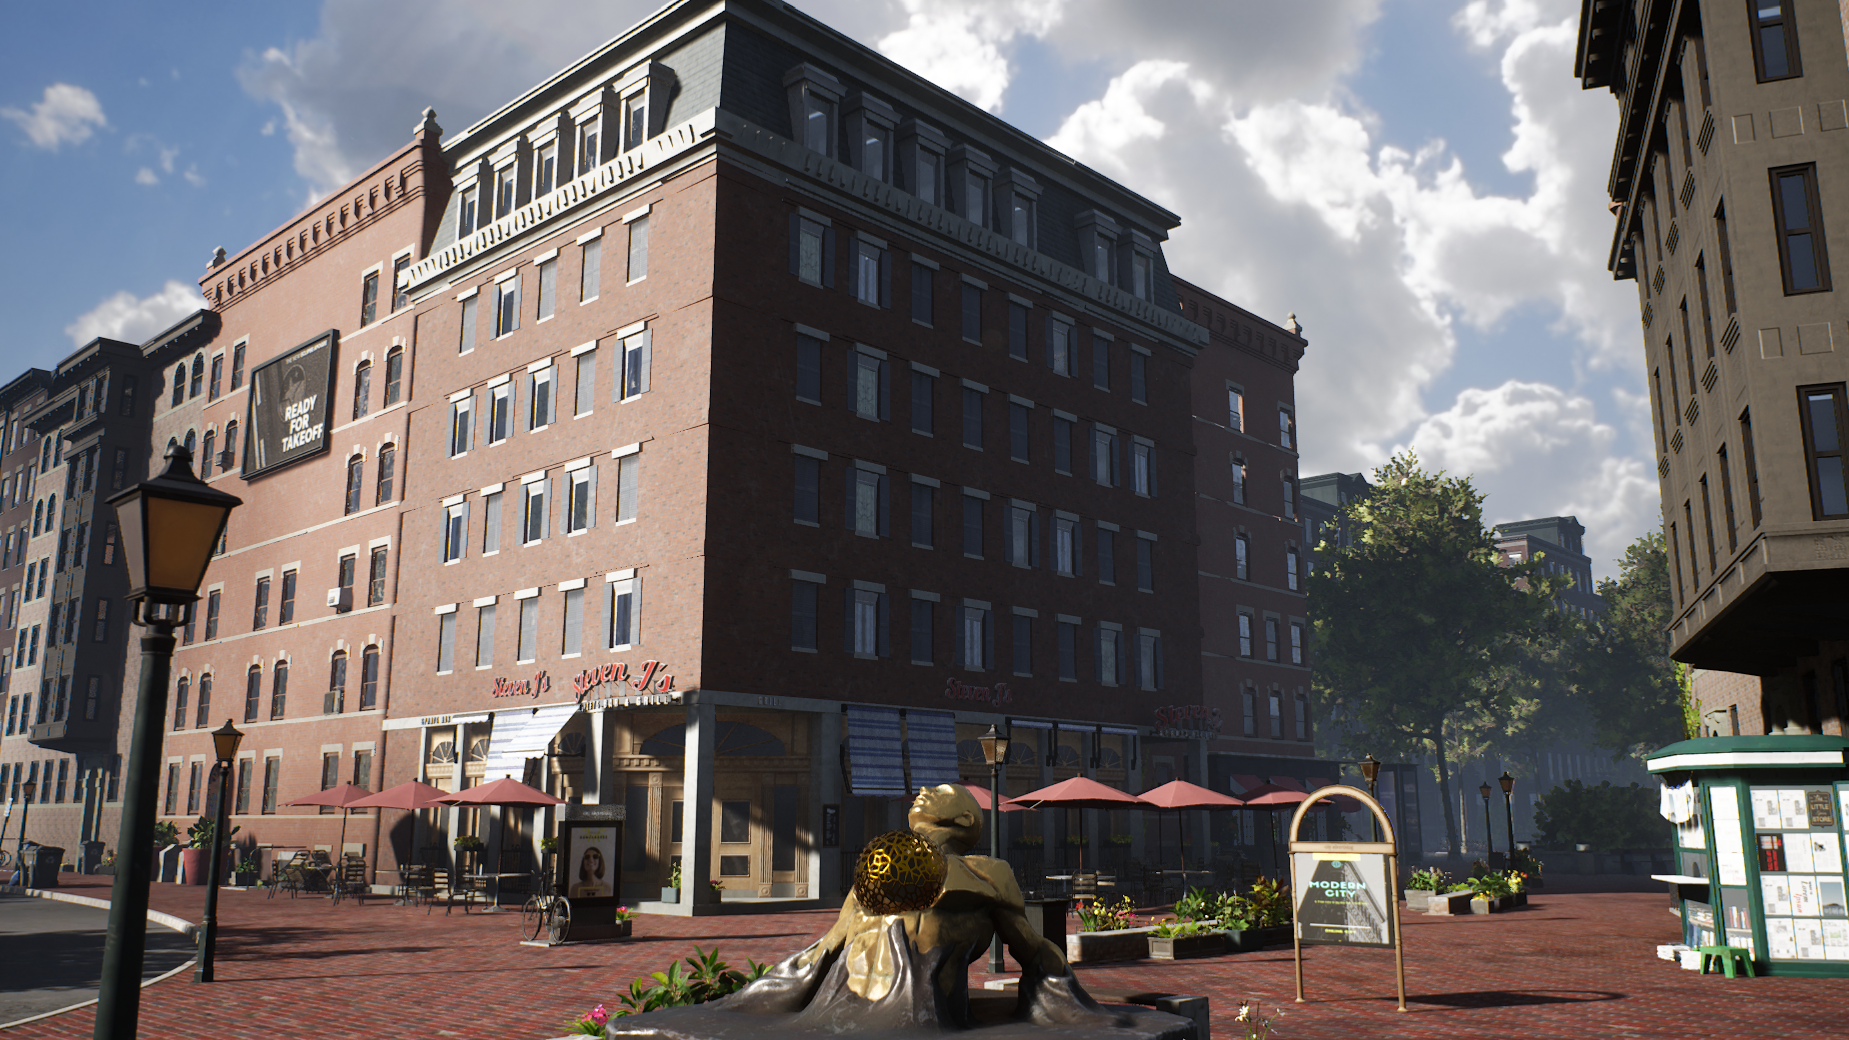
33: The finished square

34: The same square from a different perspective

Micro-Tools

Whenever we had some new demands for the tools from an artistic or gameplay perspective, we expanded the generator and added small micro-tools that allowed artists to influence the Houdini generation on a more detailed level to visually refine an area or make some performance optimizations. One example are geometry volumes that enable the modification of enclosed objects by removing or adding props, swapping materials, or cutting holes into the generated geometry.

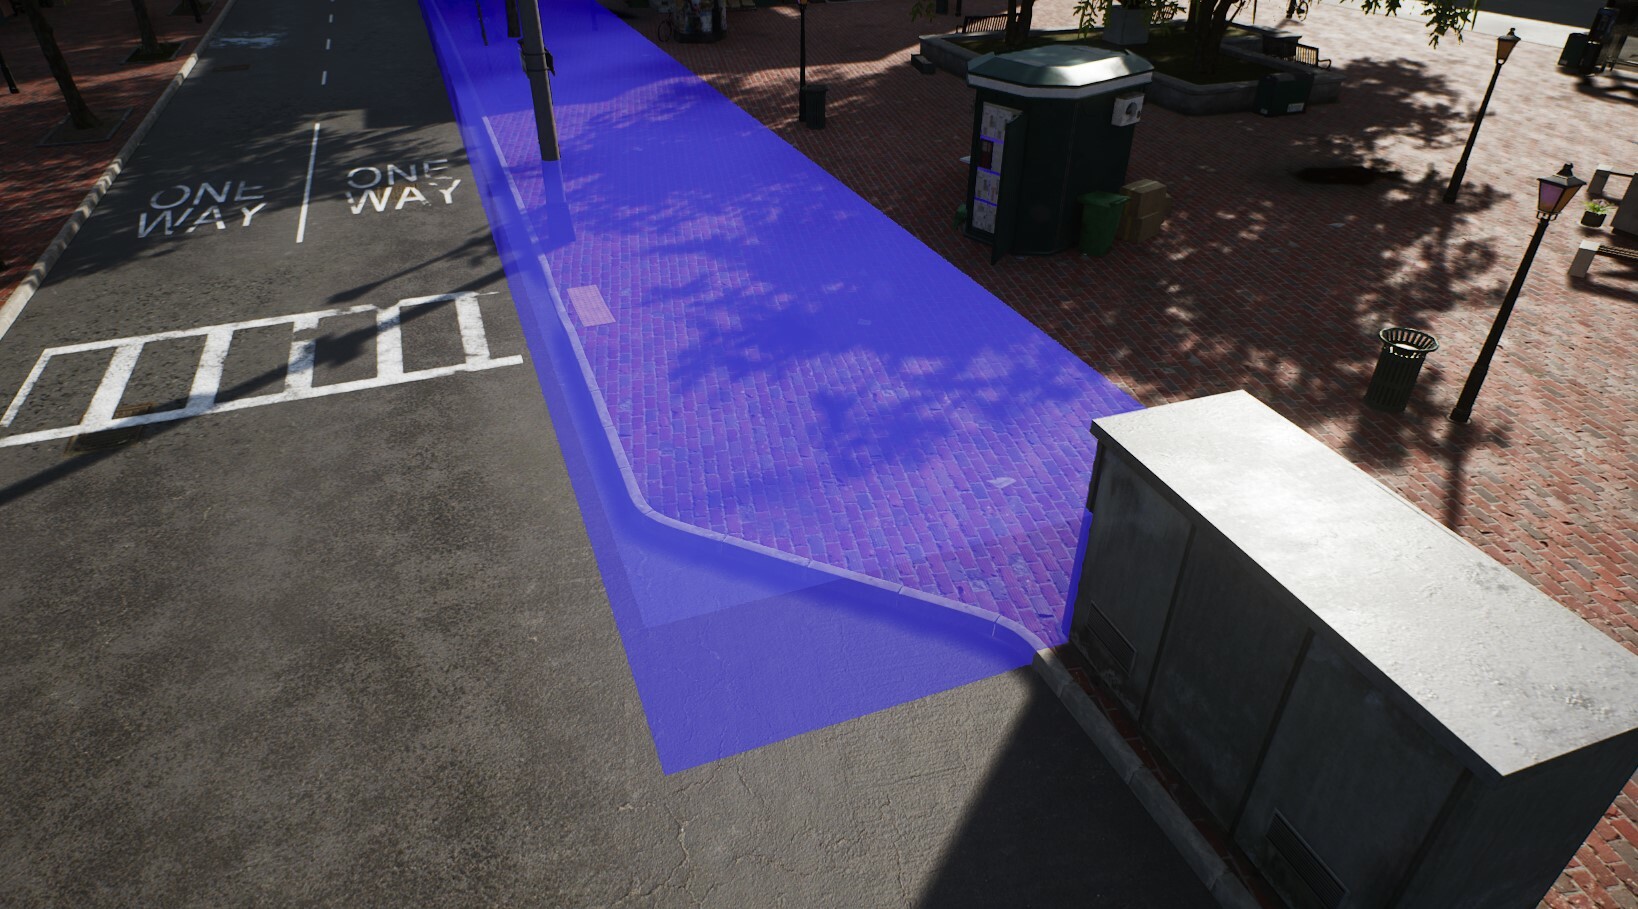
35: A volume that makes the sidewalk extend inwards to create narrow streets

Because these features were added little by little, not a lot of forethought went into them in the initial design phase during which we set up our pipelines. In hindsight we had some usability issues, especially with the aforementioned volumes because they would constantly overlap and clutter the level making it harder to get a clear picture of what was going on.

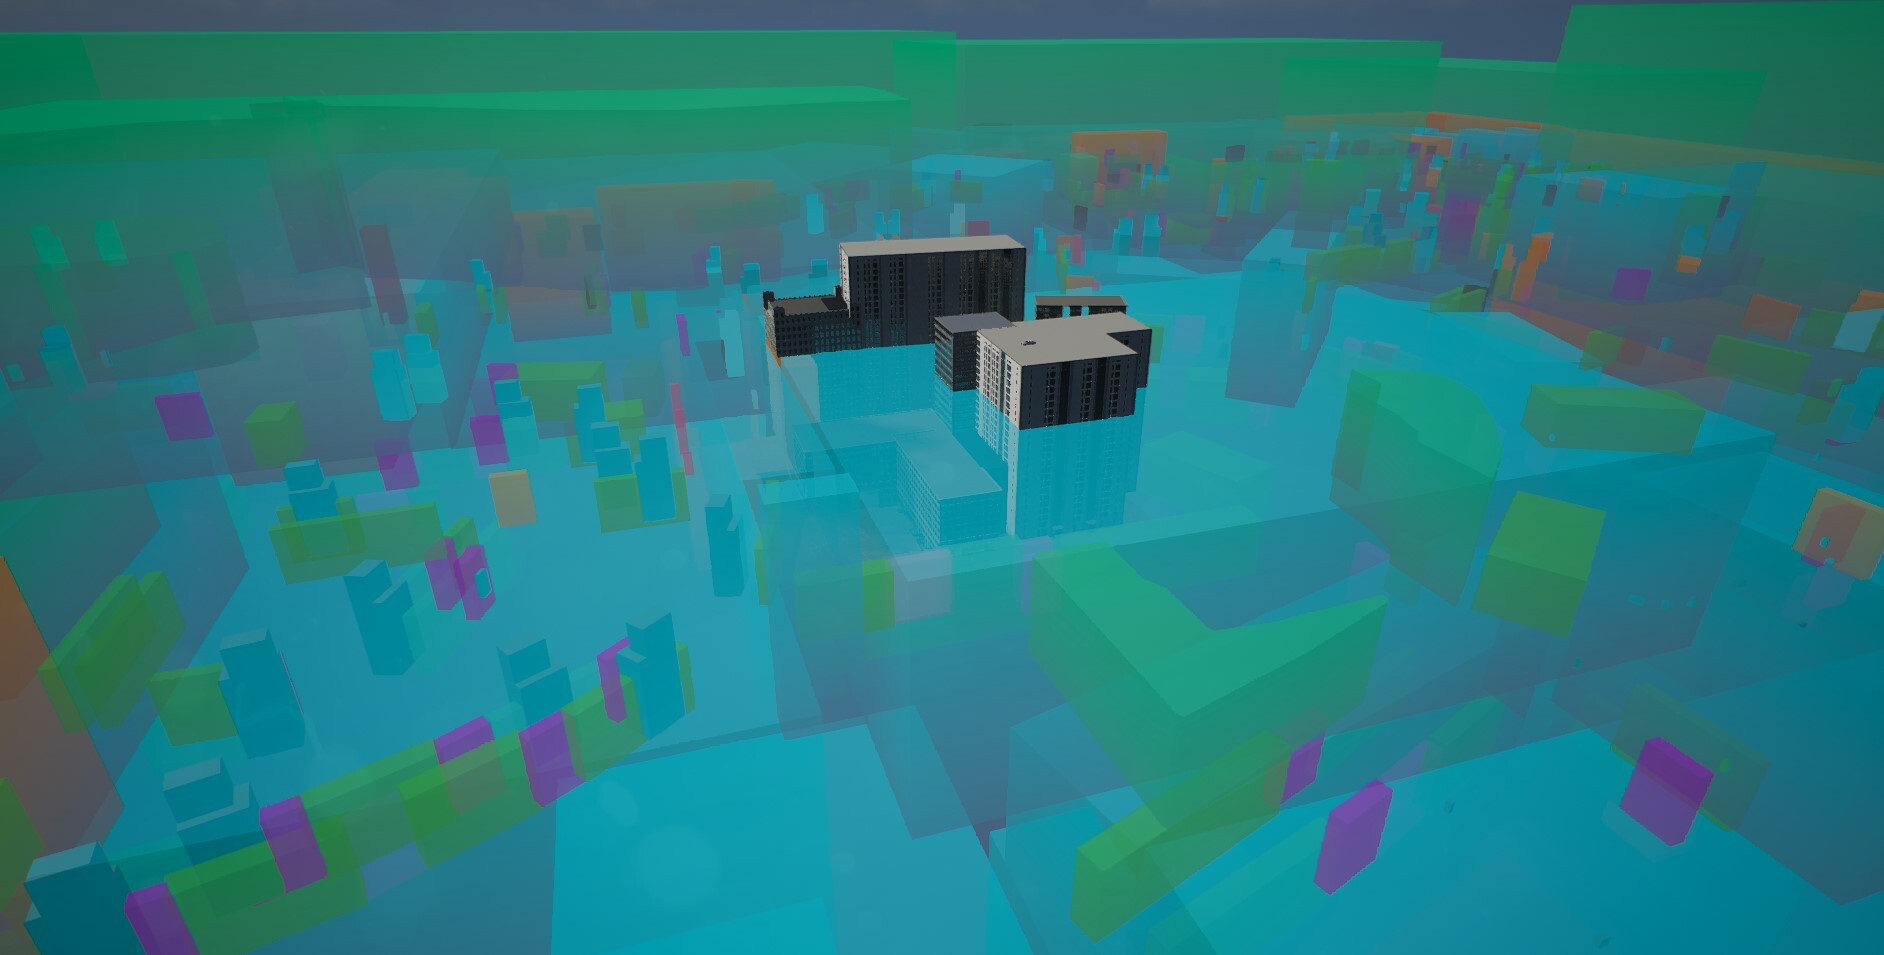
36: A part of the volumes placed in the level. 150x150m streaming level with a police car on top for scale.

This opaqueness of some of the tools was amplified by the waiting times required to see the actual output of the generators. We had done a good job with the road network preview (see above), but some of these smaller tools lacked immediate visual feedback.

We don’t have any clear plans on how exactly we want to address these issues yet, but for the next version of the tools we will certainly focus even more on usability, iteration times and the maintainability of complex scenes.

Continuous Integration Pipelines

The long execution times of HDA rebuilds and bakes mandated automating most of our Houdini pipelines. To accomplish this, we wrote custom UE4 commandlets which take care of rebuilding, baking and submitting assets to perforce. These pipelines are an important part of our overall CI setup.

The Houdini commandlets are usually executed after working hours because they have to check out and submit content to the same maps that are used by content creators. While we do have separate maps for HDAs of roads and buildings, the final meshes have to be baked into the same streaming levels alongside manually placed assets. We use actor tags to differentiate between Houdini/pipeline-controlled actors and manually placed actors so we can freely delete and replace previous bake outputs every night.

Streaming Level Proxies

We use UE4 level streaming proxies (also called level LODs) to reduce the amount of streaming levels that need to be loaded at the same time.

Our proxy generation commandlet loads up all original levels and bakes their entire content into a single proxy mesh per streaming level.

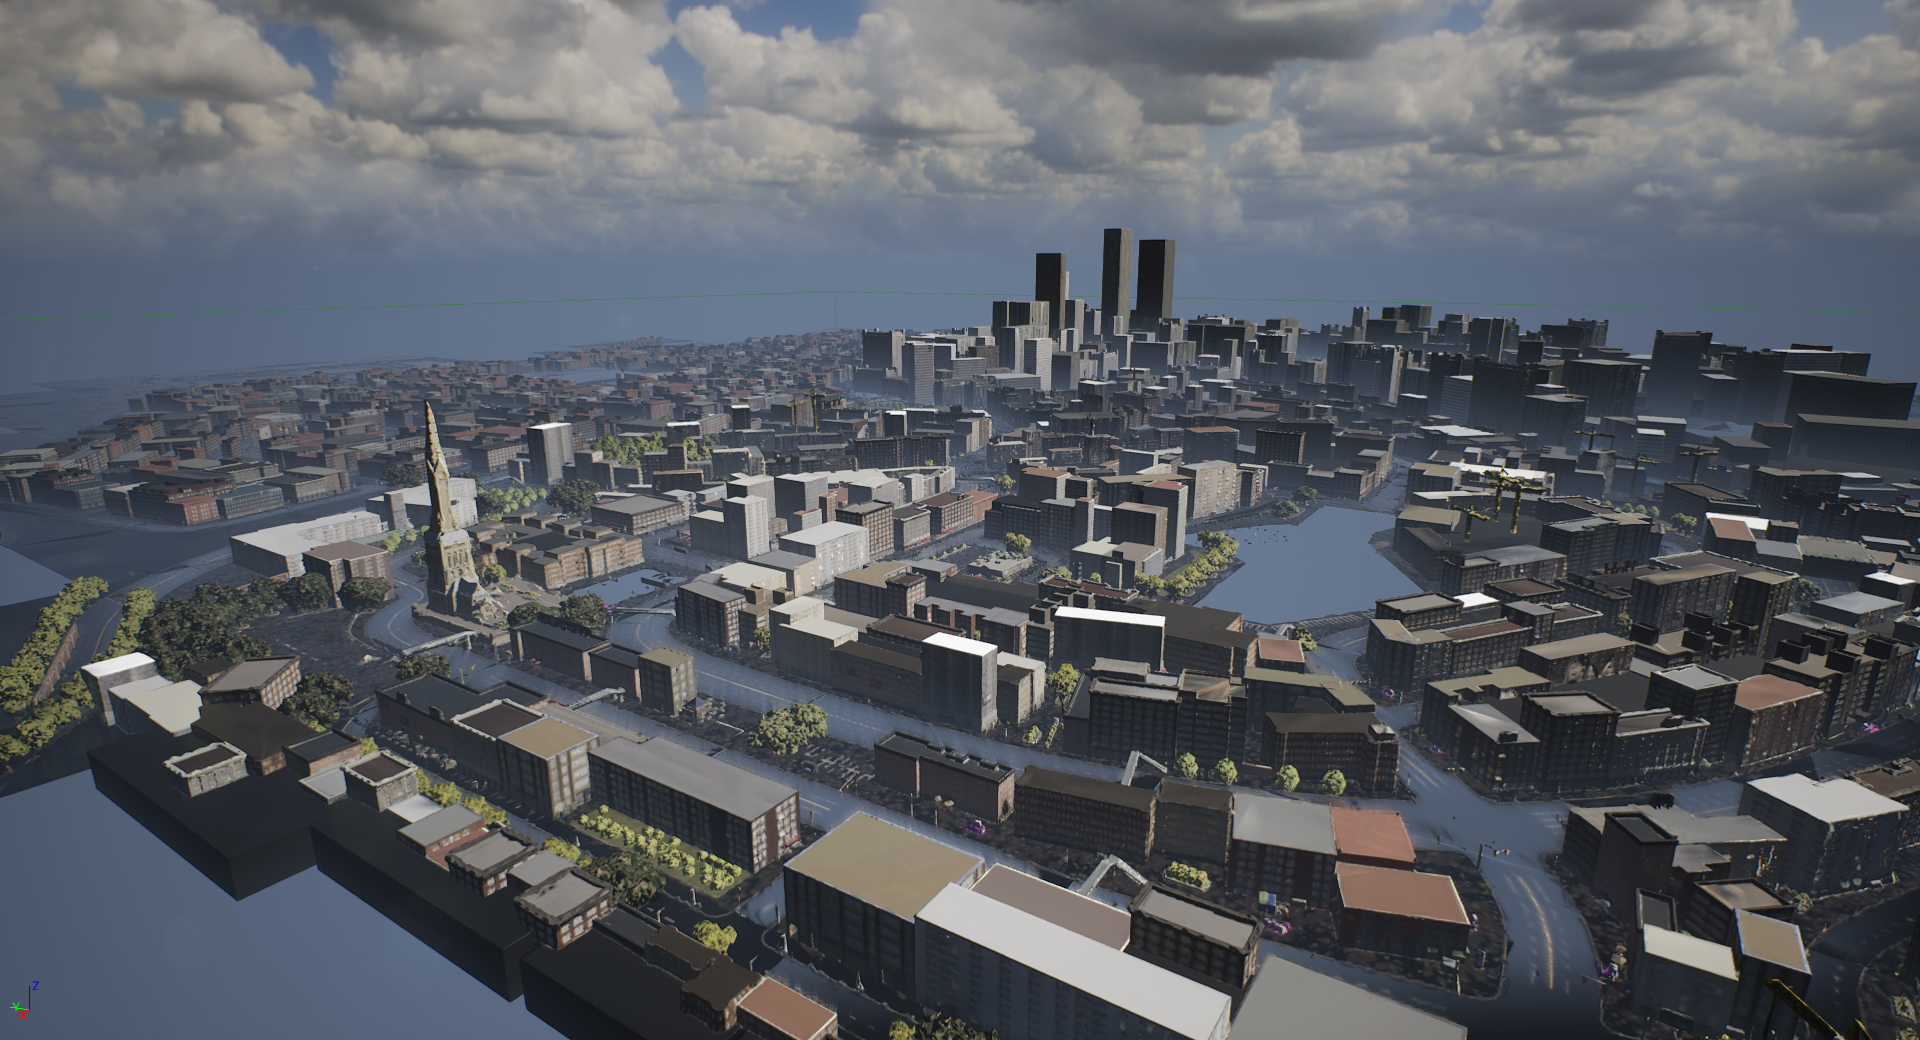
37: Brighton when viewed from above. The streaming levels close by are loaded in full detail, whereas the sky-scrapers in the back are loaded as proxies

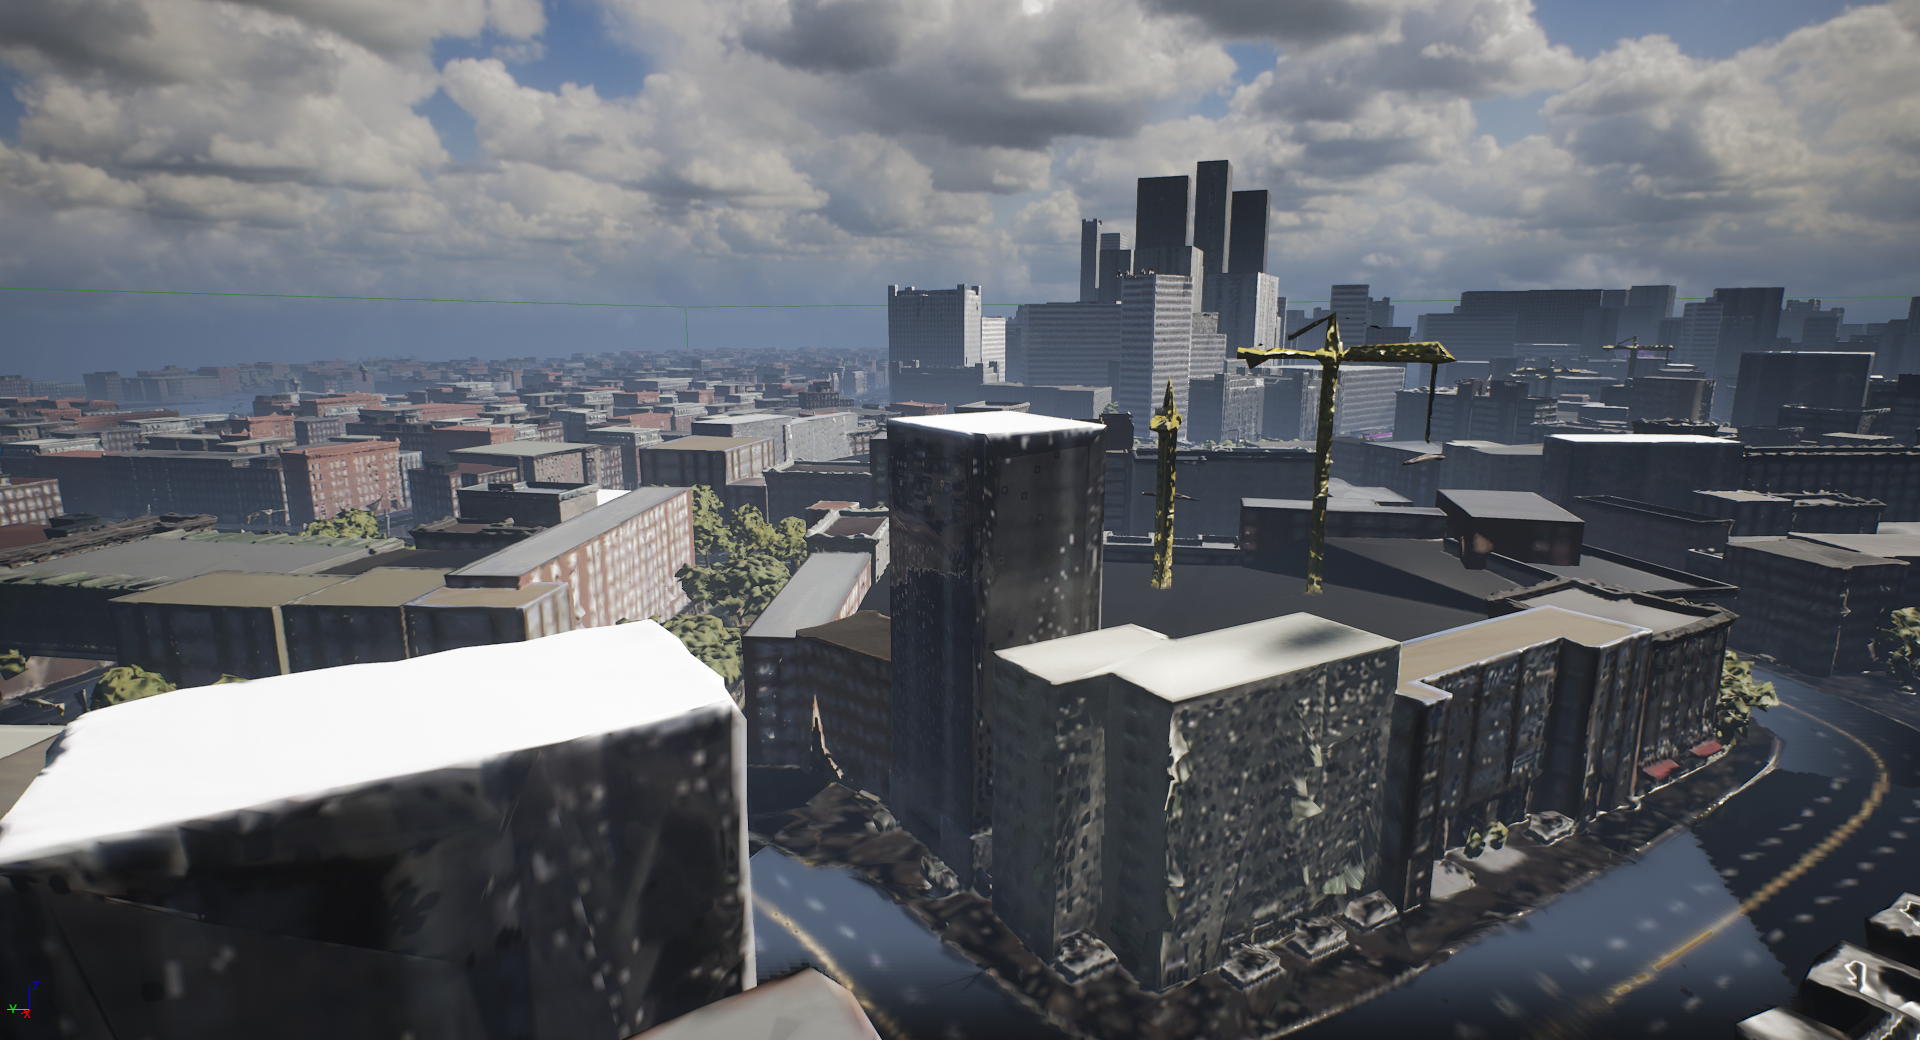
38: The proxy meshes when viewed from a close distance

Obviously, the result looks super chunky up close, but when it’s loaded in the distance we get quite a nice skyline of the city as seen here in the Downtown district:

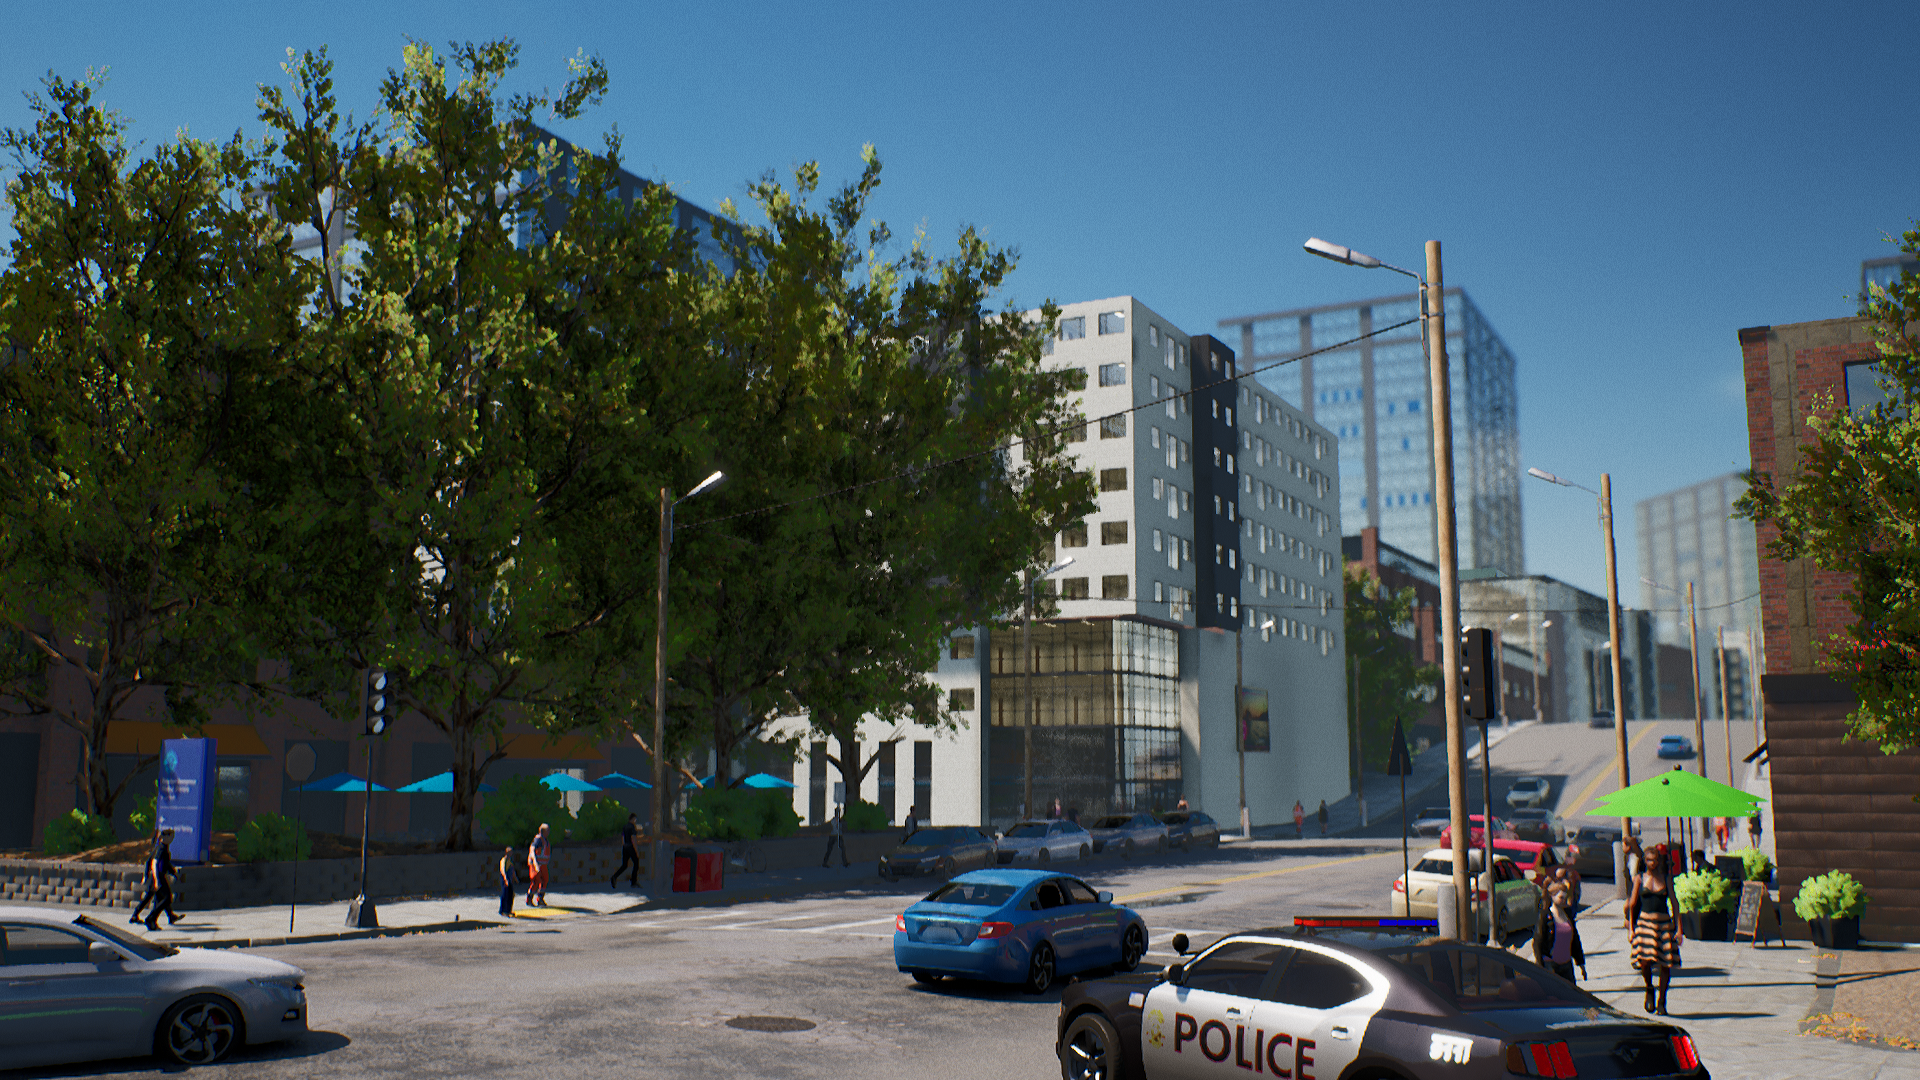
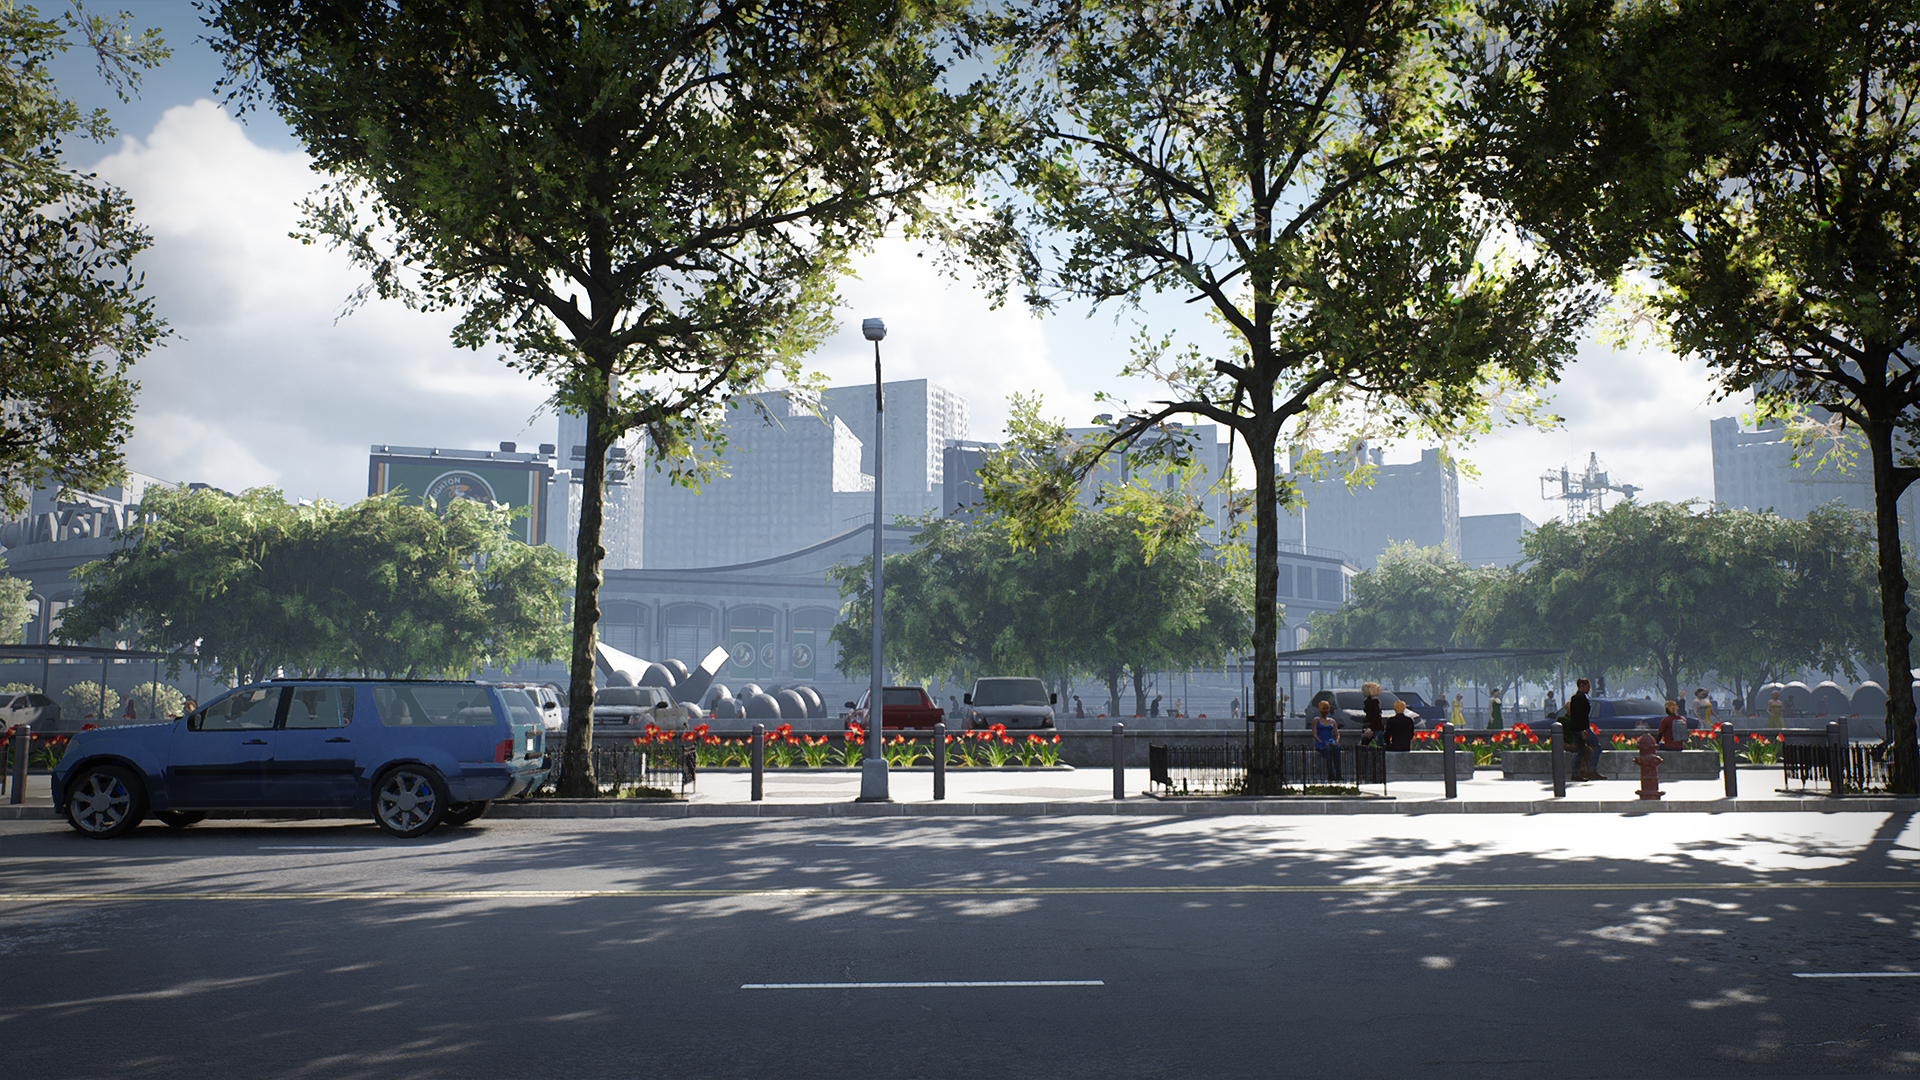
39: An ingame render from the Downtown district

Parks and Landscapes

If you play Police Simulator: Patrol Officers, you will notice that the city of Brighton is not all flat ground and concrete. There are some beautiful parks scattered all across the city. These parks are not made with any Houdini tools. Instead, they are built by our artists in UE4’s landscape editor.

40: One of the many parks in Brighton

Aesir PreCook

Everything generated by Houdini can be optimized without a big effort because we can adjust the generation algorithms and simply re-run the pipelines, but we also want to allow artists to place blueprints by hand and use them as a creative tool to assemble combinations of props. To deal with such actors, we made use of a tool from our toolkit: The Aesir PreCook is a commandlet that runs a preset of optimization steps on an arbitrary set of levels. Some of the things it can do:
  • convert child actors into real actors
  • break blueprints without logic into their components
  • batch components with the same settings together
  • create hierarchical instance static meshes where possible
  • convert ground decals into static mesh planes that render into a runtime virtual texture
  • register all lights with a single light manager actor per streaming level
All of these steps are super simple by themselves but when combined they yield great performance gains. The overall execution time fluctuates a bit based on the density of content. Timings range from 8 - 12 seconds per 150m parcel, that is 5 - 10 min per km² or 30 - 40 min for our entire map.

As a nice side effect we were able to easily add level metrics like actor counts, memory size, and their development over time.

After the precook we run the regular cook and packaging steps via BuildCookRun and deploy our builds to a Steam branch for testing.

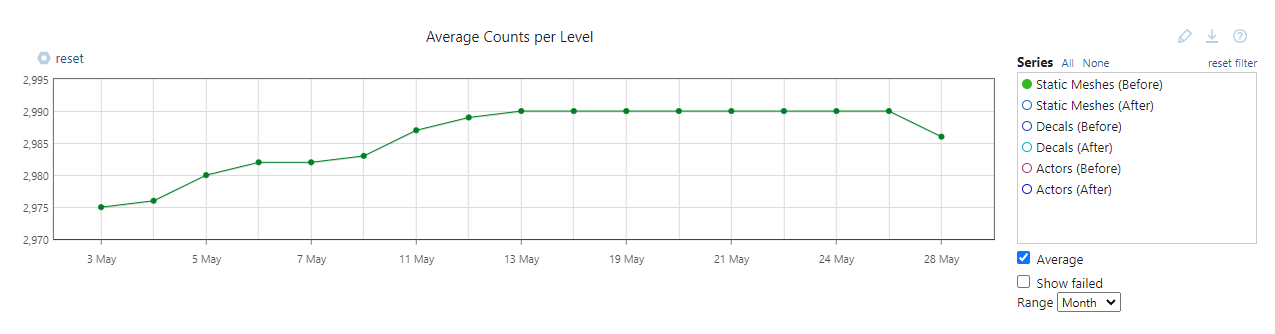
41: Average static mesh actor counts before PreCook

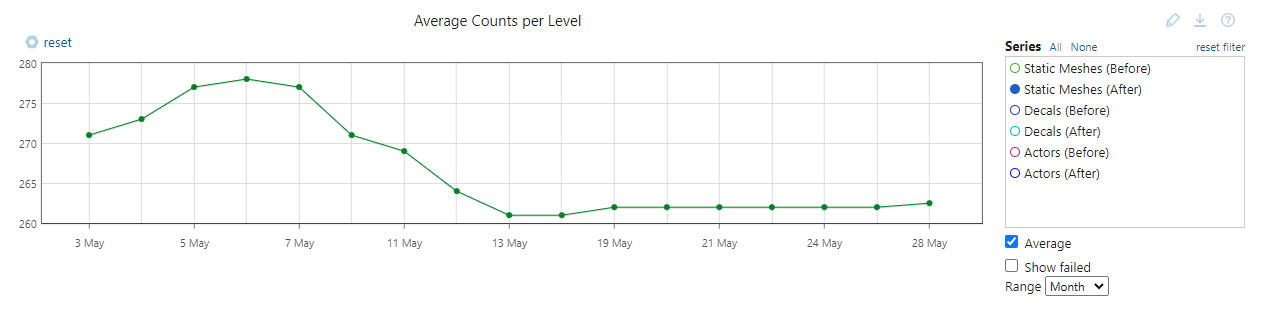
42: Average static mesh actor counts after PreCook

Final Words

We hope this article was insightful and gave you an idea of the work that went into creating our beautiful open world. After all this talk about the technical aspects of our open-world tooling it’s easy forget how many other people are involved in making this game possible. So here’s a big shout-out to our incredible environment art team and everyone else who contributed to the game!

If you want to visit some of the areas shown in screenshots above yourself, you can grab a copy of Police Simulator: Patrol Officers on Steam.

If you have any feedback on the article or simply want to reach out, you can contact our team at Aesir via hq@aesir-interactive.com or join astragon’s Discord server.

If you’re interested in the timeline for the ongoing development of the game, it’s worth checking out our Early Access Roadmap, where we outline all upcoming updates.

https://store.steampowered.com/app/997010/Police_Simulator_Patrol_Officers/
Jan 31, 2022
The Donnerwald Experiment - Wegi
-------- 1.1.6 Hotfix


#Bugfixes
-Fixed Robot Recharge using Mathf.Max instead of Mathf.Min (healed way too much)
-Fixed Geisterküste enemies not respawning.
-Fixed Nikita having a sleepover with Johanna not showing a friendship increase (visual only).
-Fixed RedRoom being quitable via Chair when Nimarus or Alentura want to talk with you.
-Fixed RedRoom being quitable via Chair when Doppelganger wants to teach you new skillz or how to defeat Nimarus.

#Overworld
-Added a new Erika Art on Day4. Also added an event on Day4 in Erika's room that can be triggered that either grants Friendship or Inspiration.

#Menu
-Crafting: The Totem requires Woy being unlocked instead of Alp now. Though it's not buildable as it requires a currently unobtainable ressource which will appear in Chapter 3.

#Battle
-Johanna no longer uses the ALP meter. Instead, she uses Woy to emulate those nightmare powers.
This ties in better with the way how she gained those Alp abilities in the first place.
-The four emotion skills that are taught in the Pact Route no longer cost Alp, only 1 Woy.
Those might be up for further balancing in the future.
-Wall Shadow no longer uses ALP, but costs 2 Stamina instead now.

Known Issues:
The game softlocks in the talk with Montgomery teaching you how to build the monocles.
This happens when you start a new file after finishing the game (without quitting the game).
I'll further investigate on the cause and how to solve it.
Kraken Academy!! - hopppi


Hello everyone!!

Hope everybody had a good start to the new year!! We had an awesome winter break and are back with full energy working on some exciting stuff!!


We are super proud to have made it to 300 reviews on Steam, 95% positive!!!! (〃^▽^〃)


Some exciting news! We are planning to make a *BRAND NEW PLUSHIE* of a Kraken Academy character!

Join our Discord to let us know which character you would like to be made into a plushie, and how much you'd be willing to spend!


The other week KiwiOnTheSticks played the Kraken Academy demo recently on Stream and it's a delight to watch and listen to her voicing all the different characters <3
You can watch it here, it starts at minute 20:00.


Finally some more amazing Kraken Academy fanart of Nikolai with a cake, by mangosqueezy <3


We also wanted to share the super cute game Dogs Organized Neatly by our friends at DU&I, which launched last week and is already a huge success! Check it out if you like puzzles games and cute dogs! U・ᴥ・U

https://store.steampowered.com/app/1597730/Dogs_Organized_Neatly/

Ohh remember the Kraken Academy is currently -30% off on Steam until the 3rd of February!

https://store.steampowered.com/app/1158220/Kraken_Academy/

Check our social media and Discord for some news about the console launch, very very soon!

Take care everyone!! <3

Join our Discord or follow us on Twitter, Instagram and TikTok for fresh updates and news in the upcoming months!

Don't forget to get your copy and leave a review if you haven't done so yet!
Reviews really help us a lot! <3


Jan 31, 2022
Goat's Tale - FoxSox Games


Update 1.4
  • When you start game for the first time, the game will ask you to run the noob mode.
  • Fixed background display problem on slower computers.

Lay a Beauty to Rest: The Darkness Peach Blossom Spring - Zerocreation
祝各位新的一年万事如意!
附现代服装的双花贺图一张~
Spaceship Hunters - Pierre Nury
Sample performance improvement when they are many bullets on screen.
Jan 31, 2022
ZEPHON - Alen
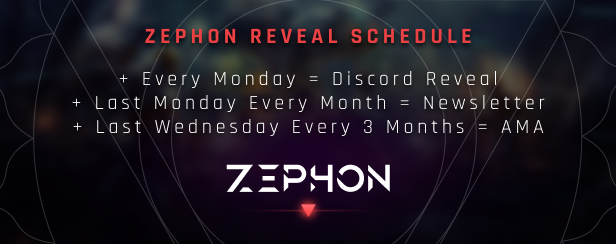
Join our Discord to follow each segment of a reveal as it happens every Monday.

From the literal use of ‘grimdark’ to the fact that the environments (if not the units) look like they’ve been inspired by the terrain of Gladius, is Zephon some kind of vision of your previous game freed from the shackles of a restrictive license?

While we are big fans of the Warhammer universe, it is definitely refreshing and complementing to work on something in parallel where we have full creative freedom. In Gladius, you build up your war machinery and battle it out with all the amazing units and factions of the 40K universe. ZEPHON is more involved: you will struggle to survive in a post-apocalyptic world, manage a more sophisticated economy, negotiate with others leaders, traverse a vast research tree, make complex ethical choices and, of course, go to war with rivals by utilizing a sophisticated mix of three distinct technological paths (conventional troops, cold-hearted machines, and eldritch horrors). A new IP allows us to express all the ideas that we’ve been accumulating over the last 6 years.


Proxy wants to go it alone with this one—any particular reason? You’ve historically partnered with Slitherine before now but there are plenty of self-publishing successes out there as well.

ZEPHON is co-funded by the Creative Europe MEDIA program of the European Union, so from a financial point of view there is no need for a publisher. We might decide to team up closer to release for marketing purposes, but we want to engage with players directly and react to their feedback with new game versions in a matter of minutes—which people are loving on our Discord.

“Let’s face it, 4X combat is often boring or shallow”—It’d be remiss of me to not want to explore this further—how does Zephon solve this proposed problem with 4X combat?

4X games often give combat the back seat. It’s not necessarily an issue, but it’s a question of focus. We feel that these games, after the economic infrastructure is created, most of the time end up being decided by combat anyway. We can do the whole experience more justice by going beyond simplistic combat. That’s done primarily by giving each unit a very distinct role through unique weapons, skills and upgrades. We’ve been inspired to bring RTS elements into 4X combat and believe it works excellently.


Considering Proxy has spent a lot time recently making a game that’s been famously devoid of any kind of diplomacy (there is only war in the grimdark, after all), how do you plan on shaking up those mechanics specifically with Zephon?

With ZEPHON we really want to emphasize the roleplay aspects when you talk to other leaders. So in order to feel as immersive and interactive as possible, they will react pronouncedly to actions you perform or choices you have made in the past. You will be able to influence leaders to perform any diplomatic action on third parties, and all leaders will have fully unique dialogue lines to bring their respective character traits to life. It’s important to us that none of this detracts from the combat experience, but rather augments it. Being able to decide with who you’re at war will ultimately give you more control over the combat than a free for all.

Your steam page also mentions shaking up other 4X foundations as well—what other innovations are you proud of?

Some are still in the experimental design stage, but two important foundations that we can mention now can be split into gameplay and visual. Gameplay-wise, we’re doing an involved economic model where resources combine to create more powerful resources (think Settlers or a simpler Factorio), but also where you pay for production ahead of time instead of your resources ticking down each turn. That means you’ll have to think about your build orders and resource allocation ahead of time if you want to play optimally. On the visual aspect, we’ve recently been seeing an influx of 4X games that try to appeal to a large mass with casual graphics. We want to go into the other direction, be more realistic and show the gritty and the dark. On top of that we are going to uniquely model every unit upgrade and also every distinct type of building in your city--so you know what kind of city it is just from looking at it.


From Pandora, to Gladius, and now your work on Zephon, what do you think is Proxy’s defining or enduring legacy on 4X strategy games?

The relentless pursuit of creating a great combat experience. And we’re doubling down on it by making it more visceral and immersive.

If you enjoyed reading this, help us out and tell your friends to wishlist ZEPHON—it's the only way we can encourage Steam to show ZEPHON to more people.

https://store.steampowered.com/app/1481170/ZEPHON/
Don’t forget to subscribe to our newsletter to receive regular reveals and exclusive closed betas to your inbox: https://newsletter.proxy-studios.com/
Jan 31, 2022
No Fair Play - Self MADev
NEW FEATURES :
Gameplay :
  • Added a radial menu for boosters (Super Candies), you can now choose the appropriate time to use them. (You may need to reset your input binding in settings menu)
  • Collected Super Candies are now stored instead of being consumed immediately.
  • Players start the game with one super candy of each type.

Statistics and ranking :
  • Added a ranking system. Players start with 100 score points (lower score). This is not really a score, it's more a "value" system (I'll rename it later)..
  • At the end of a match, players win or lose points based on the amount of points they earned during the match and the rank of their opponents.
  • The global amount of points give a rank. (Bronze to Diamond)
  • Rank is also showed in the lobby (Specific avatar background color)
  • You will get some points playing alone against bots but it's just for testing it will be removed later.
  • Add Stats : (Points per hour, Goals per hour, Win/Loss ratio)
  • Note : Stats will be resetted later so don't take it seriously ...

Penality system :
  • If a player leaves a match before the end and does not reconnect, it will lower his overall score (and also his rank).
  • You doesn't lose points if you stop a match and you're alone against bots.
  • You do not lose points if you join a game in progress and lose it.

FIXES :
  • Emoctiones animations weren't replicated for other players
  • Default Region is now on "ALL" by default
  • Credit menu was disapearing when pressing esc key, making impossible to get back to the main menu.
  • Camera didn't take the correct position after being knocked down.
  • Other player was looping a runing animation when loosing a round instead of walking.
  • Saved mouse sensitivity wasn't loaded when you started a match.
👑 Idle Calibur 👑(选王之剑) - 绝汪
If you encounter any problems, please forgive and give feedback!!

Email: 623414226@qq.com

(1/31)
·Add new daily challenge mode (all hero battle)
(All Hero !!)
·Add relic effect(Excalibur and Lake Scabbard)
·Add text (high difficulty complete times)

(1/17)
·Thanks for your feedback and fixed some missing untranslated text
·Fixed some new versions of bugs
·Added initial resources
·Difficulty unlocking adjustment

(1/16)update:
Thank you for your feedback! Fixed some missing text

(1/15)update:
Fix some newly discovered BUG and text、Adjust difficulty unlock

(1/11)update:
·New hero
·Soldier training (Barracks)
·New skills
·New challenges(Taboo book)
·A large number of text and bug fixes
·Hero gift interaction added
·New mod try
·This is not the last update!
...