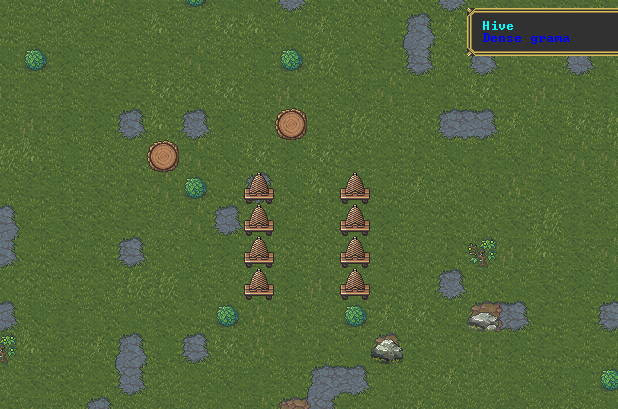
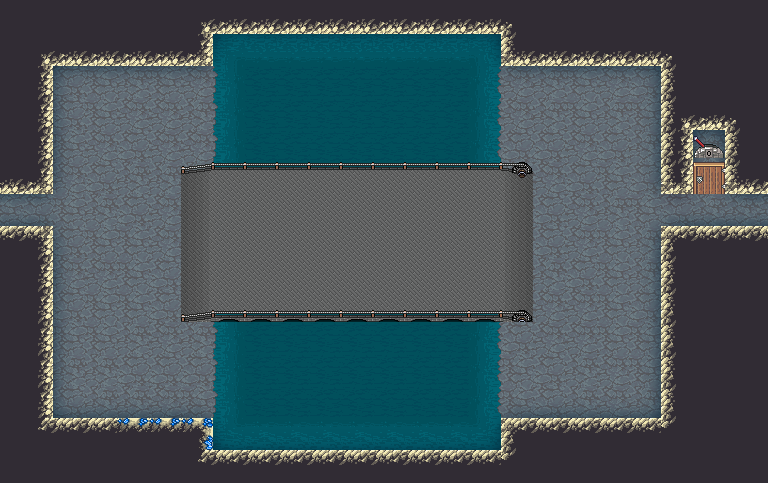
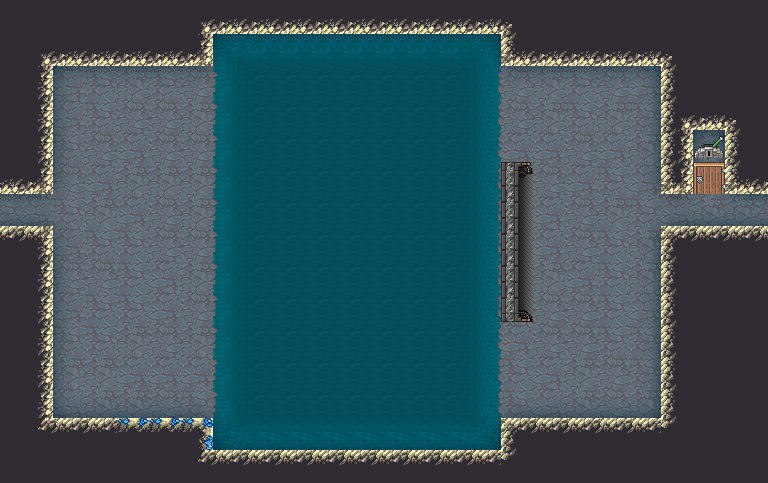
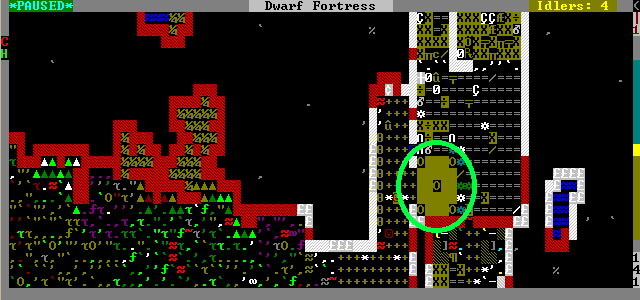
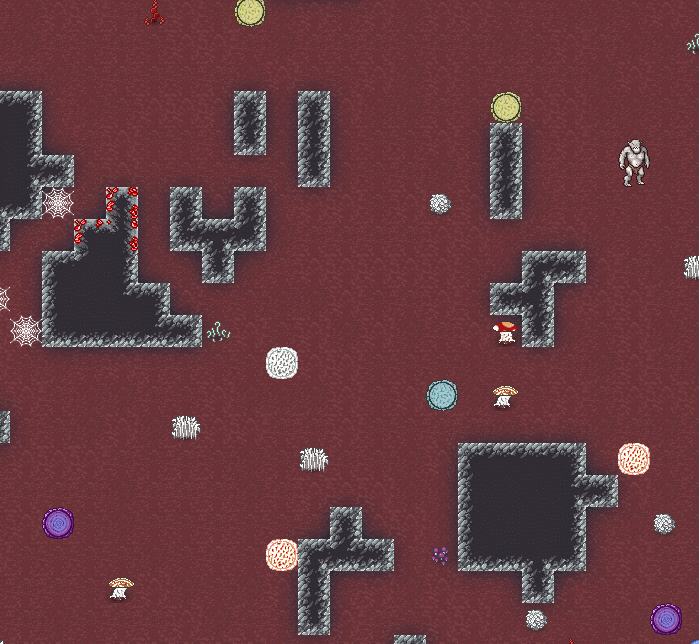
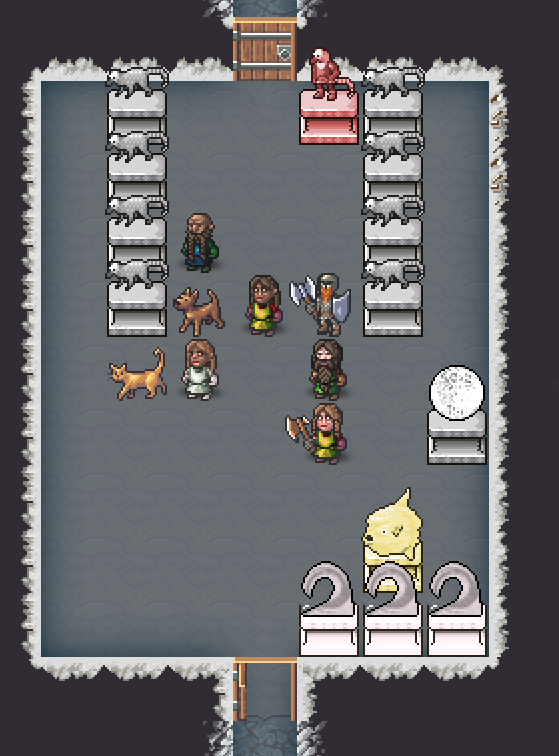
Here's a little setup I've carved out at the underground level where the water flows in a brook. Near the bottom of the image, a stone floodgate holds the water back. The channel to the north of it has a ramp for access from above, coming down from the grassy field by the brook. We also have vertical bars forming a few large cells in the upper right. The shape shown in the individual bar tiles adjusts according to what is nearby. Patrick drew the new bar and floodgate pictures.
The lever in the top left has been connected to the floodgate. I've used a hasty and risky method! As you can see in the animation below, a dwarf can run down and pull the lever, escaping upward just in time before the water comes rushing in.
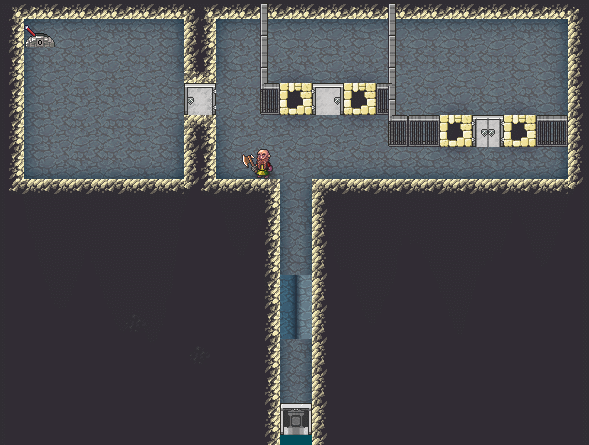
You can see in the image how water blockages works. Water can rush through vertical bars, but it is blocked by floodgates and doors. Floodgates are safer since dwarves can open doors by default and it's a bit dangerous to rely on them. Players make drowning chambers in a variety of designs for various reasons.
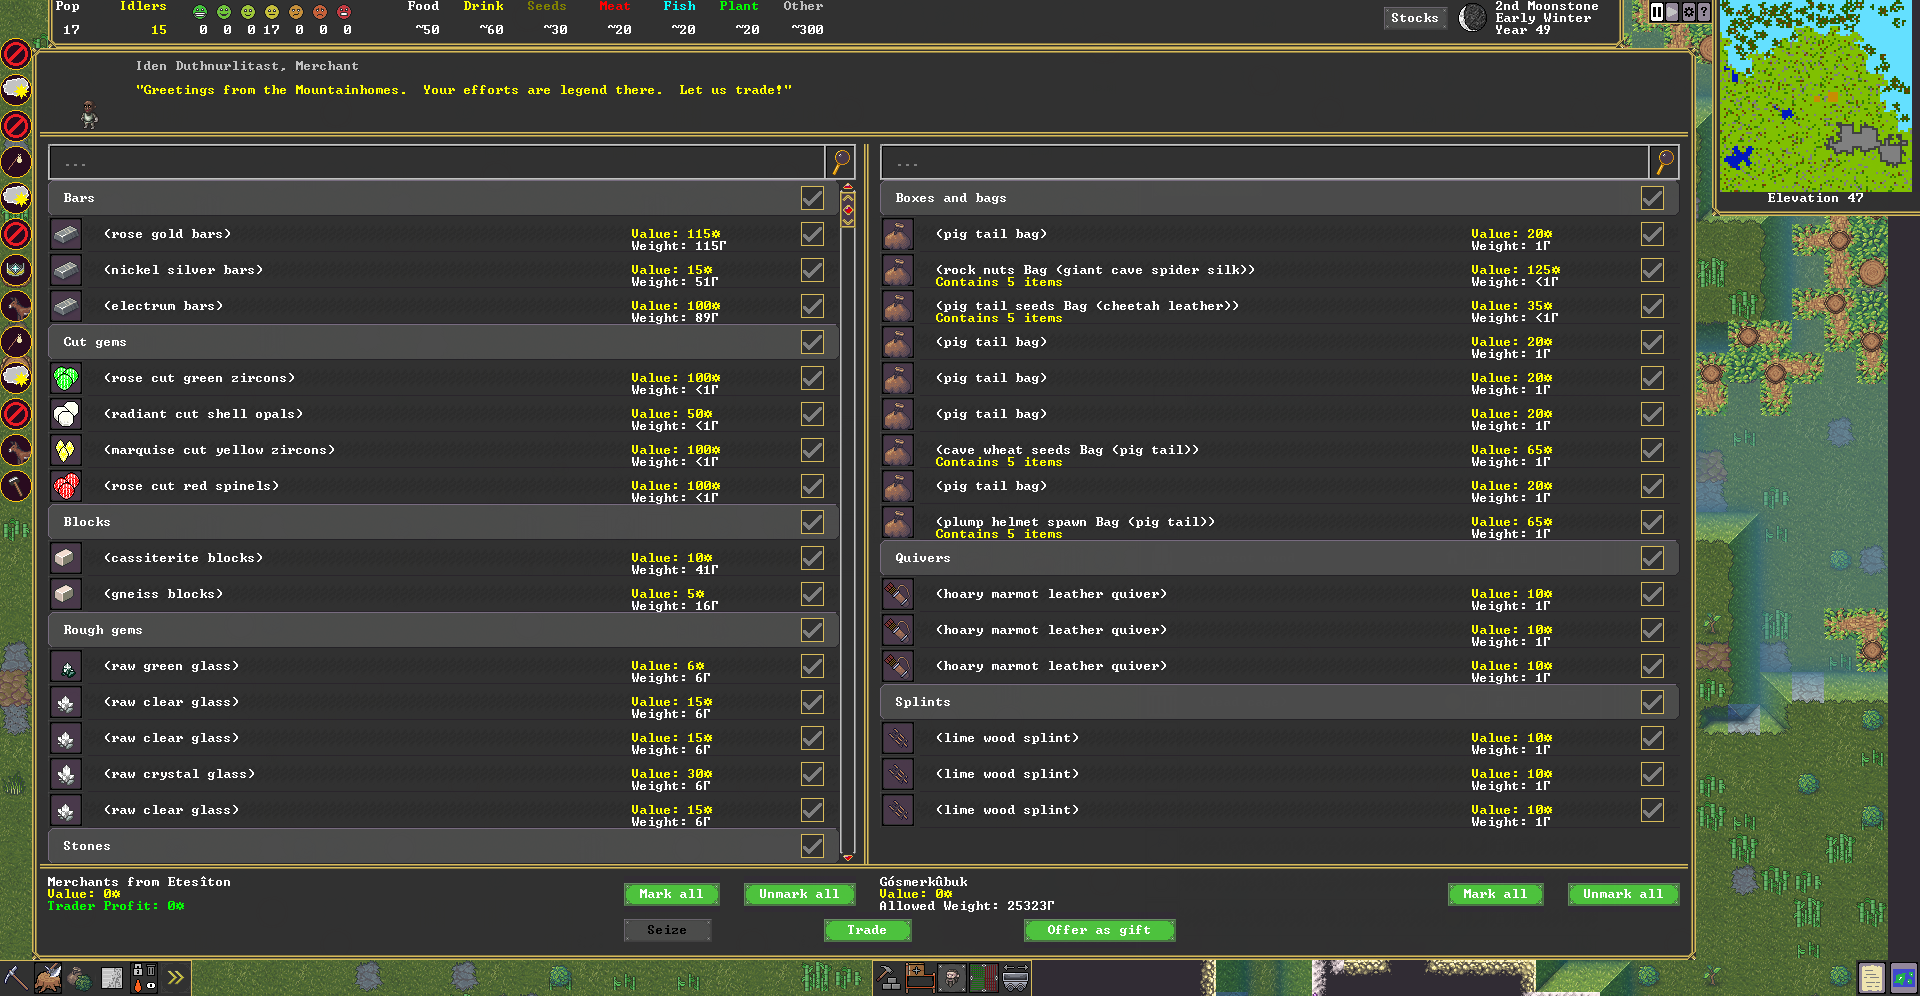
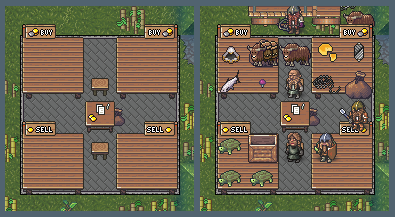
I've also more or less completed the trade screen, where you actually exchange items with the merchants that arrive periodically throughout the year. This is reasonably similar to the old trade screen, aside from all the mouse support, as well as the search filters. You can also collapse both headings and container lists by clicking on them, though I should probably add a specific button for that. The dwarf merchant there up at the top is placed so low since we need to support much larger creatures, though I should get a chance to even that out for different sizes. So, a few things left to do, but it's going pretty well.
Mostly I've been spending these last two weeks moving apartments after 13 years in one place. So much junk... and my vacuum caught on fire, ha ha ha. But there was still a bit of time for work, and now we can show you the very important DF industry, beekeeping!
This industry came about after the community voted on which of some hundreds of animals should be added to the game over a decade ago. Being a practically minded community, the animal that led to naturally to several new industries was the overwhelming favorite! Above you can see some artificial hives, ready to accept wild colonies.
Hives can be populated either using a wild colony, or by splitting an existing colony in an artificial hive. You'll want to balance your splitting and gathering of products, since gathering products destroys the hive in question.
Natural hives can take some time to appear and aren't on every map. Above, I've used debug commands to place all of the possible wild hives together. From the top going counterclockwise, there's a bumblebee colony, an ant hill, termite mounds, and then the one we are looking for, the honey bee hive!
Once installed, the bees will begin working (the second hive down on the right side has little bees buzzing around it.) You can also see an individual wild bee above the right column. These pop up around artificial and wild colonies, and are mostly okay, but will occasionally sting!
After a time, the bees' work is done and products are ready to collect! I've also split the first colony to another colony on the left side. In this way you can keep expanding your industry.
Here you can see the products in the hive building, wax honeycombs and some royal jelly. Royal jelly can be collected in a jug and used in cooking (though as old hands know, there are some jug storage issues there we're still working on!). Honeycombs themselves must be brought to a screw press. The pressing produces a wax cake and also some honey which can be stored in a jug. Honey can be used in food or made into mead, and wax can be used for crafts.
This time we'll revisit bridges, which Patrick has done another pass on.
Here I've set up a double wooden drawbridge. You can see now where the mechanisms are, and thus can tell from the image itself which way the bridge will raise. (The fisherdwarf has been busy catching salmon, steelhead trout, and mussels, but I didn't make a food stockpile, so they are littering at the riverside.)
This is the bridge in action:
This might keep some invaders out of your fort, but you'll often want to build further defenses deep underground in case things go terribly wrong.
Here's a stone bridge over an internal moat:
The water isn't necessary if you dig a deep enough pit, but it's fun to play around with nonetheless. For this moat, I connected a surface stream to my fort using a channel and then a staircase. The water flows into the moat from a submerged hallway at the northern side. Of course, due to water pressure, this is incredibly dangerous, so a submerged hallway on the southern side connects to a staircase which drains the water further down into the natural underground caverns. Lots of giant mushrooms currently being rained upon down there. You can avoid this by using floodgates and only admitting as much water as you need.
When the bridge goes up, dwarves in the hallway are safe from arrows, though the way I've set this up, the initial lever puller would be exposed.
Here's a steel bridge, or diving board, above a volcano, along with a pit zone. The game doesn't care what's below the pit zone particularly - once a prisoner or beast is designated, a dwarf will bring them over and throw them in. You can use this to create lion pits and stuff like that, or you can use it over volcanoes and other such places, as you like, for captured thieves or invaders.
- Tarn
PS: Alexandra from Kitfox here, the one who posts on Tarn's behalf. Hi! I did an interview with content creator BlindIRL that's worth checking out. Stay tuned for future community events!
Over the last few weeks, part of what we've been doing involves trade in the fortress, both making it look better and adding some new practical pieces as well.
Here we have some full wagons on the bottom of the screen bringing much-needed supplies to the player, through a bamboo forest. There's also a yak with some bags packed on it that is part of the caravan as well, and a few bodyguards. On the wagons and animals, there's not a lot of graphical real estate to work with, so the images reflect the amount of stuff being carried (there are four levels), rather than specific items.
Once we get to the newly redesigned depot, though, the situation changes, and we can show specific trade goods on the tables. The tables at the top are for the visiting merchants, and they also get the northern stool. The bottom tables show the goods the fortress is willing to trade (which are selected by the player), and the fortress broker sits on the southern stool.
In the image above, the left side is before the wagons arrived, and on the right side, the wagons have unloaded (you can see the wagons resting at the very top.) I've also brought the, um, goods I had on hand in my little test fortress, ha ha. It is a bin of wooden crafts and some turtles we caught. I'm sure the thriving capital of the dwarves will love my little turtles.
Just for fun, here's an image of the depot in the old version. I've circled it in green in case you have trouble picking it out! The separate tables and the ability to tell who is trading which item are new to the graphical version.
We're still working through the trade screens. Here you can see what we have for bringing items to the depot so far. It's a little easier to select groups of items now, as well as bins containing various objects, but we're also going to allow direct selection at stockpiles and from the items themselves, so you won't have to handle everything from the depot, which could be very cumbersome to say the least.
A little of this applies to adventure mode as well! Here I've packed some items on my trusty donkey, and that is visible now as I lead the critter through the village.
Levers in Dwarf Fortress can be hooked up to all sorts of buildings and machines, such as doors, floodgates, gear assemblies, cages, spikes, and bridges. In the old game, this was a reasonably painful process, where mechanisms had to be manually selected, lists scrolled through, and afterward it was very difficult to figure out which lever was linked to which building without just pulling it and seeing what horrible things happened.
This has been changed now! In the video, you can see what we currently have:
When you click "link lever", two appropriate mechanisms are chosen by default. You decide what to link the lever to by clicking on it, and once you've hooked it up, both the lever and the linked building have a list of links with a recenter option. So hopefully there will be fewer unnecessary tragedies.
Patrick has also drawn up some new barrels, with their contents, so that you can get some information about your food stocks at a glance.
Here we have some dwarven wine and rum, as well as meat, fish, plump helmets and seed bags.
Alexandra here with the Spring video dev update showing off all the latest features in Dwarf Fortress with Tarn. This time, we have some new, exciting developments in the Fort including bedrooms, tombs and a visit from an elven caravan! We have have big updates on the building interface and zoning placement.
This time we have a look at the expansive cavern system that you can find underneath your fortress.
There are all sorts of mushrooms down there, which Patrick has prepared for you. Big ones, little ones, really big ones... in the image above we have tower caps and fungiwood growing in the subterranean water pools, and the floor is entirely covered with smaller fungus. The largest multitile growths can be used for lumber if you manage to reach them and recover the fallen material, and the smaller ones can be used for food, dye, and clothing. These can also be cultivated. Your dwarves can use the water for all sorts of purposes, especially if the surface level lacks a river or brook. (We still have to handle the blue water behind the tree images, and the ramps cut off prematurely sometimes.)
Since the largest mushrooms occupy multiple vertical levels, you see slices of them as you move up and down through the levels of your fortress. In the gif, we start at the mossy floor with a spattering of webs and small vegetation (and a cave ogre) and move up three levels, viewing the caps as they round out at their tops.
You can see three different gem clusters in this image of a lichen floor. The open cavern makes it easier to prospect for ore and other useful minerals, but also leaves you exposed to visits from various creatures if you don't take precautions!
This time I've brought some elves, the third of the major critters you can find in the game, after dwarves and humans.
Brought to you by Mike, they are slighter than humans, as we can see here, and their hair comes in autumn colors, though some have mossy green or silvery white. I have everybody in the same clothing here to focus on the physical features. (Note that some of the beards of the dwarves have been shaved since my creature placer doesn't respect their normal customs.)
These elves grow wooden weapons and armor and don't like to trade any items made from butchered animals or wood they suspect came from felled trees. In the image above, you can see their heavy armor, and a more lightly armored warrior, with some humans in metal equipment for comparison.
And this is the variety of their typical clothing, using profession colors. A few of these professions are atypical for elves, but you can find them in human settlements where they'll often find themselves working in jobs that don't exist in their forest retreats, even those wood-working professions which the elves living among the trees might find offensive. Similarly, fully-acclimated city elves don't appreciate that forest elves eat the people they kill in the ongoing timber skirmishes, so it kind of evens out.
Statues are one of the pieces of furniture in Dwarf Fortress. You generally use them to increase the value of a room, or as the center of a room when you designate an area to be a sculpture garden. This is a place for dwarves to hang out and admire the architecture, which generally makes them happy. The statues can depict particular people, historical events, abstract shapes, artifacts, and more. Of course, up to this point, we used the same text symbol for every statue, made the material give it one of a few colors, and left the rest to a sometimes lengthy paragraph description, including whatever engravings or other decorations might be found on the object.
After Patrick drew lots of new images and adapted many additional images to the statue format, we're finally able to begin showing some portion of the details! This is my coati hall, with eight coatis and a coati person. There's also a sunfish enjoying some time in the waves under the moon. The colors of the statue give some indication of their material, various stones I located in the mines. It's a strange room, and I shouldn't be in charge of decorating anything, but my dwarves enjoy the space, because they don't know any better. There's also a visiting human monster hunter there, possibly confused.
The pedestal indicates the quality of the statue, and also reflects all of the decorations (spikes, hanging rings, engravings, etc.) Damage and spatter are also indicated. This statue has been encrusted with oval cabochons and given little menacing spikes.
This time in Adventures in Clicking on the Main Screen, we have workshops!
(Please click-through for a bigger image)
This window has popped up after clicking the mason's workshop. In the old Dwarf Fortress, looking at the items in a workshop and looking at the tasks to be performed at a workshop were two separate commands. Now that information has been combined into one window. (Like last time, none of the interface art is final here.)
There are various ways to interact with tasks and items which are now accessible through the little buttons. These include setting up repeat tasks, high priority tasks, shuffling the order of the tasks in the list, examining the details of the task in the list, suspending a task, and cancelling a task.
In the bottom list, the distinction between the two pieces of granite is that one of them makes up the physical workshop (the one with the house-shaped building icon), and the one at the end with the 'TASK' icon is the one currently being worked on in the active task. The other icons allow you to do some of the actions also accessible from the lower left menu - forbidding items, dumping items, melting items (not pictured here since none of these are meltable), and hiding items.
(Please click-through for a bigger image)
Here's what you get when you add a new task. The potential task list alphabetized now and has a search filter. I've changed some of the old job names to make the alphabetization work.
All of this can run unpaused (also new). Missing is the ability to rename the building, the worker profiles, and the ability to destroy the building. Those'll all be in soon.
I've also redone the old jeweller's workshop screen (the old gem cutting interface was very baroque, to say the least.) It now works like a regular workshop. The same is true of seven other workshops previously inaccessible to our modding infrastructure. They all work like regular workshops now (the loom, the mechanic's workshop, the dyer, etc.)
- Tarn
Kitfox's Note
Hello folks! Just a quick wee message from myself to say, happy (belated) birthday Scamps!🎉 I couldn't resist getting this birthday boy in here this week and, with full blessings from Tarn, I can share a new picture with you of the third Dwarf Fortress developer.