May 10, 2019
Armored Battle Crew [World War 1] - Tank Warfare and Crew Management Simulator - skullwolf
Hey Tankers!

Today, we'll invite you on a tour of the Garage!


Garage
The garage is where you'll get a chance to tinker with your vehicles before going into battles. Here you can change your tanks' weapon loadout, adjust armor and customize your ride with camo and decals!


Vehicle Carousel
You can add, remove, and switch vehicles using the carousel. Adding new vehicle is free as long as you've unlocked the vehicle.


Hint: Free Garage Slot!


Vehicle Info Panel
Important stats of the selected vehicle.


Arsenal
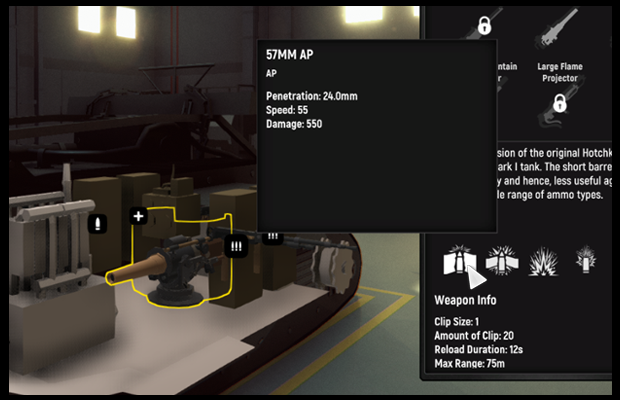
Each module of the selected vehicle can be modified based on your needs and wants. They range from weapons, engines, storage modules to fuel tanks and tracks.


Tons of weapons to choose from!


Barrack
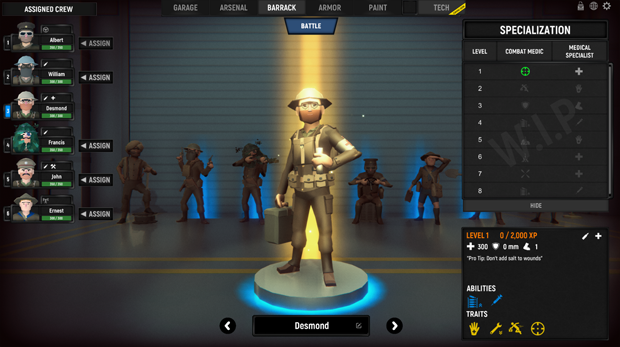
You can find all your crew in the barrack. Use the Assigned Crew Panel on the left to assign crew to your selected vehicle. More details such as health, movement speed, traits, abilities and specializations can be found on the Crew Info Panel on the right.


Say hi to Desmond!


Armor
Additional armor can be mounted on the vehicle for better protection. Be mindful that additional armor increase the weight of any vehicle and reduces mobility! So, choose wisely!


Err.. is there chainmail?


Paint
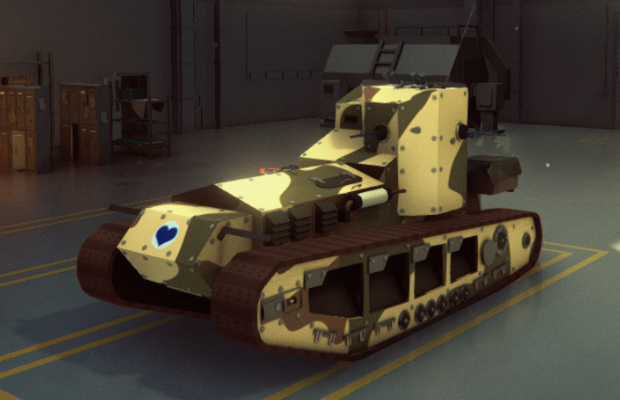
Feel free to change the Camo and Decal that adorn your vehicle. Camo and Decal customisations are purely cosmetic and can be filtered between historical and creative (non-historical) versions.


Who said a tank can't look pretty in combat?


Tech
More vehicles and modules can be unlocked from the Tech Tree using XP gained in battle.


Hmm... what should I unlock first?


Alrighty! You should be familiar with the garage now!

Stay tuned for more insight and be sure to WISHLIST the game so that you are ready to roll out when the fighting starts!

As always, join us on Discord to chat about the game and tanks!

Lastly, drop a comment and like if you like what you are seeing/reading!

Armored Battle Crew Team
Armored Battle Crew [World War 1] - Tank Warfare and Crew Management Simulator - skullwolf
Hey Tankers!
Today, we want to take you on a tour of a very special variant of Mark V tank.


German Panzerzug
The German armored train, aka panzerzug, was deployed in WW1 to protect and patrol their supply lines. Armed with machine guns, cannons and armor, they can move with speed and provide firepower when needed. This eventually lead the British deciding to emulate the Germans, with the task falling on a relatively unknown British engineer, Edison L. Emming.


Edison L. Emming
Due to the urgency and shortage of resources, Edison decided to mount the new Mark V Tank on an empty rail car and have it pushed along the track by a locomotive at the rear. This sounded absurd to some officers, but Field Marshal Douglas Haig, pleased with the ingenuity dubbed it the L. Emming’s Train.

A special wooden ramp was also designed and installed on the front, allowing the Mark V tank to dismount and deployed for further operation when needed.


L. Emming’s Train
Field trials were conducted in the mid 1918s to determine its feasibility but soon ran into multiple problems.
  • Speed suffered from due to the heavy Mark V (29 tons)
  • The Armor of Mark V (14mm) was relatively thin
  • A convoy of L. Emming’s Train were easily spotted by enemies
Eventually, the idea was abandoned as there were not many opportunities to deploy the trains strategically. Launching a frontal assault across an open field was far more effective than a railway assault.

That’s enough for the day. Stay tuned for more insight and be sure to WISHLIST Armored Battle Crew and take the L. Emming’s Train for a spin when it's available!

Do join us on Discord to chat about the game and tanks!

Leave a comment, like and share Armored Battle Crew with your friends if you like what you are seeing!

Armored Battle Crew Team
Armored Battle Crew [World War 1] - Tank Warfare and Crew Management Simulator - skullwolf
Hey Tankers!
Today, we will introduce you to a rather fascinating variant of Mark V.


Tadpole, not Walpole?
The German, facing the onslaught of British tanks in 1917, started to increase the width of their trenches in bid to impede the movement of tanks. To aid in the crossing of such widened trenches, the rear tracks are lengthened. The extra sections were dubbed the Tadpole Tail extension due to the shape and hence the name, Mark V Tadpole.


Mobility
The extra length allows Mark V Tadpole to cross widened trenches. But due to the increased weight, the tank has reduced speed. The additional track length also make the tank harder to steer, resulting in much slower rotation speed.


Mortar
Additional fire support was provided to the accompanying infantry by installation of a mortar on top of a platform at the rear of the extended tracks. In the game, the mortar can be accessed by the tank crew via the rear hatch.

A wide range of weapons such as grenade launcher, small to large mortar are available. Do note that the rear gun port is removed and with the mortar being exposed, be sure that no enemy is sneaking behind your tank!


Tactics
Due to the reduced mobility, you will have to make full use of the mortar to gain the upper hand in the battlefield. But be mindful as the medium to large sized mortars have long reload and eat ammo for breakfast.

Resupplying can be a tricky affair as the tank is slow so do plan way ahead. Additionally, do watch out when navigating tight spaces in urban area due to the extra length of the tank. You would not want to get stuck in heat of action!


That’s enough for the day. Stay tuned for more insight and be sure to WISHLIST the game so that you can be the first to try out the mighty mortar when the war starts!

Do join us on Discord to chat about the game and tanks!
Leave a comment or like if you love what you are seeing!

Armored Battle Crew Team
Armored Battle Crew [World War 1] - Tank Warfare and Crew Management Simulator - skullwolf
Hey Tankers!

Today, we will be instructing you on the Signal Module, Smoke and Star Shells.


Starry, starry night. Paint the sky with my star shells.


Signal Module
The Signal Module, when manned, provides 2 additional functionalities
  • Extend the detection range on the minimap
  • Access to Signal Support features via the Signal Module Panel

Mark V's Signal Module


Visual and Signal Range
There are 2 detection ranges on the minimap. The shorter Visual Range is active by default until the Signal Module is manned, which activates the longer Signal Range.


Default Visual Range indicated in green.


Extended Signal Range also indicated in green when the Signal Module is manned.

Essential information on enemies' location and attack formation will only appear on the minimap when enemies are in the Visual or Signal Range. So we recommend you keep the Signal Module manned as much as possible!


Signal Support
Signal Support as it name suggest supports your combat efforts. Each Signal Support type will come with 4 abilities with some of them even providing passive bonuses.

The type of Signal Support you bring into battle can be customised in the Garage.


Signal module panel with 4 abilities

Each support ability has an Activation Cost (Command Point), Active Duration and Cooldown Duration.


Choose the right Signal Support type for your mission!


Command Point
As previously mentioned, you will need Command Points(CP) to activate the abilities in your Signal Support. CP is earned as time passes during a mission or by capturing command caches scattered across the map.


Example of Signal Support
Below is the example of 4 basic Signal Supports types available in the game.

Infantry Rifle Corps

Call in Infantry support to capture and hold on to Victory Points!
Abilities:
  • Small Supply Drop (Replenishes a small amount of Tank Health, Ammo, Medical and Fuel supplies)
  • Smoke
  • Heavy Rifleman Squad
  • Mortar (High Explosive)

Royal Artillery Corps

Unleash destruction with the backing of the Artillery Corps!
Abilities:
  • Small Supply Drop (Replenishes a small amount of Tank Health, Ammo, Medical and Fuel supplies)
  • Star Shell
  • Artillery (Shrapnel)
  • Artillery (High Explosive)

Defensive Tactics

A Mix of Infantry and Artillery Support allowing you to hold back enemy advances.
Passive Bonus:
  • Bonus to Tank Health
  • Bonus to Capture and Resupply Speed
Abilities:
  • Small Supply Drop (Replenishes a small amount of Tank Health, Ammo, Medical and Fuel supplies)
  • Smoke Shell
  • Anti-Tank Rifleman Squad
  • Broken Arrow (Unleash a barrage of artillery near your tank)

Infiltration Tactics

Raid and wreck havoc in enemy strongholds and territory!
Passive Bonus:
  • Your tank can help capture Victory Points
  • Bonus Command Points when Command Caches are captured
Abilities:
  • Small Supply Drop (Replenishes a small amount of Tank Health, Ammo, Medical and Fuel supplies)
  • Star Shell
  • Trench Raider Squad (Have a squad of assault troops follow your tank)
  • Artillery (Yellow Gas)


Smoke and Star Shells
You've read about them in the the Signal Support briefing and now we'll go in-depth on the them. 2 common traits of the Smoke and Star Shell abilities are that they require a low amount of CP to activate and a quick cooldown cycle. These allow them to be used more often to gain tactical advantage.

Smoke
Smoke, when dispersed breaks line of sight between you and the enemy, making it useful when you're under heavy fire.

Enemy troops also actively avoid Smoke, making it an effective area denial tool.

You can generate smoke using the following methods:
  • Smoke grenade launchers on vehicle if equipped
  • Call in Smoke Shells via Signal Module (Depends on the Signal Support equipped)


Star Shell
The Star Shell is called in using the Signal Module and illuminates the battlefield after exploding in mid air. They then slowly descend and fade away after landing.

Star Shells has the following effects
  • Reveal units on the minimap within the radius of the shell
  • Causes infantry troops to go prone and stop attacking due to the blinding light.


All right! We hope you understand the importance of the Support Module and the Support Signal!

Be sure to WISHLIST the game now and be the first to unleash destruction on the enemy!

As always, drop us a like, comment and join us on Discord to chat about the game and tanks!

Armored Battle Crew Team
Armored Battle Crew [World War 1] - Tank Warfare and Crew Management Simulator - skullwolf
Hey Tankers,

Overlord Mighty Jingles has agreed to become a Crew Member in Armored Battle Crew on his birthday!


But yikes, we're having a headache from trying to figure out which Traits, Abilities and Tagline suits him best!

So, we've decided to leave this ever important task to our trusty Salt Miners!

Join the Poll over at our Discord.

And don't forget to wish him happy birthday over at his video too! Don't want to be sent to the gulag now do ya?!

https://www.youtube.com/watch?v=EhRbS9jYwhA


Howdy Folks! Have you wished me happy birthday?! Yes, great, back to salt mine now!

Armored Battle Crew Team
Armored Battle Crew [World War 1] - Tank Warfare and Crew Management Simulator - Gattai Games
Hey Tankers!

Watch Draegast set himself and enemies on fire in his latest coverage of Armored Battle Crew!

https://www.youtube.com/watch?v=fgYxA4AAFME

Come join us on Discord to take part in the giveaway!

Armored Battle Crew Team
Armored Battle Crew [World War 1] - Tank Warfare and Crew Management Simulator - skullwolf
Hey Tankers!

The Rear Admiral Mighty Jingles, has made a introductory training video for Armored Battle Crew!

Be sure to watch it and give it a like OR risk being sent down to the salt mines for hard labor!

https://youtu.be/KSIQSlXrDm4

If you wish to chat about the game and tanks, join us on Discord !

Armored Battle Crew Team
Armored Battle Crew [World War 1] - Tank Warfare and Crew Management Simulator - skullwolf
Hey Tankers!

Today, we look at Armored Battle Crew's fuel system and the highly anticipated flamethrower!


Flamethrowers in action!


Fuel Consumption

Keep your eyes on the fuel meter!

All vehicles require fuel to operate (duh), and a vehicle's fuel reserves are stored in the fuel tank. Naturally, the vehicle will no longer be drive-able when its fuel tank is empty.

Note: Engines with higher performance are usually fuel guzzlers and drain your fuel reserves faster. So, choose your engine wisely!

Engines also consume fuel at different rates depending on the vehicle's state
  • Idle (very low amount overtime)
  • Pivot steer (low amount)
  • Driving (medium to high depending on speed)

Due to the compact map design and relatively fast pace of ABC, the fuel consumption rate of engines have been set significantly higher when compared to their real life counterparts. This is done so you'll need to monitor your vehicle's fuel reserves.

In typical real-life scenarios, a vehicle's fuel reserve would last over a few hours of driving before needing to refuel. However, in ABC fuel consumption is balanced so that the tank will require refueling at least once, or twice during each mission (30min average playtime).

Fuel as a Resource


Fuel Storage

Fuel is a resource that can be stored in a Fuel Storage Module in the form of Fuel Cans. These cans are used to replenish the Fuel Tank or flamethrower.

The Fuel Storage Module and Fuel Tank can also be refilled/replenished using the following methods:
  • Staying on Resupply Points scattered throughout the map
  • Calling in Supply Drops via the Signal Module (Cost 50 Command Points)

Flamethrower
The Flamethrower or flammenwerfer, was first seen and used in WW1 by the Germans during the attack on Verdun in 1915. The device was powered by a pressurized fuel tank and was carried on the back of soldiers.

Upon activation, the pressurized gas forces fuel out of a long rubber tube. The fuel is then ignited by an igniter situated on the steel nozzle, at the end of the rubber tube. This projected a jet of flame over a short distance onto a target's position.

The British Army experimented with larger and static flamethrower setups, with one of them requiring a long tunnel to store the fuel tanks. Eventually, smaller and more portable devices, for example the Hay Flame Gun would be used by the British Navy during the Zeebrugge Raid in 1918.


Small Flame Projector

There are 2 types of flamethrowers in ABC, Small and Large. The Small Flamethrower has a shorter range (15-20m), but can be mounted in the vehicle's gun port as a Light Weapon.


Large Flame Projector

The Large flamethrower on the other hand, has an extended range (30-40m). Giving it a larger area of effect in exchange for slower reloading speeds.

The flames shot from both flamethrowers travel in an arc, making them useful when engaging targets fully or partially behind cover. The flames are ineffective against enemy armor, but are devastating on exposed infantry.

Do note that the flamethrower uses Fuel as a resource, not your typical Light or Heavy ammo. So, be sure to have a Fuel Storage Module on board!


This is what Fire Range is for!


That’s all for now! Stay tuned for more insight in ABC and be sure to WISHLIST the game and be the first to set the battlefield on fire!

Also, join us on Discord to chat about the game and tanks!

If you like what you're reading/seeing, consider dropping us a like and comment!

Armored Battle Crew Team
Armored Battle Crew [World War 1] - Tank Warfare and Crew Management Simulator - skullwolf
Hey Tankers!

Today, we will go into detail about the difference between ammo types and how the armor works in Armored Battle Crew.


Try aiming at a flat surface!

Ammo
Each weapon has the ability to fire a maximum of 4 types of Ammo. For example, the 57mm 6 Pounder 6 cwt cannons can fire Armor Piercing, High Explosive, Canister and Shrapnel rounds. The ammo type can be change during combat in the Weapons Panel, so be sure to use the right ammo for the right target!


You can view each available Ammo Type when customizing the weapon in the Garage.

Armor Piercing (AP)

AP Shells will deal damage to any target in its path but as their name suggests, are best used against armored targets. However, they take into account of armor sloping and can be completely stopped if the armor is thick enough.

High Explosive (HE)

HE Shells will explode on impact against any surface (eg. fence, wall). This explosion causes splash damage with it's effective damage dropping drastically over distance. HE Shells have a low armor penetration value which means armor thickness can greatly reduce the damage caused. The HE Shells rely on chemical energy for its destructive power, which allows it to keep its penetration and damage effectiveness over distance. This makes it useful for engaging both armored and infantry targets at distance.

Canister

Canister Shells functions like a giant shotgun, releasing a volley of bullets from the muzzle of the gun in a forward arc. It has short range but absolutely devastating against exposed infantry.

Shrapnel

Shrapnel Shells function similarly to the Canister Shell, but detonate at a fixed distance before the target. On detonation, the round releases a volley of bullets in a forward arc. It is not as powerful as the Canister shell but is useful when engaging infantry at long-range.


Firing Canister against enemy infantry!


Armor and Shell Mechanic
Now you're clear about the types of Shells we have in Armored Battle Crew, lets find out how the different types of rounds interact with Armored targets.


Learn how the armor works so that you won’t go ballistic when your shots keep bouncing off enemy armor.

Armor Piercing (AP) Shell Mechanic
When an AP Shell hits an enemy vehicle, the game will calculate the contact point and Impact Angle to figure out the effective thickness at the collision point. If there is enough Penetration Value, the shell will punch through the armor and do damage.

Shell Penetration Value
All AP Shells have a Penetration Value that will drop over distance traveled and when striking armor.

Impact Angle
The angle at which a shell strikes the armor. The ideal impact angle is at 0 degree (also called the normal) and is perpendicular to the armor. The real Impact Angle is then calculated based off the deviation from the normal.

Effective Armour Thickness
All tanks are armored with metal plates of different thickness. Generally speaking, a tank's armor is thickest at the front and gets progressively thinner as you go toward the rear, with the top and bottom being the most thinly armored.

That said, the real thickness of a piece of armor is based on the Impact Angle of a shell. A shell that strikes at an angle away from the normal will decrease it's Penetration Value, making the armor harder to penetrate.


The effective armor thickness is calculated by dividing the real armor thickness with the cosine of the impact angle. #Math
  • At 0 degree, Effective Armour Thickness is at 100%.
  • At 30 degree, Effective Armour Thickness is at 115%.
  • At 45 degree, Effective Armour Thickness is at 141%.
  • At 60 degree, Effective Armour Thickness is at 200%.
As the Impact Angle increases, so does the Effective Armour Thickness. So, it's advised to target the side or rear of enemy armor and avoid firing at a highly sloped surface.

Last but not least, this mechanic applies to enemy shells as well. Angle your armor to maximize its effective thickness and watch incoming rounds bounce off like they're nothing!

High Explosive (HE) Shell Mechanic
As mentioned, HE Shells explode on contact, so keep a lookout for potential obstacles such as trees, fences, sandbags or walls to avoid friendly fire damage.

Do note that anything within the splash radius will get damaged and the best way to negate splash damage is to create distance and make sure there is armor between the point of impact.


That’s all for now. Stay tuned for more insights and be sure to WISHLIST the game and don't go AWOL when the enlistment begins!

As always, join us on Discord to chat about the game and tanks!

And drop a like and comment below to let us know what you are thinking!

Armored Battle Crew Team
Armored Battle Crew [World War 1] - Tank Warfare and Crew Management Simulator - skullwolf
Hey Tankers!

Today, we want to give you an overview of the Whippet tank.

Medium Mark A Whippet
The Whippet, was designed with better mobility to exploit gaps left by the slower Mark series tanks. It is manned by 3 crew members, made up of a driver, a commander and a gunner.


Mobility
The Whippet sports a pair of 45 horsepower Tylor petrol engines. It can reach a top speed of 13 km/h, a good 5 km/h more than Mark V.

The engine and fuel tank is located at the front of the fighting compartment, with the crew needing to exit the tank to access the fuel tank via the engine deck.


Firepower
Armed with only 4 gun ports (Front, Left, Right and Rear), the Whippet lacks the firepower of Heavy Weapons, which makes enemy tanks harder to deal with.

So, take advantage of you superior mobility and out maneuver your enemies!


Armor
Despite being classified as a medium tank, the armor installed on the Whippet is comparable to Mark V. The armor, measured in at 14mm, is well sloped at the front. The tank tracks also serve as extra armor, covering a good part of the relatively flat side armor.

The frontal mounted engine and fuel tank provide additional protection, but the tall profile of the rear fighting compartment makes it hard to conceal the tank.


Storage
Due to the cramped fighting compartment, the two storage modules can only be installed on the tank's exterior and access through a rear door. This makes it risky to restock ammo under fire.


Want to see the Whippet in Action?

Catch ManyATrueNerd trying to survive in WW1 - https://www.youtube.com/watch?v=QABPSJa96nI&t=1s

Watch GrayStillPlays in this Short but Super Funny take on the game - https://www.youtube.com/watch?v=Ow3-wMB0dTY&t=236s

That's all we have on the Whippet for now, but be sure to WISHLIST the game and ride the Whippet when the battle begins! Stay good because Whippet Good!!!

As always, join us on Discord to chat about the game and tanks!
Or leave a like and comment below to let us know what is on your mind!

Armored Battle Crew Team
...