Hell Let Loose - Jonno
Hey everyone,

Welcome to Developer Briefing #15. This week we’re giving you the first look at our updated map overviews that we’re in the process of implementing into the game!

If you missed the previous Developer Briefing, where the Game Director for Hell Let Loose, Max, stopped by to share some feedback on our recent closed test weekend, you can read all about it here.


Map Overview Update

Recently, the team have found themselves in a position to spend some time improving the presentation and authentic feel of the map overview that our players use as they fight on the frontline.

When approaching this update, we were keen to achieve the following goals:
  • Create a visually rich map.
  • Deeper tactical application during battle.
  • Easy to read.
  • Simple visual language that highlights key locations.
  • Terrain features identifiable through using the map.
  • It looks like a map that would be used from that era.
This then gives our players a tactical, authentic map that can be used for advanced planning on both attacking and defensive strategies by providing a true lay of the land.


Out with the old…


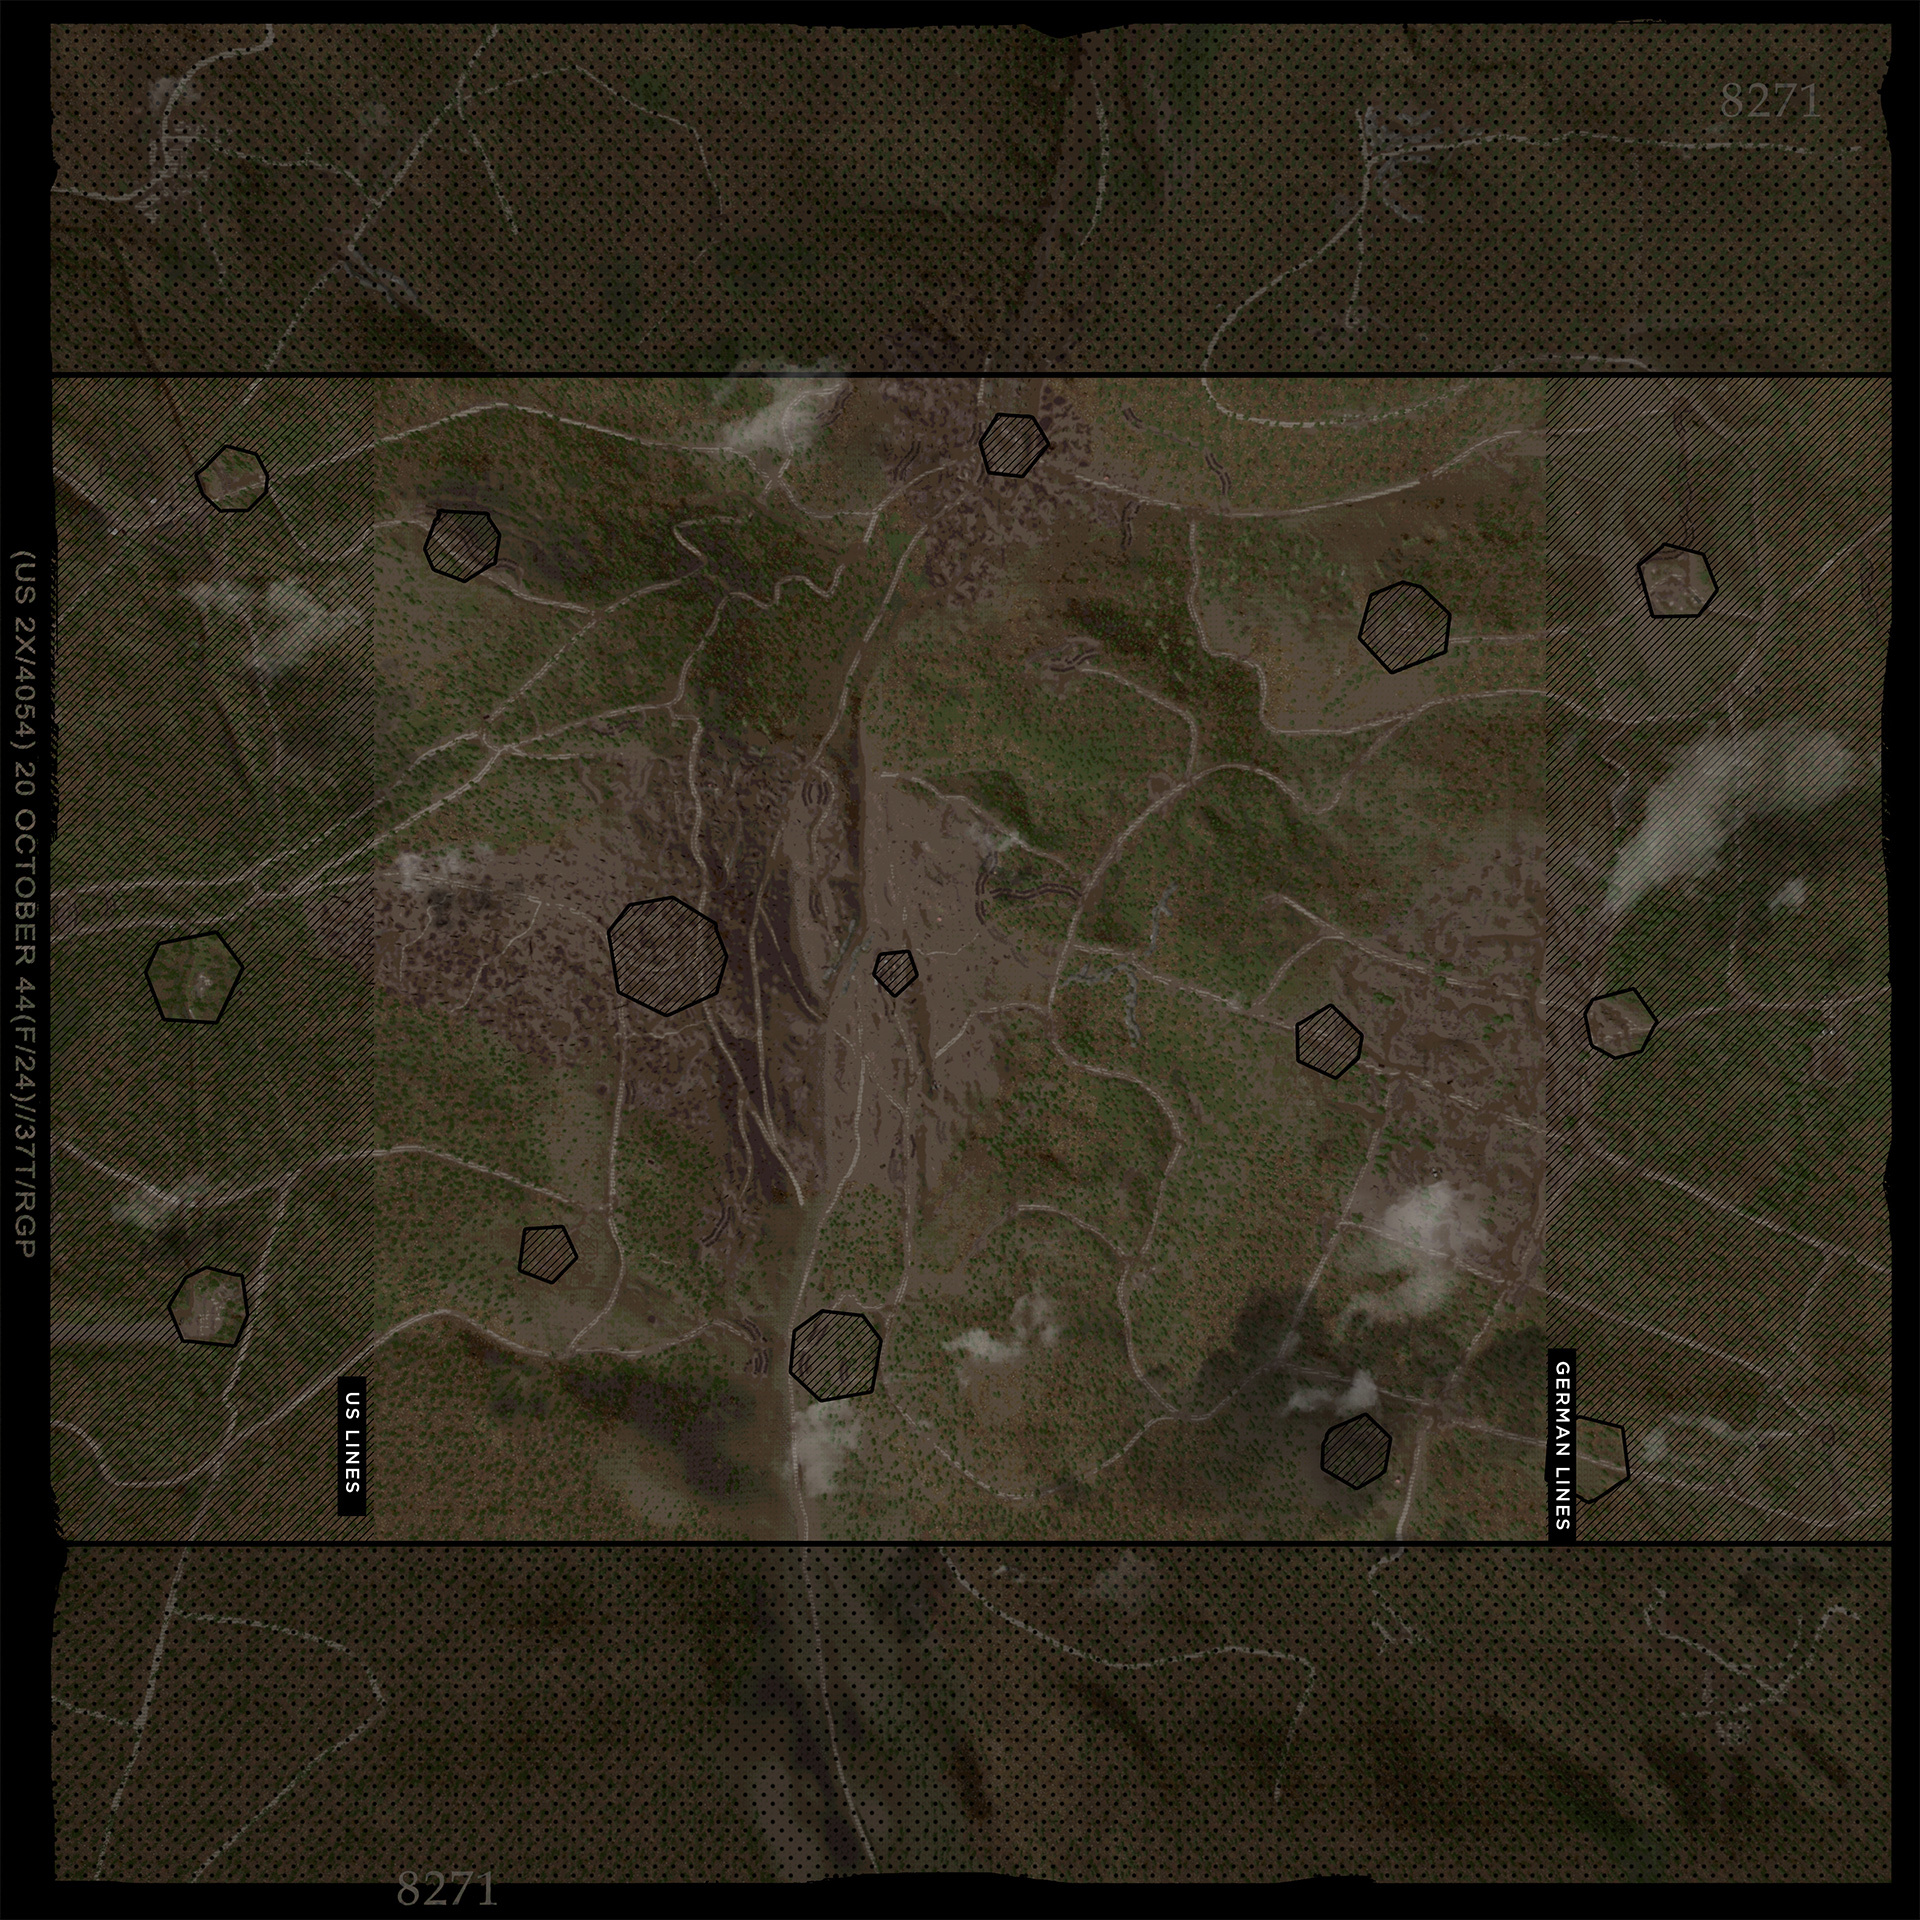
Aesthetic but lacking tactical use.


In with the new!


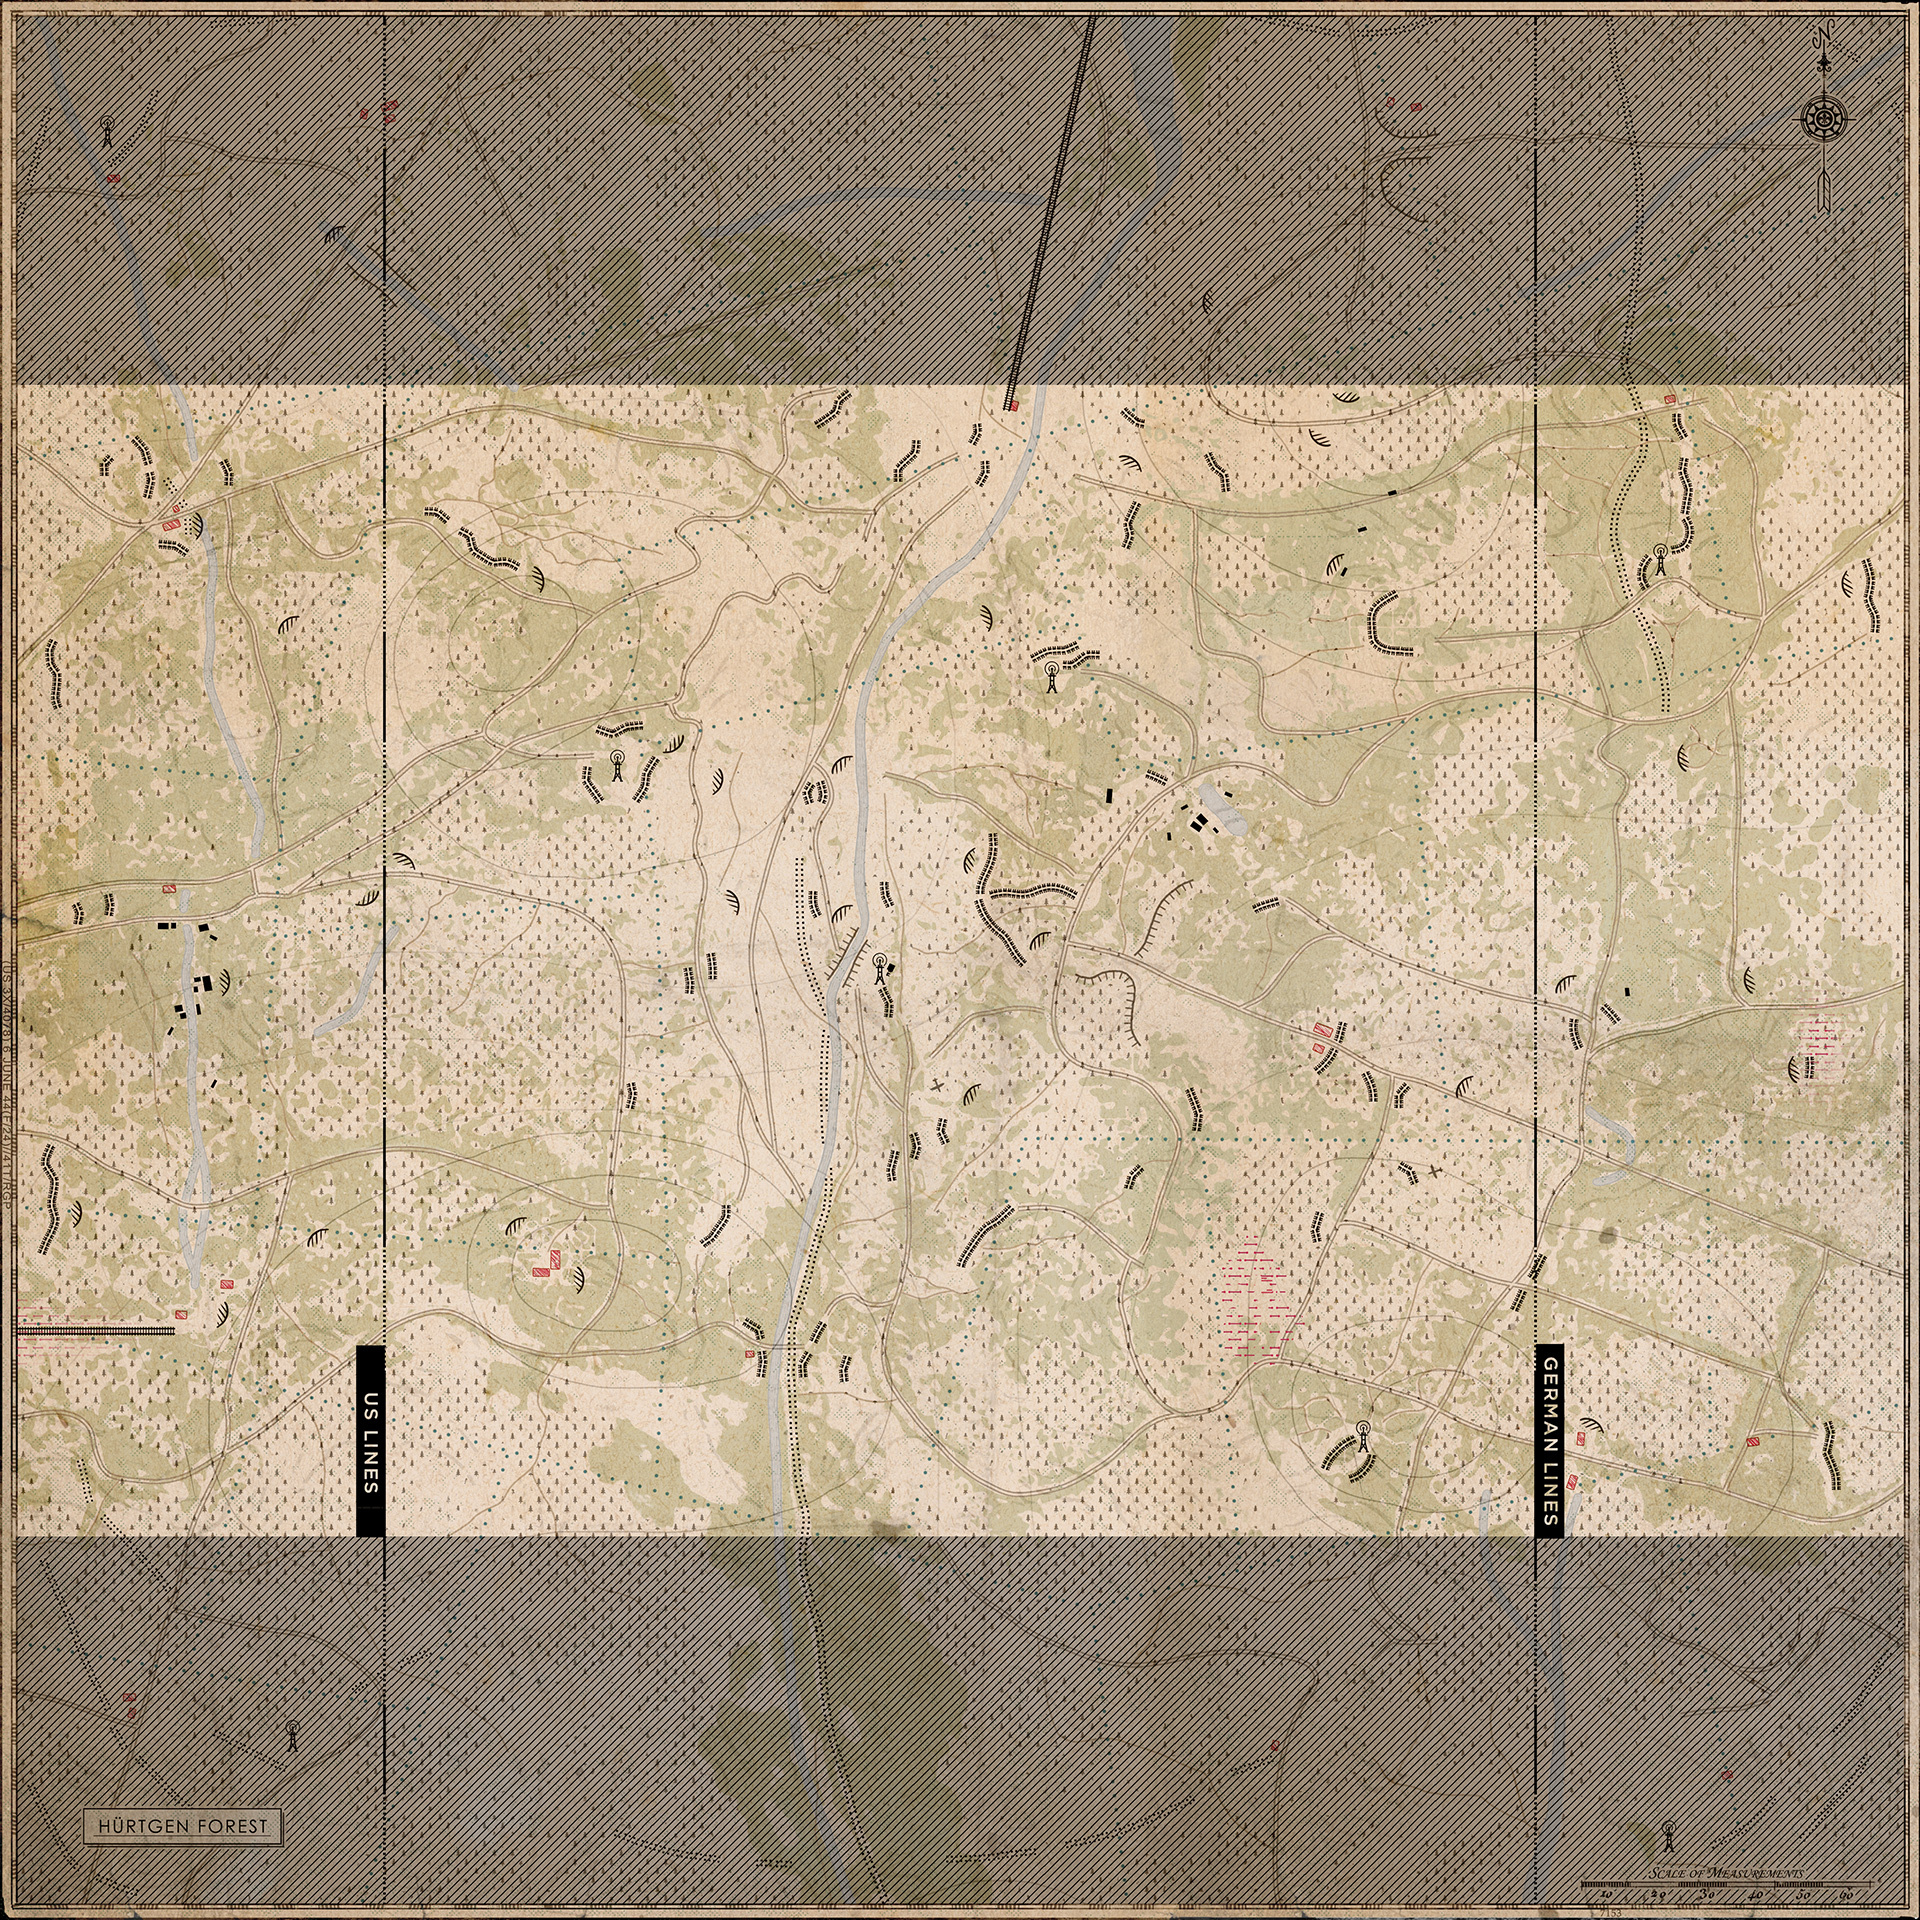
Mapping the path to victory!

As you can see, the example above now includes much more detail, including trenches, tank traps, bridges, roads, forestation and map contours (height).

We’ve not including the in-game sector, strongpoint and HQ overlays in the above image so that you can get a real good look at what you’ll be playing with.


‘Ordnance’ Survey

As we work towards getting this into player hands, we’ll be working on things such as icon legibility and tactical application. If you have any thoughts on how you’ll be using the new map overview design, let us know in the comments below!

Hell Let Loose is available to Wishlist now:

https://store.steampowered.com/app/686810/Hell_Let_Loose/

Follow Hell Let Loose on Twitter
Like Hell Let Loose on Facebook
Hell Let Loose - Jonno
Welcome to Role Guide #7!

This week we’re looking at a role that enables your team's dream strategies to become a reality – the Support.

If you missed the previous guide where we looked at the Assault, you can catch up here.


The Support

As a Support, you are the fuel that feeds your team’s strategy. Working closely with your Officer, Engineer and Anti-tank roles, you will provide them with the means to deploy game changing spawn points, heavy weaponry and fortifications.

Key Duties

Placing Supplies


The pinnacle duty of the Support, placing supplies. As the only role that actively carries supplies in their loadout, your use of this valuable resource will be instrumental in executing your team’s strategy.

Once a supply crate is placed, certain deployables can be built in a set radius around it.

As mentioned in the introduction, your supplies can be used in a wide variety of ways with different roles:
  • Officer – Garrison (Teamwide spawn)
  • Anti-tank – Anti-tank Gun
  • Engineer – Fortifications (Sandbags, barbed wire etc)
Support players spawn with one supply crate in their inventory and once it’s placed, it can’t be moved. When committing to using your supplies make sure they’re in the best possible location for their purpose.


Support the attack


A Support soldier prepares for battle in the shade.

Once you’ve deposited your supplies, you should focus on joining the Rifleman, Assault and Automatic Rifleman roles at the front, taking on the enemy and pushing the objective.

Equipped with either an M1 Garand or the Karabiner 98k, as well as grenades, the Support can stand toe to toe with the Rifleman and put a dent in the enemy team’s plans.


American Support Loadout
  • M1 Garand
  • Mk2 Grenade
  • Bandages
  • Supplies

German Support Loadout
  • Karabiner 98k
  • M43 Stielhandgranate
  • Bandages
  • Supplies

Combat Tips

Supply and demand – Don’t just throw your supplies down at the first opportunity. Communicate with the roles that make use for them to ensure your supplies are placed in the most tactically viable location.

Eyes on the prize – Supplies can be destroyed by the opposing team! If you leave yours unguarded and the enemy find it, your supplies won’t be around for long. On the flip side, feel free to remove any enemy supply crates you encounter by moving up to them and following the on-screen button prompt.

Supports united – If your Commander decides to create a fortified location, or base, on the frontline, multiple Support roles will have to work together to ensure enough supplies are deployed to create the Commander’s plan. Talk to your Officer and use proximity chat to co-ordinate with your fellow Support players for maximum efficiency.

Support the attack – Your role may be called Support, but you’re equipped with a loadout that lets you hold your own on the frontline. Once your supplies are down, don’t shy away from combat. Show those other roles what Support players can do!


Hell Let Loose is available to Wishlist now:

https://store.steampowered.com/app/686810/Hell_Let_Loose/

Follow Hell Let Loose on Twitter
Like Hell Let Loose on Facebook
Hell Let Loose - Jonno
Hey all,

Welcome to Developer Briefing #14!

This week, Hell Let Loose's Game Director, Max, has stopped by to share what we've learned from our recent closed test weekend as well as what you can expect from that moving forward.

We'd love to hear what you think, so feel free to share your thoughts in the comments below and over on the forum.


An update from Max

Hi everyone,

A very large thank you to those who jumped into our impromptu weekend playtest.

Our key goal for this test was to understand the exact player density needed per sector in order to achieve a battle that had the intensity of World War Two frontline combat. We wanted to test on Hurtgen again, as it would allow us to directly compare to our previous playtest, in which we had tracked player density and also the way battles evolved.

We know that it's quite frustrating to play the same map again, and we thank you for taking the time to help us test. While these tests are less exciting than normal, they’re critical in helping us to refine the whole experience before we start to actively market the title. We'd like to reassure you that playtests in the future will be announced in advance and broadcast more widely to make sure you have plenty of warning. We're very excited to begin mixing in Sainte-Marie-Du-Mont and to get feedback on new quality of life changes, bug fixes, sound improvements and animation improvements.

We've tracked all feedback in both the feedback channel on Discord, on our forums and in conversation with the team. After each playtest we essentially compile all recorded issues or opinions, break them into categories (audio, animation etc.) and then work to triage the issues out into order of importance. At the moment, we're focusing very much on making sure the core gameplay is stable, optimised and (most importantly) fun for our Early Access launch later this year. Our launch is going to formally mark the beginning of our journey, in which we'll be balancing bug fixes and quality of life upgrades with added features and content. We have a good idea of what we want our 1.0 version to look like, and we’re planning out the most effective way of getting there.

Our highest priority right now is making sure that we have a solid foundation to work on. By ensuring that the key pillars are in place, we can then begin to focus on adding new maps, weapons, vehicles and other goodies to the game.

Reflecting on the feedback

It can be gruelling to sift through all the qualities of the game that people disliked most, but it’s the best way for us to improve what we’re doing. Below I’ve broken down some broad observations from the community that align with what we experienced. We feel it’s important that you feel heard and know whether or not we’ve listened to the feedback given.

Metagame

The entire dev team played throughout the weekend in order to get a good feel of how the new meta affected the gameplay experience. Our reflections were similar to the community - we were having more frequent tangible and intense combat situations. The combat also felt more direct and much more precipitous (with several moments where our victory was snatched away). We found that vehicles mixed in nicely and could either use their infantry line for close defence, or they could push into the open (and potentially be rewarded with a rocket in the back!) and act as a spearhead. We also found that artillery was able to be used effectively on points, but not so overpowered that it became impossible (though we’ll keep an eye on this). We found that while some sectors would become incredibly intense, working with the Commander to drop supplies and flank - or to call in a bombing run - allowed us to approach each situation with freedom to escape the butchery.

That said, while the general sentiment is that the player density is great and there is a much more consolidated front, the soul of the sector gameplay we initially described is diluted. We can see that we've compromised the level of strategic freedom that we described in the Kickstarter. If you’re a community member who feels frustrated by this, I’m keen to let you know that our key task now is to introduce additional features that add and emphasise greater strategy and RTS elements of the game. For the Warfare gamemode, this means looking at implementing secondary objectives and reworking how resources are acquired in order to give each team the ability to effect their resource flow in a more meaningful way (eg. building a Fuel Dump to generate fuel). It also means looking at our upcoming Offensive gamemode and making sure there is a decision-making process in every attack.

Essentially, we now have great data that gives us a threshold for player density per 100m for what we'd consider a great World War Two battle. Our key task now is to introduce additional features that add and emphasise greater strategy and RTS elements.

Bugs

In addition to the metagame, we identified a wide variety of issues to fix (and many that already are as of this week), such as being unable to use VOIP or chat during the pre-deployment phase, or when in the deployment map waiting to respawn.

From tank physics to gamma levels, we’re working through fixing the bugs.

Sound

Players consistently reported that while the sound directionality was better, it fell off in volume far too fast and the actual quality of the weapon sounds themselves could do with more work.
As such, we’ve been reworking the distance ranges and aspects of the fall off (which bounce quite widely around and lower the ability to discover the source of the sound). You can now hear firearms much further away - increasing the total feeling of battle and making it much easier to pinpoint the origin of fire.

We’ve also begun work on improving the quality of the sounds themselves. We’re keen to make sure it’s a satisfying experience and that each sound fits properly into the soundscape.

Animation

Many players reported feeling like some actions and animations were unnecessarily clunky. There are many smaller tweaks we’re implementing in order to make the entire experience more fluid and less like you’re fighting the controls.

In all, we’re working hardest to make sure the first-person player experience is as solid and satisfying as can be. We’re also working hard to finish and fix any large visual bugs you may see in third person (snaking being a good example!). During Early Access, we’re keen to do a large improvement on many aspects of the systems we’re using - feet adjusting for the terrain beneath them, additional actions (like lean, vault, dive) and slightly tilting the player into their angle of movement so that their body leans satisfyingly as they corner. We’re also looking at friction-per-surface for vehicles and infantry.

Hurtgen

It became quickly clear that tanks were having an incredibly hard time crossing the map. To fix this, we’ve opened up a gap in the centre to make it less of a snakes-and-ladders experience in crossing from one side to the other. We also noticed that Jacob’s Barn tended to be the area players enjoyed defending the most. There were some locations in the map that felt unfinished and needing additional cover. We also felt that some more compounds would strengthen the diversity of experiences you’d have while fighting across the map. We’re going to be doing a small terrain and cover pass on the map in order to fix these issues and make the map that bit more enjoyable to fight over.

What’s next?

We’ve got bigger and bigger playtests lined up for the near future that will give an opportunity for those outside of the backer community to participate, as well as bringing in our patient Recruit tier backers. As you can imagine, the more data we have from a higher volume of players will enable us to make sure our infrastructure is well established for our Early Access launch. We’ll be mass-messaging these to ensure you have the time and notice to take part. We’re very excited to continue polishing the core experience for Early Access. We’re very thankful for the fantastic community feedback and for your patience as we tweak and alter aspects of the game.

In addition to the testing, we’ve been busy planning out our Early Access development schedule. For us, the Early Access release is still only the beginning of the development of Hell Let Loose. We’ve got lots of features to add across all aspects of the game, and we’re excited to release the roadmap so that you can come with us on the journey.


Hell Let Loose is available to Wishlist now:

https://store.steampowered.com/app/686810/Hell_Let_Loose/

Follow Hell Let Loose on Twitter
Like Hell Let Loose on Facebook
Hell Let Loose - Jonno
Welcome to Role Guide #6!

This week we’re taking a look at a role that is commonly seen as the aggressor of a unit, fearlessly charging the enemy frontline and shining in close-quarter combat – the Assault.

If you missed the previous Role Guide where we looked at the Medic, you can catch up here.


The Assault

As an Assault you’ll be leading the charge on the frontline. Strongpoints, trenches, buildings and hedgerows, all are fair game for you.

Using your primary weapon and grenades, you are a highly mobile combatant, able to relentlessly push enemy positions and lay down fire with fully automatic weaponry that have a quick reload. Where other classes would struggle when outnumbered in close combat, an Assault sees it as a fair fight.


Key Duties

Tip of the spear

At the front of the unit is where you belong, head first into battle, disrupting enemy lines as you sprint from location to location, bursts of weapon fire in tow.

With suppressive fire from your allies, you can quickly gain ground and put your loadout to good use. A soldier that manages to breach enemy lines can cause havoc as the enemy struggles to focus their fire in one direction.

This role is wrought with danger, but with great risk comes great reward.


Stalwart Defender

Assault players are known for their aggressive playstyle and storming capability, after all, it’s in their name! But, did you know they also excel at defending build up urban locations and trenches?

Other Semi-automatic and heavier full auto weapons lack the handling and mobility to be a match for the Assault’s guns in the confined spaces of urban combat, whether that’s room to room or street to street.

Having an Assault on guard duty in these build up areas can pay dividends, even holding back multiple enemies in a chokepoint on their own.


American Assault Loadout
  • M1A1 Thompson
  • Mk2 Grenade
  • Bandages
German Assault Loadout
  • Gewehr 43
  • M43 Stielhandgranate
  • Bandages

Combat Tips

Room service – When storming a building/trench, make use of your grenades! Whether you’re looking to clear a room or force a group of enemies into your firing line, using a grenade will be much safer than charging into said area outnumbered.

Lock ‘n reload – Both the American and German weapons have a respectable rate of fire and will quickly dispense the available ammo in their magazine. Make sure to reload after engagements to keep your battle readiness. Charging into your next fight to discover that you need to reload is a sure-fire way to be sent to the respawn screen.

Look back – As the vanguard of your unit, the chances are you’ll be in front of your allies. When combat begins, you’ll be even further ahead, diving into enemy lines. Just remember not to stray too far from your unit. Being isolated is not only a detriment to yourself, but your unit.

It’s all in the hip – At close range both the Thompson and Gewehr 43 are competent hip fire weapons. If you encounter enemies in an uneven environment, or are caught off-guard, don’t be afraid to just shoot! The previous seconds you save from not aiming down sight can be the difference between winning and losing.


Hell Let Loose is available to Wishlist now:

https://store.steampowered.com/app/686810/Hell_Let_Loose/

Follow Hell Let Loose on Twitter
Like Hell Let Loose on Facebook
Hell Let Loose - Jonno
Hey everyone,

Welcome to Developer Briefing #13. This week we’re sharing with you an update we’ve made to the Hell Let Loose metagame following community feedback in January’s closed beta.

If you missed the previous Developer Briefing, where we revealed our new in-game tips feature, you can find out more about it here.


Metagame Update

After January’s closed beta, the team have been busy going through all the feedback that our participants have shared with us. This was a crucial test to allow us to make various tweaks, updates and bug fixes to the game.

We also took the opportunity to listen to what our players were saying around the core metagame and whether it was providing a consistently satisfying and dynamic experience. It was pleasing to hear that the overall feel of the game was going down well with our beta players, however we spent a lot of time both playing and listening to community feedback and noticed some critical things that we felt should be addressed, more on that below.


The New Metagame


Map markers can only be placed by the Officer/Commander roles.

The updated metagame for Hell Let Loose is as follows:
  • Only one sector in a column is now in active play at any one time, down from three.

  • Every time the map is played, the sectors that are in play are randomised, creating different scenarios in different matches.

  • When a sector is captured, the next available sector to attack/defend will be selected depending on if it is adjacent, or diagonal to the current one. This eliminates the need to walk to the opposite end of the frontline.

  • A victory occurs when you capture the enemy HQ sector. A loss occurs when you lose yours.

  • When a HQ sector is in play, the defending team cannot spawn in that sector. Instead, they must spawn in the adjacent HQ sectors, or make use of an OP/Garrison.

  • The team that captures an active sector will gain ownership of that entire column (three sectors).

  • The map coloration has been updated to clearly show the progression of the battle along the entire length of the map.


Issues & Solutions

The feedback that led to this change, as well as the logic behind the solutions can be found below:

Issue One: Player density was too low for the majority of the match. This lead to a boring experience and rarely feeling like you were experiencing the full intensity of the battle.

Solution One: The vast majority of players will focus on one sector, creating higher density gameplay. While one sector sounds like it would create an unacceptable bottleneck, we’ve found that the 400m wide sector nicely consolidates Infantry, Armor and Recon units, as well as rewards units that manage to widely flank the opposing sector in order to cut off the enemy.

Issue Two: Players who defended empty sectors seldom saw action and combat - therefore being punished for doing the “right thing”. In addition, games were often won in a similar way to Alpha - with small groups of players walking around the sides and cutting off the main battle.

Solution Two: Players can now choose to proactively flank and penetrate the enemy lines in new, dynamic ways - instead of being forced to defend an empty location. Similarly, your team will no longer lose enormous groups of sectors due to small groups walking past.

Issue Three: Seeding servers was unappealing as confrontation was rare in low population servers.

Solution Three: Even low population servers will have a focal point of where the action is, assisting in seeding new servers. We will be watching this and looking at further refining the way in which low population servers are seeded.

Issue Four: Battles never felt large or competitive, as you were never sure if you were fighting the full breadth of the enemy force or just one unit.

Solution Four: Players will always be engaging in the biggest conflict in the server, whilst keeping the options to flank or retreat from combat. Defeating an enemy in a sector is much more rewarding now, as it means the entire enemy team has been forced back.

Issue Five: Artillery, tanks and other large-scale abilities aren’t as effective as they could be due to the breadth of the battlefield.

Solution Five: Artillery and other assets now have a determined location to attack/defend.

Issue Six: Newer players unsure of where they should be heading or respawning.

Solution Six: Simplification of the way we communicate attack or defend locations will direct inexperienced players to where they should be.


To the next battle!

When making the metagame changes that we’ve described above, we were keen to implement quality changes based on community feedback without sacrificing anything in the process.

We feel we’ve achieved that, increasing the intensity, frequency and scale of battles, without sacrificing map size, objective play or the wide range of strategic options available to our players. In our team testing, we’ve actually found that the majority of player tactics are now more effective and viable with a consolidated objective. Additionally, due to the randomising nature of the objective order, you’ll be fighting a very different battle every time you play each map.

We have several more metagame functions to polish, refine and add to and this testing time will be critical for us in making sure the game is satisfying every time you play.

That wraps up this week’s Developer Briefing. We hope you’re pleased by this player feedback led update and would love to hear what you think about it, so pop your initial thoughts in the comments below!

Be ready for the frontline by wishlisting Hell Let Loose:

https://store.steampowered.com/app/686810/Hell_Let_Loose/

Follow Hell Let Loose on Twitter
Like Hell Let Loose on Facebook
Feb 26, 2019
Hell Let Loose - Jonno
Welcome to Role Guide #5!

This week we’re taking a look at a class that can turn the tide of a losing battle and make wounded soldiers fighting fit – the Medic.

If you missed the previous guide where we looked at the Automatic Rifleman, you can catch up here.


The Medic

As a Medic, you’ll find yourself in the unique position of being able to revive wounded allies, an incredibly powerful tool when made the most of. Whether it’s a member of your unit, or that of an allied one, you can get them back on their feet and facing down the enemy without the need to respawn.

This allows you to be a driving force for your team’s momentum, keeping up constant pressure as you push deeper into enemy lines, not needing to wait for your unit to regroup following any respawns.


They may be a non-combat role, but Medics come armed!


key Duties

Reviving wounded allies

Successfully fulfilling this role will make you a popular individual on your team and a bane to the enemy! Armed with your morphine, you can approach wounded teammates and perform a short action holding LMB to revive them.

Once you’ve revived them your job is not done quite yet, you’ll then need to apply a bandage to them to stop the bleeding.

After both these actions are complete, that soldier is ready to return to battle once again!


Bandaging the injured

In Hell Let Loose, injury can come in many shapes and forms, from bullet wounds to explosions and fall damage, a Medic’s life will be a busy one.

Whilst all soldiers enter battle with a small number of bandages to address any damage that comes from these sources, you as a medic will come equipped with many more!

As such, if you notice a teammate getting injured, or receive a request for healing over voice/text chat, go forth and apply a bandage to a soldier in need.


American Medic Loadout
  • M1 Carbine
  • Colt M1911
  • M18 Smoke Grenade
  • Morphine Syrette
  • Bandage

German Medic Loadout
  • Karabiner 98k
  • Walther P38
  • NB39 Nebelhandgranate
  • Morphine Ampoule
  • Bandage

Combat Tips

Watch for signs - To assist Medics in their reviving pursuits, they’ll be able to identify downed allies in need of help by a black skull on a red background in their field of view. This is accompanied by a distance marker to help you gauge your distance from the wounded. Use this to spot allies who need reviving when you’re not in direct contact with them.

Look left, look right, look left again – If you see a wounded ally bleeding out on the floor, be careful when approaching them. Unless your unit has secured the area there’s a chance that whoever took them out is still watching. Before running over to revive the downed soldier, check the surrounding area and ask your unit if they’ve spotted anyone.

You’re a doctor, not a miracle worker – Whilst Medics are gifted with the ability to heal wounds that would otherwise be fatal, they can only do so much. If an ally is shot in the head, or dies from an explosion, they will be unable to be revived and must respawn.

Medics in the mist – There will come a time during a heated, intense battle that you’ll see an injured teammate, bleeding out and calling for help as bullets whizz past them. Feeling the heroism swell inside, you feel the need to act. That’s where your smoke grenade comes in, throwing a smoke and letting it build cover for you before pushing out to revive can allow you to pull off combat revives in the most chaotic of situations.

Staying alive - As a Medic, you’ll be a priority target for enemy Snipers and Riflemen. Because of this, it’s generally advised that you stay near the back of your unit, unless required to perform your healing duty. The loss of a Medic at the start of an engagement can be a severe detriment to a unit’s survivability.

Non-Medics, listen up - If you’re wounded you can wait for a medic instead of immediately going for a respawn. If there is a friendly medic in close proximity, they will show as an icon on your screen. We recommend to always try and wait for a medic as letting go will take deplete your Manpower resource.


Hell Let Loose is available to Wishlist now:

https://store.steampowered.com/app/686810/Hell_Let_Loose/

Follow Hell Let Loose on Twitter
Like Hell Let Loose on Facebook
Hell Let Loose - Jonno
Hey everyone,

Welcome to Developer Briefing #12! In this week’s briefing we’re sharing with you a preview of our new hints and tips system.

If you missed last week’s Developer Briefing, where we revealed some of the building interiors you’ll be fighting through in Sainte-Marie-du-Mont, you can view them here.


New Feature – Hints & Tips!

In Hell Let Loose, one of our primary goals is to give our players a fantastic gameplay experience that combines objectives, shifting strategy and authentic, team-based combat.

If you’re a veteran of this genre of game, the chances are you’ll take to Hell Let Loose like a landing craft to water, picking up on the metagame as well as the game’s nuances swiftly.

However, this of course isn’t the case for everyone. To help fresh players get up to speed with the game’s various mechanics and style, we’ve begun to implement different types of tips that will crop up the first time a player finds themselves in a particular situation or attempting to perform an action.


Tip Type #1 – Objectives

Strongpoints and Sectors make up the two key aspects of Hell Let Loose’s metagame. Capturing and holding them will all contribute to your team’s victory, as well as bringing in resources for your Commander to make use of.

To inform players how they are captured, among other things, the following type of tips will be displayed in-game:


Tip: You are capturing a sector. You must outnumber the enemy to continue capture progress. Look out for Strongpoints to capture more easily.

Outnumber the enemy within a sector to capture.


Tip: This sector is locked! Locked sectors display a padlock on their icon. Move back towards a neutral or unlocked sector.

[M] to open the map and view locked sectors.


Tip Type #2 – Equipment & Vehicles

Equipment and vehicles are powerful tools that are at the disposal of our players on the frontline. To assist in players getting quickly accustomed to and using them, we’ve added tips that explain both what they do and how to control them.


Tip: Provide fire support with the Artillery. Change the elevation for distances and the traverse for rotation. Load either an explosive or a smoke round in the chamber from the second seat.

[W] & [S] for elevation, [A] & [D] for traverse, [LMD] to fire, [R] to reload.


Tip Type #3 – Situations & Actions

When attempting to perform certain actions or encountering specific situations for the first time, players will receive a message that suggests to them what their next steps should be. Examples of this include attempting to enter a tank when you’re not an armoured unit, and what you should do to stop yourself bleeding out after taking a non-lethal bullet wound.


Tip: You cannot enter this vehicle. You must be in an Armour Unit and on the correct team to enter. You can change units by redeploying.


Knowing is half the battle!

The in-game tips we’ve shared above are just a few examples of the tip system we’re using that will help on-board our players in Hell Let Loose. These tips aim not only to improve the individual player’s experience by helping them learn the game as they play, but to also improve the overall gameplay quality of the matches themselves as all players are introduced to the game’s mechanics in a natural, progressive way.

We’re not stopping there though, the team are working on other ways for players to learn more about the various roles, loadouts and playstyles that exist within Hell Let Loose. These will be easily accessible in-game and give players the opportunity to read up on various elements of the game before heading to the frontline.

What tips do you think would benefit new players to Hell Let Loose? Share yours in the comment section below!


Be ready for the frontline by wishlisting Hell Let Loose:

https://store.steampowered.com/app/686810/Hell_Let_Loose/

Follow Hell Let Loose on Twitter
Like Hell Let Loose on Facebook

Hell Let Loose - Jonno
Welcome to Role Guide #4!

This week we’re looking at a flexible, hard hitting role – the Automatic Rifleman.

If you missed the previous guide where we looked at the Machine Gunner, you can get up to speed here.


The Automatic Rifleman

As an Automatic Rifleman, you’ll have the advantage of being both mobile and hard hitting. Fighting alongside Riflemen, Assault and Anti-Tank roles, you’ll be in a position to attain fire superiority in a skirmish to allow your unit to advance on the enemy and secure the objective.

Please note: The characters models for both the German and American Automatic Rifleman are currently placeholder and in the process of being updated.

Key Duties

Close-mid range fire support


Armed with either a M1918A2 BAR or StG 44, this role finds itself in the unique position of having both high mobility and suppressive firepower. Excelling at close-mid range combat, Automatic Riflemen are equipped to engage multiple targets simultaneously in a variety of environments ranging from woodland, to trenches and house to house combat.

When fighting the enemy with your unit, you need not worry about being precise with your shots. Whilst you can accurately shoot enemy soldiers, you have the ability to suppress the enemy for your allies. Focused fire in the opposition’s general direction will suppress them and/or pin them behind cover. This is an especially important tactic to use when your unit isn’t receiving support from an active Machine Gunner.


Shoot, move, repeat!


During a firefight, Automatic Riflemen have the ability to kill multiple enemies and relocate in quick succession. If you’ve taken down an enemy or supressed them, take this opportunity to relocate a short distance, reload and open fire once again. This can disorientate all but the most iron willed of units and quickly throw them into disarray!


American Automatic Rifleman Loadout
  • M1918A2 BAR
  • MK2 Grenade
  • Bandage

Suppressing fire - Character model is a work in progress.

German Automatic Rifleman Loadout
  • StG 44
  • M43 Stielhandgranate
  • Bandage

Choke point control - Character model is a work in progress

Combat tips

It’s the thought that counts – When attacking an enemy position where your unit has begun engaging the enemy, if you know where the enemy is but can’t see them, for example a window, fire towards it anyway! The consistent shots will more than likely lead to the enemy not risking themselves getting shot by peeking, allowing your team to overrun the enemy with less resistance and casualties.

Short, controlled bursts – When engaging the enemy at range and going for a kill shot, maintain short, controlled bursts. This will greatly assist you in keeping your sights on the enemy, especially when there are multiple targets in proximity of each other.

Between an explosive rock and a hard place – Having both a mobile automatic weapon and hand grenades allows you to instil panic in the enemy whilst also boxing them in. Throwing a grenade or two into an enemy position, followed up with fully automatic fire can suppress them, leaving them less likely to escape the blast radius. Those that do make a break for it will then find themselves directly in your automatic fire…

Move, but not too far – Whilst Automatic Riflemen are encouraged to shoot and move, it’s worth keeping an active note on your positioning. It can be easy to get over zealous in the heat of battle, leading to a player overextending, leaving them isolated from their unit and vulnerable to enemy reinforcements.

Staying still is ok too – Staying prone and waiting for an ambush opportunity, or merely laying down consistent, suppressive fire from a fixed location on the enemy is a great way to play the Automatic Rifleman too! When paired with the Rifleman’s ammo box, you can successfully keep watch on a given area for an extended period of time.


Hell Let Loose is available to Wishlist now:

https://store.steampowered.com/app/686810/Hell_Let_Loose/

Follow Hell Let Loose on Twitter
Like Hell Let Loose on Facebook
Hell Let Loose - Jonno
Welcome to Role Guide #3!

This week we’re laying down suppressive fire with one of the hardest hitting roles in Hell Let Loose – the Machine Gunner.


The Machine Gunner

As a Machine Gunner, your main responsibility will be to provide heavy suppression on enemy units and positions. With a high rate of fire and a large ammo count, this role excels at holding down a field of fire from a fixed position whilst their unit pushes forward.


Key Duties

Suppressing Fire

Machine gunners are unparalleled amongst the 14 infantry roles when it comes to zone control and suppressive fire. However, in order to achieve this, you must first set yourself up by deploying your bipod. Deploying your bipod will leave you immobile, but will allow you to aim down sight, increasing accuracy and lowering recoil. To deploy your bipod, simply approach any hard object (including the ground) and press F when prompted.

When engaging the enemy with your unit, you should aim to be set up on your bipod before the main encounter begins. A unit that manages to stop the opposition from setting up their own Machine Gunner in a prime location will have a significant advantage. In the likely scenario that you’re not afforded this opportunity, you should quickly seek out a suitable bipod position that gives you the most beneficial firing options and return fire.


Officer’s Wrath

When playing as the Machine Gunner, you’ll be packing a large portion of your unit’s firepower. Because of this, it’s important to work closely with your Officer to ensure that their strategy is seen through.

For example, when looking to defend a strongpoint your Officer will likely base their defensive strategy around you. It’s vital that you listen to your Officer’s plan, failure to do so could leave an exploitable gap in your unit’s defences and your allies being overrun. That being said, if you have an alternative strategy, make sure to discuss it with your Officer as it may be the better option!


American Machine Gunner Loadout
  • Browning M1919 (Machine gun)
  • Colt M1911 (Pistol)
  • Bandage


German Machine Gunner Loadout
  • MG42 (Machine gun)
  • Walther P38 (Pistol)
  • Bandage


Combat Tips

Brace yourself – Whilst Machine Gunners are most effective when holding down a field of fire, in a desperate situation they can hold the RMB to brace fire. This fires their weapon from the hip, limiting accuracy and making you an easy target, so use it sparingly… Or if you’re clearing a building.

Know your surroundings – Machine Gunners will find themselves relatively stationary for a large portion of their combat time, therefore it’s important to know what’s around you. Unlike other infantry roles, your mobility is severely hampered when you’re aiming, so make a mental note of where you can be flanked, shot from or penned in from. Whilst you’re at it, have an escape route planned too!

Patience is a virtue – If you’ve set-up your bipod and found yourself watching a chokepoint or contested path, patience can have big rewards. If you see an enemy soldier emerge from cover, unaware of your presence, it can pay off to wait a few seconds before opening fire. Why? Because where there’s one soldier, there’s normally their unit too! This can make the difference between one elimination and a unit wipe.

Light them up – When firing your machine gun, you’ll notice that some of your rounds are tracer rounds! These are an effective way to highlight enemy positions, not only for your unit, but surrounding allies. Whilst you’re suppressing an enemy position, your allies will be able to focus in on where you’re shooting to aid in taking out the opposition.


Hell Let Loose is available to Wishlist now:

https://store.steampowered.com/app/686810/Hell_Let_Loose/

Follow Hell Let Loose on Twitter.
Like Hell Let Loose on Facebook.
Hell Let Loose - Jonno
Hey everyone,

Welcome to Developer Briefing #11! This week we’re bringing you a second dose of Sainte-Marie-du-Mont as we share with you a first look at the updated interiors that you’ll be fighting in.

If you missed the initial Sainte-Marie-du-Mont Developer Briefing, where we showcased updates we’ve been making to the map’s outdoor, rural environment, you can catch up here.


Building interiors update!

In Sainte-Marie-du-Mont you’ll fight across fields, hedgerows, farms and eventually the town itself.

The town is made up of roads, paths, residential buildings and the church, which serves as a landmark for approaching armies!

Knowing that our players will be engaging in fierce house to house combat in this area we felt it important to create authentic, interesting environments within these locations that give both the players defending or storming the buildings a fantastic gameplay experience.


Imagine taking cover behind a fallen table, isolated from your unit, as you hear the dull thuds of boots on wood as enemy troops slowly climb the stairs…


Through the keyhole

When creating the environments found within the homes of the residents of Sainte-Marie-du-Mont we were very keen to create ‘lived-in’ spaces for our players, where upon entering one these buildings they can read the room and feel as though a story is being told.


Whoever left this building did so in a hurry, even leaving behind their breakfast!


Once a family home, now abandoned and ravaged by war.


Taking the high ground

Those that venture to the upper floors of buildings may find themselves in a position to overwatch key locations, perfect for Machine Gunners and Snipers! Just make sure to check your corners for any unwanted guests first…


A strong vantage point, if you don’t mind the mess…


Floor to floor

When storming, or holding a building, players will need to keep a note of the building’s lighting. Shadows and dark rooms can hide soldiers, whilst lighting can give away your position!

The image below shows off one example of this. Soldiers looking to storm the upper floors will face a fierce battle here as they push into the gloom.


Interior decorating

Fighting in buildings will be a stark contrast to battling amongst trees and farmland, encouraging new tactics and brutal gameplay.

When designing these interiors, we wanted to give you areas that felt natural, whilst being fun to fight in. We hope the images we’ve shared with you here go some way in showing what we’ve got in store for you!


Be ready for the frontline by wishlisting Hell Let Loose:

https://store.steampowered.com/app/686810/Hell_Let_Loose/

Follow Hell Let Loose on Twitter
Like Hell Let Loose on Facebook
...