With a mere one day to go before the launch of Götterdämmmerung, it is tradition that we leave you with the change log to pore over. The usual disclaimer applies; this list should be comprehensive but omissions may have occurred. Any items we add retroactively will be placed in a separate spoiler underneath the main list.
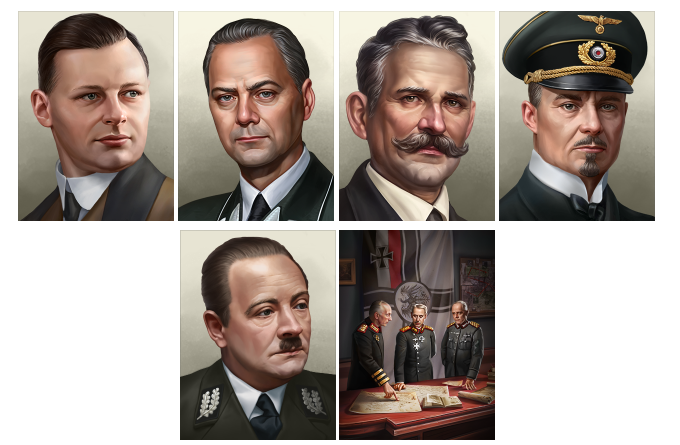
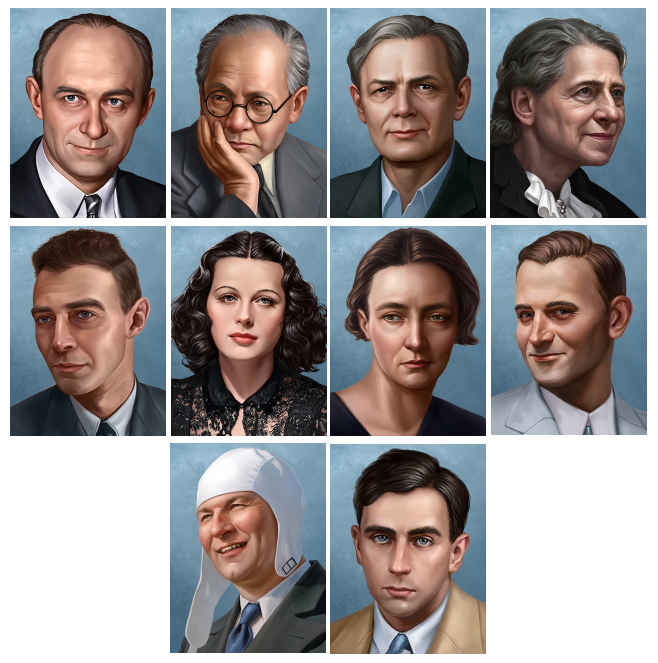
- Added new German ahistorical focus tree paths - Added full Austrian focus tree - 
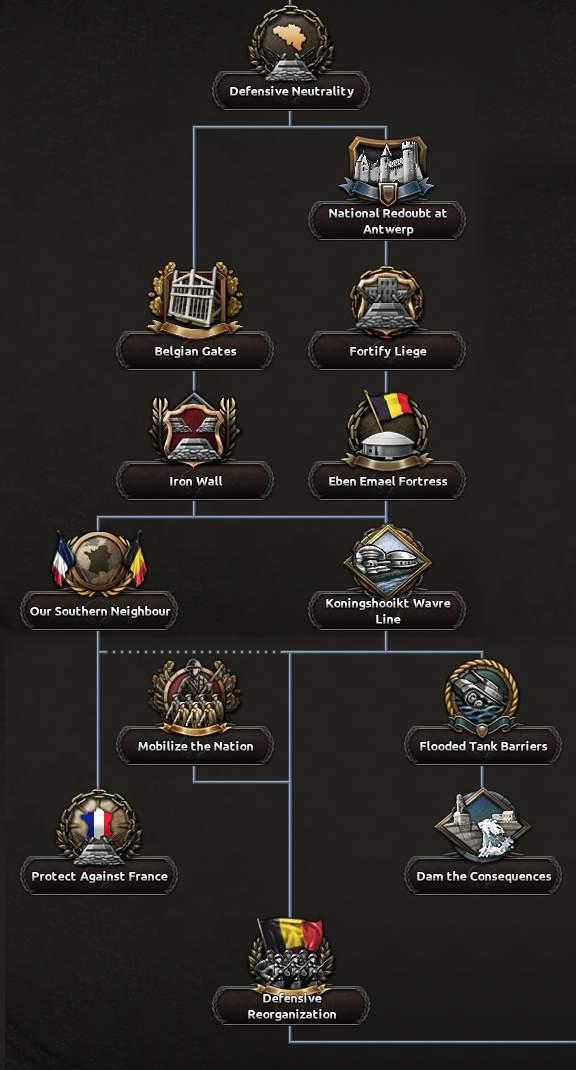
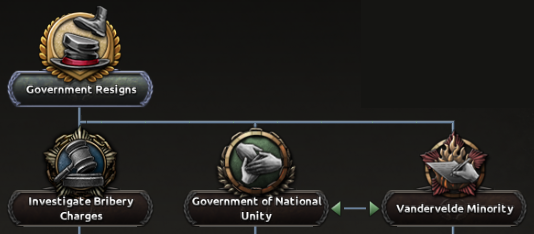
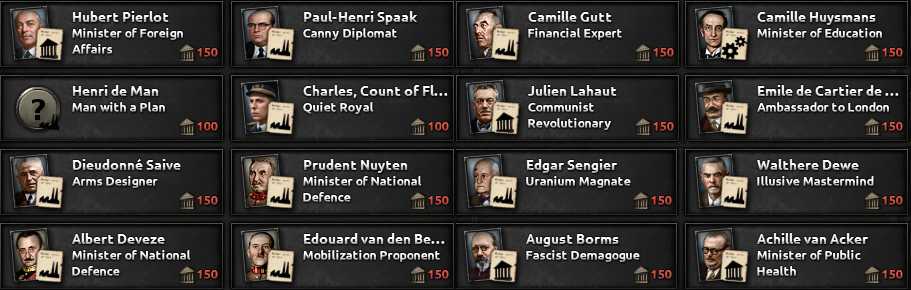
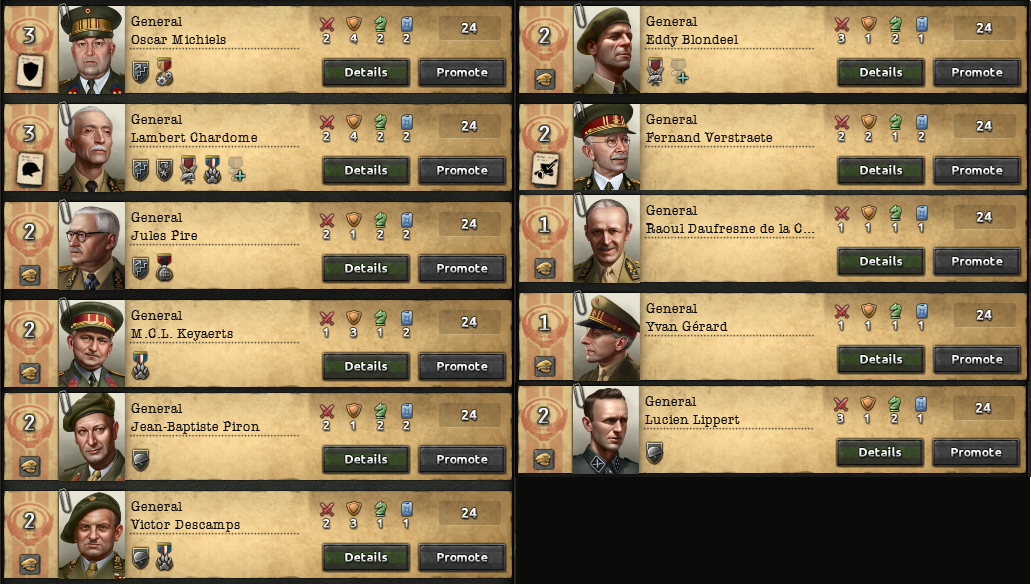
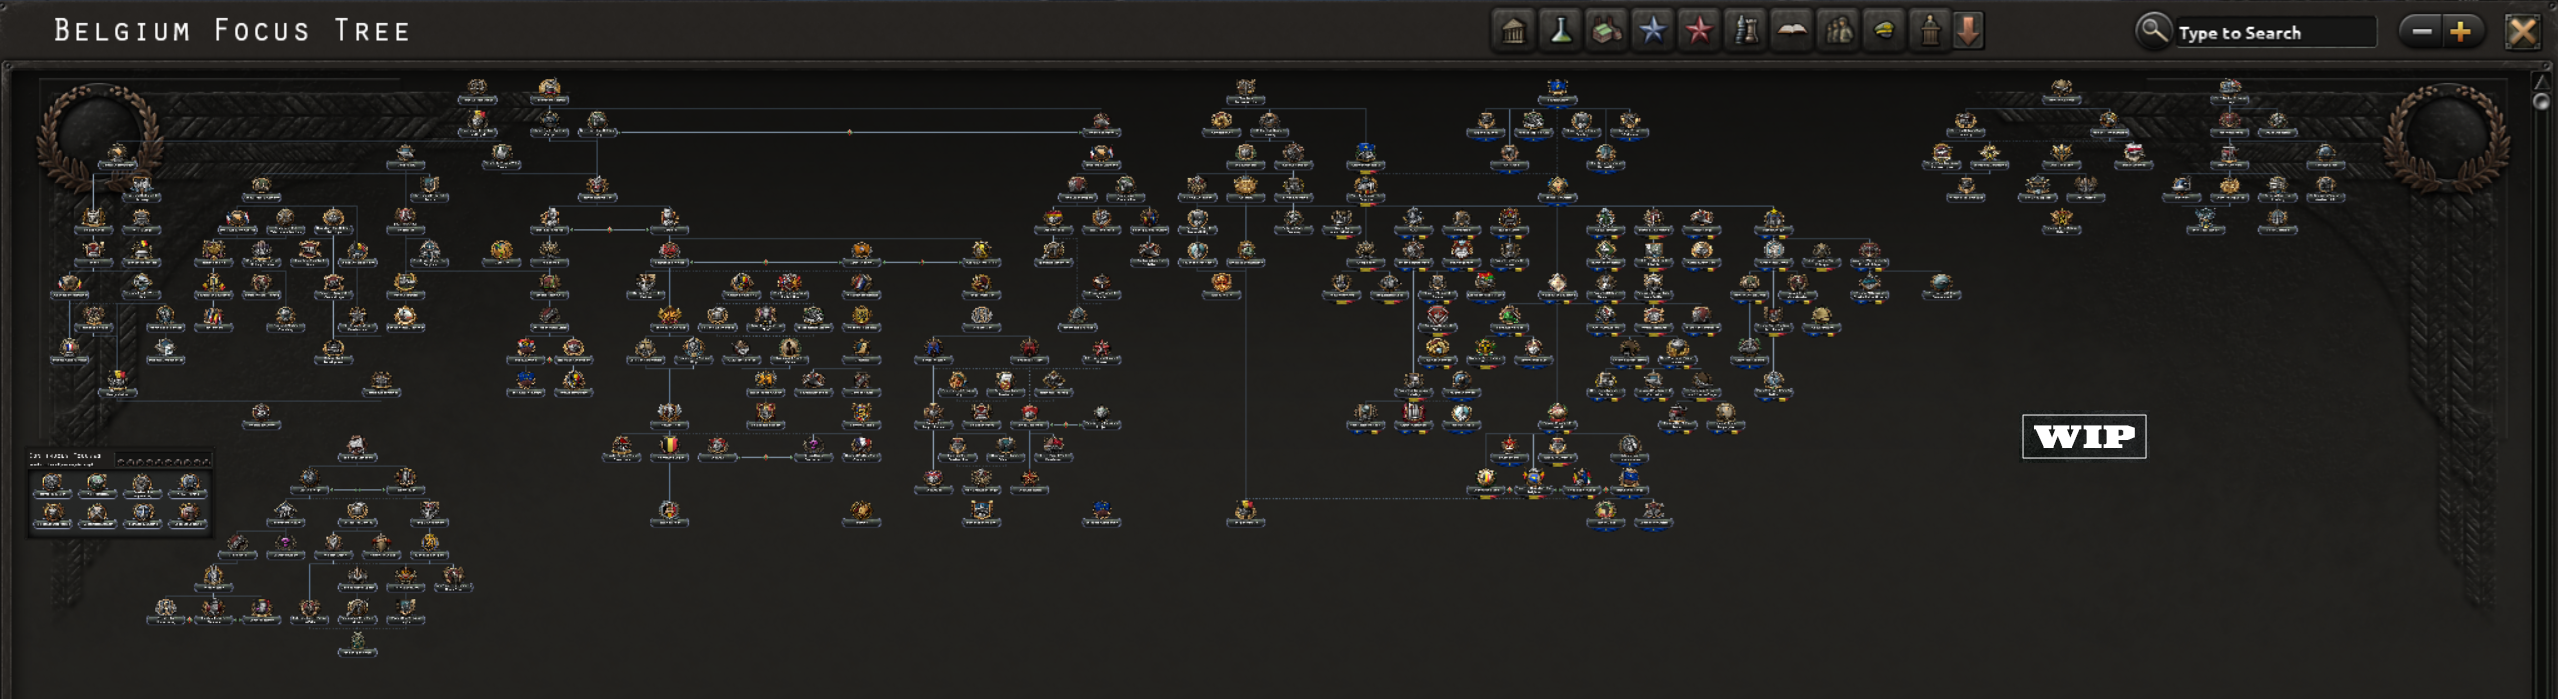
Added full Belgian focus tree - 
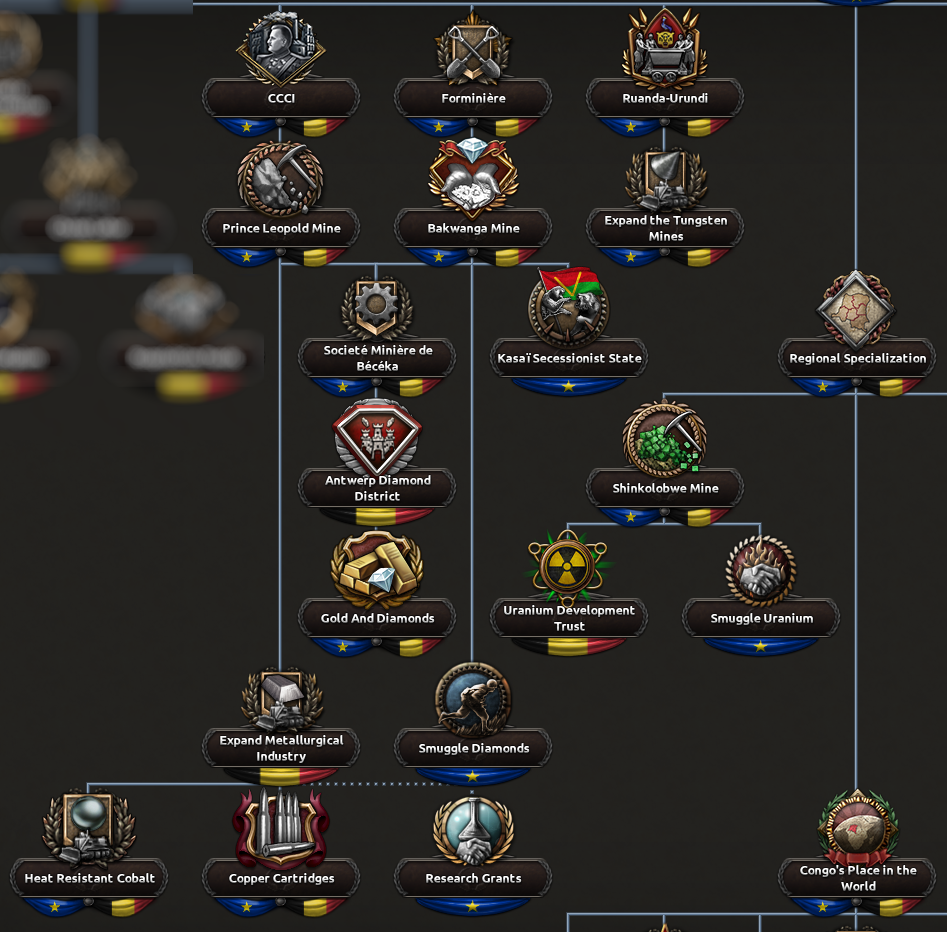
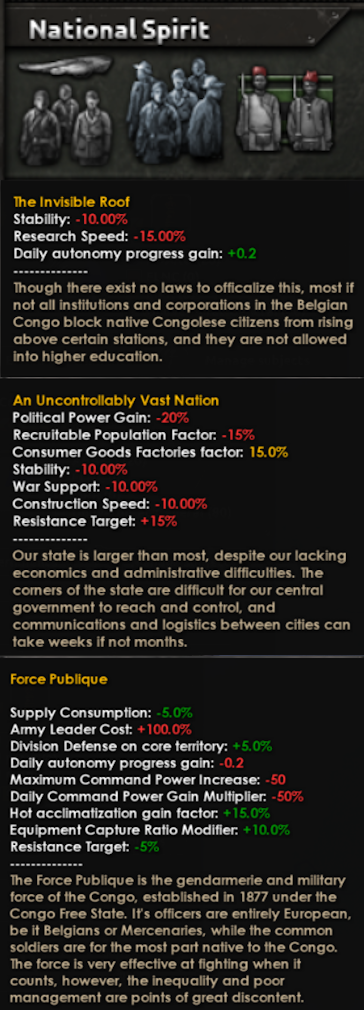
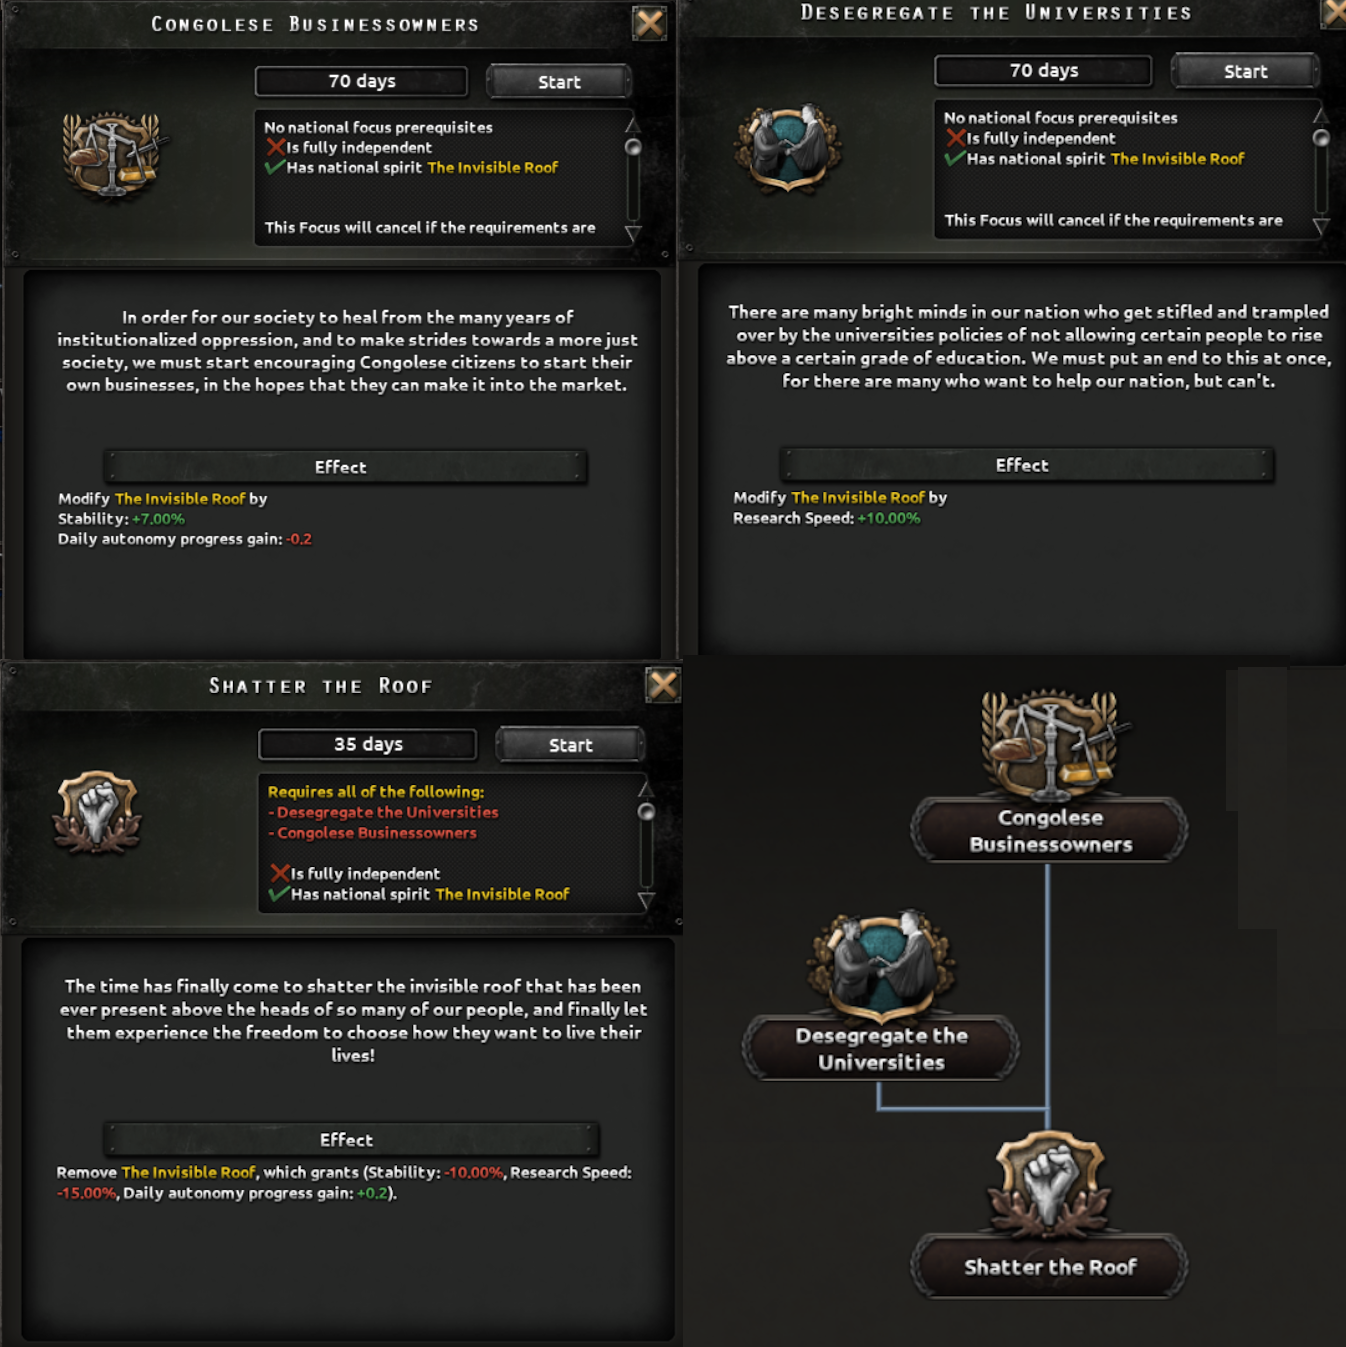
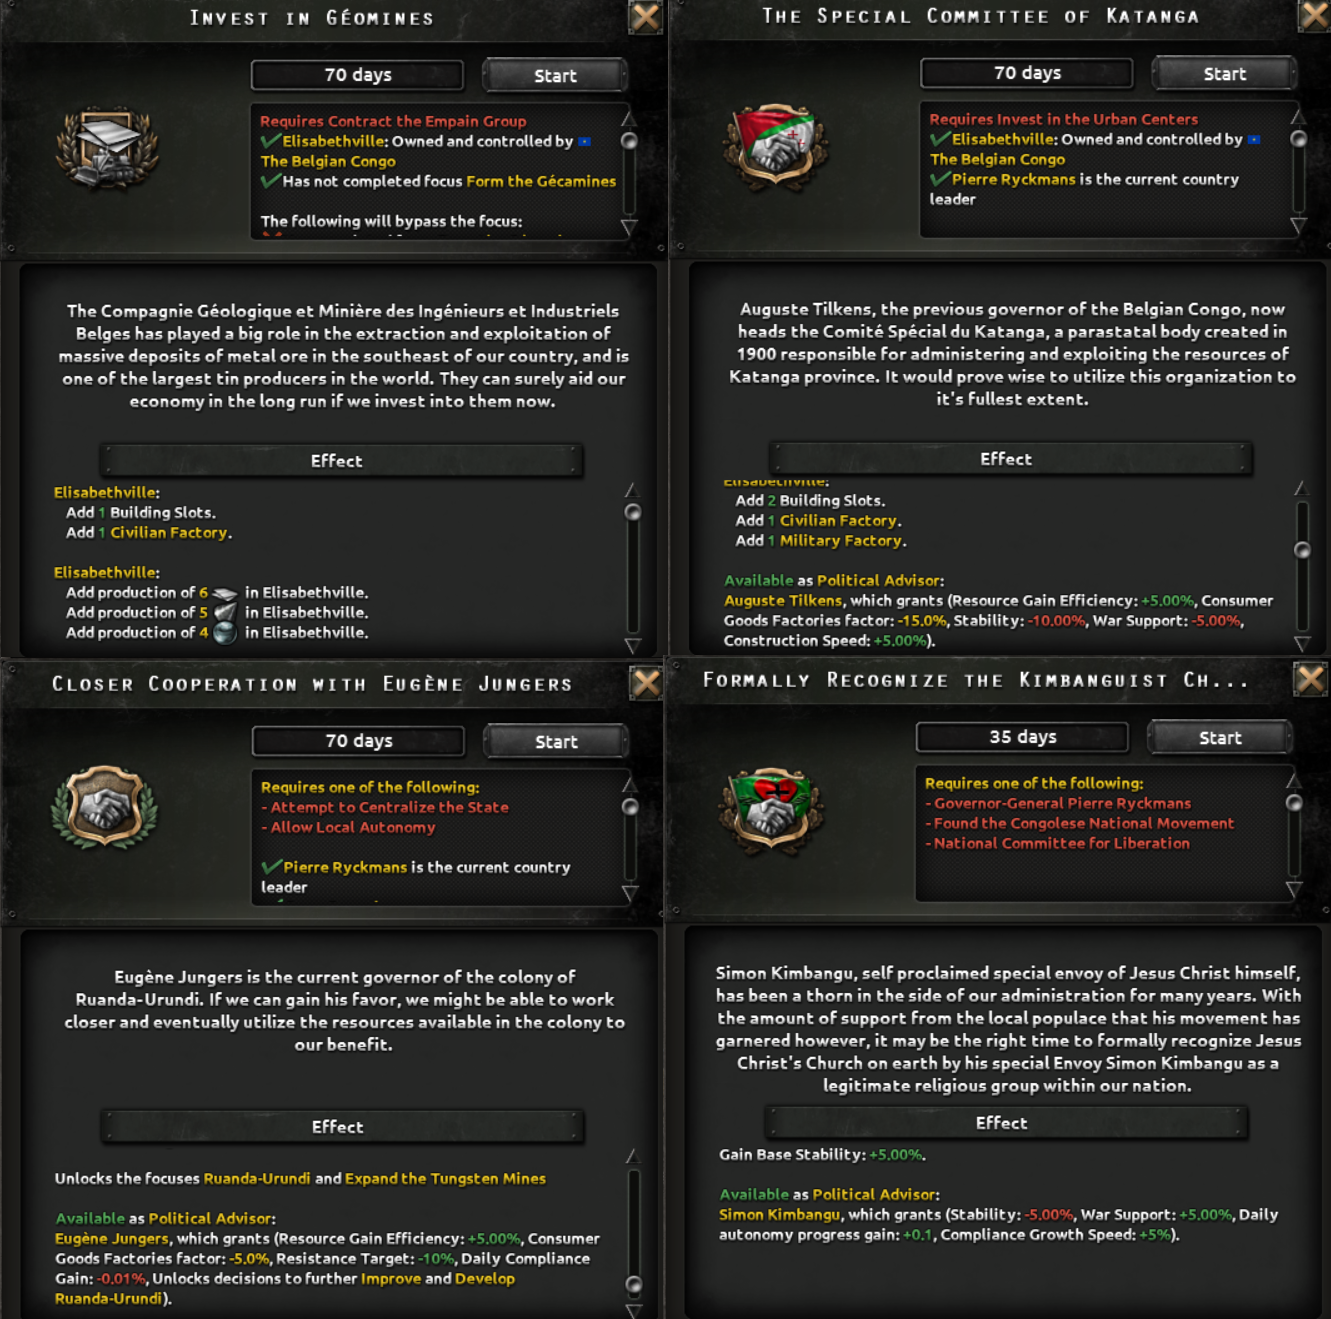
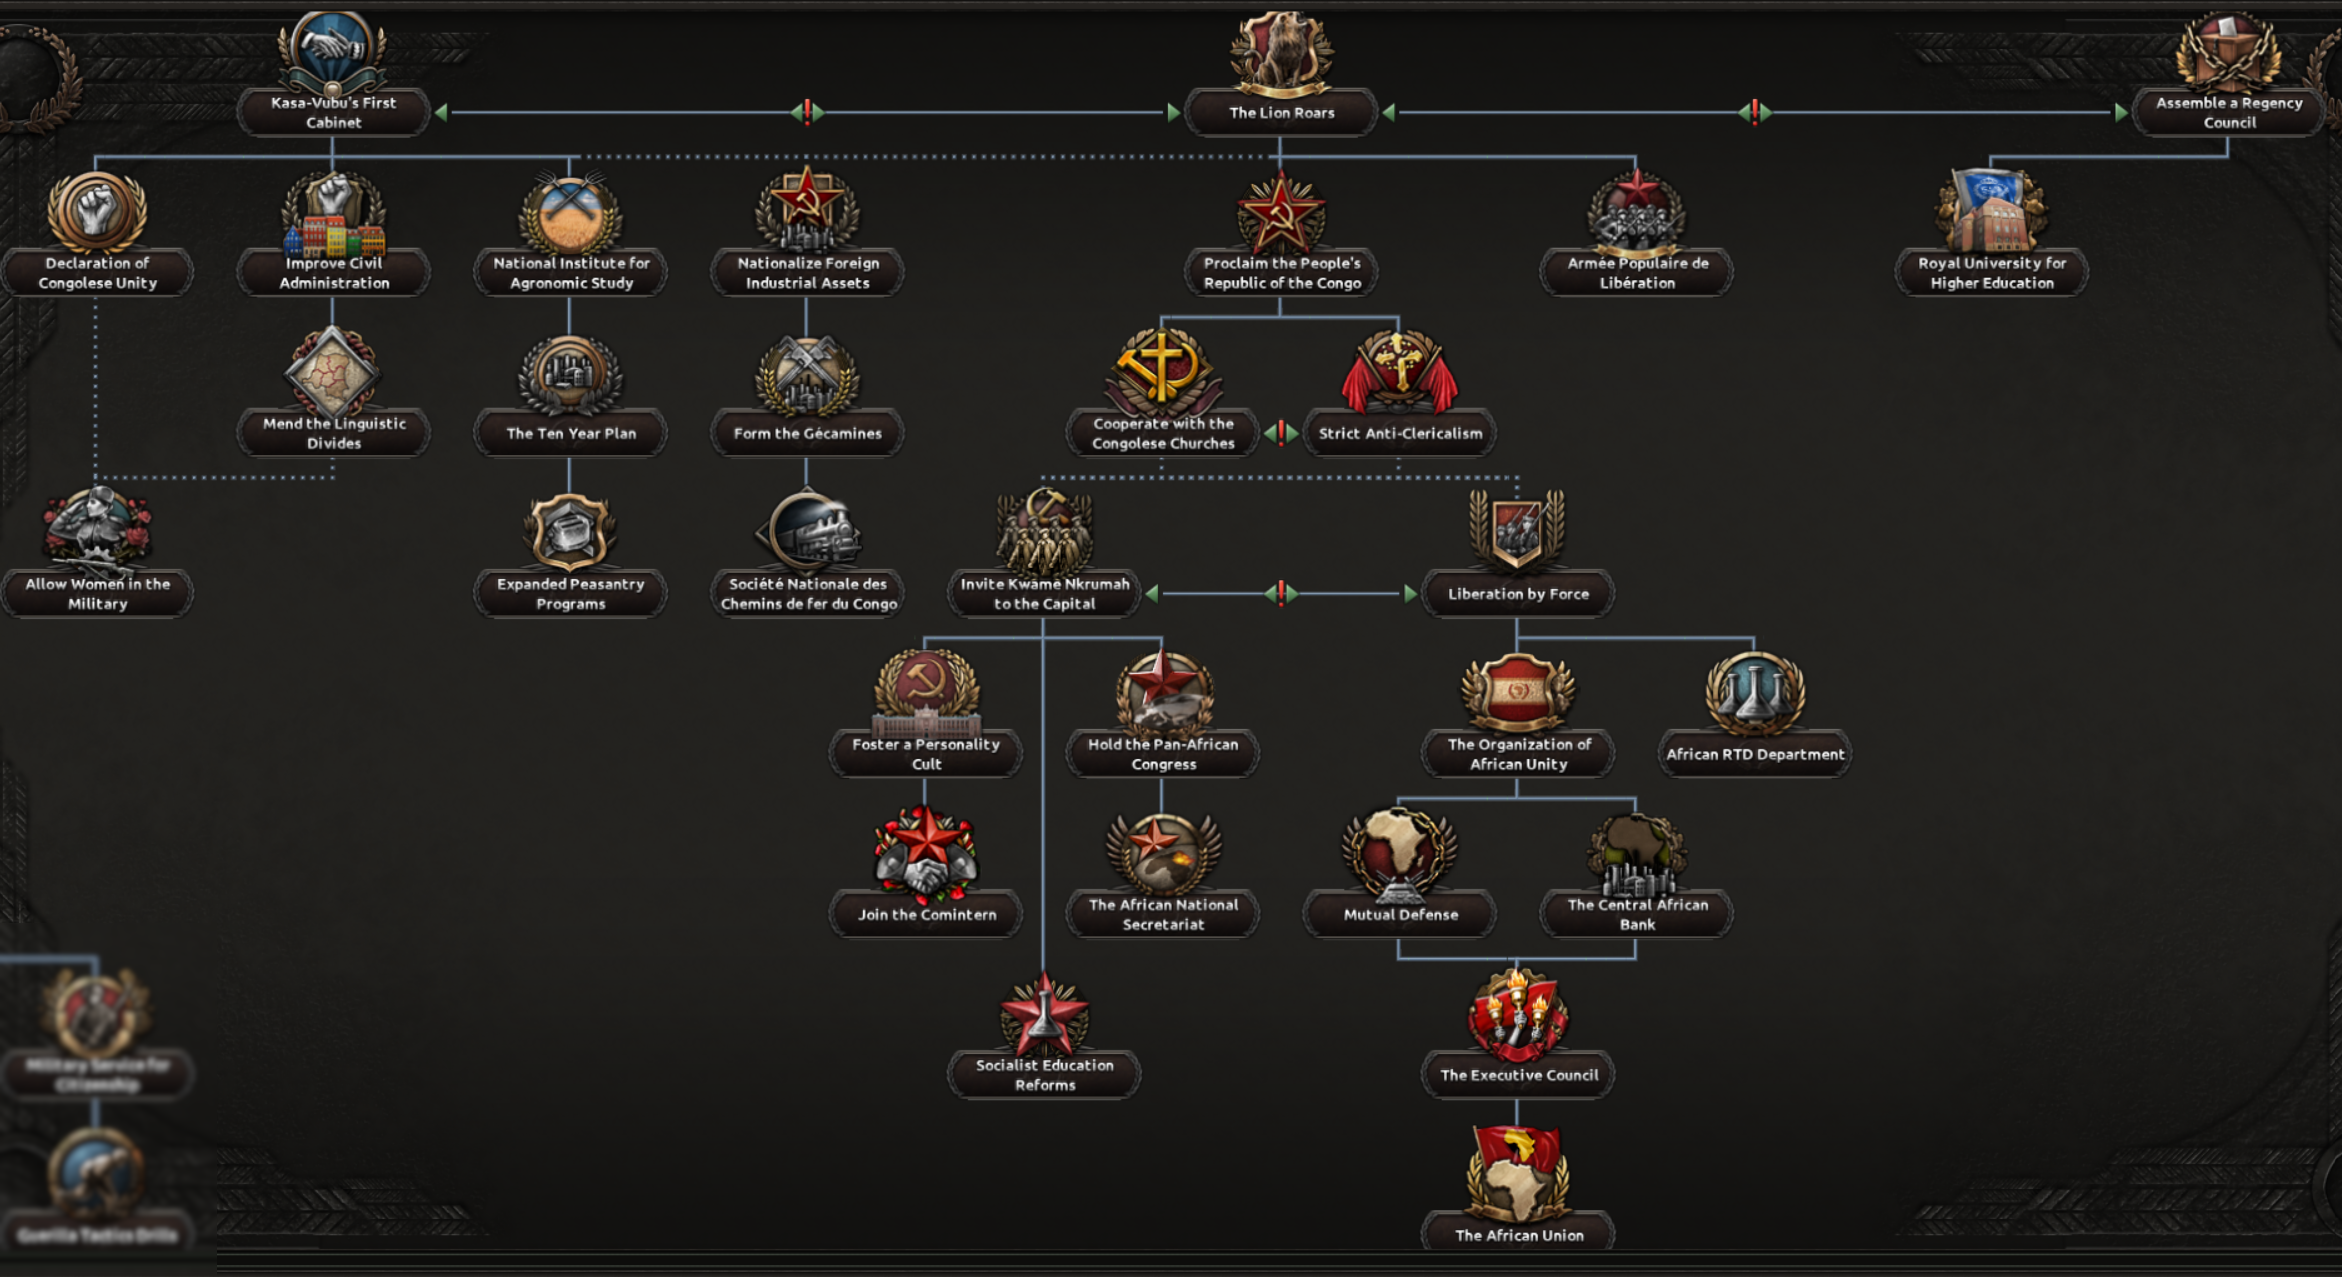
Added full Congo focus tree - 
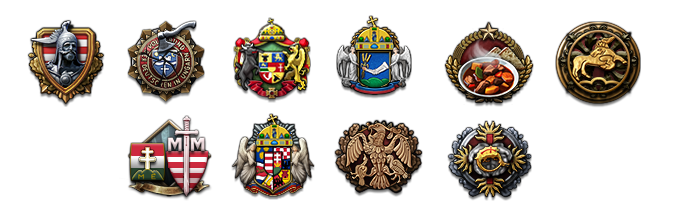
Added new Hungarian focus tree - 
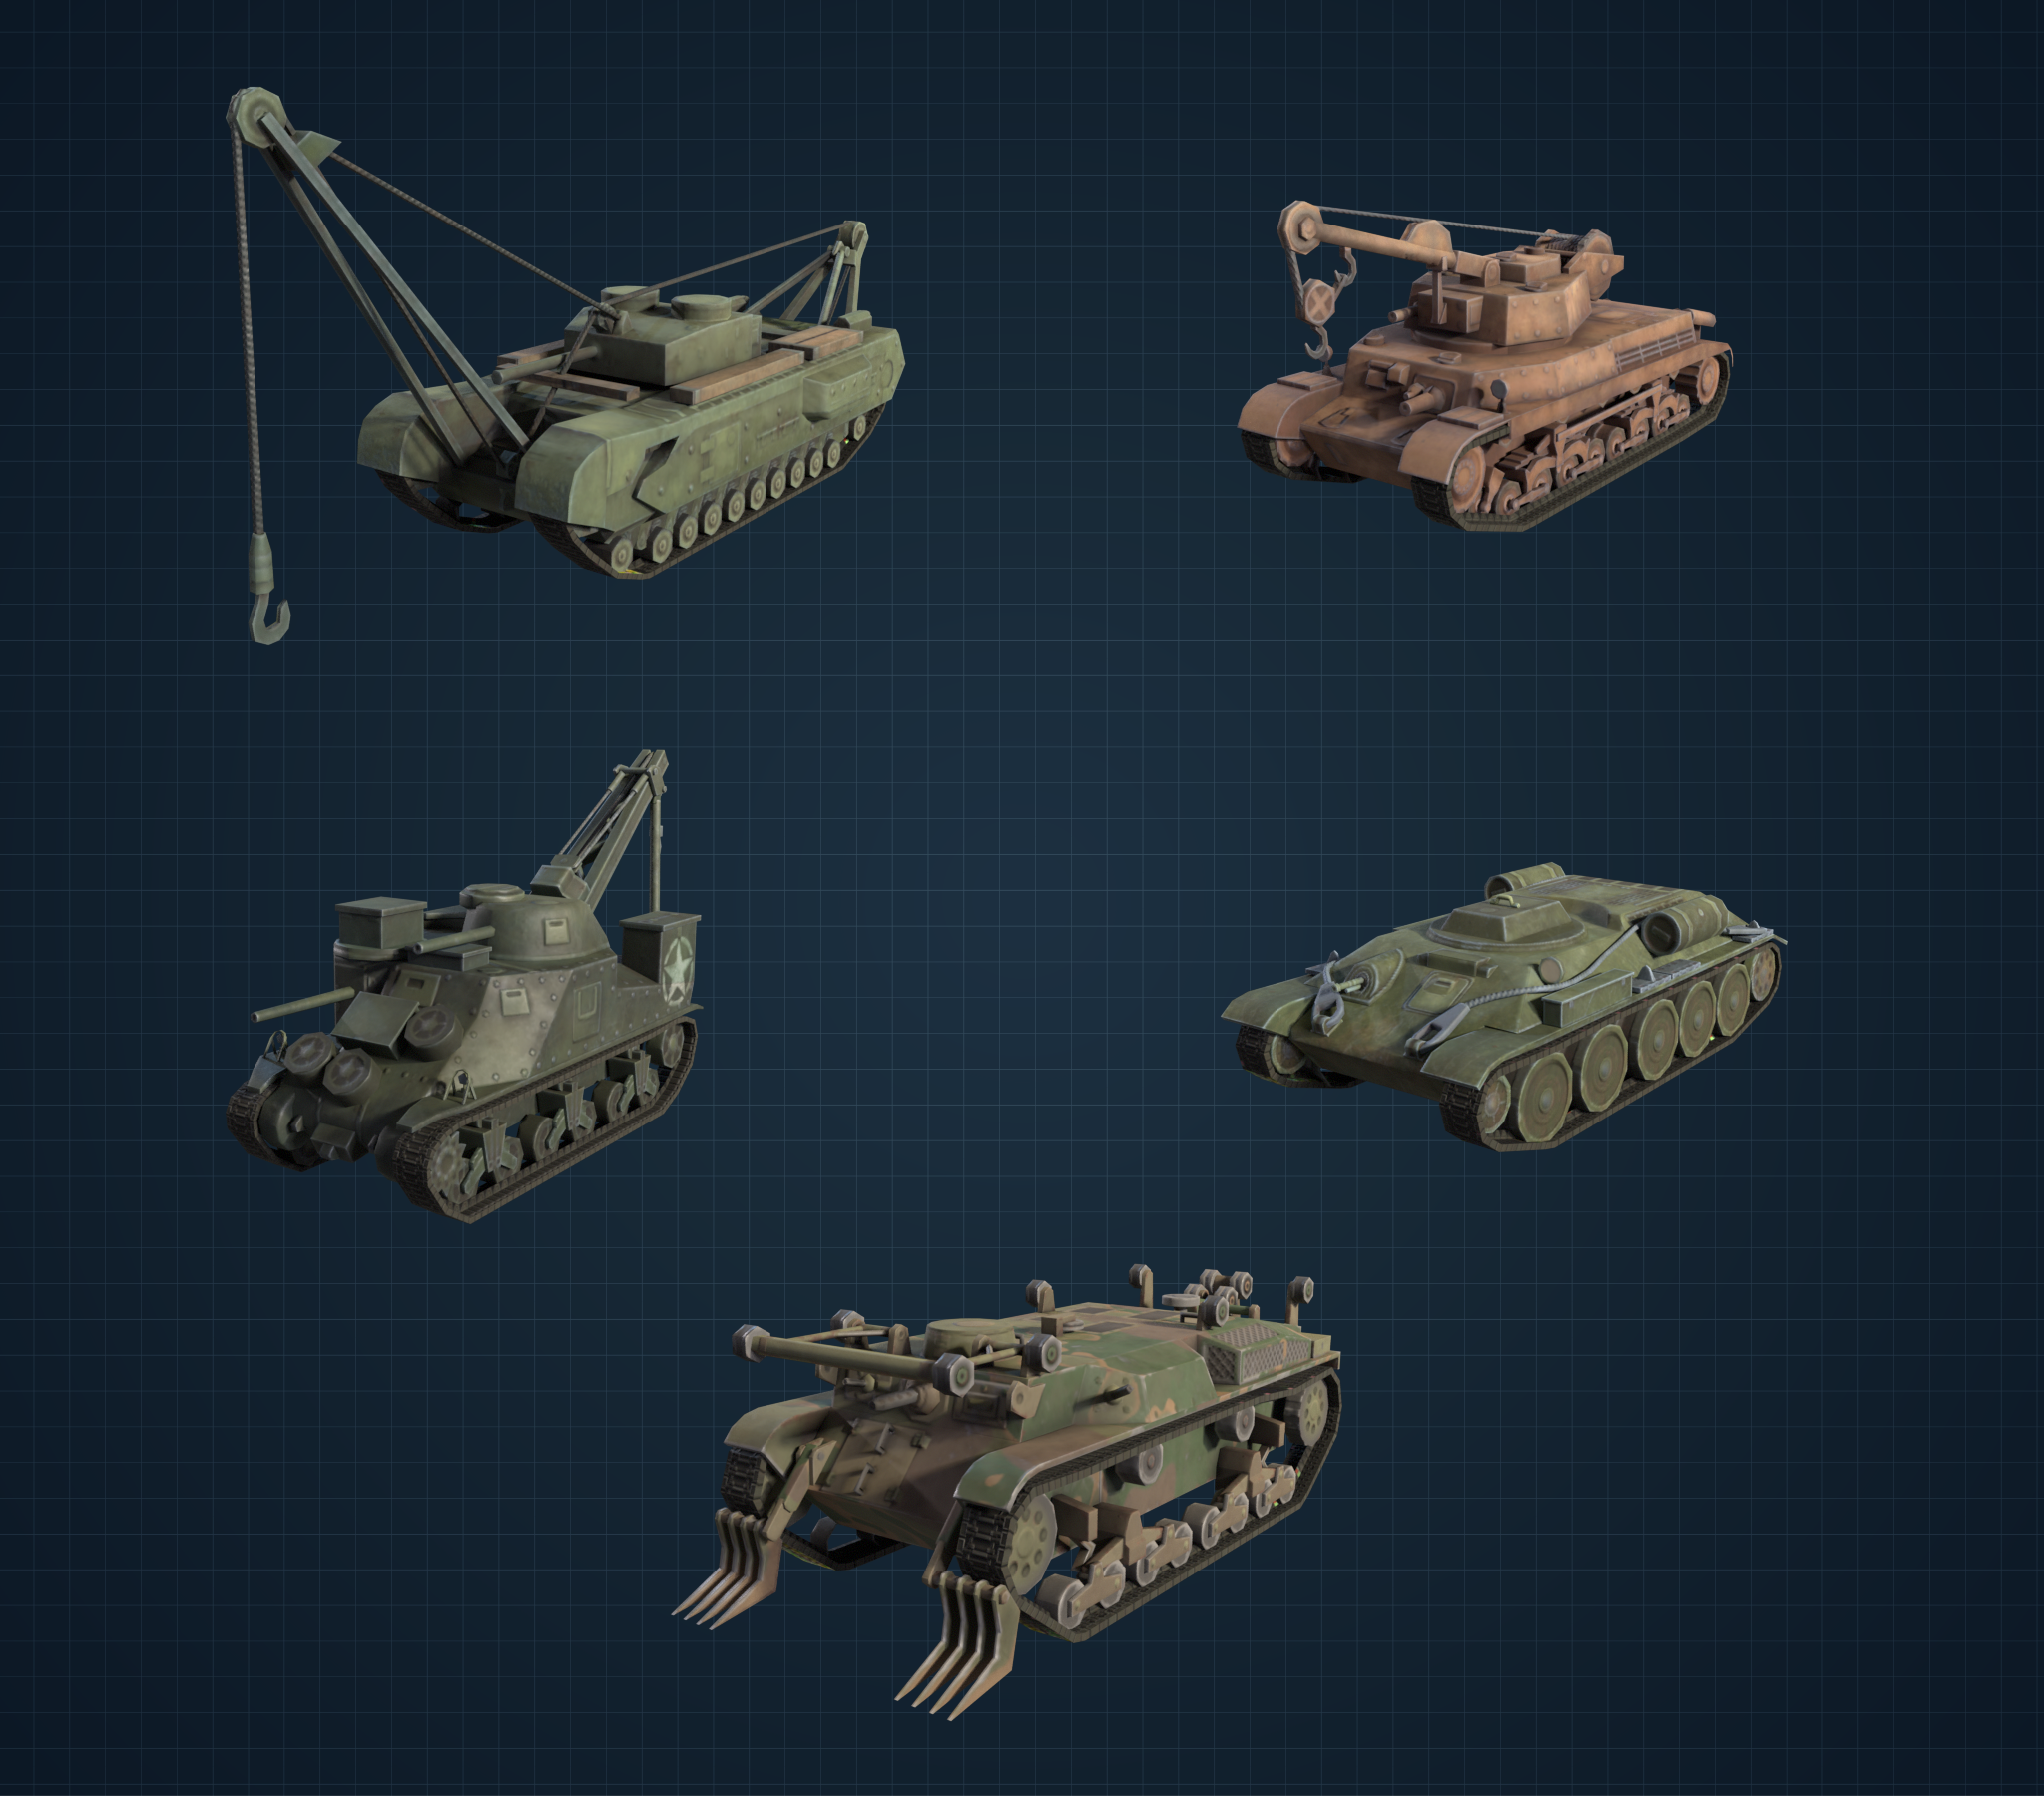
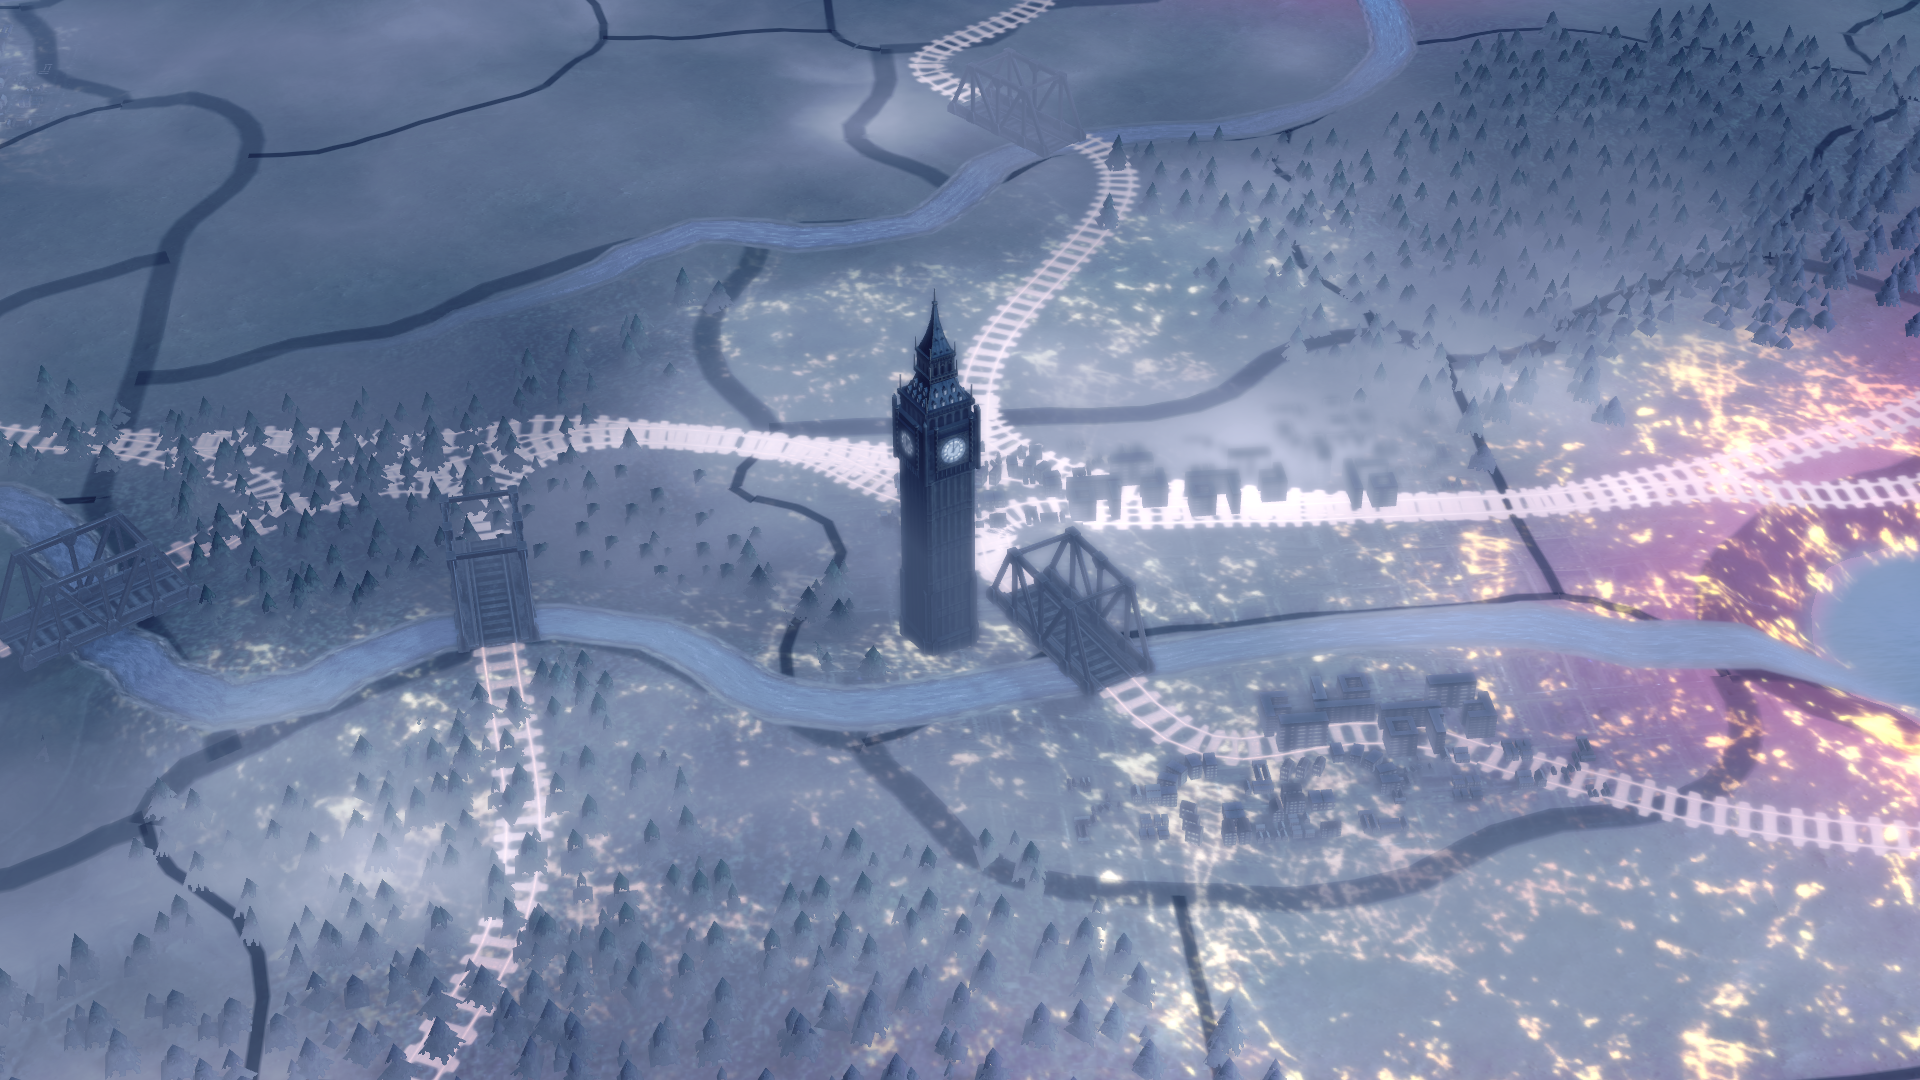
Added over 180 new 3D models, including cool experimental equipment, unit models, cool experimental equipment and landmarks. - Added 11 new music tracks - Added 28 new Special Projects - 
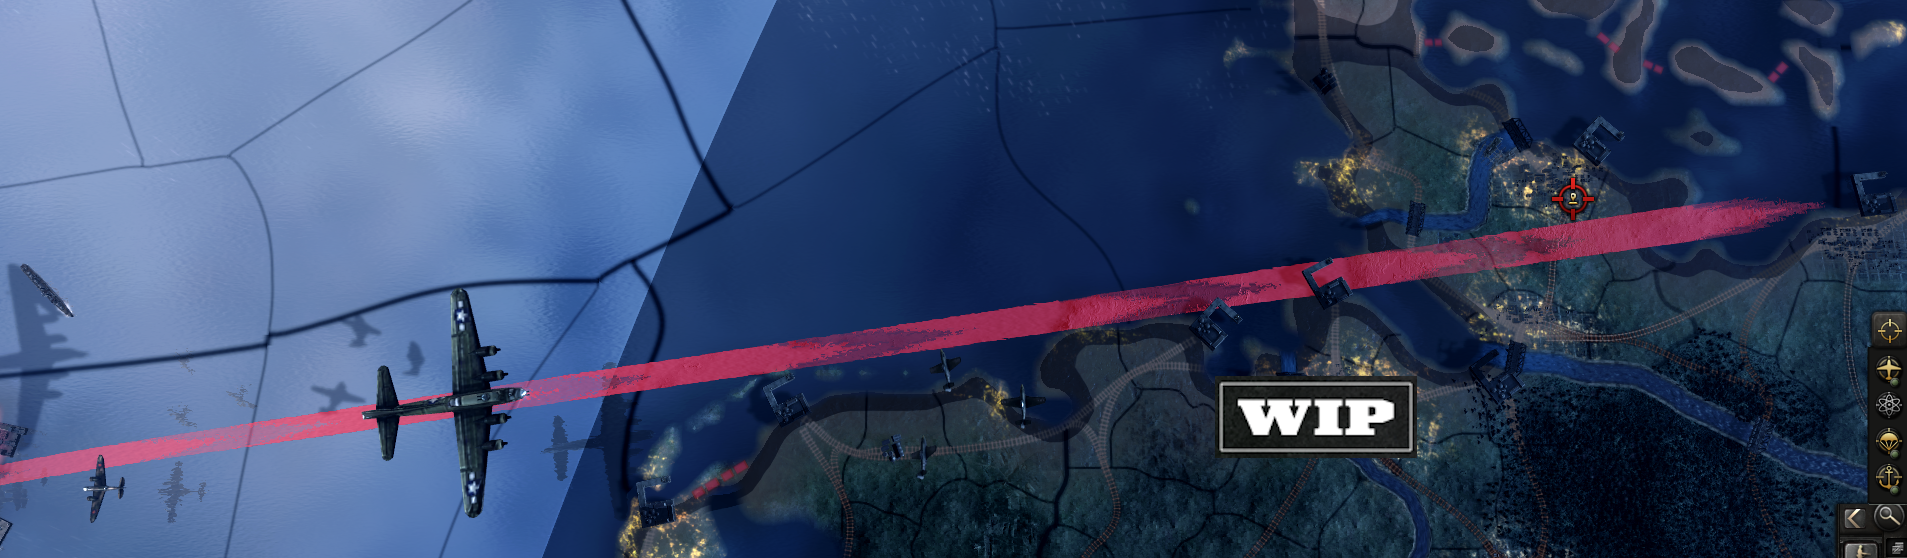
Added Air, Paratrooper Raids, and targeted missile raids - Added VO for Austria and Belgium - Added Helicopter Brigade - Added Helicopter Logistics - Added Helicopter Medevac - Added Armoured Maintenance Company - Added Armoured Engineer Company - Added Assault Engineer Company - Added Super-Heavy Artillery Companies - Added Land Cruiser Support Company - Added Super-Heavy railway gun
- Research Tab was enriched with Scientists, Experimental Facilities and Special Projects. - Added 15 new Special Projects - Added 2 Special Projects to the No Step Back expansion - Added new historical German focus tree paths "- Reworked Land and Coastal Forts - their maximum buildable level is now capped by the province terrain type. Those caps can be increased primarily by researching new Fortification Technologies " - Added numerous new technologies associated with or unlocked by Special Projects - Added a variety of horse colours for cavalry units - Added focus shortcut system showcased in the German national focus tree - added raids system for launching nuclear bombs
"- Rebalanced Norwegian advisor traits - Added Rolf Jørgen Fuglesang, Eivind Blehr, Eivind Heiberg, Christopher Hornsrud and Kirsten Hansteen as new advisors for Norway." - Updated a few Czechoslovak focuses to be a bit better or faster. Also added more flavour to many of the names of the Czechoslovak focuses. - A few faction-joining focuses in the Spanish and Portuguese trees have now been made into 35 days focuses. - Updated the French focus and national spirit "Fortification Focus" to additionally grant +1 max level for land and coastal forts. - Updated the Czech "Fortification Studies" and "Sudetenland Fortifications" focuses to grant additional max fort levels, to accommodate for the new fort system. - The Turkish AI shouldn't start WW3 with historical focuses on "- Fixed an issue with the French decisions to reorganize the various Air Force MIOs so that they no longer get the same name duplicated. Also rebalanced the decisions to be more worth taking. - Added the Société Française Radio-Électrique asa new electronics concern for France. - The French focuses “Latin Entente” and “Towards a New Europe” now don’t only change the country leader, but also change the name of the leading political party to match the leader you gain. - The French Focus “Bring Home Quebec” now also gives claims on all Quebec cores. - Fixed an issue where the French focus “Grow the Empire” didn’t account for the new Congolese states added in BBA. - The French focuses “Reach Out To Spain” and “Invite Portugal” have been made into 35 day focuses. - The French focus “The Natural Borders of France” now also gives claims on the target states. - The French focuses “Celebrate the Commune” and “Legal Equality” have been made into 35 day focuses. - The French National Spirit “Agricultural Collectivization” now additionally grants -10% consumer goods factories factor. - The French focus “Proclaim the Third Empire” now creates a faction called “The Continental System”, that is renamed to Confédération du Rhin when taking the focus “Disunite Germany”. - The French national spirit “Le Déluge” now additionally grants 10% war support. - The French focus “Utilize the Leagues” now grants an additional 75 political power and -3% stability. - Adjusted a few consumer goods factories values in the Soviet industrial Branch that still held values and tooltips from before the factories to factories factor change. " - The British focus "Home Defense" now unlocks a decision category that can use to aid in the defense of the British Isles. - The American focuses "Tank Destroyer Doctrine" and "Main Battle Tanks" are now 35 day focuses. - Croatia is now more likely to be created when yugoslavia ends up at war with germany - South Africa now has access to a few of the British MIOs, and the focus "South African Railways" now can unlock the basic train tech for free, as well as adds 15 British trains to the stockpile. - Added a new focus for the United Kingdom with La Resistance to expand the MI6, and gain an intel agency, operative slot and some other intel bonuses. - Updated the Polish air-focuses to work better with the BBA techs. Also made the focuses "Expand Air Bases" into a 35 day focus. - Added the ability for Ethiopia to prospect for a small amount of extra resources within it's core territory. - The Estonian focus "Join the Axis" now takes 35 days instead of 70. - Italy can now gain an Air Facility north of Rome in the focus "Città dell'Aria". - The Soviet focuses "Modernize Aircraft Facilities" and "Soviet Atomic Bomb Project" can now give them a facility of the corresponding type. - 
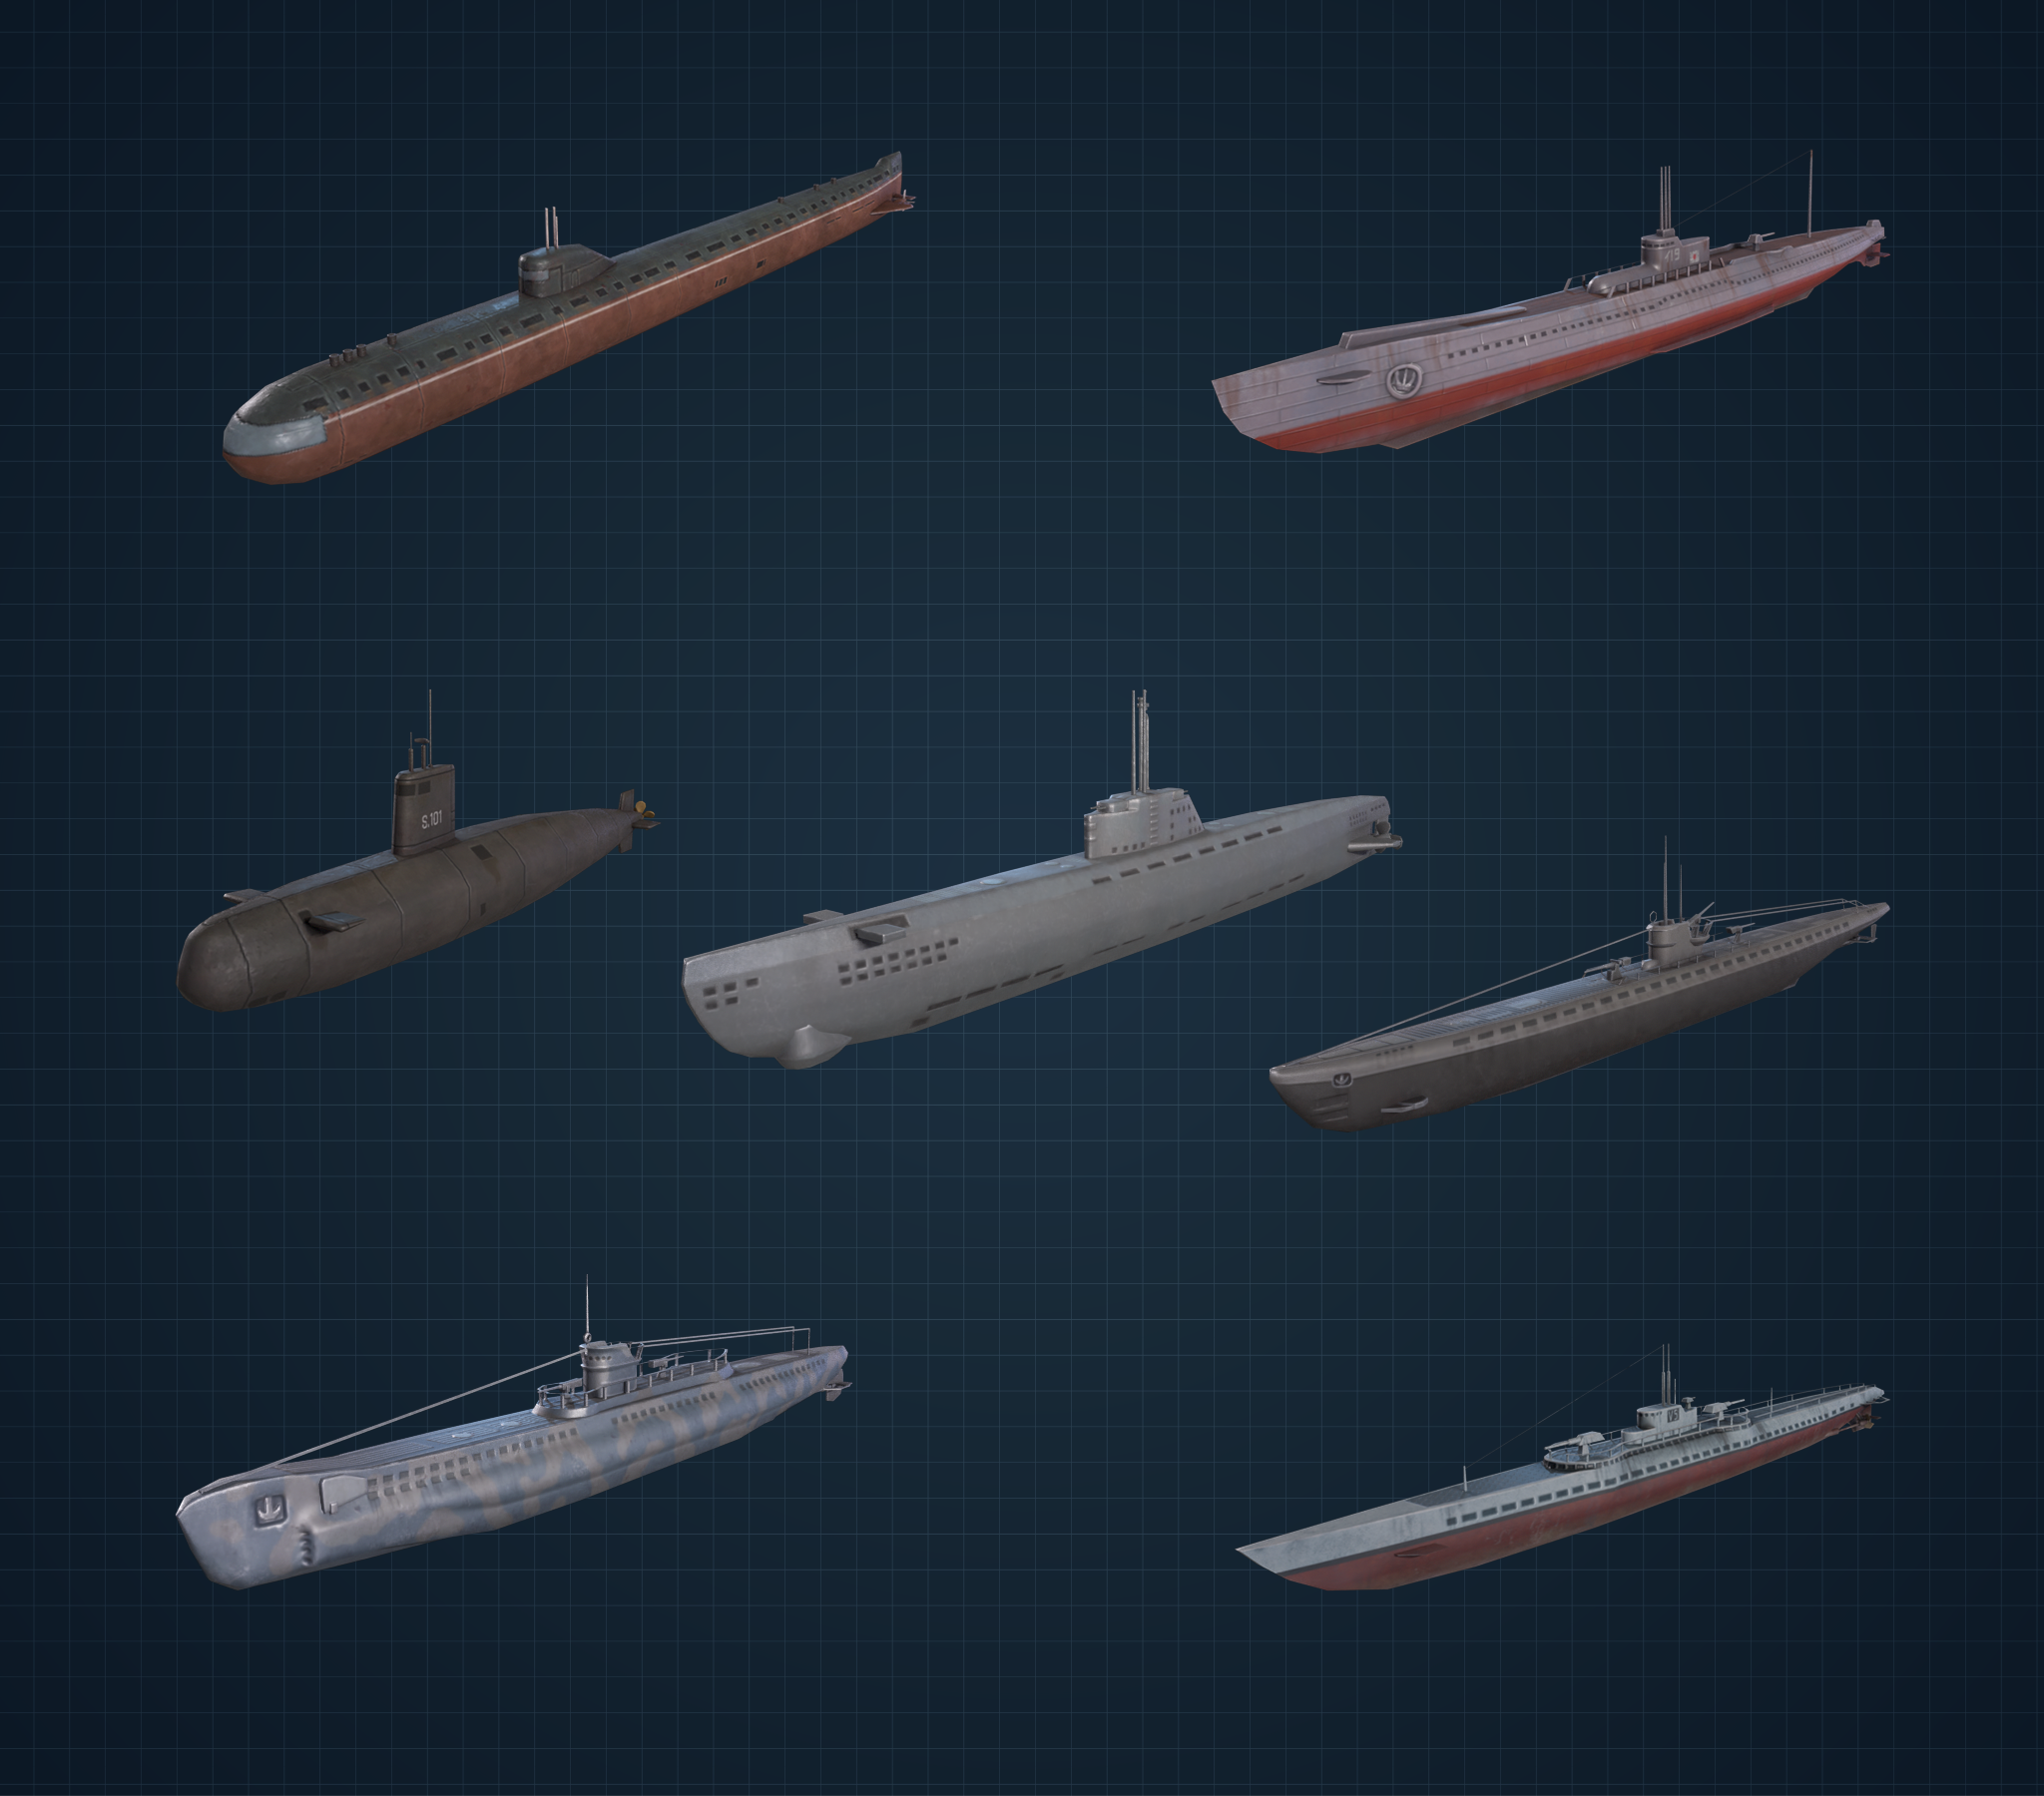
Sonar Modules Submarine Detection increased from 6/10 to 8/12 - Depth Charges Modules Anti-Submarine Attack Values increased from 8/12/16/20 to 8/13/17/22 - Submarine Torpedo Modules Attack Values reduced from 14/18/22/28 to 13/17/20/25 - Submarine Engine Modules Visibility Reductions changed from 0%/-5%/-10%/-15% to 0%/0%/-5%/-10% - Some Chilean democratic focuses are no longer blocked from each other. Some effects in the branch have been adjusted to accommodate for this. - Players can now reject handing pre-planned expansion states over to Bulgaria. - Cavalry now gets +5% Breakthrough in Infantry Offensive Doctrine (Grand Battleplan Infilitration Path) and Cavalry Recon bonus from Infiltration Assault (Grand Battleplan Infilitration Path) now also extends to mounted infantry -Prioritize Naval Aircraft Construction Decision for Japan now provides -10% cost reduction to Carrier Naval Bombers and Carrier Air Support, to reduce their double-dipping effect from -40% to -30% -Admiral Trait Concealment Expert Visibility Reduction was reduced from -20% to -15% -Giving Refuge to Italian and German Scientists now also provides +2% Special Project Research Speed - Fuel Silos cost is now cheaper based on the amount of already existing Fuel Silo in the state.
- Added names for Polish Cavalry Brigade Commanders - Added the Czechoslovak State Railways as a new industrial concern (railway company) for Czechoslovakia. "- Added admiral roles to Dimitrios Oikonomou and Epameinondas Kavvadias - Added Stylianos Gonatas as a military high command and general for the Greek republicans - The Greek industrial focus Fiscal Responsibility now hires Emmanouil Tsouderos for free if possible - The targeting for construction in the Greek focus Making Use of our Islands has been switched from owned to controlled states, and can also target Cyprus if they are a puppet of Greece. It can also integrate Cyprus if that is the case. - The MIOs gained from the Greek focuses Rapprochement with the Italians and Appeal to the Soviet Union now gain 2 sizes immediately - The Hellenic Air Force Academy national spirit now grants an additional 5% air exp gain factor - The Greek focus A Legacy of War also grants 3% organization - The Greek focus The Backbone of the Army now grants half a percent of recruitable population, from the previous a fifth of a percent - Added a new focus to the Greek industrial branch to utilize the Macedonian Farmlands in order to gain supply bonuses and a tiny reduction to consumer goods factor - Many Greek focuses regarding switching ideologies, factions or wars, are no longer available to them if they are a subject of another nation - Added a new focus to the Greek monarchist branch, allowing for the Reorganization of the Royal Guard, leading to some manpower and two free divisions - Modified the event The Monarchists in Greece Request our aid so that the British are much more likely to say yes and send equipment - Added a new focus in the Greek monarchist branch allowing for the further utilization of British capital, allowing for more infrastructure and building slots in Greece " - Added the Antillean Confederation as a new formable for nations in the Caribbean. Also fixed an issue where Belize couldn't access the decision to Form Central America. - Added New South Wales Railway Company as an industrial concern for Australia. - Added New Zealand Railways as an industrial concern for New Zealand. - Various old focuses connected to the Soviet Union, Finland, Sweden and Portugal now grant dams as buildings that give states additional positive state modifiers. - Added Fanny Schoonheyt as a General for the communist Netherlands. - The French advisor Charles Maurras can now also be unlocked by the focus "Orleanist Restoration". - Added Vasily Flug and Boris Shtefion of the Russian Protection Corps as characters that can become available through various means for Germany, Yugoslavia and the Soviet Union. - Added a focus for Fascist/Tsarist Russia to gain a wargoal to reclaim Uryankhay Krai. Also changed the focus "Vengeance for the Yoke" to a 35 day focus. - Tsarist/Fascist Russia can now release nations after taking the focus "Reconvene the Zemsky Sobor". - Updated and improved the Post-Yalta events between Poland and the Soviet Union. - Added a focus for the United Kingdom to expand Vickers Experimental Facilities in Foxwarren. - The British national spirits "Wartime Industry" and "Prepare for the Inevitable" can combine, thus enabling less clutter in the UKs country screen. - Luxembourg now starts with ARBED as an available Industrial Concern. - Ethiopian High Command Feodor Konovalov can now join the Russian White Forces when the Second Russian Civil War starts. - Added a crossing in the Philippines between Mindanao and Sulu. - The British AI will now protect their main island better - Mutapa can now be formed when a subject of another nation, and has seen its borders expanded slightly. - Added Georges Valois as an advisor for France. - If the conditions are right, Georgia may find an unexpected visitor on their doorsteps. - Added Marcel Déat as an advisor for France. -Degaussing Effects are now standardized. For MTG players, Degaussing Technology now gives +10% Submarine Detection to the Destroyers and Cruisers - and the unique spirits that awarded them are no longer granted. For non-MTG players those national spirits still provide the effect for those select countries - Added new unit categories in order to clean up some of the less 'readable' technologies and doctrines (Hello, Mobile Infantry!). - Cavalry now benefits from Anti-Tank Weapon Technology with the same ratio as Support Weapons. (2/5 - so +10% Hard Attack and +40% Piercing) - Supremacy of the Battlefleet Japanese National Focus now awards a National Spirit granting +10% Capital Ship Armor and +100% Super Heavy Battleship Special Project Completion Speed - Area defense orders now start with no pre-selected parameters, reducing overall interaction required in most circumstances
- Fix of bug where factory conversion button had no glow when selected. From now all building construction buttons will glow at once only if player not uses all of the available factories. - Country-specific train icons are now shown properly in the production menu
################################## # AI ##################################
- Fascist countries now also respect negative declare_war AI strategy values - implemented a new system for AI political-power spending - Invasion importance score is affected by 'invade' strategy, and tweaks to the US Operation Torch strategies
- Fix trigger all_enemy_country trigger to evaluate all countries and not just any - Added variable divisional_commander_xp to set divisional officer experience on unit creation - Allow using MIO category equipment group as equipment bonus type - Add state_resources_<resource>_factor state modifier - Add a equipment_production_min_factories_archetype AI strategy which only affects equipment of a specific archetype - Fixed bugs and revamped how the AI designs division templates. Removed a bunch of properties from division templates that either didn't make sense or were simply not useful. - AI division templates now get their AI role assigned on creation based on their target template, rather than being dynamically matched to a role based on match_to_count. - Add MIN_SHIPS_FOR_HIGHER_SHIP_RATIO_PENALTY define which can be used to make penalties from having a higher ship ratio not apply to small fleets - Added support for specifying division name list for AI templates - Implement a trigger parameter to get all the states in a given continent - A new trigger for naval invasion: has_naval_invasion_against_state - Implemented a console command to show/hide all hidden techs - Implement a new console command sp_prototype_reward - Add AI strategy force_concentration_target_weight to affect which targets are being used by AI Force Concentration - Add AI strategy force_concentration_factor to control to what extent the AI uses AI Force Concentration - Add force_concentration_front_factor AI strategy - Added support for disabling grow animations on buildings
- 3D buildings on map will now have fire/smoke pillars if they are damaged enough - 3D cities on map will now have fire/smoke pillars if corresponding civilian structures are damaged enough - Fixed DX11 trying to switch modes when Alt+Enter is pressed - Selecting display monitor now works in DX11 - Selecting display monitor now works in both windowed and borderless mode - It is now possible to override display settings from command line - Free France flag should now use the proper historical blue/red hues rather than the post 1976 ones - Updated the Czechoslovak focuses to improve the variation and spread of their focus icons.
- Fixed a rare CTD for ai garrison order - Now correctly display battalion modifiers when the factor is additive - Spirits are now shown in the Modify Officer Corps alert - Checkboxes in the strategic air view details graph and the fuel stockpile graph are now clickable - Fixed an issue where previously-capitulated Lithuania would be released controlling Wilno state due to the Molotov-Ribbentrop Pact. - No longer possible to justify war goal on impassable states - Fixed an issue where the incorrect modifiers were applied to the Crusade Against Democracy ideas, leading to the effect not applying correctly. - Fixed an issue where the the democratic party of Norway wasn't Høyre after taking the focus to get their leader as the new country leader. - Fixed a bug that caused incorrect unit distribution when frontline is split - Fixed an oversight where a few Turkish admirals were using the army versions of the traits "Career Officer" and "Media Personality". - No longer possible to delete division templates used by divisions escaping into exile (which could cause crashes) - Fixed broken texts in French news event for Claiming the French Throne. - The Mexican decision Support the Spanish Right now also works with Non-Aligned Francoist Spain. - Replaced Terrain Penalty Reduction modifier which was not working in National Spirits by the modifier Terrain Traits XP Gain. - Fix the bug with the UI where daily power is clamped to 0 despite it being negative - Soviet Union: Purge-Related National Spirits will now be transferred to the Stalinist side in the Soviet Civil War, and the relevant decisions to remove them will be available for the Stalinist side during the civil war. - Soviet Union: Dissolve Aircraft Design Bureau purges will now properly work with MIOs when Arms Against Tyranny DLC is active. These purges will no longer trigger twice for an already dissolved bureau. - Soviet Union: The decision tooltip to Reinstate Aircraft Design Bureau will now display the days that have passed since the Bureau was dissolved (as the decision is unavailable until a year has passed since the dissolution). - Changed the post war names for Italy and Romania to better match the historical names - num_battle_plans now also counts the field marshal's own battle plan - Fixed an issue where Japan couldn't have integrated puppets despite no longer being fascist or non-aligned. - Fixed an issue where Argentina could core states that it had already cored. - Fixed an issue where the warlord focus Ideological Education required you to be and not be a subject at the same time. - Fixed an issue where the Dutch focus "Expand the Artillerieinrichtningen" said it unlocked and gave bonuses to the MIO Siderius when it was meant to give it to A.I. Hembrug. - adds conditions to effects that construct forts and coastal forts, as well as availables and improved bypasses in the British focus tree - Fixed various instances of unlocalized strings throughout content. - Fixed issues in the Italian events and decisions to invite Turkey or Greece to your faction in exchange for the Dodecanese, where they would previously target the wrong countries. - Building slots are no longer reduced by 50% due to non_core_controller. This should be purely handled by resistance & collaboration - Fixed an issue where the Blackshirt March on the Isle of Man would count as one having been done in the Highlands due to an incorrect flag being set. - Fixed an issue where the Lithuanian general Kazys Skučas used his large portrait where he should have used his small icon. - Fixed a small LOC issue in the Polish decision "Sideline the Right". - Fixed an issue where Romanian puppets wouldn't be peaced out with their enemies when Romania switched sides using their decisions. - Fixed and updated the requirements to take and bypass some of the Turkish faction joining focuses. - Fixed a minor typo in the description of the Argentinian national spirit "The Roca-Runciman Treaty". - Fixed an issue where Swedish advisor Frans Severin was hidden prior to being unlocked. - Fixed ?s showing up instead of unknown characters in the Vietnamese namelist - minor fix to Swiss focus Preempt Anschluss to bypass if Austria doesn't exist, or is a subject of someone else
In addition to today’s change log, we are also including a link to a mod update and migration guide compiled by a series of mod authors that have been given early access to Götterdämmerung in order to begin the process of updating their mods early.
Hello! And welcome to the last Dev Diary for the DLC Götterdämmerung!
I’m CreamGene and I hope you have had a good time reading previous Diaries and are as excited as we are for the release.
Since I’m here, I would like to share with you some of the art we on HOI have loved to see the most as well as show off some behind-the-scenes… or WIPs of how some of the features took shape and came to be… as well as a passion project from me that I’m very excited to finally unleash!
Features
From my point of view, the features took some time to nail down and feel right, and I think it's very important to invest time and effort in that.
Here I’ll showcase some of the steps and directions that the Special Projects and Raids went through. I believe that you have already gotten some nice run-throughs from earlier DDs so if you want to refresh your memory, please head to the earlier DDs where our fantastic Content Designers explain the ‘hows and whys’ since I’ll mainly showcase the art journey for them.
Special Projects
Let me tell you that I already had the vision here and I’m so happy that it came through! Since we wanted to introduce scientists and all the things they can do I wanted to make it look and feel like stationary! Paper and folders, ink and coffee stains to really tie this together. I started to change the font as well to match better and I’m so happy that it could stay in.
Mock-ups of how the windows could look
Fixing the Scientists and the List to hire scientists WIP!
Window coming together (WIP)
The project windows starting to look alright. Still, some tweaking left to do.
Adding colour-coded ribbons in the research tech tree to better tie the techs together.
Current In-Game look for Special Projects
Raids
This was interesting because we really wanted to make this one feel right, and also stand out as its own thing. You primarily play from the map but the icons shouldn’t look like any generic icons but still not steal too much attention, yet be visible enough for you to interact with. Also, the window should feel linked to this as well. There was a bunch of trial and error and a lot of playtesting involved but in the end, I think we managed to get some really nice-looking art for you to go along with a cool feature!
The launch window. From concept (and this is just the most recent concept, there would be too much to share if I showed the whole iteration process) to in-game.
The outcome window. Again, from concept and prototype to how it looks in-game.
The on-map icons, from concept (again, so many iterations) to how they look in-game!
And some fancy iconography that shows how the landmarks look in the province view.
Current In-Game look for Raids
Focuses
You know the drill! Here are some of our favourite Focus icons for this DLC.
German Focus Icons
Austrian Focus Icons
Hungarian Focus Icons
Belgium/Congo Focus Icons
Portraits
And of course some of our favourite Portraits as well!
German Portraits
Austrian Portraits
Hungarian Portraits
Belgium/Congo Portraits
Scientists Portraits
Loading Screen
Another DLC, another loading screen! Directions for the loading screen this time around were: Alt-history with the feeling of a rally, personal and a nod towards the cathedral of light!
I can’t say that buildings have been my strongest suit to put on but I believe it turned out pretty alright in the end! I hope you guys enjoy this too! and not a boat in sight
Horse Coat Colour Project
Maybe you already know this but I’m passionate about a four-legged creature called ‘horse’. During one of our internal development times, meaning not planned development time for this DLC, I felt something needed to be done with this poor outdated little guy. Everyone else gets a shiny new update… like, all the time! Why not the horse too!?
I made it my project during two PDTs (personal development time as it's called) to breathe new life into the companion that brings the soldiers to the battlefield.
Opening the 3D texture for the horse made me realize my limitations. The legs are mirrored, so that limited me making individual markings and gave me less customisation than I really wanted. Oh, cruel world.
Maybe updating the 3D model can be something for me in the future?
Anywho, I got to work pretty quickly and started to map out different shades and colours and took requests from the team if they had a favourite colour I should add as well. When spawning the new looks for the horses into the game I also realized how careful I had to be with the shades but also how little or too much could show up on the model in the game because of the zoom limitations. There were a bunch of tweaking involved before I got the hang of it. And when I did… no one could stop me.
This is how the UV map looks for the horse in HOI4 and me doing some shenanigans to create a new colour.
Painting new coats on the diffuse map (diffuse = colour).
And here is an image of the same UV-map but on the 3D model where the pink part has been highlighted so that I know which parts are mirrored on the model’s diffuse sheet. Of course, I had excellent help from our 3D guy slurpen whenever I needed it.
Nice looking 3D model
Skip this next part if you’re bored with sciency-genetics stuff cause I can yapp!
Welcome to CreamGene's Ted talk! Sit down, relax and enjoy a fun lil dive into some very basic horse genetics.
A horse has two basic pigments; Red and Black which create two colours, namely: Chestnut (red), which is a fully (and when I say fully, I mean body, mane and tail) red-brown tinted horse and Black (black) which is a fully black horse.
All other coat colours you see are created by additional genes and become a modifier of the two! I know how much you guys like modifiers.
So all the brown horses you see are actually called Bay and have a modification that creates something called ‘point colouration’. ‘Points’ in equine terms is a name for the mane, tail, lower legs and ear trims. I would say in HOI terms the point colouration is a modifier that suppresses the black colour to all but the extremities of the horse.
Bay, together with Chestnut and Black is called a ‘Base Coat’ and it's from these three colours that we can get a vast range and variety of coat colours for the horse.
For Example: Chestnut colour variations and what they are named:
Liver chestnut: Dark red body, main and tail
Flaxen chestnut: Any shade of chestnut but with a significantly lighter mane and tail
Bay colour variations and what they are named:
Dark bay: Can look almost black
Blood bay: Bright red coat with black points
Seal brown: Can look almost black but the soft parts, such as the muzzle, around eyes, inner ears, and underbelly will be a light tan colour.
And as a bonus, I also want to add a lil snippet of some genes and modifiers that I’ll be showcasing just down below!
White? Horses are never white in terms of colour, but grey. Grey is a colour modifier that turns the original coat white with age! A pure white horse from birth is called “a dominant white” and is another form of mutation where the hairs are white and the skin is pink with dark eyes.
Grey variations and what they are named:
Steel grey: Looks steel grey in tone but with age turns white. More usual on a black horse than a bay.
Dapple grey: Looks like the body has rings of grey hair mimicking dappled sunlight if you will. Will eventually fade to white or fleabitten grey with age.
Fleabitten grey: Fully white coat with either brown or dark grey dots throughout the body.
Leopard gene: A white horse with either black or brown spots, resembling a Dalmatian or a leopard. Here I mimic the breed Knabstrupper which is a native breed to Denmark.
Silver gene: Affects the black base coat to a chocolaty brown, points will get a silvery shade and the mane and tail will usually range between a flaxen colour or a silvery grey.
And from here we dive into the modifiers that change, tweak and add patterns to the horse's coat. There are a myriad of different colours and a bunch of different ways that a horse acquires them genetically and me explaining these occurrences would probably explode the character limit of what we can post on a DD. So I’ll of course refrain from doing just that and just showcase the colours I’ve made so far that you can now find roaming the maps of HOI4.
However, If you are in fact curious, I highly recommend doing your own research.
Welcome back from the lil Sciency bit if you skipped it! So with the power of Zoom, I’ll present to you the different colours that you can now randomly find on your frontlines:
Chestnut, Flaxen chestnut, Liver chestnut and Flaxen liver chestnut
Seal brown, Blood bay and four basic-looking Bays
Just two cute-looking black horses with different markings
Dapple grey, Steel grey and Fleabitten grey
Bay base and Black base… and my bad, I forgot the in-game look for the black leopard.
One cute Silver Bay horse!
Maybe you have a new favourite horse colour now or maybe even a little bit of interest in the vast variation of our four-legged friend on the battlefield. Regardless, I hope you enjoyed scrolling through my little passion project and I do hope that they will make you look twice on the map when you play! Horse Designer when?
3D Models
And of course, the Art and Achievements Dev Diary would not nor could not be completed without showcasing some of our favourite 3D models as well! I’ll hand over to slurpen for this ofc since he’s the one in charge of our pretty 3D models.
Thank you CreamGene Wow, you really love horses! I suppose those 3D horses are a good segway for me to show off a bunch of the new 3D models related to this DLC! There’s a bunch of stuff to see so let’s not waste time and get right to it!
Let’s take a closer look at some of the soldiers that will be seen on the frontlines this time around:
Something new to Hearts of Iron is the landmark buildings that can be seen around the map. They are fun to look at but even more fun to destroy. They will eventually get rebuilt but that may take some time.
Let’s move on to some models related to the special projects. Various unique models can be seen on land, in the air and out at sea. Let’s start in the air and work our way down!
Air-Based Projects
Somewhat steadily hovering over the battlefield are the helicopters. A groundbreaking new way of flying through the air! Are helicopters here to stay? Whatever the case, they may be of some use to you.
Helicopters
Next up, we have the motherships with their adorable little planes that are there to protect them when things get tough! A big plane paired with a small plane should give you the best of both worlds right?
Motherships with their cute babies.
One way to ensure air superiority is to be the fastest kid on the block. With the development of the jet engine, you can travel faster than the speed of sound. If you can manage to harness this power you might just be able to turn the tide of the war in your favour!
Supersonic Jets
If nothing else works there are always nukes. Missiles and nukes can be developed and launched towards your enemies. The question is, who will strike first?
Missiles
Land-Based Projects
On land, we will have to start with the crazy but wonderful land cruisers. They are hard to miss after all:
Land cruisers
You will need some big guns to take on those beasts. Here are some super-heavy howitzers that can even the odds:
Super-Heavy Howitzer
Super-Heavy Self-Propelled Howitzers
Things are heating up! Speaking of heat, next, we have the flamethrower tanks coming in hot:
Flamethrower Tanks
Land vehicles can be used for more than just destruction. They can also help clear a path or help out with retrieval missions. These vehicles are categorized as engineering vehicles. Have a look:
Recovery vehicles
Mine-Clearance vehicles
Crossing Support vehicles
Sea Based Projects
The ocean is vast so there is a lot of space for some crazy experiments. If you truly want to show off the power of our navy these ships will make a statement. Whether it’s a ship made of ice (kind of), a supercarrier or a modern super battleship equipped with radar equipment you are sure to make a name for yourself.
Special Project Ships
If you prefer the sneaky approach to naval warfare, don’t worry! We have got you covered:
Submarines
Before we go completely off the rails with the in-game screenshots and achievement icons we can’t forget the super heavy railway guns:
Super-Heavy Railway Guns
To top it off let me show you some of the models in action:
Believe it or not, there is still more to see but I think we will wrap things up here. A lot of work has gone into making these special projects a reality so I hope you will have fun researching and utilising them in the game!
Until next time, Slurpen out!
Achievements
And here we finally have them. What you have been waiting for. The awaited shiny new achievements for you to conquer from Götterdämmerung! Disclaimer: Names and Descriptions of how to get the achievements can have been changed on release.
Antischluss As Austria, control all German starting states
No Friends, Only Family As Austria or Hungary led by a Habsburg Monarch, Control the Swiss Plateau and have at least three other countries be led by a member of the Habsburg family
Edelweiss Seedelweiss As Austria have a coastline, at least 10 Battleships and have Georg von Trapp as an Admiral
Otto-man As Austria or Hungary, led by Otto von Habsburg, control the starting states of Austria, Hungary, Czechoslovakia, Romania, Bulgaria, Greece and Turkey as well as the states in Polish Galicia, Slovenia and Croatia.
Spaak of Genius As Belgium, with Paul-Henri Spaak as country leader, research at least 10 different Special Projects
Brentry As Austria, Belgium or the Netherlands be the leader of the EU and have the United Kingdom join your faction
The 501st Legion As Belgium, have the National Spirit “Rexist Legion” and be in control of all of your starting neighbours’ Capitals.
Congolese Belgium As Congo break free from the shackles of your old overlord and take control of all of their starting states
The Lenin Boys are Back in Town As Communist Hungary bring back the Lenin-fiúk and take control over Leningrad
A Great Hunger As Hungary proclaim Greater Hungary and control all of your historical states
Weltpolitik As Germany take control of all of your former colonies
Naval Arms Race As Germany led by an Admiral capitulate the United Kingdom
Woman in a High Castle As Germany with a female leader either annex the USA, including Alaska and Hawaii or have an American puppet that owns all the American starting states, including Alaska and Hawaii
American Prometheus As the USA have Robert Oppenheimer complete the Manhattan Project
Tsar Bomba As Tsarist Russia complete the Special Project for Thermonuclear bombs
Super Heavy Metal Complete the Special Projects for Intercontinental Bombers, Land Cruisers, and Super Heavy Battleships
Backfire As the United Kingdom complete the Special Project for Medium Range Ballistic Missiles, have a rocket site, and be at war with Germany
Dam It! Successfully execute a Dam Busting Raid
Bullseye Successfully launch a raid on a Landmark
The True Successor As Luxembourg led by Charles Marx control both Brussels and Trier
And with this Dev Diary on Art and Achievements, we on HOI4 wish you a happy conquest and many, many hours of challenges and fun gameplay!
If you haven't heard just yet, we announced earlier today that we've launched a small Amazon Merchandise shop with the release of Götterdämmerung. You can grab a Hoodie or T-shirt to better equip yourself for your World Domination endeavours, or simply to sport something stylish.
(Some restrictions apply, check Amazon for shipping eligibility and costs)
Hello everyone, it's again the time to give you a glimpse into the fun stuff we've been doing from the tech side. You know, in addition to implementing the new features. This time around, I (PDXen) got the honour to write the Dev Diary.
I'm gonna start off with some outdated news from the past: Did you know that we did a performance pass on Trial of Allegiance? I honestly hope that you didn't. Being a country pack, we never intended to improve the performance but we did make improvements to counter the influx of data that happens when we add more content.
But I know you don't want to listen to ramblings about the past. So let's get started on what we've done this time. While we've taken time to look at the performance and improve parts of it, we've also added some new generic features that we hope our modders will like.
Performance
I'm gonna be brutally honest with you from the start: The performance goal of this DLC was to not decay performance. (Un)fortunately, this doesn't mean we can lean back and ignore it. More content and new features all add to the computations we need to run and I wanted all the new stuff to happen at net-zero performance cost. Essentially, the same thing as for Trial of Allegiance, but with much more. So we had to do something to maintain the status quo with performance.
So whenever our performance tracking indicated a slowdown for the first time I took a look at what we could optimize and became a bit disheartened. The French Paradox did a very good job at parallelising much of our code for AAT. There were not many easy options for parallelisation left but we managed to identify a few places. Even on our machines with quite a lot of cores, this wasn’t enough so we took a step back and looked at optimizing the sequential parts of the code. I hope this is quite good news for all of us that run on hardware with fewer cores.
The hunt for optimization opportunities led to looking at old systems that now had more data and the uncharted lands of legacy code. I’m just gonna give you a few tidbits of old systems that we found interesting assumptions about the data in or simply interesting ways of solving it.
Focuses
I imagine some of you have been with us from the start. Do you remember the size of the original focus trees? And for those of you who don't, simply open up the generic tree to get an idea. Over the years, we've had a large influx of focuses in the focus trees. For example, we have ~60 in the generic focus tree compared to the ~180 national focuses in Belgium, not counting the Belgian-Congo part. And the size of the Belgium focus tree doesn't even compare to the new German one (which is somewhere between 350 and 400 focuses).
The new German focus tree with 350-400 focuses, which I couldn’t even fit into a 2k screen.
The new Belgium focus tree with ~180 focuses.
The Haiti docs tree is using the generic focus tree with ~60 focuses
The size in itself is not that much of a problem since you generally don’t have the focus tree open at all times. However, we have a nifty functionality to bypass focus. Over time this function has taken more and more performance to run. Guess why? It checked every single focus in the game, every single time. At some point in time that might not have been an issue but with the size of the current focus trees? The good thing is that it’s not as bad anymore. We now only check the focus that has a remote chance of being bypassed.
Dynamic memory and paralelism
When we started looking at the sequential parts of our parallel code we found a quite interesting trend. There's a lot of dynamic memory allocation. Now every time we do something that requires dynamic memory allocation, the operative system may grab a global lock. Essentially, risking the algorithm to become at least partially sequential. Finding this caused a period of going through the code and eliminating the worst of these dynamic memory allocations.
Hidden AAT Inefficiencies
AAT was the expansion that optimized HoI4 (in modern times). Now there’s a drawback with the drastically improved performance: All the inefficiencies from the new systems in AAT were hidden by the drastic improvements in the rest of the game. A lot of old content was optimized by a large margin, and as a result new performance overhead simply got lost in the steadily improving numbers. For example, on my machine disabling the international market automation saved me 2ms per daily update. It’s not a lot (about 0.5% of the overall performance on my machine). But for market automation? Good news, it’s way less now. Bad news, you can still improve performance a very small amount by disabling it (though, manually clicking will have way worse performance in terms of speed).
Another hidden inefficiency that we’ve found is the increase in the number of equipment variants. Before, there was a very limited amount of equipment variants in a game but now, there’s a lot of them. Every single MIO update can create a multitude of different variants. And not to mention that International Market and Lend Lease pass these variants around in the game. Now throughout the code base, there are a lot of things that interact with equipment. Every interaction wasn’t adding much but all put together, that’s quite a bit. I won’t say that variants are free but please go ahead and add more, there should be less performance impact now than before at least.
Modding
Now let’s leave the area of performance and continue with some other things we’ve looked at from the tech side: New fancy modding stuff. During the development, I got a bit fed up with requests for support for new tooltips. So we sat down and thought: How can we get content developers to write the tooltips themselves? While we couldn't backport Jomini to HoI4, we took some inspiration and made it possible to write more complex tooltips in the GUI and script files.
Localization, localization and localization
If you have looked into our localization files before, you've probably noticed something like the following:
SCIENTIST_ROSTER_SORT_BUTTON_TOOLTIP: "§YClick§! to sort according to $REASON|Y$"
Traditionally, this meant that `REASON` was replaced with something that was provided by the game (i.e. not scripteD). In many cases, these variables were just replaced with some other localized string. So to avoid having to update the source code every time we wanted to change this, we introduced a new concept to the scripting language: Bound localization.
Bound localization simply allows you to bind variables to the localization from script. So instead of opening up the source code, we can now simply update the script files like the following:
Naturally, doing this was opening up Pandora's box with requests from some content developers so we continued a bit more to push the boundaries. For example, in the German focus tree we can find the following odd syntax:
The custom effect tooltip that shows the state modifiers for a dam with a custom indentation to fit this very specific tooltip.
This adds another new concept we introduced: localization formatters. Essentially, it allows you to get a localized text property of some static token (in this case then state modifiers for the `dam` building). You’ll recognize a text formatter when you see a localization key that has the format `<formatter>|<token>`. Some of the formatters also take some parameters (such as the `INDENT` in the example above). The benefit of using these over new tooltip overrides for effects or triggers is that the localization formatters are usable in every place a bound localization is usable (some might require that it’s localized with some context but that should be documented).
One of the main drawbacks with the new things we add, is that you can in general only use it in specific places that is pointed out from source code. Unfortunately, this still holds for the new stuff but the goal was for fewer requests for tooltips so we made some effort to make it a bit more usable. For example, you can use this in the very much (ab)used `custom_effect_tooltip` effect, `custom_trigger_tooltip` trigger as well as in some of the new places (see for example, the building database). But the main thing is that we added support for this in GUI files.
All our GUItypes now support the new tooltip `bound_tooltip` construct. If you use this, then you'll be able to use the bound localization. And maybe more interesting is the `context_aware_tooltip` construct that is a bound localization but it will be localized with a context so you can use contextual localization. Unfortunately, this requires us to provide the context from the source so mostly new places support this (and we try to document it in the GUI files, when and where it is supported). Note that this is recursive so if a parent object is localized with a context, then all children objects will be localized with the same context.
We'll come back to this in a short while when digging into the tech behind the new inner circle GUI in the focus tree.
Naming is Hard
Imagine that you have a province or state that, depending on who you ask, has a different name. For techs, equipment and a lot of other things we’ve had the support to add country specific names (we call it cosmetic tags) by simply adding the countries tag before the name of it. Now we’ve added the same support to province and state names as well.
We can take Turku as an example, this Finish area has both a Finish and a Swedish name (Turku being the name in Finish and Åbo is the name in Swedish). Before we had quite some script to change the name of the state depending on its owner but now we simply have to prefix the name with the correct country tag in the localization file:
STATE_926: "Turku" # Default name
SWE_STATE_926: "Åbo" # Cosmetic name for when Sweden owns the state
The state of Turku (i.e. Finland owns the state).
The state of Åbo (i.e. Sweden owns the state).
Focus Navigation
More national focus means more fun, right? But at some point it just becomes hard to navigate the focus tree. Fear not, we’ve added an option to add navigation shortcuts to focus trees. The new German tree has 6 different navigation icons (as of me writing this).
The focus navigation tabs for the new German tree.
If we click for example the “Economy” navigation tab, then we’ll be moved to the economy section of the tree with a nice zoom level for it. Naturally, this is completely scriptable so you can modify the focus trees to your liking for your mods.
Focus Inlay Windows
You've probably seen the Inner Circle GUI in another Dev Diary by now, but did you know that the whole GUI is written in script, and it doesn’t contain a single scripted GUI window? The inner circle is the first usage of what we call focus inlay window. A focus inlay window is, similar to the continuous focus window, a GUI object that is drawn inside the focus tree view..
Let’s go through an example: We want to display all the potential members of the Nordic Defence Council and if they have joined. For some reason it’s also very critical for us that we show the leaders of the countries. Something like the following:
A focus inlay window to show the potential members of The Nordic Defense Council with access to the joint focus tree.
When defining a new inlay window, there's three main components that you need to implement: The inlay window definition; the GUI definition; and add it to the focus tree(s) it should be shown. Let's start with the completely new construct, the inlay window definition.
As for most components in HoI4 different databases have different folders and so has this. The inlay windows are located in the `game/common/focus_inlay_windows/` and we can throw up the first definition of the inlay window as follows:
This is actually a minimum working example for a focus inlay window definition. We've now a new inlay window with ID `nordic_alliance_inlay_window` that points to a container window named `nordic_alliance_ui_window`. Let's continue with adding more stuff to this later on and continue with the GUI itself.
guiTypes = {
containerWindowType = {
name = nordic_alliance_ui_window
orientation = lower_left
size = {width = 400 height = 450 }
clipping = no # Never clip in focus inlay windows due to some legacy bugs
background = {
name = background
quadTextureSprite = "GFX_tiled_window_1b_border"
alwaystransparent = yes
}
instantTextBoxType = {
name ="faction_name"
orientation = upper_left
position = { x = 0 y = 20 }
font = "hoi_36header"
context_aware_text = [Country.GetFactionName]
format = center
maxWidth = 400
}
iconType = {
name = "sweden_frame"
spriteType = "GFX_ascended_advisors_unappointed_frame"
orientation = upper_left
position = { x=55 y=107 }
centerPosition = yes
scale = 0.4
}
iconType = {
name = "Sweden"
spriteType = GFX_blank_leader_portrait
orientation = upper_left
position = { x = 40 y = 90}
context_aware_tooltip = [SWE.GetLeader]
scale = 0.2
}
instantTextBoxType = {
name = "sweden_text"
orientation = upper_left
position = {x = 100 y = 105 }
context_aware_text = {
localization_key = NORDIC_COUNCIL_MEMBER
IN_FACTION = [SWE.NordicCouncilMemberInFaction]
COUNTRY = [SWE.GetNameWithFlag]
}
}
# Below are copies for the Sweden entries adapted for the rest of the Nordic countries.
[...]
The GUI components aren't anything new, but I've thrown in some of the new localization capabilities to give you an example. Since all focus inlay windows are localised with the focus tree country as the context, we're free to use all the new fancy stuff when writing the localization. We have one `context_aware_text` that uses the contextual localization to grab the faction name. Another that uses bound localization to localise `NORDIC_COUNCIL_MEMBER` with the parameters `IN_FACTION` and `COUNTRY` with the result from localising `[SWE.NordicCouncilMemberInFaction]` and `[SWE.GetNameWithFlag]`, respectively. I’ve also thrown in a `context_aware_tooltip` to get the name of the leader when hovering over the portrait.
While we're at it, we can complete the localization by adding the following scripted localization to the game (in `game/common/scripted_localisation`):
And add the localization key `NORDIC_COUNCIL_MEMBER` to a loc file:
NORDIC_COUNCIL_MEMBER: "$IN_FACTION$ $COUNTRY|Y$ has joined"
With the localization done we only need to fix the portraits of the country leaders. Defining dynamic images for focus inlay windows is done in the focus inlay window definition:
nordic_alliance_inlay_window = {
window_name = nordic_alliance_ui_window
scripted_images = {
Sweden = {
GFX_portrait_SWE_per_albin_hansson = {
SWE = {
has_country_leader = {
ruling_only = yes
character = SWE_per_albin_hansson
}
}
}
GFX_blank_leader_portrait = yes
}
# Insert definitions for the rest of the nordic countries below
[...]
The `scripted_images` entry contains a list of image definitions that will be used in the focus inlay window. In this case, the icon named `Sweden` will have its image replaced with `GFX_portrait_SWE_per_albin_hansson` if Swedens’ current country leader is `SWE_per_albin_hansson`. If this doesn’t hold, then the next entry in `Sweden` will be checked and so on until something that evaluates to true is encountered. The last entry in this example (`GFX_blank_leader_portrait`) always evaluates to true and is therefore the default image if no other is true.
Now there’s only some final touches to be made. Firstly, we’ll restrict the inlay window to only be shown if the country has formed (or joined) a Nordic joint alliance (i.e. has completed the `NORDIC_form_joint_alliance`. Secondly, we’ll set the window to only be visible to the country owning the focus tree (so no other player can view it).
Stay tuned for tomorrow, Thursday November 7th, that there will be a Dev AMA over on Reddit!
Paradox_Danne here one last time to guide you through the final German Dev Diary before Götterdämmerung drops and you can experience all of this first hand. Buckle up, because today we’re diving into German alt-history! Before we get started though, let’s have one last look at the old German Focus Tree and then compare it with the new one.
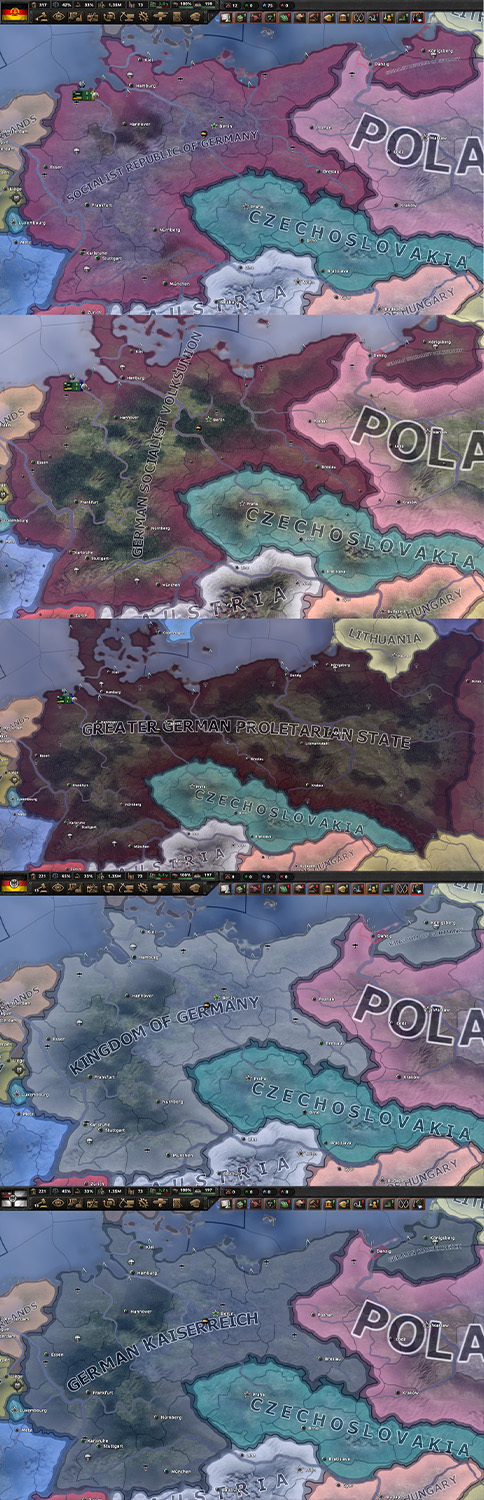
The Old German Focus Tree has served us well over the years
But it’s time to let a new German Tree sprout
As you can see, the new German Focus Tree is something of a behemoth and by far the largest Tree in the game. If you’ve read the previous two Dev Diaries about the Historical branches and the German systems (if not, stop reading this and head over there immediately!) most of you will recognize a lot of this, but there’s uncharted territory here as well. Hoist your proverbial sails and let’s see where the current takes us as we explore Germany’s alt-history. But a word of warning before we cast off; all you are about to see is very much a work in progress, which means things might and will change.
Germany’s democrats and monarchists have received more to do and are now even accompanied by the communists
As you might be able to tell, the alt-historical branch has been greatly expanded upon and offers a wide range of different playstyles for Germany. One thing that remains the same though is the actual Civil War. We decided very early on not to expand this bit or alter it all that much; we reasoned that if you want to play alt-history you want the Civil War to begin and end as soon as possible. So it’s very much straight to the point still (with maybe one or two new minor surprises). Before moving on to the various political paths, let’s talk about the few Civil War-centric focuses there are.
After starting the Civil War you have a few focuses to help you through these dark times
With the Civil War tearing Germany apart, you can Rally the Nation to bring down the Nazis faster and Rebuild the Nation to help your industries recover faster, which then can be expedited with Revitalize the Nation. All of this should bolster Germany and help it recover quickly to move on to other things, such as tending to the future and deciding what kind of politics you want to pursue.
Democracy or Monarchism
The Democratic and Monarchist paths share most focuses but cater to different playstyles while not excluding any of them
You don’t have to be Sherlock Holmes to quickly deduce that the Democratic and Monarchist branches share almost all focuses between them. This of course means you can be hyper-aggressive as a Democratic Germany, or become the saviour of East Europe as the Kaiser and fend off Soviet aggression. This has been done to offer different ways of playing Germany, but it also has a basis in reality. After WW1 Germany never ratified the eastern borders set by the Versailles treaty (it would actually take until 1970 for the eastern borders to be accepted and ratified properly), and it always harboured a desire to regain these territories. Even during the Weimar Republic, Germany coveted these areas and never fully accepted the loss of these lands. You’ll be able to regain these lost parts of Germany through different means - but more on that later. Let’s discuss what exactly sets Democracy apart from a revived Kaiserreich.
Democracy
After you Re-establish Free Elections you can become a technological powerhouse, secure better relations with your Western neighbours, but also become a beacon of Democracy
The Democratic branch is all about cooperation, reconciliation, and technological advancements. You can Reverse the Brain Drain to kick your research into high gear and then further improve it with Shared R&D Programs to really accelerate the research pace. And by making amends with your Western neighbours you can increase trade with them or even regain some of your old colonies. Depending on what you choose between Embrace Liberal Leanings or Strive for Conservative Values you’ll either make political advisors, Economic and Trade Laws much cheaper or get all political and military advisors at a slightly reduced cost while Conscription Law also gets a lot cheaper.
Cooperation and reconciliation will lead to technological innovations and more trade
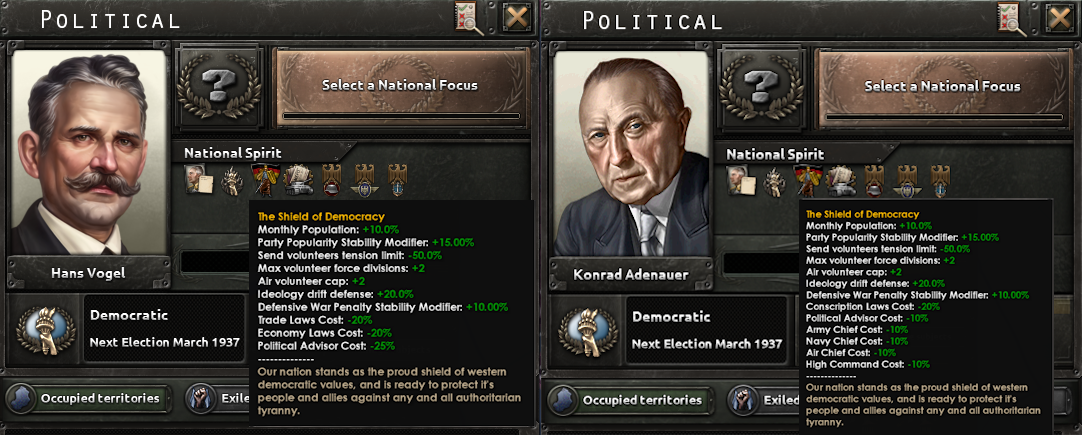
The Shield of Democracy comes in two different flavours
Monarchism
After you Revive the Kaiserreich you can start to realize the Imperial Forces’ true potential
The keen-eyed among you will notice that you can now choose which flavour of authoritarianism you want; the rule of good old Wilhelm II or install a Military Dictatorship with Wilhelm III as figurehead, with the Fourth Supreme Army Command as the true power in Germany. This also has a historical background with the Army Command being the de facto authority in Germany during the later parts of WW1. Both options have their own exclusive focuses with the Kaiser geared more toward research and the development of Special Projects while the Supreme Army Command is all about preparing Germany for the next war and strengthening its military. What’s true for both though, is the eagerness and willingness to rearm and demand lost territories and exact vengeance….
Weltpolitik
With Germany’s old colonies lost, the question is how you will regain them
Now, after having chosen your leader and political course, it’s time to set sail and venture out on the open seas to rebuild your old empire through some good old-fashioned Weltpolitik - which simply means “world politics”. This was the imperial foreign policy under Wilhelm II as Germany aimed to become a global power. There are basically two ways to become a global empire once more; you can either accept British naval dominance and ask nicely (and sometimes not so nicely - looking at you Portugal) to get your old colonies back, or you can simply go to war over your old claims and demand your rightful place in the sun. Wedged in between these two paths you have a third option; to align more closely with China and offer both industrial and military help to bolster them. In the end, you’ll carve up Asia between yourselves in spheres of influence. “But wait, hold up, hold up”, I hear you say after taking a long, hard look at the picture above, “‘Carve up Congo’ doesn’t sound like anything the British would agree on”. Believe it or not, but this also has a basis in history; the then Prime Minister of Britain, Chamberlain, once offered Hitler to carve up Congo between both nations. This was a part of his appeasement strategy (famously working out oh-so-well), and the idea was that this would placate Hitler and his lust for conquest. Lmao. I thought it was a neat idea and put it here instead.
Realpolitik
What alliances and deals will you strike to strengthen Germany?
If Weltpolitik is all about global power plays on the world stage, then Realpolitik is about how you conduct politics and diplomacy closer to home. The big name associated with the term is of course Otto von Bismarck, who used Realpolitik to achieve the unification of Germany and created a delicate balance of alliances in Europe designed to keep Germany out of a two-front war (which abruptly fell apart as soon as he left office - leading to WW1). There’s quite a lot to go through here actually, so let’s get started - and we’re starting from the far left with:
Mitteleuropa
Tie other nations closer to Germany by strengthening their industries and exploiting their resources
Mitteleuropa of course means “Middle Europe” and is a German term for Central Europe, but the definition of what Mitteleuropa encompasses has shifted throughout the ages. It is not merely a geographical term, but also a political one. Mitteleuropa envisions a German-dominated central Europe with countries strongly tied to, or even ruled by, Germany. And this is exactly what you can achieve by going down this branch. After the Civil War you stand alone, without allies, but this changes here; this is where you once again can form your own alliance to weather whatever may come. This is also where you decide how to handle poor old Austria; do you invite them into your newly founded faction or do you push for unification, giving Burgenland to Hungary to entice them to join Mitteleuropa? From here you have to decide whether or not to restore the old Central powers (with either Austria or Hungary depending on your earlier choice), but under a much stronger German influence, or try to unify as much of Europe under your leadership as possible while making every faction member stronger until you’re able to form the European Confederation?
See to the Eastern Front
Who said playing nice can’t be fun? Protect Eastern Europe before the Soviets come knocking on your door
What happens if you play it cool and don’t decide to gobble up other nations? Well, someone else is just going to take your place, aren’t they? There’s a very high likelihood that the USSR will start to eye the countries between them and you with increasing appetite (so not very different from history actually). Who’s going to stop them anyway? You? Ravaged by Civil War you can’t possibly hope to save the countries of Eastern Europe from their fate. It is sealed. A done deal. The Soviets will have these nations for breakfast. Well, I guess you can always try to help them. Offer them guarantees, construct forts, build up their industries, train their militaries - do whatever you can. There’s even a possibility that you can invite them into your faction and further boost their industries….
Restore the Brest-Litovsk Borders
Coerce your eastern neighbors into giving up lands so you can restore the borders set by the Treaty of Brest-Litovsk
Well, what if you don’t want to play nice? Oh, there are options for you too (the Weltpolitik branch notwithstanding)! Many of you may already know this, but Germany signed a separate peace deal with the Russians towards the end of WW1, the Treaty of Brest-Litovsk, where the Russians lost ⅓ of their population and over 50% of their industrial lands. So, a pretty severe blow. Well, all of this was undone by the Treaty of Versailles which annulled the treaty, and all of the lands Germany had gained became free nations. It is now within your grasp to restore these borders and German honour!
Reject the Locarno Treaty
If you are of the mindset that the Treaty of Versailles was unfair you can Reject the Locarno Treaty and reclaim Elsass-Lothringen
The Locarno Treaty was signed between Germany and a whole bunch of other nations to secure and guarantee Germany’s new WW1 borders with France and Belgium. If you have chosen to bring back the Kaiser from his exile or appoint a military dictatorship, you have the option to first bully the Danes into giving back southern Jutland (another piece of land lost with the Treaty of Versailles), before you can Reject the Locarno Treaty and have at it with France one more time. As you may have noticed, this path is also accessible if you Accept British Naval Dominance in the Weltpolitik branch; the caveat being that France has to fulfill certain criteria first, much like the old focus with the same name.
But what if you don’t want to play a fascist, democratic, or monarchist Germany? Well, there are slim pickings then, but you can always start;
The Proletarian Revolution
Throw off the shackles of capitalism and free workers around the world as Communist Germany
Welcome to the revolution comrades, it’s been a long time coming. It’s time to establish the Proletariat and bring it to the masses all around the world. There are two ways of doing this, one more aggressive than the other, but neither is peaceful (those damn capitalists just won’t see common sense!), but before we get ahead of ourselves we have to discuss how to turn Communist in the first place. You didn’t think you’d do it by the press of a button, did you? No, you need to press several buttons!
Some of you may deem this the most unrealistic path for Germany to take, but they had several socialist uprisings just after WW1 and some even broke away from Germany and proclaimed their own, independent Soviet republics. In fact, it was the Kiel Mutiny of November 1918 that sparked the following revolutions and uprisings and the downfall of the monarchy in Germany. This mutiny had clear socialist undertones, and while the Left was finally defeated in the German Revolution of 1918 and all German Soviet republics abolished, the Weimar Republic emerged from this turbulence helmed by the Social Democrats. Ok, why am I giving you this quick history lesson? Because this is kind of how you turn Communist; by mimicking history.
Spread the Proletarian Revolution to new states to gain momentum for your cause!
For each state you spread the revolution to the stronger the Communist movement grows, but so does the instability of Germany. And be mindful that not all states are equal; the more industries a state has the more workers you can sway to your cause, and the bigger the impact in loss of stability and increase in Communism support you’ll get. You might also have noticed the Imminent Proletarian Revolution that’s ticking down. So what happens if you reach 0 days?
The Second German Civil War
The states you manage to spread the Proletarian Uprising to will join you in any potential Civil War. Luckily, this Civil War is avoidable - if you play your cards right. For each state you spread the Proletarian Uprising to, you'll add days to the Imminent Proletarian Revolution, postponing the Civil War by a few days. This can also be achieved by completing certain focuses. It’s a race against the clock, but one which you should be able to win - especially if you plan ahead just a little bit.
With The People’s Victory, you have finally become a true socialist nation
So, you’ve emerged as a Communist nation - what now? How will you secure the Revolution, or even spread it elsewhere? There’s a lot left to cover so let’s do a blitz through the various shared branches the Communists have.
If you like the spy game, a Communist Germany is what you’re looking for where you can form the infamous Stasi
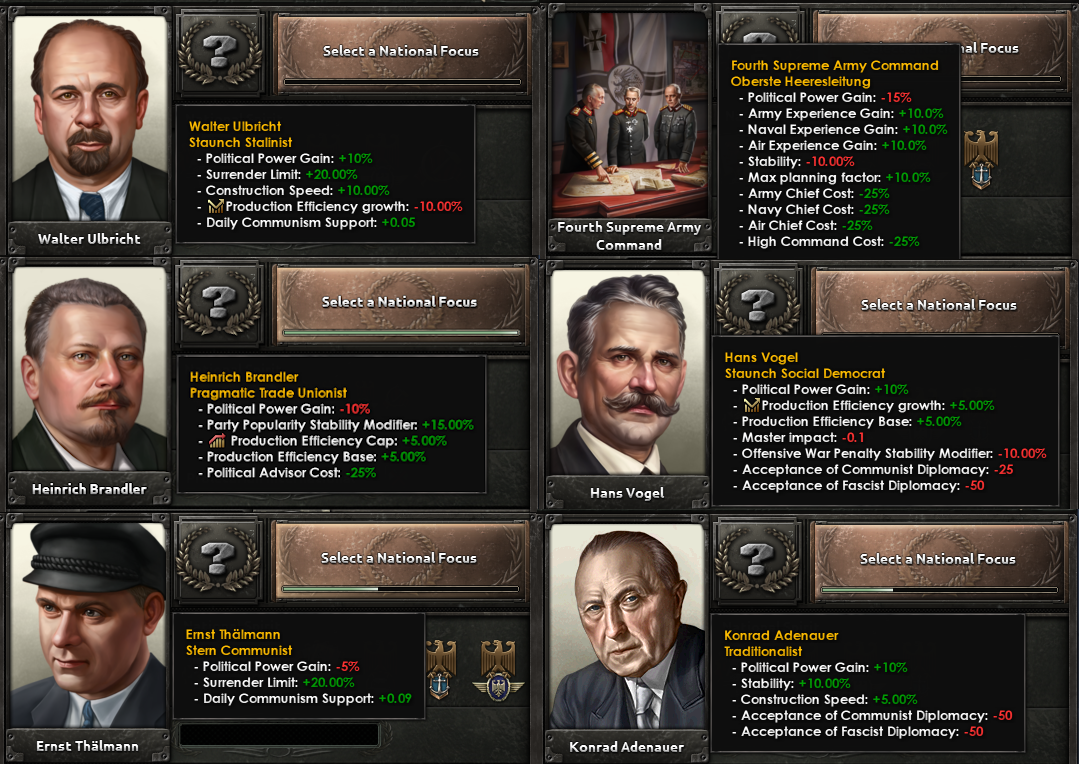
Get Communist militias and upgrade Ernst Thälmann’s advisor trait in the Nationale Volksarmee branch (where you might have to sack some generals but also get new ones)
Nationalize Industries to improve August Thalheimer and your factory output before expanding your Recruitable Population with Women’s Rights and Equality
Sign the Second Treaty of Berlin to boost your and the Soviet’s industries and maybe trade some of your factories for resource rights
And that’s it for this blitz round. Let’s turn our attention to more intricate stuff, like how you-
Spark the Flame of Revolution
You have had your revolution, comrades, but what about everyone else?
If you like flipping countries Communist, this is the path for you! Here you can Bolster Communist Sentiment in countries, and in doing so eventually trigger a Civil War in said nation. But to secure the Revolution and guarantee that your side comes out on top, you can send Infantry Equipment to countries embroiled in a Communist Civil War, or even send boots on the ground with your volunteer forces. By completing Spark the Flames of Revolution you’ll also create your very own faction: the Proletarian International. With Strengthen Proletarian International you’ll automatically invite any country you helped turn red to your new faction (so those pesky Soviets don’t sweep right in and reap what you’ve sowed by enlarging the Comintern).
Turn all of Europe Red to bolster your faction in ever-growing numbers and put an end to Fascism in Europe
Root Out Imperialism
You might have ended Fascism in Europe and turned all of your neighbours into docile allies, but what about the rest of the world?
If you want to spread the Proletariat beyond Europe’s borders you’ll have to Root Out Imperialism and increase resistance and autonomy in African and Asian countries suffering under the boot of colonialism. After that, you can spread the word of Marx to South America or the Middle East before facing off against the forces of Capitalism (which we all know resides in the USA) and the remnants of corporatism in Japan (we don’t care if they’ve turned their backs on their emperor or not - to us they’ll always be fascist sell-outs unless they’re actually Communists, which makes them waaaay cool).
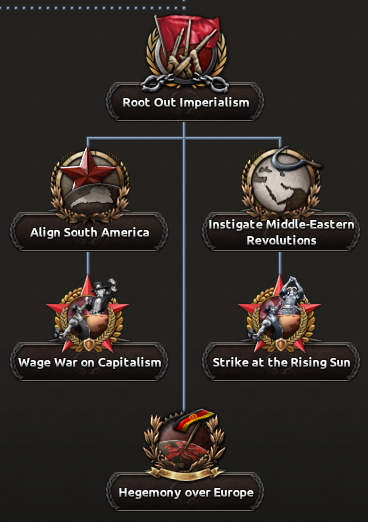
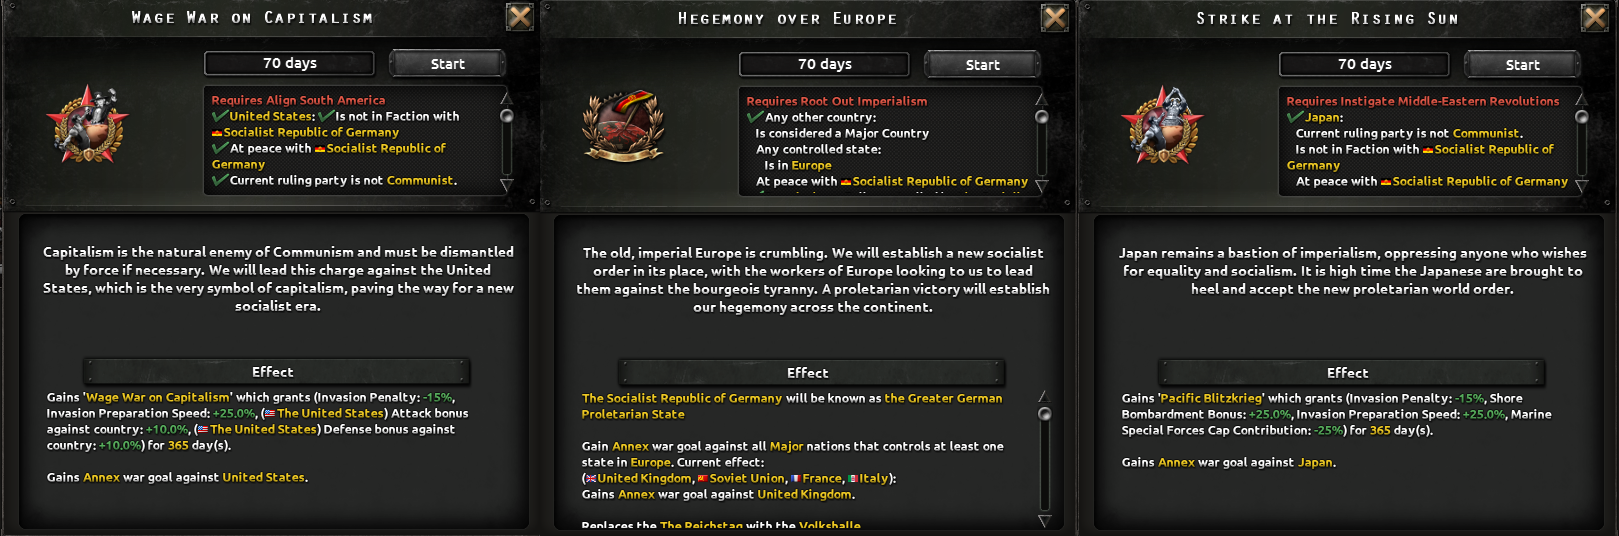
Communist hegemony won’t be realized until we have Hegemony over Europe
Legacy of the Spartacus League
Look toward the past and follow in the footsteps of the Spartacus League
The roots of the German Communist movement and the German Communist Party (the KPD) can be found in the Spartacus League, a breakaway group of the Social Democrats. The Spartacus League was founded and led by Karl Liebknecht and Rosa Luxemburg (both murdered during the Spartacist uprising in 1919), who both were very much anti-militarists. Luxemburg in particular believed in Democratic institutions and that Communism should use those venues to gain power, while Liebknecht believed in the proletarian revolution. This is also reflected in the exclusively Communist National Spirit of Politbüro.
Politbüro will take on different aspects depending on which Communist path you go down
Honoring the Legacy of the Spartacus League emphasizes the spread of the revolution and embracing Democratic institutions, which all come together in a brand-new type of subjects, exclusive to this path - namely the:
Volkskommissariats
By spreading Communism to neighbouring countries you can subjugate them to Protect the Revolution after you Embrace Democratic Institutions and protect Civil Liberties. This in turn will let you create Volkskommissariats out of these neighbours. The Volkskommissariats will give you a higher percentage of their industries and manpower to their Overlord, namely you.
The Volkskommissarit will strengthen its Overlord’s industries and military
You can also choose to develop your Volkskommissariats’ industry, which in the end will boost your own production. You can also help Instill German Discipline in your subjects, to make them a more effective fighting force
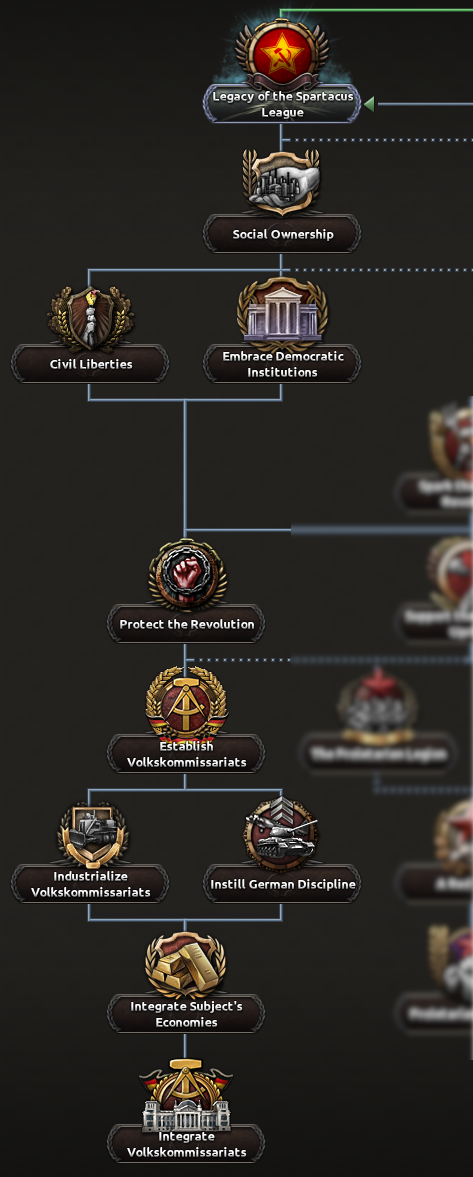
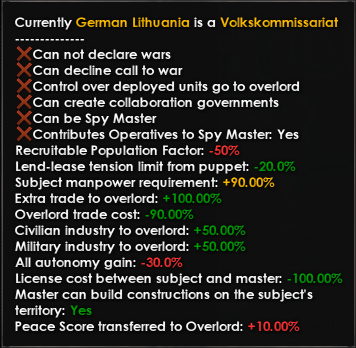
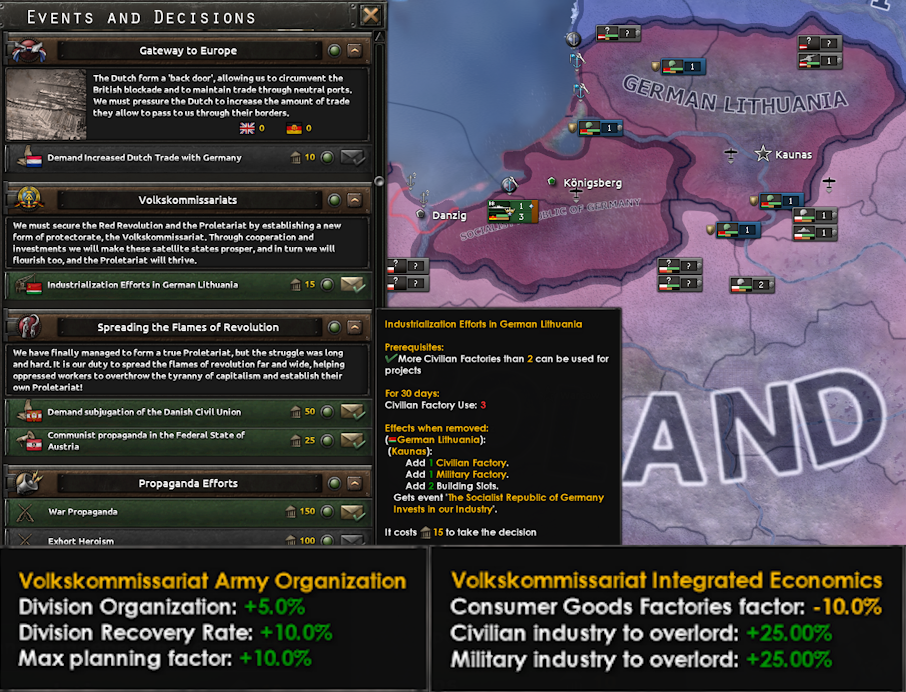
Boosting your Volkskommissariats will inevitably strengthen you too
And in the end, you can choose to integrate any Volkskommissariats and create the German Socialist Volksunion. But what if you want more action? What if you don’t like taking your time map painting? What if you’re the impatient kind who just wants war? Welcome to the-
Proletarian Dictatorship
The Proletarian Dictatorship resembles the other branches more in the sense that you get to gobble up a bunch of nations
This branch is more straightforward and to the point compared to the Legacy of the Spartacus League with its ability to set up Volkskommissariats; here you simply apply superior forces to conquer other nations. Yay! But before you can start your world-conquering rampage you have to sign a Defense Treaty with the Soviets to exchange mutual guarantees with each other, and after that, there’s just one more step; carve Europe into Spheres of Influence. Divide Europe into your respective playgrounds, where you’ll relinquish control over the East but have the West all to yourself. How fun! This will mean that it becomes more expansive for you to try and take any state that resides in the other’s influence.
The Spheres of Influence will divide Europe between you and the Soviets
Okay, you must be getting tired of reading about how to turn Communist, or thinking about if you want to protect Eastern Europe from the greedy Soviets, or if you want to gobble it up yourself. We’re nearly done, let’s just look at some pretty pictures before saying goodbye.
Country Leaders
Feast your eyes on some (but not all) of the new country leaders you can get with Götterdämmerung
There might be some more surprises besides these, but the only way to find out is to play the game once the DLC has been released.
Advisors
The political advisor roster for Democratic and Monarchist Germany
The political advisor roster for Communist Germany
The Various Shapes and Colours of Germany
Germany has a plethora of new formables
Units
Phew, we’re very nearly done! Thanks for sticking around this long (it’s been quite a long read). To finish this Dev Diary off we just want to show off some of the very cool new models we have! This is not all of them, but some of them.
Some handsome German Infantry
Some very hot German Infantry
Some Very cold German Infantry
And with that, I would like to say so long, farewell, auf wiedersehen. This is the last Dev Diary about Germany before the release of Götterdämmerung on November 14th, but it is not the final Dev Diary. Next up we have Performance and Modding dropping on November 11th, and after that, the last Dev Diary, Art and Achievements, out on November 12th. I hope you have enjoyed reading about what’s in store for Germany and I can’t wait for you to actually get to play it! See you around folks.
Hello! My name is MordredViking (Gareth), and I’m joined in this Dev Diary by D3vil (Jonathan). We previously talked about Belgium and now it’s time to talk about Congo! I’ll start talking about a specific part of the focus tree which relies on close Belgian cooperation, then Jonathan will take over and cover the rest of the branches.
Why Congo though? I know there was some surprise at their inclusion in this expansion, but there is a good reason for it. Namely, they contributed a lot more to the Second World War than you likely realize, plus they were of course intrinsically linked together with Belgium. It was their gold and diamonds which kept the Belgian Government in Exile solvent, meaning that they did not need any donations or loans from the other Allied nations. Congolese soldiers fought in the Force Publique together with other Allied troops against the Italians in Ethiopia. Congolese rubber production was expanded following the fall of South East Asia to Japan, and other raw materials were heavily developed for the war effort, particularly copper and cobalt.
Plus, of course Congo’s Uranium was vital to the Manhattan Project, as Congo had at the time the largest known Uranium deposit in the world.
Now, I am well aware of the elephant in the room. Belgium’s relationship with Congo has not always been benign, and there was a period where horrible atrocities occurred, particularly under King Leopold II (King Leopold III’s grandfather). While the situation in Congo during the Second World War had significantly improved from those dark days, things were by no means perfect. I would remind you however, that this is a war game, focusing on the war and as such we are most interested in Congo’s contribution to the conflict at large.
Now, with that said, let’s get stuck in!
Behold! The Congo Focus Tree in all its glory!
And now for some reason, I’m going to show you a part of the Belgian Focus Tree.
The fog has been lifted, and you can finally see some of those focuses look a little… different.
Colonial Branch
You might notice that they share a rather large part in common, well this is the joint Colonial Branch that both countries share. There are parts which only one country can do (denoted by the singular flags) and there are parts which either country can do (denoted by both flags, side by side). As one country completes a focus in this section, it will also be completed for the other, with both nations getting something from it.
Belgium must complete Monetary Reconstruction from their Industrial branch, and then Congo Investments and ideally Societe Generale de Belgique to gain access. Congo meanwhile, must do Belgian Congo and then Heart of Africa.
So how does all this work? Well let’s give you some examples.
The bunting flags beneath the focus show who can do what
Everyone gets something, regardless of who completes it
Both countries have modifiers that these will generally improve. For Belgium it’s Colonial Returns. For Congo its the Model Colony.
Societe Generale de Belgique : Completed by Belgium. Improves Congo’s Model Colony with better construction while also improving Belgium’s Colonial Returns with some Political Power Gain.
The Heart of Africa : Completed by Congo. Improves Model Colony with Research Speed for Congo, and gives +75 Political Power to Belgium.
Bakwanga Mine : Completed by either Belgium or Congo. Gives Congo a Civilian Factory (and slot), while improving Belgium’s trade resources per factory.
Generally, the single-nation focuses will give a bigger bonus to that country (and in some rare cases, gives nothing to the other, or can actually cost them something), whereas the focuses either can complete will boost both. Some focuses also function like a “gate” meaning one country needs to complete a focus before the other can progress down a mini branch.
These are the central line of focuses which split the branch into tiers.
The Colonial Branch is also split up into tiers, denoted by the central three (well, technically four) focuses.
The Belgian Congo : Only accessible to Congo, and only Congo will benefit from these. Something of an introduction to the branch as a whole, and solid early-game boosts.
The Heart of Africa : Tier 1, contains most of the resource improvements, as both countries work to kick-start Congo’s economy.
Regional Specialization : Tier 2, requires 6 focuses in the Heart of Africa tier. More advanced resources are here, as well as increasingly technical areas.
Congo’s Place in the World : Tier 3, requires 14 focuses from across Heart of Africa and Regional Specialization. This determines Congo’s future direction and their relationship with Belgium.
Broadly the Colonial Branch is also divided left against right. On the left we have the focuses regarding the extraction of raw resources. These generally will increase Congo’s autonomy. On the right are the more developmental focuses, and these will generally decrease Congo’s autonomy.
How Congo feels about Belgium will determine their future options
So why does autonomy matter? Congo’s autonomy when Congo’s Place in the World is completed will determine their future as a colony, and as a nation.
Congo Free State: Belgium annexes Congo. Overseas Department of Belgium: Congo remains a puppet of Belgium. Dominion of Congo: Congo becomes a Dominion, much like Canada or Australia with Britain. Republic of Congo: Congo declares independence from Belgium. It is possible to achieve this peacefully, but it will be up to Belgium on whether they deem it important (or possible!) to fight to keep it.
When a choice is made here then that status is locked, so note which of these can be completed by Belgium and / or Congo! Of course, if Belgium is no longer the Overlord, then this whole Colonial Branch will be locked. Congo lost its main investor.
Historically, after the war Belgium was able to recover the most quickly of all the European nations, and this was in large part because of how wealthy Congo had made them (plus their gold reserves were intact). This became known as the Belgian Miracle.
Therefore, if Belgium is able to invoke the Congo Free State, Overseas Department or Dominion of Congo, plus Engine of the Economy from their own tree, then they can do the “Belgian Miracle” focus which comes with a massive industrial bonus.
Colonial Mini Branches
Let’s go into a little more detail about what you can actually get out of the Colonial branch!
Belgium’s “Overlord” branch.
This is Belgium’s Overlord branch, the first two giving access to the wider shared branch, however the latter part generally takes things from Congo, without recompense. These will have pretty large boosts for Belgium, but come at a high cost in autonomy.
The Katanga region, in southern Congo is especially resource rich
Congo is very resource rich, and can bring a wealth of benefits. These range from growing the mining companies of CCCI and Forminiere, prospecting for gold or diamonds, and eventually, expanding the Shinkolobwe mine for more Uranium.
Belgium however, must also bear in mind rising autonomy should it invest in this area too heavily though! Similarly, if Congo is on a path to Independence then it might want to sacrifice some of their mineral wealth… for the greater good (the greater good).
Speaking of Uranium, if Belgium is able to complete the Uranium Development Trust, then this will confer a bonus to Nuclear Special Projects for ALL members of their faction! Congo too can tap into this more sneakily, and smuggle Uranium to any other Major Power to give them that bonus too, for a price. Even if they’re at war.
These focus more on the non-mineral related activities within Congo, including rubber production
There’s more to the Congo than mining, for one there is major potential for rubber cultivation as well as widespread agriculture. The sheer size of Congo is also a factor here, and you can invest in various forms of infrastructure to better utilize the vast interior. The Belgian Devaluation line contains autonomy reducing systems, while French Congo and Colonial Ambitions provide an outlet towards further African expansion.
The Force Publique was the militarized police force, significantly expanded during the First World War and critical in the war against German Africa
The Force Publique section is initially locked so that only Belgium can access it, however should Congo find itself at war, then it too can begin completing it.
Initially this section is about improving the Force Publique, increasing the manpower available, giving them bonuses to fighting in the Congo proper, and some hefty jungle warfare buffs. Later, you can modernize it into the Army of the Congo.
Congo can nab this talented officer from the Belgians!
It was said of Raoul van Overstraeten that, “he is likely one of the most talented officers in the Belgian military, the problem is that he himself knows it”. It’s unlikely (but possible) that Belgium will want to bring him back into service, however he served with distinction in the Congo during the First World War so may be more amenable to serve in Africa once more.
Anyway, that’s all from me on the shared part of the tree! I now hand over to D3vil (Jonathan) for more of the Congo-centric part of the tree. I warn you in advance he has added a lot of kings! Like seriously, there are a tonne.
The Unique Branches
Hello again, it’s me D3vil here to bring you some more interesting things regarding the Congolese content. So to start off with the unique Congolese focuses are divided into a few separated parts, namely: “The Invisible Roof”, “Governor General Pierre Ryckmans”, “Congolese National Movements”, “Our Overlord’s War”, “The ANC” and the “Post-Independence Political” branches. Also don’t worry, it may not look like anything now, but a path may appear below the focus “Assemble a Regency Council” once someone has been chosen to take the throne.
The Branches in question!
In order to give you a better idea of how the country starts off, so that I can better explain the unique tree, I’ll show you their country screen and their starting national spirits.
The new country select screen for the Belgian Congo, with a TL:DR for the historical context
Their Starting National Spirits
First of all, there is a small sub branch for ridding yourself of the “Invisible Roof” national spirit, costing of these three focuses. They can only be taken once you have become independent, through whichever means it may be.
The Invisible Roof focuses
But to move on to some of the more interesting branches, let’s start off with the ones I usually call the “pre-independence political branches”, as in the ones that start with the focuses “Governor General Pierre Ryckmans”, “Found the Congolese National Movement” and “National Committee for Liberation”.
The left-most focuses are to do with strengthening the colonial regime,while the ones to the right deal with achieving independence, one of them peacefully, the other through a war of independence
Some focuses in the Pierre Ryckmans branch
If you wish for independence, one way would be to grow your democracy support and gain independence score to peacefully liberate yourself, while the other would be through war. The choice is yours, and breaking away peacefully will more than likely put you on a path towards democracy, but should you choose violence, well then the political climate may change drastically…
Some focuses in the “Push for Independence” branches
There is a branch available to you if you are still together with Belgium, and they happen to find themselves at war, perhaps by the Germans invading them to get around the Maginot. Should this occur, the Congo will be able to gain strong timed bonuses that will help it rearm and prepare to aid its allies in the new Great War.
The “Our Overlord’s War” branch and some of its focuses
The armed forces of the Congo can’t stay a colonial gendarmerie forever, and as such, either after gaining independence, or after finishing the Force Publique branch in the Joint focus tree, the “Armée Nationale Congolaise” branch will unlock, allowing for professionalization of your armed forces.
The ANC branch and some of its focuses
After becoming independent, there are a few different paths you can take. One requires you to have 40% or more democracy support, one the same but for communism, and the third requires less than 40% for either political party.
The Post-independence political branches
First, before we show off individual branches and focuses, it might be time to show what advisors are available to the Congo.
Congolese Advisors
First off we have the democratic branch. This one focuses mainly on being able to quickly rid yourself of your administrative maluses, and industrialize as soon as possible. It does also contain the opportunity for a bit of expansion, and as the Congo has a new “generic” formable nation available to it, they have the ability to core some places no matter which path they choose.
The United States of Latin Africa
Some focuses in the democratic branch
In the communist branch you have two main choices, similar to what you can do in Ethiopia. One is to use wargoals and limited wars to liberate nations, eventually leading up to forming the African union, with the other one about spreading the revolution throughout the continent, potentially also joining the Comintern. With the Congo also being able to use the formerly purely Ethiopian “African Union” mechanics, these decisions have been changed to be cheaper for both countries, and have had parts of their functionality revised.
Some focuses in the communist branches
Now for something a bit more unusual. In the case that the country cannot unite behind one school of thought, a council of ministers can be put together to convene with a sole goal in mind. To end the political chaos, and select a ruler who can take the nation in a better direction. They will attempt to select a ruler from one of many regional monarchs in and around the Congo, in an event chain similar to the Polish royal election events. A focus branch will then appear, depending on who you decide on in the events.
I will give you a sneak peek at two of the branches, and leave the rest of them for you to discover. I will however leave you with the portraits and names of the awesome-looking monarchs you can elect for now.
Two of the available monarchist branches
The Monarchs available to the Congo
That has been all for now however! If you have any questions, Mordred and I will do our best to answer what we can. Be sure to tune in next week, when Paradox_Danne and ManoDeZombi will show you all about the new and improved German alt-history routes. See you then!
We’re going to be talking about a nation that was invaded in both World Wars, and were present and fighting until the end in both, despite being either partly, or wholly occupied for the majority of those conflicts. Their people were very much on the front lines, and the landscape remains scarred by the wars even to this day.
Hello! My name is Mordred Viking, though some of you may know me as Gareth. I am a Content Designer on Hearts of Iron IV, and I very much wanted to see this nation given more content in the game because they contributed so much, but are often so little known.
As such, I’d like to present the real story of the plucky underdog: Belgium.
Behold! The Belgian Focus Tree! Plus a weird blurry bit in the middle. I wonder what that could be?
I had a couple of goals starting out with the design of Belgium. Firstly, I wanted to give them a chance to actually hold out. Secondly, if this failed, I wanted them to be fun to play in exile. Thirdly, I wanted to showcase the close relationship between Belgium and Congo. As is always the case in these diaries, please bear in mind that all you are about to see is a work in progress.
Overview
Right! So with those goals in mind, let’s start taking a closer look at what all this actually means.
Paul van Zeeland is the Prime Minister at the start of the game. You can see from his fancy top hat, that he is clearly a very trustworthy fellow!
At the start of the game, Belgium finds itself in an interesting position. The memory of the Great War is still very much in mind, their economy still recovering from its impact and the countryside still scarred by the many trenches meandering through the fields of Flanders. In order to avoid a second Great War, the Belgians embarked on a policy of neutrality, much like the Dutch and Swiss. They even canceled their alliances with Britain and France, something which took both those nations by surprise as they had fought to protect Belgium previously.
The Chasseur Ardennais give Belgium some unique fighting options in terrain other nations would find too rugged.
The political landscape wasn’t much better, corruption plagued the government of Prime Minister Paul van Zeeland, causing a furor which was whipped up by the fascists under Leon Degrelle who demanded an investigation- we’ll talk more about this later! Complicating all this, Belgium is of course a nation of twin cultures, the French speaking Wallons and the Dutch speaking Flemish. To reflect all this, they have the above starting National Spirits.
Which to tackle first? Security or corruption? Despite increasingly hostile rhetoric from neighbouring Germany, the Belgian government historically refused to sanction further military spending needed to bring state forces and defenses up to scratch without the promise of a declaration of neutrality from the crown, so that they could avoid being drawn into what they saw as other people’s wars. Simultaneously, Fascist agitation against the widespread government corruption can cause the Democratic government to resign, triggering political manoeuvring which can ultimately lead to any of the ideologies rising to power.
Military and Industry
Following the declaration that Belgium is “Independent, Neutral and Loyal”, you gain access to the defensive branch
The so-called Defensive branch is about, well, defending. When hostilities seem inevitable, Belgium would be wise to invest some time and resources into these. The Redoubt of Antwerp line will see the rise of impressive fortifications, while Belgian Gates and the Iron Wall act as force multipliers and improve the effectiveness of these defenses. The latter part of the branch provides additional defensive options, including the radical decision to really tap into Belgium’s position as one of the Low Countries, and saturate their enemies with more than just bullets.
The Belgians boast a number of powerful MIOs, particularly small arms producer FN Herstal who partnered closely with Browning (and would later go on to buy them).
Belgium’s army was surprisingly potent, having been able to muster 600,000 troops before the German invasion, with decent officers and well developed industrial support providing high quality equipment particularly in terms of infantry equipment and artillery. I’ve also chosen to tap a little into their WW1 penchant with armored cars to give them that option, and they can eventually overcome the Scars of WW1 and turn those experiences into their strength.
On the other side, education was important to the Belgian military, and high level courses in a wide range of different subjects were offered through the Royal Military Academy. Historically, Belgian integration into the British SAS met with excellent results, particularly in France… where being able to speak French was a real advantage... Quelle surprise? This combined with the Chasseur Ardennais modifiers, means that the Belgian Special Forces can indeed bring something powerful and unique to the battlefield.
For such an industrial nation, the Belgian industrial branch is curiously small… I wonder why? Could there be another facet to this?
Although the economic situation facing Belgium at the start is quite poor, the scaling potential is quite impressive, with numerous ways to quickly get new factories up and running, and then to make those as efficient as possible. Historically, Belgian industry was in an interesting position, with companies having a very progressive attitude towards their employees, including the introduction of a 40 hour work week and paid vacations.
The cornerstone of Belgian industrial might was Cockerill, a company that suffered through the First World War, and continued manufacturing machines and ships throughout the interwar period and into the Second World War. Historically, they survived the conflict, maintaining high levels of employment manufacturing pig iron and trains rather than weapons for the occupiers. This gets to the heart of Belgian production at the time, trains, which were the primary export in the run up to war.
The Belgians were real innovators in the air, unfortunately their aeronautical industry never really took off in time.
Despite a good showing in the First World War, the Belgian Air Force was woefully under developed at the onset of the Second World War. The majority of Belgian aircraft in 1940 were old foreign planes, and despite a very brave attempt, the Belgians recorded only one German aircraft downed.
However, they did have some good home-grown design talent, particularly Alfred Renard who was a pioneer in the development of all-metal aircraft, and Nicholas Florine, the father of twin-rotor helicopters. Who knows what they could have achieved had that domestic industry been allowed to flourish.
The Belgians had a huge and flourishing port in Antwerp, not to mention overseas colonial possessions, so surely they had a mighty navy to protect it all?
The Navy in 1936 was… well, there wasn’t one. Despite being granted ships from Germany in the Treaty of Versailles, the Belgians disbanded their entire fleet in 1927 as a cost saving measure. This means that you have to start from scratch in order to develop a fleet at all. This focus branch therefore is all about doing just that. Thankfully, the Belgians are not without resources and capacity, with Antwerp particularly being capable of quickly bringing naval production online.
This highlights another facet of the Belgian game we’ve not yet touched on, their excellent capacity for diplomacy. Through having the right people in Government and developing Antwerp, Belgium can enjoy a significant advantage when buying resources on the world market, spending fewer civilian factories for each trade.
The Port of Antwerp can really help your trade
Political Introduction
Behold! Politics!
Now that we’ve talked about the industrial and military facets important to any Belgian game, let’s talk about the political sphere, the Democratic resistance, Fascist rise or Communist tough-decisions. Finally, the Monarchy was a real power within Belgium and can be involved in all branches, although just what role they will play remains to be seen - and of particular concern to the people of Belgium is precisely where the King’s loyalties lie.
Step one. Stamp on van Zeeland’s hat.
As we mentioned earlier, rife corruption is the first political hurdle to be overcome. In order to begin tackling those horrible corruption modifiers, Paul van Zeeland’s government will have to resign. This will call an immediate election, with two outcomes. Historically, the Emile Vandervelde’s Labour Party won the most votes, but did not have enough to form a majority government. Therefore they allied with Zeeland’s Catholic Bloc to get the numbers needed, and the Government of National Unity was formed with our main man, and master survivor, Paul van Zeeland at its head.
The other option is for Vandervelde to form his own minority government. While this will cause some instability, it will lead towards a left wing- possibly Communist path. We’ll talk about that in a bit.
Going back to the first option, unfortunately Paul van Zeeland is himself a ticking time bomb, and his luck can hold out only so long. The Fascist Leon Degrelle intensifies the corruption investigations, and reveals that, shock horror, Paul van Zeeland himself is implicated! This leads in time to the fall of the Government of National Unity.
“Don’t make me choose!” - King Leopold III probably.
King Leopold III himself steps and mounts a royal intervention, declaring for either the democratic Paul-Émile Janson, or acknowledging Degrelle’s work tackling the corruption inherent in the system and swearing Degrelle in as the new Prime Minister.
Historical Branch
The Historical branch is short and sweet, and it was definitely not an intentional design decision to give more time to spend on certain other parts of the focus tree. Nope, definitely nothing so nefarious.
The Historical branch focuses on stabilizing Belgium following all the chaos that has dogged the democratic side.
The first step is implementing Henri de Man’s economic policies (historically, he was the Minister of the Economy), in the amazingly named “Plan de Man” which helps relieve some of the pressure from “Economic Downturn”. This in turn leads to the Economic Recovery, though it does require the Dyle Plan. What is the Dyle Plan you ask? Well, it was the result of Belgium’s declarations of neutrality and breaking of their alliances with Britain and France.
Despite this public neutrality, Belgium was under no illusions about Germany’s intentions and maintained secret back channel negotiations with the Allied nations. The Dyle Plan was a military strategy where Belgium would resist invasion to the Dyle River line, allowing French and British troops time to arrive and assist in the defense, much like in the First World War. In game-terms, this increases the likelihood that Allied forces will actually come and help Belgium, rather than leave them to their fate.
Unfortunately, the Economic Recovery was something of an illusion, and Janson didn’t survive as Prime Minister, this time being toppled by Paul-Henri Spaak who is quite possibly the most important Belgian politician ever.
Seriously, look this guy up, he was quite impressive. He was Prime Minister of Belgium several times, first President of the United Nations (and sponsored the entry of the Soviets Union into the UN, ensuring there was a platform for the two Cold War rivals to talk), President of the European Coal and Steel Community (forerunner to the European Union), and finally General Secretary of NATO.
This leadership was first tested with the Adriaan Martens Crisis, where a Flemish Nationalist, WW1 German Collaborator and Fascist was appointed to the Royal College of Surgeons. Historically, Spaak did not survive this crisis, leading to his resignation and the arrival of Hubert Pierlot to the office of Prime Minister, although here you have the option to pay the political price and keep Spaak around, allowing you to call the Council of Europe, and form the European Union. Pierlot was the historical wartime leader of Belgium during the Second World War, and fled with his Foreign Minister (Spaak), Economic Minister (Gutt) and Minister of Colonies (Vleeschauwer) to London and formed the Belgian Government in Exile.
Now it is possible to just… not capitulate, in which case Pierlot can reverse the Belgian Neutrality and join a faction. If however, the worst should happen and Germany (or whomever) does successfully invade…
The King Surrenders
Remember that I had a couple of goals starting out with the design of Belgium: I wanted them to be fun to play in exile - therefore there is a reason to keep playing if this happens!
I won’t spoil the circumstances around just how this happens! You’ll have to play it to find out.
(We’re still waiting for La Dame Blanche icon art!)
The worst has happened, and Belgium has capitulated. Some of that blame will, rightfully or wrongly, fall on the King’s shoulders. Just how he is treated by the government in exile will determine whether he falls by the wayside, or becomes a figure around whom to rally resistance.
The historical path was to declare the King unfit to reign, and centralize resistance efforts around the Government in Exile in London. This path is all about gaining support from allies, and using the resources in Congo to fight back and reclaim Belgium.
The Prisoner King is a very plausible alternative path, and the real Exiles agonized about how best to mount the resistance. In this scenario, the King plays on his status as a prisoner in his own nation, using his influence to solidify Belgian resistance and begin a monarchist resurgence.
Fascist Branches
The rising power of the Fascists in Belgium have a lot of options open to them.
(We’re still waiting for Strength and Brotherhood icon art!)
Once Degrelle has been invited to take power as Prime Minister, he will need to make a choice between which Fascist group to support and empower. Degrelle will remain in power regardless of your choice here, this is because I absolutely cannot imagine him giving up that position once he’s got it, plus it was the King making *him* the Prime Minister, not the Fascists. They are still a minority in the country. As such, the decision here is not an indication of which faction is in power, but rather whose ambitions Degrelle is supporting.
There were two major factions at the time (and a whole myriad of smaller ones), and each has a broad set of goals they want to achieve but it can loosely be considered as follows:
The Rexists are the “Fascist Nationalist” path - Build up Belgium itself
The VNV are the “Fascist Expansionist” path - Make a bigger Belgium
The middle shared path - Things both sides can do
The Rexists believed mostly in a strong Belgium and worked with many different groups to this end. They were the primary collaborator with Germany during the war, so in this branch they are very Germany-aligned (early designs even had them become a puppet!), and have the most to gain from an alliance with Fascist Germany. The main thing blocking this tall approach is internal Fascist support, so Degrelle will need to work at consolidating his grip on power within Belgium.
The VNV (Vlaamsch Nationaal Verbond) were historically Flemish nationalists, and didn’t want much to do with the Walloons. However, I really didn’t want to add yet another civil war, nor did I want to break up an already small country (because a player’s first action would be just to unite it again). As such I thought they’d be most about embiggening Belgium, uniting with their Dutch speaking brethren to the north, and invoking the old ideas of Burgundy. If they’re feeling super bold, they can go after France proper in a bid to recreate the old Roman province of Belgica, including the ability to core a number of French states which comprised Belgica historically.
The shared focus tree allows Fascist Belgium to do a number of things, including a peaceful union with Luxembourg, abandoning neutrality early in order to join factions or attack other nations, plus it gives them a number of tools to consolidate power and enhance the power of the state.
The Constitutional Crisis Branch - Turtle Belgium
What If Belgium held out? This is the branch to find out!
So Degrelle has come to power, but Hubert Pierlot, fearing what this would mean for the democratic traditions of the country, invokes Parliament’s own protections, declaring the King temporarily unable to reign before the monarch can sign the royal assent locking Degrelle in. This renders the appointment void, and Pierlot calls for a snap election. This will lead to King Leopold’s abdication, and Charles, Count of Flanders’ appointment as Royal Regent (Leopold’s brother).
For those questioning the realism of this, something similar actually happened in Belgium in 1990. King Baudouin didn’t want to sign a bill into law for personal religious belief reasons, so had himself declared temporarily unfit to reign, meaning Parliament could bypass royal assent.
The election is then between the Liberals, led by Pierlot and the Socialists, led by… you guessed it, Spaak! This gives Belgium a choice to gain Allied protections or go for another option- the Soviets. Internally, they build build build, combining defenses in this branch with the defensive branch will lead to some truly massive fortifications.
Belgian Maginot
Better than Maginot
Mobile Maginot!
Socialist/Communist Belgium
Belgian Socialists had some interesting opinions on Spain and Congo.
Going down the other path after that initial election, choosing the Vandervelde Minority sets Belgium on the path of Socialism. At the time, there was very little actual support for Communism, with even the trade unions being quite weak. This was because, as mentioned earlier, many large companies were already very socially aware and progressive for their time. As such, in game Belgium will generally remain Democratic in this branch, though there are ways of going Communist further down.
Therefore this branch is less about radical shifts in policy, and more about their diplomatic outlook. Belgium has the potential to provide significant support for the Spanish Republicans (something that Vandervelde historically pushed hard for). Similarly, Socialist attitudes in Congo were quite paternalistic, providing a strange combination of imperialism with socialist values. Finally, Socialist Belgium can send peacekeeping forces (volunteers) without turning their back on neutrality.
Ultimately, lines in the sand must be drawn, and Socialist Belgium can turn to the Soviets (with “Raise the Red Flag” flipping them Communist for gameplay reasons), or form the European Union.
Advisors, Commanders and other Bits and Bobs
Belgium has a broad set of skills at their disposal
Belgium has a good number of advisors, with a wide range of different abilities. Of note are:
Paul Henri Spaak, who can increase the amount of raw materials per civilian factory in trade. Did I mention he was kinda cool?
Edgar Sengier, who realized the importance of Uranium to atomic research, and so shipped the Belgian Uranium supplies to America before Germany could take them. He was also critical in reopening Uranium mining in Congo. It was his foresight that basically made the Manhattan Project even feasible. He boosts the speed of Nuclear Special Projects.
Walthere Dewe, leader of the Belgian resistance in WW1. Anticipating the German invasion, he went back into hiding just before the outset of WW2 to rebuild his networks, and led the resistance AGAIN. In-game he [REDACTED].
Dieudonné Saive, the principal designer at FN Herstal, and who collaborated closely with Browning. He increases factory output, research speed and MIO funds gain.
I know this was a weapon of the 1950s, but hear me out!
While we’re on the topic of Saive, there is one slightly controversial topic that I just know will come up, so let's address it. I’ve chosen to include the FN FAL as the final tier of Belgian Small Arms. So why is this weapon, widely adopted in the 1950s by NATO forces, in a WW2 game? I sincerely believe that had Belgium not capitulated, then between Saive’s exceptional weapon design capabilities, his very close collaboration with John Browning and access to the German Sturmgewehr 44 that Belgium would have developed their own assault rifle in the latter years of the war.
As it was, the first prototype of this weapon was delivered in 1947 and it went into regular service in 1953. Ideally I’d have included this as a 1943-44 weapon, but as this is the final weapon tech in our tree this is where it had to go. After all, isn’t half the fun of these games the “what-if” scenarios?
The Chasseurs Ardennais rocked the iconic green berets, although they were worn longer on the side.
Belgium was fortunate in generally having a competent officer class. While many of the generals here will not be available from the start, there is a good selection of skills available. Despite this, Belgium starts with no Field Marshals, and while a couple of the above would make good candidates in the interim, they can recruit the two below later.
Make the right choices and King Leopold III can also take the field!
Now, Belgium didn’t have a navy during WW2, and therefore I could find no admirals… but wait! The unknown designer before me who had added a couple of Belgians to vanilla had included an admiral. At first I thought he was just randomly generated, but no. Turns out he was the chap responsible for rebuilding Belgium’s entire fleet post-war, so he’s in!
If you get him a navy, he will lead it for you!
I know many of you will be curious about the Belgian units, well here we are!
Belgian Soldier (left), Chasseur Ardennais (right)
Music
Before I sign off, there was one last thing I wanted to cover, and that’s audio. We have a super talented team who handles this, but it was the one area of development that I had never really collaborated with.
Therefore when we were told that each country would have 2 new music tracks added, I had zero idea about how to approach this. We had a sit down with the audio directors and composers who we’d work with, and they laid out the process. We then needed to find several reference pieces to give the general “sound”, as well as include the emotions we wanted the tracks to evoke.
Belgian Wartime Track : Proud, Stubborn, Defensive Belgian Peacetime Track : Trepidation, Uncertainty, Loss
This was the general premise I provided for the peacetime track
I’ve got to say they absolutely nailed those notes, and I am super, super excited for you to hear these tracks when you play Belgium in Götterdämmerung!
Final Notes
That’s all we have for you for Belgium!
I can’t wait to see you all give it a try when we release, and I eagerly await the stories from your playthroughs!
Other Plushies lack a certain flair or Discipline, whereas THIS Duck-Kaiser-billed platypus has all the authority and gravitas befitting the Ruler of PLUSSIA! Equipped with the formal regalia befitting their station, this little Imperial will rule over your display shelf with all the venom a semi-aquatic turn of the century ruler should!
Get your LIMITED EDITION Hearts of Iron plushie TODAY and give your collection some Plussian might! The campaign will only run for a limited time, so make sure to order your Kaiser Platypus right now and don’t miss out!
Hi, Thomas here talking about game mechanics again. I work as Design Manager and Design Lead on Hearts of Iron. Today we are looking at another of the new features that comes with Götterdämmerung, namely Raids. The normal caveats apply, everything you see here is subject to change, especially visual details as some are awaiting final art touches at the time of writing, and other things, such as balancing and tweaking are ongoing. But you probably know the drill by now.
The Raids feature allows you to plan and execute targeted strikes on enemy installations, or perform unique missions of various kinds. Whereas strategic bombing targets enemy industry and infrastructure in a general way, Raids are pinpoint strikes against very specific targets that usually require months of preparation. Targets can vary, but the general goal of a raid is to inflict strategic damage to your opponent that will hamper their war machine for an extended period of time.
Perhaps one of the most important functions of the Raids is that you can use them to target enemy experimental facilities in order to disrupt their special projects. Once you know the location of a facility, you can start planning a raid to damage it, and inflict a setback to the ongoing project there. A successful strike not only damages the facility, slowing research down until repaired, but can also damage equipment etc. and set the progress back by weeks or even months.
The feature also allows you to replicate things such as Operation Chastise, more commonly known as the Dambusters Raid. You can develop the Barnes Wallis' bouncing bomb, and then target an enemy dam with one of your raids. A successful strike not only knocks the hydroelectric power plant out, it also floods the region, hindering enemy troop movement.
Or, if you want to take that concept even further, you can try to blow up the canal locks in the Panama Canal, to stop enemy ships crossing from the Pacific to the Atlantic Ocean. But you will probably need a very long range bomber for that - unless you start in Central America of course…
Let's take a look at how to work with the Raids:
Setting up a raid
The main interaction point for the Raids feature is the map. You see potential targets on the map and when you hover them you get more details about them.
When you click the target icon, you start setting up a raid against that target. Some targets might have more than one viable Raid type, in which case you first decide what top target with this particular raid. What do you want to strike, the Reichstag, or the experimental nuclear facility in Potsdam? (Just an example, right. Germany does not start with a secret nuclear lab, Promise!)
Deciding on a target for a Raid in Northern Germany
After having selected your target, you need to find a unit to perform the Raid, be it paratroopers, an air wing, or whatever is required by the Raid. You can do this from the map as well, or you can select from a list of units that is displayed at this stage. Various factors affect how good a unit is at executing a Raid, but the most important one is usually how experienced it is. The more experience, the better the chances of getting a really good result. But again, other things apply as well.
Time to choose the airwing
The last thing you need to select is from where to launch the Raid. If it is an air wing you need to pick an airfield within range of the target. Once you have made these choices, the selected team is ready to start preparing for the Raid.
Let’s launch from a safe place
Assembling and preparing
You can’t launch the Raid immediately. The unit must travel to the starting location if not already there. Usually there are other requirements as well. It might require extra equipment of some kind. (Common examples being convoys, transport planes, infantry equipment, or even nuclear bombs…)
Once everything is in place, the unit can start preparing. Equipping the right type of bombs, undergoing special training, and so on. The amount of time needed depends on the Raid type.
Once preparation is complete, you can launch the Raid whenever you choose to - as long as the launch criteria are met. What does that mean? Well, some raids can be prepared in peace time for example, but can’t be launched unless a war is ongoing.
It’s going to take some time, but hopefully it will be worth it
But what if I don’t want to sit and monitor whether a Raid is ready to be launched? First of all, you get an alert when a Raid finishes preparation, so you don’t really have to monitor it that closely. Second, if you feel that it is not necessary to time it exactly you can select auto launch instead. When you do that you get the option to only launch when your chance of a successful Raid is at least at a certain level.
Launching and Success
As said above, the Raid can be launched either manually or automatically. Or if you prefer, you can launch all prepared raids at the same time with the press of a single (red) button.
Once launched you will see a 3d model travel to the target, executing its orders. And when it strikes you get a report of the outcome.
Getting there
A Raid will not automatically be successful. There are a number of factors that come into play when executing a Raid. Some depend on the unit itself (experience for example), others on specific conditions, such as for example air superiority, and others again on what the enemy does and how they have set up their defenses. You see a general indication of your chances on the Raids display, and when you hover the display you get a more detailed breakdown in the tooltip. As a defender you do various things to decrease the chances of a successful Raid. If it is an air strike you can add Anti Air and you can try to gain air superiority, for example.
Our chances aren’t super high, maybe time to do something about it
There is one further lever you can pull. By increasing the risk taking of the unit you can increase the chance, but if they don’t succeed they run a higher risk of taking severe losses. And vice versa, you can lower the risk taking, and thereby minimizing the risk for a disastrous outcome, but also somewhat lowering the chance of a very positive outcome.
It worked flawlessly
Cost
Starting a Raid is a bit of an investment. Especially in time, as the unit involved will be unavailable for quite some time. In addition, additional equipment is sometimes needed, forcing you to have it in your stockpile. Finally, there is a Command Power cost to Raids, lowering your max cap while preparing and executing.
We’ve allocated 25 to this, but we still have plenty to go
Filtering
Together with the map mode selection ui, you have a new section with raid filters. This allows you to hide and display your raid targets and raids depending on your preferences. If you are only interested in displaying Air Raid targets for example, you can hide other categories. Or if you want to hide them all in the Land/Sea/Air map mode, you can do so, and only access them through the raids map mode.
Types of raids
There are a few different types of Raids to choose from in Götterdämmerung, some of which I will talk a bit about below:
As mentioned in the beginning, you can for example do a strike against an enemy experimental facility - much like the historical Raids on Penemünde. This will, if successful, cause damage to the facility; making it slower, and you can set the actual project work back by a number of weeks or even months, buying you more time to defeat your enemies.
If you do the Bouncing Bomb special project first, you can strike an enemy Dam. Dams are a new building that we have added. They apply state level bonuses, and thus are useful for boosting your industry, but of course they can be a bit of a liability if your enemy comes up with a way of destroying them. You can’t build Dams per se, instead you get a few starting ones, and then certain countries can get more through their focus trees where appropriate.
Additionally, if you have developed the bouncing bomb, you can do lock strikes. There are two major locks represented in the game, Panama and Kiel. Blowing up one of these will stop naval traffic through the canals. And no, there are no locks or anything you can blow up in Suez… Sorry… It’s just a flat stretch of water through sand…
Raids can be used as counters to enemy super weapons as well. If your enemy develops the V3 mega gun project, you can use your earthshaker bombs to target and destroy them.
Another thing you can do is to try to strike at your enemy’s resources. For example, you can try to target the Ploiești oil fields, as was done by the USA in Operation Tidal Wave. A successful strike here will lower the oil output from Romania for quite some time, thus hampering the German (and Romanian) war machine.
Hampering the German access to oil
A somewhat different type of Raid are the nuclear strikes. Yes, nuclear strikes are now planned in advance and you need to designate a unit to drop the bomb, you no longer just press a button in the state and province view. The nuclear raids work very similarly to other raids, with one major exception. Instead of having one or more set targets, the UI lets you select any province when planning a nuclear strike - as long as they can be reached. You can plan strikes against neutral countries, but you can’t launch unless at war, and you cannot target your allies - they wouldn’t be your allies if you could, right?
In addition to the initial destruction caused by nuclear bombs, they also now have some lingering effects, making them a bit more devastating than they used to be for the country getting nukes dropped on them
Selecting a place to bomb
Custom Raids
Not all Raids are available to everyone. In order to make raids even more flavourful, we have also added a few custom raids; such as the German Eben Emael raid where Germany had spent a vast amount of money and resources on preparing for a combined paratrooper and glider attack on the Belgian border fortress - having their soldiers train on every step of the attack beforehand. Or as the UK, you can replicate the British bombing of Berlin during the early stages of the war (this was, and is in game, mainly a morale booster). We have also included some of the more odd but rather flavourful Raids, such as Operation Jericho where the UK tried to free French resistance fighters by blowing up a prison using Mosquito fighter bombers.
Chinese Bombers enroute to Japan - but wait what are they dropping?
That's all for this Developer diary, we hope you enjoyed it. Stay tuned, more Götterdämmerung content will be arriving on Wednesday where we will be talking about Belgium and neutrality. Surely Belgium can manage to stay out of the war this time…
Last time we talked about the Common Branches and the Historical Branch of Germany. Now, I, Paradox_Danne, ManoDeZombi, D3vil and Nattmaran (please insert joke about how many content designers it takes to make a Germany) will at least try to explain the various new systems for Germany. As we alluded to and hinted at in the last German Dev Diary, Germany has a whole swath of new mechanics we’d like to go through with you. Keep in mind that all of this is still very much a work in progress, which means things may change. So without further ado, let’s press on!
The MEFO Bills
Historically, the MEFO Bills played a major role in the German rearmament in the 1930s and were devised by Hjalmar Schacht. It was partly a way to keep military production hidden (because it directly violated the Versailles Treaty from WW1) and functioned as a means to pay for the actual rearmament program. While Austrian and Czech gold reserves that were seized helped to bolster the economy and staved off an impending collapse, it only bought the Germans some time. In the end, this glorified Ponzi scheme almost bankrupted the country and can be seen as a motivation for why Germany went to war when it did. The armament program constantly required new resources to devour, so Germany was forced to continue to feed the beast as it were. This led to large-scale plundering and theft wherever the Nazis and the Wehrmacht went, to sustain the ever-hungry war machine.
In-game, this economic collapse was never really seen or felt, and it wasn’t until after the first war that you had to pay back the MEFO Bills. This means that the vast majority of players probably never even knew there was a price to pay for them. This is all changing. The intention of the reworked MEFO Bills is partly to slow down early German build-up somewhat and at the same time drive a German player to go on a conquering spree.
The MEFO Bills at the start of the game in1936
Granted, this is a far cry from what the MEFO Bills looked like in the old version, but if you read the previous German Dev Diary (which you really should) you know that this National Spirit can be improved. But something else you probably picked up on, is that Consumer Goods Factories factor (that is to say, the percentage of your civilian factories that are put on producing Consumer Goods, ergo not able to trade or build anything) is increasing each month, and it will continue to increase until it reaches 100%. This is the price Germany pays for quickly rearming again; all available resources are diverted to military production. The keen-eyed among you have also read two other things; additional penalties will be added once you reach 100% Consumer Goods Factories factor (henceforth known as CGFF because I can’t be bothered to type all of that out every time I refer to it), and that the rate of increasing CGFFwill be higher based on the amount of non-core states controlled by Germany. What does all of this even mean? Well, simply put, if you fail to feed the beast that is your arms industry, you will start to produce less material. And by controlling non-core states, you’re diverting valuable resources away from rearmament.
Bad things will happen if you can’t manage the MEFO Bills
Price Controls There are of course ways you can manage the MEFO Bills - at least for a while. Institute Price Controls will not only lower the monthly CGFF increase by 0.5% (so from 3% to 2.5%), but it also unlocks decisions to temporarily lower the CGFF.
Institute Price Controls will reduce the monthly CGFF increase ever so slightly
Price control measures will be crucial to managing the MEFO Bills
Seizing Gold Reserves
Sooner or later you’ll run out of tricks to keep your economy afloat though, and what do you do then? You do what every other dictator does when things are going south at home; go to war. Going to war will trigger an event, asking you if you want to get rid of the rearmament program and receive Recovering Economy instead, or if you want to switch MEFO Bills for Economy of Conquest and unlock the decision to Seize Gold Reserves.
Would you rather have a Recovering Economy or an Economy of Conquest
The decision to Seize Gold Reserves is key to managing the ever-increasing CGFF. Once you have capitulated a country (and this is important; the country must have capitulated to you or one of your subjects) you will be able to seize their gold reserves. This will temporarily reduce the CGFF - just as with the Price Controls decisions. The CGFF reduction is based on the number of total factories in the core states of the targeted country you control. Ergo, more developed countries will reduce the CGFF more. These decisions can however only be taken for countries in Europe - so don’t go around thinking you can seize the USA’s gold reserves. There’s one catch though; seizing the gold reserves of a country will increase Resistance and lessen Compliance in the states. I’m also toying with the idea of giving each state a productivity penalty for a short amount of time.
Seizing Gold Reserves
Seizing other country's gold won’t fix your own economy though, it’s just buying you more time. Is there a way of getting rid of the Economy of Conquest? Why yes, yes there is! But it obviously involves a lot of conquering before you can fix the mess you’ve put your economy in.
By completing Autarky Achieved you will transform your economy and gain Wirtschaftswunder
As you can see, you need a lot of natural resources. (Just a quick fyi here; these numbers are not set in stone yet and might change before release.) Not only will Autarky Achieved replace Economy of Conquest with Wirtschaftswunder (or Economic Miracle, for those who didn’t read the previous German Dev Diary - naughty, naughty!) but it will also improve the Trade Law Autarky.
And that’s all there is to say about the MEFO Bills and Economy of Conquest and how to manage them. Let’s move on to another brand-new mechanic, an utterly unique one for Germany.
The Inner Circle
The Nazi government functioned in a pretty peculiar way; on the one hand, you had the proper government and all its institutions and whatnot, but on the other hand, you had the Nazi party functioning as a parallel ruling body. This system of having two governing bodies often clashed with each other, and people within the Nazi hierarchy often plotted and intrigued against each other to gain the favor of Hitler. Hitler was happy to let them do this, he even encouraged it - as long as the results benefited him. Nazi officials often had overlapping roles, and these roles often overlapped with government institutions, creating a chaotic administrative system. We knew that we wanted to have this represented early on - but we struggled for a long time to get it right. Finally, Arheo and ManoDeZombi found a very (imho) interesting solution.
The people of the Inner Circle will try to ascend within the Nazi hierarchy
So how will we represent the in-fighting between these fellas and the parallel administrative system that existed? By letting each one of them work on and complete focuses in their own mini-branch. This means that you will be able to work on multiple focuses at the same time.
An Ascending Reichsleiter will work on and complete his own set of focuses
If you paid close attention you will have noticed that the GUI (Graphical User Interface) for the Inner Circle is shaped like a pyramid with Mister Mustacheman himself on top, and three empty slots just under him. And some of you might already have guessed that you can only have three Reichsleiters ascending (that is, working on their own focuses) at the same time. Yes indeed, you can only have three Reichsleiters simultaneously completing focuses.
Only three Reichsleiters can Ascend within the Inner Circle at the same time
The cool thing though, is that you can swap out which of the Reichsleiters you want to ascend within the Inner Circle, which means that you can prioritize different things depending on your needs.
Swap out your Inner Circle depending on your current and future needs
This doesn’t mean that swapping out one Reichsleiter for another will save you from the jaws of defeat; it takes them quite some time to complete the focuses they work on.
Letting a Reichsleiter ascend within the Inner Circle takes time and investment
Besides, why would you even want to let someone ascend within the Inner Circle? Well, they all offer different bonuses based on their historical roles. You can see their traits and bonuses both in the new UI in the Focus Tree, by hovering over the portraits, and in the National Spirit tab.
All Reichsleiters have their unique traits and bonuses
Worth mentioning, most of these advisors have a small daily PP cost when ascended, which increases once they complete their second focus in their branch. On the other hand, your Party Chancellor (be it Bormann or Hess), will grant you daily PP bonus which counters part of the PP cost from the others, so if you are not swimming in PP it might be a good idea to save one of the Ascending slots for the Party Chancellor of your choice.
Another reason why you’d let someone ascend is if you want to swap out Hitler. Who needs that low-life scumbag anyways, right? Surely Himmler, Göring, or Goebbels could do a better job! Or why not maybe Hess? They all seem like very reasonable and stable people…. Yes, this is how you get to play with an alternative Führer. They keep their Inner Circle traits and get a new one to boot!
A new Führer has Ascended
How do you go about usurping Hitler then? Well, first off, you have to have three Reichsleiters completing all of their focuses they can complete and then finish A Strong Successor.
Whoever will you choose to become the new Führer
We hope you like this new feature and find it interesting! It took a lot of blood, sweat, and tears (mostly ManoDeZombi’s) to get this working. One of the main goals of this system was to declutter a bit the otherwise-overcrowded political advisor list, so players can choose different political advisors within the three political advisor slots, while still being able to pick among historically party figures in the Inner Circle, which can in turn evolve and provide different bonuses and effects on their own, allowing the player to utilize the invaluable focus time in whatever branches they consider most important.
Moving on, we would like to mention a small system that we didn’t have the time to talk much about in the first German Dev Diary, and that is quite interesting and can prove to be pretty useful if you are planning on expanding your influence across the Ocean, and challenge the USA’s hegemony in America.
The Monroe Doctrine
Hello again, Malin Monroe (it’s actually Nattmaran though) here to talk about the Monroe Doctrine. We’ve all come to know the Monroe Doctrine through Trial of Allegiance, but as a recap; the Monroe Doctrine was USA’s attempt at keeping the peace in America, primarily to make sure no one else, and certainly not someone hostile, got a foothold that close to them. Of course, the Germans however, would most certainly have liked to have a foothold that close, and we wanted to represent this in game.
The focuses below Crossing the Atlantic are meant to give you the tools to challenge the USA’s military and influence over America
Decisions on the map will appear to sway American countries, once you have brought at least five countries into opposition, you will be allowed to destabilize the doctrine once and for all.
The decisions are rather straightforward, you can bolster sentiments to boost the popularity of fascism in the target country. A fascist country is more likely to oppose the Monroe Doctrine. You are not alone in this endeavor however, the United States will be alerted of your actions, and like you, they might very well start their own campaign in search of support. Once you have garnered enough support (which is actually opposition) you can click the button, and demand the dismantling of the Monroe Doctrine, and as such, you will most likely have a good landing point for further American crusades, invasions and expansions.
Finally we are rid of some of the guarantees…when I took these screenshots, it came at a high cost however…
And we have one last system we need to talk about before wrapping up this Dev Diary, namely-
The Reichskommissariats
And now for the new Reichskommissariat mechanics, brought to you by D3vil and ManoDeZombie.
Hi, it’s me, Jonathan here again to now introduce all of you to the new mechanics and content surrounding the Reichskommissariats! Starting off with how to get them, you will enable the mechanic after completing the focus Uplift the Rosenberg Office near the top of the fascist part of the focus tree.
The focus in question.
Alfred Rosenberg, head of the Reichskommissariat projects, will not show up as a regular national spirit or advisor. Instead, he will show up in his own GUI in the decision category, and you will be able to see what effects he grants by hovering over his icon.
Alfred Rosenberg.
Now I hear you asking, why would I create these puppets when I could just occupy the territory normally? Well about that, as explained previously, the MEFO bills/Economy of conquest grows ever more taxing the more non-core territory you occupy yourself, not counting puppets. Apart from that, these special puppets have various bonuses to both their leaders and national spirits, and not only that, because Alfred Rosenberg gets stronger the more Reichskommissariats you create.
Alfred Rosenberg becoming stronger when founding a Reichskommissariat.
As seen in the image above, creating Reichskommissariats also gives you the choice of what kind of leadership you want to instate. One of them being a German governor who is better at keeping resistance down and granting more resources for you, the other being a local collaborator, one who will be better at gaining compliance in the Reichskommissariats-owned territories. The new Reichskommissariats do not have any cores, similar to Italian East Africa, but that shouldn’t be too much of a problem due to the bonuses they possess.
The event you get when creating a Reichskommissariat. Reichskommissariats also possess a new type of ownership referred to as contested ownership, where, apart from their established capital state, they do not actually own states unless you own them first before selecting their respective decision. This helps to not mess with the surrender progress of the nation you are invading, for example the Soviet Union, so that you won’t have to push past the Urals because you founded RK Ukraine, whilst also ensuring that not only the capital (for example Kiev for RK Ukraine) counts for the Reichskommissariats own surrender progress.
How contested ownership looks.
From the beginning, only European Reichskommissariats are available to you, but there are a few focuses that can enable the creation of such states in other continents as well.
All of the Reichskommissariat focuses.
And as one final thing before moving back to Paradox_Danne, here is how the world looks when having created every possible Reichskommissariat.
The New World Order.
Closing Words
Paradox_Danne here one last time for this Dev Diary, just to say that’s it from us! All of these systems and mechanics are part of the German rework and won’t require the Götterdammerung DLC, but will be baked into the base game. Hopefully, you’ve enjoyed this Dev Diary about German Systems. We hope these systems will distinguish Germany from any other nation, and more importantly, that you feel they’re interesting and fun. But wait, we’re not quite done with Germany just yet! We still have to talk about the alt-historical branches for Germany; how will we handle the old Democratic and Imperial branches, and will there be a Communist one? Who knows! Tune in for the next, and last, German Dev Diary coming later. But before that, why not stop by to read the very next Dev Diary that’s coming on October 28th about Raids? And if that doesn’t sound too interesting, we have Belgium to look forward to as well!
Hey everyone! I'm Plankie, one of the game programmers on hoi4, and one of my favourite parts of developing a game is to work on the game AI. So when I was asked, almost a year ago, whether I wanted to take charge of a small AI feature, I was delighted! The goal of this feature was to make the AI better at concentrating their hardest and meanest divisions instead of spreading them out along an entire front line. This is something we've wanted to do for a long time and with the Germany-focused Götterdämmerung expansion, we had the perfect opportunity. We call this feature AI Force Concentration, or AIFC for short (an acronym which has caused many football-related jokes in the team).
AI Force Concentration
So WHY did we want to focus on this?
Well, first of all, the AI has frankly not been very good at handling their armoured divisions. Sure, they produce tanks and assign them to fronts, but they are seldom concentrated enough to actually pose a threat for the defender. Second, the AI always pushed along the entire front with equal effort. There's nothing strictly wrong with that, but most military operations have a strategic goal like capturing a city or a supply hub rather than just taking ground, so making a concentrated offensive effort towards a specific goal seems more realistic and human-like. Third, we want to make the combat gameplay more dynamic and interesting for you as a player. If the enemy concentrates more and better divisions in a certain sector, it requires you to make choices. Should you meet the anticipated offensive head on, will you lure them into a trap, or use the opportunity to attack somewhere else?
The days before Operation Barbarossa. The AIFC divisions are visible in the right picture as the turquoise army, preparing to quickly take a supply hub in Volyn when the war kicks off.
Cool! How does it actually work then?
For the most important fronts, the AI considers whether it wants to concentrate its forces. If it has enough units available to both hold the line and still allocate units for offensive duty, then it will create an AIFC army. This army will receive the "best" divisions along the frontline, taking into account factors like attack and breakthrough stats, how experienced they are, how fast they can move, and so on.
The AI then evaluates possible targets close to the front line, for example supply hubs, ports, large cities and so on, and it finds a path from the front line to the chosen target. This path is determined according to the path-of-least-resistance principle, which essentially means that it tries to avoid river crossings, bad terrain, fortifications and so on, while also following railway lines in an attempt to avoid ending up in a situation where it can't supply the troops.
The paths evaluated by Germany before Barbarossa.
The AIFC armies follow those paths-of-least-resistance and will continuously update their orders to make sure that the front lines match up with the intended path. Of course, since placing too many units too close together might cause some problems with your Amazon deliveries (a.k.a. your supply situation), they will spread out somewhat along the neighboring provinces.
But as they say, "a plan never survives contact with the enemy". This can be true for the AI as well. Because of this, it keeps track of how well an AIFC offensive is going. If the offensive is going well, by all means let's continue pushing. But if it stagnates and fails to make progress towards the target, then the AI sooner or later decides that the plan indeed didn't survive the enemy contact, and it tries to find another target for its next offensive. Similarly, if the offensive succeeds and the target is taken, the AI will start looking for new opportunities to concentrate their forces and break through, taking into account the newly conquered areas as a potential start of the offensive.
In order to make it feel like the AIFC behavior is not static, the degree to which it is used is (mainly) tied to the doctrines an AI has unlocked. This means there will be a difference between for example fighting an early war Soviet Union compared to a late war Germany. Doctrines which narratively and stats-wise promote a higher force concentration will make the AI prefer using AIFC to a higher degree (fully scriptable of course, so all our wonderful mod creators can play around with it).
On the receiving end of an AIFC offensive.
More new things
Thomas here now to add some more info about a selection of other things we have been working on. Aside from the AIFC, we have - as we tend to do - tried to touch up things here and there during the development of Götterdämmerung. So let’s take a quick look at some of the other smaller features and changes we have done:
New Technologies
The tech tree has as mentioned in the Special Projects Developer Diary received a few new techs relating to Special Projects. But those are not the only changes we have made to it. We have also added a few new techs to make research and gameplay slightly more diverse, and give you a few more options.
First of all we have added a few new Transport Plane Techs and related tech and equipment icons. The main benefit of researching these is that your transport planes gain more range, allowing you to paradrop or supply your troops at a greater distance.
One cannot have too many Junkers, right?
The other, slightly bigger change we have made is to Forts. Previously everyone could build level 10 forts everywhere from the get go. Now the max fort level depends on the terrain the fort is in, and the techs you have researched - as well as other modifiers you can get from e.g. focuses. This means the engineering tab has received 5 new techs for forts - one general, and two each for Land Forts and Coastal Forts.
Initial maximum fort levels, without techs or other country specific modifiers are set to 6 for all Coastal Forts, and Land forts are as follows: Plains: 5 Hills: 5 Urban: 5 Forest: 4 Mountain: 4 Desert: 4 Jungle: 3 Marsh: 3 (Note that values might change before release. Yes I know that I’ve said this already, but just to make sure the message gets across :) )
The new fortification techs,
Here we have upped our fortification capabilities a bit, just need to construct the actual forts
Command Power Cap
We have also slightly changed how the Command Power Cap works. Now your High Command will actually increase the Command Power Cap, so that with a good set of military commanders, you will have more Command Power at your disposal. This should make it less punishing to build up your high command, rewarding you for having a competent staff.
By adding von Rundstedt to our staff, we increase the Max Command Power by 20
Dams
As Mentioned in other dev diaries, there are now Dams in the game. They can be targeted by Raids which makes them a bit of a liability, but not by strategic bombing so they are relatively safe. What do they do? Their main effect is that they boost the state they are in, making it easier and better to invest in industry there. You can’t build new dams except through specific focuses.
Landmarks
Another thing you can see on the map, and that several of you have already noted in previous diaries and streams are what we call Landmarks. First of all, these look super cool on the map, and make countries more unique. But additionally they have small country level effects. A bit like National Spirits, but as buildings on the map. The cool thing with these bonuses is that they only apply to the country that originally owns the Landmark, so by capturing for example the Statue of Liberty, you can deny the USA their bonuses, but you won’t get them yourself.
A landmark in the UK
State and Province UI - minor QoL changes
In order to make the difference between State and Province effects a bit easier to see at a glance we have made some changes to the State and Province UI. The main focus of these changes were to ensure that Province Effects are in the lower part of the window, and state effects are in the upper section. A special area for all state effects and a summary of all state related effects from buildings has been added at the bottom of the “State section”.
Some of the more unique Province level buildings, such as Dams, Landmarks, and Experimental Facilities, are displayed in the “Terrain section”, while the rest are displayed beneath it as before.
The upper section, marked in yellow in this image, contains things that are relevant for the entire state, so e.g. state related modifiers have been moved up there. Down in the bottom section, we have collected all the info that relates to the province, such as terrain, weather, victory points etc. Not a drastic change in any way, but hopefully it should be a bit easier to understand what relates to what.
Area Defense QoL
We have also done some minor quality-of-life updates to the Area Defense settings. First of all, no specific settings are active by default when you open it up (unlike the old behavior where all settings were activated by default). Instead, if no special setting is specified, the divisions will spread out as evenly as possible in the selected area. We changed this since a very common pattern when using Area Defense was to immediately unselect all the options one wasn't interested in, which led to a lot of unnecessary clicks.
The new Area Defense settings for guarding borders and special project facilities (red arrows), and the updated supply setting (orange arrow).
The supply setting has received some small changes: Instead of trying to cover the supply hubs and ALL the railways, it will now cover supply hubs and railway junctions. It has also received a new icon depicting a supply crate instead of the previous railway icon. We have also added two new settings to Area Defense: Guarding borders, and guarding special project facilities.
The new Area Defense setting for guarding borders
Horsies with different colours
All horses aren’t bays, or browns for that matter. This is something one of our artists, who happens to really like horsies, was very aware of and wanted to do something about. So after having convinced one of the programmers that this was a brilliant idea, they set out to make a few new textures and ensured that the horsies in the game now have more varied and realistic colours.
I assume these would be Hanoverians…
There’s always more…
That was a selection of the things we have been working on aside from the major features for Götterdämmerung. Of course, we have been up to more things. There is always some balancing, tweaking, and bug fixing work going on. And fixes to code and to the AI in general. We have made some changes to how we script things for example, that we hope to describe more in the upcoming modding diary (together with some other cool stuff). But for now, we hope that you have enjoyed this diary.