Hearts of Iron IV - PDXKatten
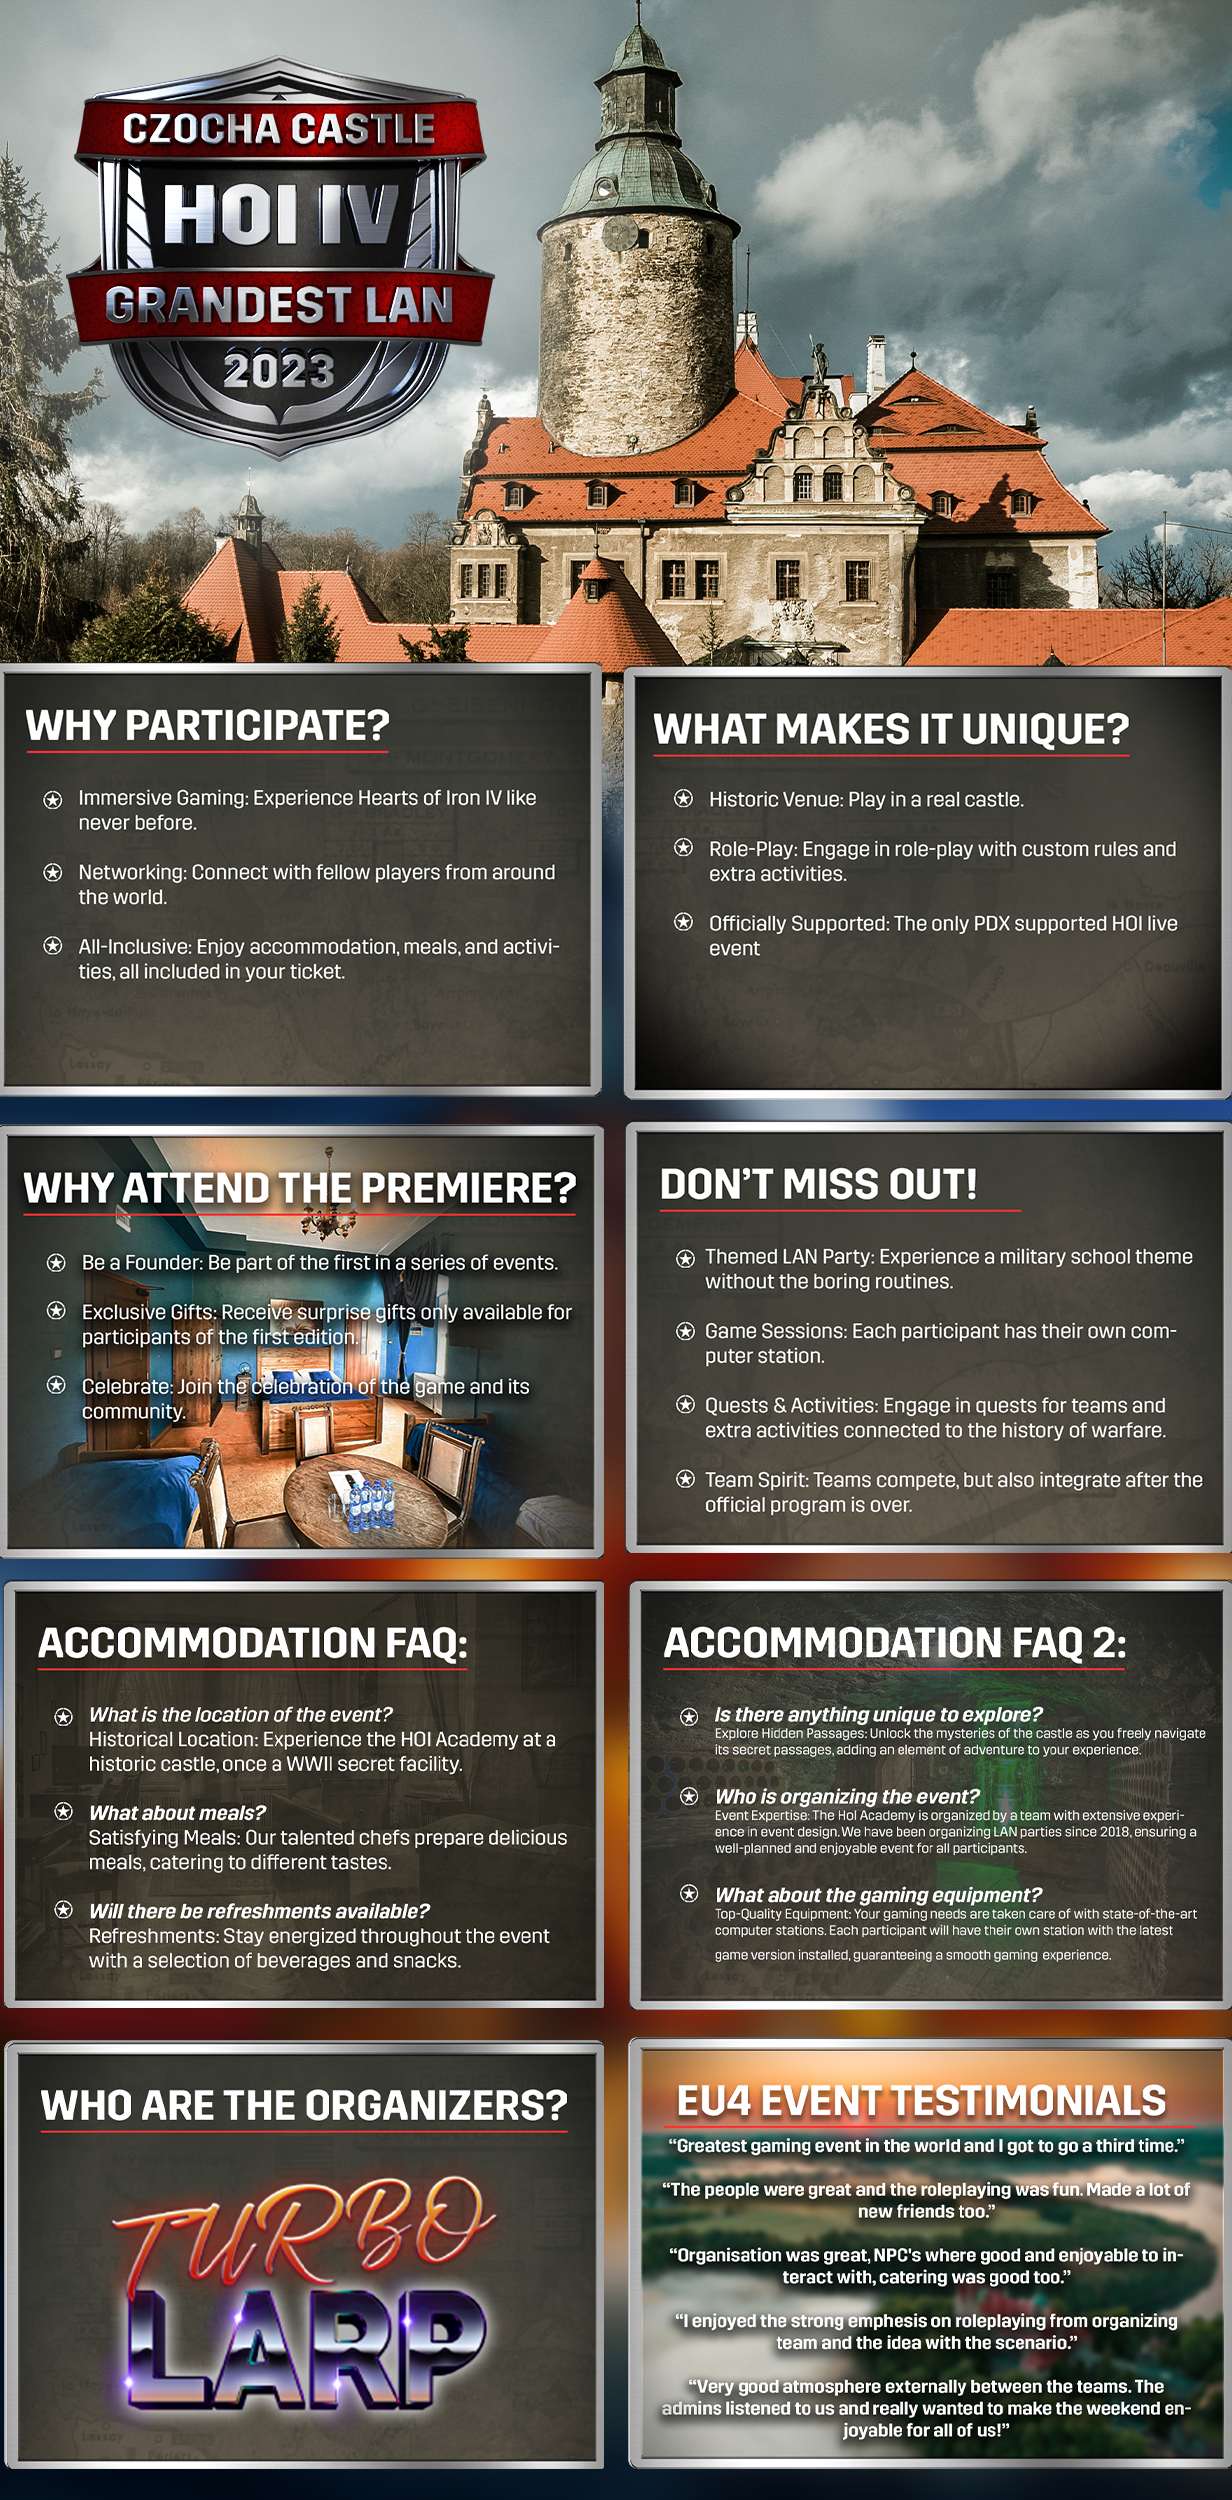
Generals! New intel has arrived from Turbolarp about the upcoming Hearts of Iron IV Grandest Lan!

Check it out below in the Infographic we created.
For more information beyond this, check out the event website: HERE


Hearts of Iron IV - PDX Chakerathe
Hello there, it's me C0RAX.

This week we are going to talk about some of the small features coming with Arms Against Tyranny, these are small things that add or change the game to increase the QoL or add to the game.

So this week we have 3 main groupings;
  • Division Structure
  • Economy
  • Presets
Division Structure
First up we have division structure changes. The way you make a division has been fairly static for quite some time. With this update there are some new changes that increase the challenge and compromises you will have to make when designing your divisions.

First up we have some changes to the categories for each brigade that you choose when you pick the first battalion for each vertical column. Previously we had both artillery, AA and AT in the same category as maneuver units like infantry and tanks. This is no longer the case; artillery, AA, and AT are now in their own category meaning you need to choose how many support brigades you have and how many maneuver brigades you have. This extends to mobile battalion and armored battalion categories.


Previously there was never any real scarcity when it came to a division's battalion slots, you could generally always have whatever number of battalions you wanted in generally any mixture. Now your brigade also starts with the bottom slot locked making a 5x4 grid.this is the default state of divisions and you can unlock this 5th slot by unlocking doctrines giving you a 5x5 grid. When this is combined with the category changes you will need to think about how much combat support battalions you can bring vs vs how many maneuver battalions you you need if you want to make that large division with lots of tank and infantry you will be significantly restricting just how much Artillery, AA and AT you bring to boost your unit.


Economy

Now we are onto something many of you have seen in the focus tree dev diaries is the new modifier “Consumer Goods Factories Factor” . This new modifier exists because the Consumer goods calculation and its associated modifiers have changed.

Previously the calculation of consumer goods was calculated by adding all the consumer goods modifiers to get a percentage; it then worked out the number of factories that percentage represented against your total factory count. So if you had 5 civs and 5 mils for 10 total factories and your consumer goods modifiers total was 10% you had to pay 1 civ for consumer goods. You were then “taxed” that number of civilian factories.

This had a nasty problem in that it was very easy to first reach 0% consumer goods which was a considerable balance consideration due to it allowing faster snowballing of the economy. This easiness of reaching 0% consumer goods was then a problem because once you reached 0% other parts of the game where the reward was a further reduction of consumer goods were rendered useless since you cannot go below 0% consumer goods.

This is now done a little differently, firstly there are now 2 steps to the calculation of the percentage. First we have the base value(expected consumer goods), this works the same as the old percentage calculation; it's a simple percent value that is added up together. This generally is only set by laws so it acts as a base value that everything else modifies. We then have the consumer goods factor (the new modifier) which multiplies this value and if there are multiple factor modifiers they are multiplied together meaning that you will generally never actually reach 0% consumer goods from just the factor alone and the effect of each additional consumer good factor modifier has diminishing returns.


We have also as part of this made the consumer goods calculation round down consumer goods factories which should help minors a bit while not really being highly noticeable for majors.

For those who want a detailed copy of the calculations it's like this:

ConsumerGoodsPercent = (Base1 + Base2 + ….) *((1+Factor1) * (1+Factor2) * ….)

ConsumerGoods = Max(ConsumerGoodsPercent , MINIMUM_NUMBER_OF_FACTORIES_TAKEN_BY_CONSUMER_GOODS_PERCENT ) (ConsumerGoods * Total factories).RoundedDown


Presets
And finally I kept the most exciting one till last, and that is presets for your equipment designers. Ever since the introduction of the equipment designers we have known that some players don't want to or struggle to interact with the complexity of them especially when they are new to the features or game. This was for many off putting and something they would shy away from or be continuously frustrated with, Since the game didn’t really teach you how to make a well rounded design for each role. This was doubly true if they wanted to recreate a historical vehicle that they know from their own knowledge of WW2 but didn’t understand how to translate that into the game with the designer.

What these are are premade designs for your equipment designers that are stored in the game files. When you create a new variant from a blank chassis you can press the presets button and will get a list of all the presets made for that chassis/hull/airframe. So should you open up the improved heavy tank chassis presets you will find an entry called Tiger I and you will see the picture of the Tiger I tank and if you click it all the modules and roles and values will be set for you. Should you be missing modules or upgrades the preset entry will tell you what you are missing in order to make it, then all you have to do is research those modules and then create the variant.

So now if you don't understand or want to understand the deeper workings of equipment design you can still make good use of the equipment designers just pick the tank you want and the game will make it for you. Of course if you want to try out tweaking the designs to edge your way into the world of equipment design you can do that too. Once the preset is loaded you can adjust any part of the design as normal, and if you feel lost at any point you can just load the preset back in.


Some of you may wonder why we’re not allowing you to add your own presets or saved templates. In short, this is something we’d like to do and are not ruling out for the future - historical presets are an important step towards making custom presets a possibility.

However, this feature is entirely moddable so if you want your MP mods to have all the latest meta builds there as presets you can do that, or if you want even more templates for your super in depth history mod or maybe a totally different world you can do that. These presets are defined by the templates you make normally for the AI with some new additional fields, you can now define the art and the name of the template.

That's everything for this dev diary, I hope you will enjoy these changes as much as we have. As always feel free to let us know your favorite parts.

Next week we will be bringing you more information on a new system for content along with how it will be tied into the stories you can tell with this expansion and beyond. See you next week.
Hearts of Iron IV - PDX Chakerathe
Generals!

Not only do we have a Developer Diary this week for you, but we also have some intel from the Development team about some of the features coming to Arms Against Tyranny! This is the first video fo a few that we have planned for you all, so we hope you enjoy!

Make sure to check it out The Video


Hearts of Iron IV - PDX Chakerathe

Hello everyone!

My name is John and I’m the 3D artist for Hearts of Iron IV here at Paradox! For this week's Dev Diary, I will be giving you all a behind-the-scenes look at my role in the team and our process for making the 3D art for Hearts of Iron IV.

My role is to create and manage all the 3D art in the game! Not all 3D art is created by a single individual, however. To save time we also have help from various talented outsourcing partners to make sure we can have as much juicy art ready for release as possible!

During this diary, there may be some terminology that may or may not be familiar to you but I will try and make sure that everyone can enjoy reading this and get a glimpse into the 3D art for Hearts of Iron 4.

Creating, tweaking, and managing all this 3D art is a lot of work but it is also a fun and rewarding process so let’s not waste any more time and get right into it!


Receiving art requests

First of all, I will receive a bunch of 3D art requests from our awesome content designers that will provide me with some general information as well as some reference images and useful links to help explain what they want to be added to the game. Doing research and finding material is time-consuming work so this is very useful to get things started.

You never know what can end up being requested. There were a lot of interesting vehicles and uniforms during World War 2 so this helps keep things interesting!

To manage all of these requests we use Miro which is a useful tool to manage a lot of images and text. These requests will be added to my 3D art board in Miro where I will sort them by things like priority and country. From here I will decide which units to work on. I will place the assets that I want to outsource on a separate board where they can be gradually reviewed along each step of the creation process. I will usually provide them with more technical feedback when it comes to the 3D art and our content designers will give input on how the asset looks from a more historical standpoint.


Finding references

These are the types of images that I look at when I’m making a 3D model!


For 3D art, you generally want to have as much reference material as possible so I will usually try to add some additional reference images from the information I have been provided if needed. To understand things like angles, scale, and movement better, watching videos can also be incredibly helpful. If there are any vehicles or uniforms that still exist to this day, then this will provide greater image quality and it can also be good for color reference. It’s important to be aware of re-created paint jobs and modifications that may have been added after the war. Finding good references can be hard at times, we always try our best to stay faithful to the reference material but time is always limited so it can be easy to make mistakes. Being very meticulous and delivering a lot of assets in a short amount of time is definitely a balancing act!

Blockout
The process of creating 3D art can differ a bit from artist to artist or depending on what it is that you are creating but usually, I will begin blocking out the most important shapes for whatever I’m creating. During this phase, I won’t need to care too much about the typical rules of 3D modeling. Things like that will become more important later on. The most important part here is to create the basic shape and also get a good understanding of how all the pieces will fall into place. At the end of this phase, you can use the basic building blocks that you have created to make a high-detail and a low-detail version of your 3D model. This helps save a lot of time and it will ensure that the high and low-detail versions are not too different from each other.

A block out using simple shapes.


A common trick to make sure that you have the right base shape is to disable the lights in the viewport of your 3D modeling software, this leaves you with only the silhouette. If the silhouette looks good you know that you are on the right track!

Can you guess the names of all of these vehicles?


High Poly - Making a detailed version of our tank!
Now we will use the block-out model as a base to start working on a version with a lot more fun details. This is the part where you can truly let loose in terms of geometry, no polygon limits are needed here! We will use this model and bake it down to our low poly version later. In short, this means that a highly detailed version of the model will be projected onto the lower detailed version to simulate detail. This will make the end product look less blocky and detailed without using a lot of polygons that can impact performance. In other words, we will get the best of both worlds!

The thing I will need to keep in mind here is to add detail to make the model interesting and accurate to the source material but at the same time, it is important to not add too much detail that will make the model hard to read from a distance. Adding too many tiny details will make it hard for the brain to distinguish between different parts of the model.


Some extra details like tools or holes will be added! These aren’t present in the low-detail version of our model. I will use colors to mask out various parts that will help me later on when adding textures to our model.

Here is the high-detail version of our tank!


It’s fun to be able to view these models up close with this level of detail so here are a few other examples of high poly models for your viewing pleasure!

Here are some high-poly models that are used for Arms Against Tyranny.


Low Poly - Making an optimized low-detail version of our tank!
Now that we have added all that sweet-looking detail to our high poly 3D model, we can go back to the block-out version of our model to make ourselves a low-detail version that will be the version that is used in-game!

I will go through the model and make the adjustments like this!


Most of the work here is spent on removing unnecessary polygons in various ways to ensure that the model is optimized. We have a polygon limit for each type of asset. We want to stay within these limits as much as possible without sacrificing too much visual quality!

Here is the low poly version for now!


I have kept some polygons on parts that will help speed things up later on when we will prepare it for animation! It’s important to remember how the model will move, so you will also have to be careful not to remove geometry on parts that will bend. This is especially important for objects with more organic properties such as the limbs of a character for example.

UV-mapping - Preparing the model for a paint job!

Before we can start adding textures to our model we need to go through a process known as UV mapping. This is where you create a 2D map of your model so that you have something to paint on. It’s sort of like cutting a paper model into different sheets of paper that you fold out so that you can paint on them.

Once you have cut your model into all of these pieces we will need to put them into a 2x2 square that will end up being our UV-map. This process is very much like a puzzle game. The actual size of the texture image that will be used in-game is quite small so different shells will be mirrored and stacked on top of each other. This is a technique that’s commonly used in games when you want to cram as much resolution out of your texture map as possible. There are limitations to doing this, it can make camouflage or dirt look repetitive in ways that are not so appealing so we will need to be conscious of how the model will be viewed in the game. Not all artists enjoy this part but I find it to be pretty fun in its own right!

This is what our UV map looks once we have sorted everything!


Texturing

If you have ever painted a miniature model in real life then this is the part where we grab our brush and start painting our model! This is honestly one of the most satisfying parts of being a 3D artist because you are no longer looking at a model without realistic materials and well.. texture!

To create our textures I will use a program called Substance Painter. I will prepare the high and low-detail models, sort the different parts by name and separate some parts from the rest of the model. After this, we will import our low-detail model into our texturing software. Once that’s done we will take our high-detail model and project it onto the low-detail model. Once this is done we get a lot of these maps with different properties that we can use for various effects when we start painting our model.

From here, it’s all about listening to your favorite music tracks (low-fi HoI anyone?!) as you add color and detail to your model. When you are texturing you will make adjustments to different values that will affect how different materials are perceived. It’s good to start with a base color and from there, add color variation as well as other properties such as how shiny or metallic the different parts should be. Working in Substance Painter is all about working with layers and masking out different parts using various methods. Thanks to the colors that we added to our high-detail model earlier we can quickly add color to things such as tiny holes as well as materials to other details such as small pickaxes and other tools. I will add some ambient occlusion to add some dark color to the nooks and crannies. This will also help separate some of the details from each other. Camouflage will be made a bit larger than in real life to make the texture appear less cluttered from a distance. Last but not least, let’s add a tiny amount of highlights to the edges to make the details pop!

A timelapse of the texturing process!


Rigging and Animating
We can’t have our model be completely static in the game so let’s make it come to life with some animations! Like many things, animation and rigging is a science in itself so there are artists that specialize in this process alone. But in most cases, I will be able to create my animations from scratch or reuse older ones if needed.

Before our model can move we will need to add “bones” or “joints” that will be placed into the model. These can then be moved around to create our animation. We will place our bones in a manner that lets us manipulate how we want the model to move. Once the bones are in place we can move on to a process called weight painting which lets us tell the game exactly what part of the model should move together with a specific joint.


Now we will animate it by moving the skeleton we have created and pinning certain key poses. It’s important to get certain timings right to sell the weight and gravity that’s being applied to the vehicle as it moves. This can be trickier than it sounds but with some patience and minor adjustments, we will hopefully get the result we are looking for!

It’s alive!


Finally, It’s time to put our model, textures, and animation into the game! Once added we will make some minor adjustments to the textures and that’s that!

Tadaa!


While we are on the subject of animated assets, here is a bonus one for you! You may have gotten a peak of it if you read the Historical Finland Developer diary!

Look at them go!

And with that, our tank is ready to wreak havoc on the battlefield! Things are still under development so changes may happen here and there but I hope I was able to give you some interesting insight into the 3D art for Hearts of Iron!


This is just a small taste of all the 3D art we will have in the upcoming DLC so I hope some of you will zoom in every now and then as you play, even if it's just for a moment!

Best regards,
John


Hearts of Iron IV - PDX Chakerathe
Hello there, it's me C0RAX.

A bit of the different DD than you’re used to this week. I'm here to introduce a new thing I will be doing over the summer. This summer for weeks we will be giving you the chance to test some of the balance changes coming with the 1.13 Stella Polaris patch. These changes are hand picked for testing in order to get feedback from the community on specific changes that might have large impacts. These changes will affect all three major combat groups (Army, Air, and Navy), and vary from value changes to some new functionality and behavior so be sure to read the change list so you know what you're getting yourself into.

So let's go into how this is going to work. From July 6th until August 3rd there will be a special Summer Open Beta branch on steam, this branch will have the new changes listed below. Additionally it won't have anything new coming with AAT just changes for base game and previously released DLC’s. In the last week of the test we will post a feedback form to be able to collect feedback data that we can use to analyze your responses. Of course this doesn’t mean you can’t or shouldn’t post about it outside the form, I want to encourage as much discourse, theorizing and number crunching as possible so give it a try and let us know what you think.

Now lets go over the change log.


##########
Balance
##########

##########
Mid Summer Beta Update
##########
- updated combat width defines as per
- implemented type 2 combat widths as per
- improved some templates for planes
- balance pass on new modules
- rebalanced dismantle and conversion costs for BB engines
- adjusted damage reduction thresholds for ships

#####
hotfixes
#####
-fixed damage reduction happening before stat initialisation
-fixed +1 to threshold values

##########
Air
##########
- Excess thrust will now increase agility instead of max speed (0.5 AGI per excess thrust)
- airframes now how base max speeds to better represent airframe size speed effects
- reduced terrain combat widths slightly, change support widths also
- major air rebalance pass for airframes and modules
- increased tech date for survival studies to 1939
- Improved aircraft turrets
- slight decrease in agility hit for large bomb bays
- small airframe can only take single turret modules
- adjusted turret stats so they are less powerful for fighters but better for bombers
- rebalanced thrust and weights of modules and airframes,
- added new modules
- Large autocannon
- Large bomb rack
- Armor piercing bomb rack
- 3 levels of torpedo mounting
- Added new techs for plane designer (see above)
- Combat better Agility and Speed has increased effect on air combat

##########
Land
##########
- Super Heavy tanks are now support units. Super Heavy tanks are no longer line battalions
- Armor skirts provide 1 more armor
- Most tank chassis' now grant 10-20% more armor
- Super heavy tanks now cost more overall, but require 20 per support company.

##########
Navy
##########
- added damage reduction to piecing thresholds for naval combat
- convoy hitprofile reduced from 120 to 85 bringing it inline with new hitprofile calculations
- Ship torpedoes accuracy increased to bring them back in line with new hitprofile calculations 145 > 100
- slightly decreased AA disruption from ship AA
- removed visibility effects of super heavy bb armor
- rebalanced, ship engines
- removed visibility impacts from medium guns
- rebalanced IC costs to reflect engine changes
- super heavy armor now part of normal heavy armors
- rebalanced armors
- added cruiser armor to carriers


##########
AI
##########
- AI more likely to upgrade division in the field even with equipment deficits
- added generic AI upgraded infantry template for late game infantry
- added ENG and USA upgraded infantry templates for AI and improved their infantry templates in general

Right now let's get into some explanations.

Thrust and weight:
Let's get the big one out the way thrust and weight for planes. This change requires a bit of game explanation and some explanation of aircraft. So why affect agility, agility previously was a stat that was seldom increased but often reduced by making it something you are rewarded by not using all your thrust budget you can lessen the agility effects of modules by not loading up your entire plane creating a choice between maximizing raw damage or maximizing damage bonuses during air to air combat by bring higher Agility.

Now the aircraft stuff, so power/weight is very not intuitive for aircraft, adding more power will make a plane faster but taking weight off a plane won't make it faster since speed is almost entirely determined by thrust against drag not weight. What less weight does provide is better climb rate acceleration plus some other things. These are abstracted into agility in game. So now if you want your plane to go faster you either use a newer airframe with lower drag (higher base speed) or by putting a bigger engine in the existing airframe.

Combat widths:
Now the next big change, terrain combat widths. This is the change that originally spawned the open beta idea. These changes are generally intended to flatten the efficiencies further for combat widths while also reducing division sizes. There will obviously still be certain numbers that fit better than others but overall these differences should be less extreme.

  • Terrain = CW+Reinforcement Width
  • Desert = 82+49
  • Forest = 76+40
  • Hills = 72+36
  • Jungle = 74+34
  • Marsh = 68+22
  • Mountain = 65+25
  • Plains = 82+49
  • Urban = 86+28

Ship penetration:
Finally the last change I want to discuss is the new penetration effect for ships. To put this imply they now reduce damage directly on top of reducing critical chance. The damage reductions are smaller than for land combat but that's because they have a much greater effect on the combat but be careful defeating an armored foe with just small guns should be much harder now.

Thresholds and damage are as follows

Pen to Armor Threshhold
Critical Change Factor
Damage Factor
2
2
1
1
1
1
0.75
0.75
0.9
0.5
0.5
0.7
0.1
0.1
0.5
0
0
0.3


That concludes the run down of the upcoming “Summer open beta” and it's coming to you tomorrow!. I hope to see you try it out and give feedback on the changes. See you next week for more Arms Against Tyranny content coming your way. It's going to be a pretty one.

Jun 29, 2023
Hearts of Iron IV - PDX Chakerathe
Generals!

The Steam summer Sale is kicking off, and we've got the deals for you all to get the packs you want or need for up to 70 percent off! Grab a drink, find a lounge chair, and relax down by the beach with us B)

Base Game

  • Hearts of Iron IV 70% off
  • Hearts of Iron IV: Starter Edition 70% off
Expansions
  • Hearts of Iron IV: By Blood Alone 20% off
  • Hearts of Iron IV: No Step Back 30% off
  • Hearts of Iron IV: Battle for the Bosporus 50% off
  • Hearts of Iron IV: Death or Dishonor 60% off
  • Hearts of Iron IV: Together For Victory 60% off
  • Hearts of Iron IV: Waking the Tiger 60% off
  • Hearts of Iron IV: La Résistance 50% off
  • Hearts of Iron IV: Man the Guns 50% off
Music & Model Packs
  • Hearts of Iron IV: Eastern Front Music Pack 50% off
  • Hearts of Iron IV: Eastern Front Planes Pack 50% off
  • Hearts of Iron IV: Allied Speeches Music Pack 50% off
  • Hearts of Iron IV: Radio Pack 50% off
  • Hearts of Iron IV: Sabaton Soundtrack 50% off
  • Hearts of Iron IV: Sabaton Soundtrack Vol. 2 50% off
  • Hearts of Iron IV: Allied Armor Pack 50% off
  • Hearts of Iron IV: Axis Armor Pack 50% off

Hearts of Iron IV - PDX Chakerathe
Velkommen til Danmarks historiske Dev Diary! As you might have so astutely observed, today’s Dev Diary is all about Historical Denmark (and if you didn’t catch that, it’s ok; no one understands Danish anyways, so you’re not alone). Denmark has had the great misfortune to be designed by a Swede, namely me - and why would that be such a terrible thing you might ask yourself? Well, let me shed some light on that and give you a bit of context dear reader. Denmark and Sweden have fought the most wars between them than any other countries, so there’s some old blood and rivalry here. Which is thrilling to me; I now have the chance to make them as underpowered as I want - muahahahaha!

Before we go any further, do keep in mind that everything is still a work in progress and might change before releasing in- oooopsie! Spoilers ;) But every bit of feedback and correction is welcome! Do you think I missed something? Do let me know! Did I misspell something in Danish? Don’t even bother - I’ll never get it right anyways ;)

Denmark is famous for surrendering after merely 2 hours when Germany invaded, so this Dev Diary will be similarly short and sweet. Let’s jump straight into it, shall we?


And there you have it folks, that’s all from-

….

….

So, this is awkward…. I’ve been told that this won’t do and that Denmark needs at least 2 more focuses. I might be able to throw something together. But before we get there we have other things we gotta talk about.

Historical Context
Let’s start with some historical context because it’s crucial to understand Denmark’s situation leading up to the war and why they surrendered so quickly. Denmark’s entire foreign policy was based around their perceived biggest threat, which prior to WW2 was Germany (and thereafter the Soviet). This way of viewing the world was shaped by their disastrous war with Prussia and subsequent defeat by them in 1864. From this date onward they pursued a policy of neutrality and did all it could not to anger Germany, lowering military spending and eventually focusing on what would become the welfare state.

One of the reasons why they kept this strict neutrality and disarmament was because they were unable to obtain security guarantees from the UK or from a Nordic Alliance once the war was looming on the horizon. The UK was in no position to offer any meaningful support to the Danes (and told them so in no uncertain terms) while the rest of the Nordic nations had widely different security concerns and couldn’t unify behind a common policy. The Danes realized that they had no hope to withstand a potential German invasion and didn’t, therefore, bother with military spending except to keep a symbolic force to emphasize their sovereignty.

Map changes
Before we delve into what changes are coming to Denmark, let’s first look at some maps! My suggestion to simply bundle up all of Denmark into one state and rename it Southern Sweden was sadly downvoted (but just barely!). Instead, Denmark gets a whole bunch of new states (so that any Swedes - and Norwegians too! - can really savor the sweet, sweet sensation of conquering all of Denmark, bit by bit). As you can see, Germany is getting an additional state as well, and the Kiel channel has moved to a more accurate position. In total, Denmark starts out with 7 states now.


Besides that, the Danish Belts have gotten a makeup too


At the Game's Start
With that out of the way, let’s take a look at Denmark’s starting position in 1936.


The more observant of you might notice that Denmark now starts out as a Disarmed Nation to better reflect their unpreparedness and policy of disarmament. Secondly, you might also have noticed that there’s an upcoming election in April of 1936 - which isn’t at all the usual 4 years cycle other nations have. Denmark actually has this little quirk where an election has to be held within the next 4 years from the last one, meaning an election can be held after 2 years, or 3 years, or whatnot. In-game, this is represented by Denmark holding elections every 3 years (this will be a great opportunity for you to switch the ruling party - but more on that later), but I digress! Other things some of you might have picked up on is that the non-aligned party is now called Bondepartiet and not Venstre. I would say that this is a more accurate reflection of the political landscape in Denmark during the 1930s, but it also fits better with how elections and politics at large has been reworked for Denmark with Arms Against Tyranny.

What’s also noticeable is that the Danes are starting out with 3 new National Spirits, 2 of them are quite bad and the third one is in bad shape.

Neglected Military is a reflection of the poor state that the Danish military was in when WW2 broke out, but by completing certain focuses you can improve this spirit and remove it entirely.


The Great Depression hit Denmark slightly later than other places, but it did have a great effect on the country. It led to businesses going bankrupt, farmers foreclosing and skyhigh unemployment. All of this spurred the growth of extremist movements on the political fringes. This is all represented by Economic Crisis, which the player can use to their advantage if they wanna boost Bondepartiet, for example. But like with Neglected Military, you can improve and even remove this spirit through focuses.


The last of the 3 starting spirits is Danish Industrial Capabilities, which also can be improved through focuses, but as you can see is in a pretty rough spot at the start of the game. Oh, that Consumer Goods Factories factor might look quite high, and I know that a few of you are wondering about that. We know this seems high but don't worry it's a new modifier which we will be explaining in a future dev diary.


Balance of Power
Before we move on to advisors and the actual Focus Tree, we need to check out Denmark’s Balance of Power since it’s going to be affected by all of these things. This is where all of the political decisions will be happening, and all of them will affect the balance between Welfare and Warfare. Now, what exactly does Welfare and Warfare actually do? Good question, and I’m glad you asked! Let’s take a closer look.


The more you spend on Welfare, the more you’re pouring into developing your country. This is reflected in population growth, faster research, and the construction of Infrastructure, Civilian Factories, and Railways. On the other hand, this means that you are pulling resources away from military build-up and construction.


If you go all out on Military Spending civilian construction will suffer, but you’re going to produce military equipment much faster and deploy troops at a quicker pace.


Advisors
As I mentioned, Advisors will affect the Balance of Power - so you better think it through properly when hiring someone. What they will do is push the Balance of Power in either direction - largely based on their historical leanings.


Politics
Like I previously mentioned, Denmark has a 3-year election cycle now, and the perceptive among you might have noticed a Balance of Power decision called “Motion of No Confidence”. This all plays into how politics works in Denmark for Arms Against Tyranny. You will be able to select between different democratic parties and leaders now, as well as the Non-aligned, Communist, and Fascist parties.

The “Motion of No Confidence” decision allows you to choose a different country leader based on if their political party meets the right criteria.


Not only can you change your country's leader, but you can also call for a snap election if other political parties have high enough popularity.


If you called for a snap election you get the opportunity to boost the popularity of a political party and give them a higher chance of forming a new government. This is also what happens during the regular elections.


The Focus Tree
Sadly, I wasn’t allowed to only make a 2 focuses long tree - even though I argued it was historically accurate! Anyways, without further ado, here it is


The Industrial Branch
It’s through the Industrial Branch that you can improve and eventually remove the Economic Crisis spirit, but even before starting out on the Industrial Branch, you have to make a decision that will affect the rest of your game. Will you go for Sign the Kanslergadeforlig or Fortify Our Borders?


Historically, Denmark signed an agreement called the Kanslergadeforlig which was the very beginning of the modern Welfare State they have to this day. This will also unlock Karl Kristian Steincke as an advisor.


Moving down this path will provide civilian factories and building slots, as well as a National Spirit called “Danish Produce”.


If you on the other hand are more concerned with how flat Denmark is and how it’s just perfectly suited for, let’s say tanks, then you might wanna fortify the borders and receive the Defense Minister Alsing Andersen as an advisor.


This path will yield forts and military factories all over Denmark, as well as the spirit “Improved Logistics”


But no matter what your first choice is, there are plenty of focuses the 2 paths have in common! The first one is Devalue the Krone, which leads to being able to trade with both the UK and Germany. This is actually something Denmark did during WW1 and leading up to WW2


And with Connect the Islands both paths meet up again and share the same focuses.


You can also get Niels Bohr as an advisor


With Expand the Industries you unlock the decision to develop Greenland, the Faroe Islands, and Bornholm.


You can also improve an Industrial Concern and/or unlock one.


But you can also extract more minerals from Greenland


The intention with the Industrial Branch is to make it flexible so that you can really focus on your overarching strategy and have the branch complement that vision. And speaking of which, let’s move on to the military side of things!

Military Branch
I gotta be honest with you all here. I could have put most of this part in the alt-history dev diary since Denmark didn’t do most of these things. As I’ve already mentioned, Denmark was fearful of angering their bigger, southern neighbor, so they spent as little money on the military as possible. But playing like that makes for a boring WW2 war game! Wanna play a little game? Guess how far Denmark got in the branch below ;)


You’ve made a guess? Ready for the answer? They completed Expand Ubådsvåbnet. To be fair, they were also like 90% through the Foreign Designs in the Airforce path. But that’s it! The rest is me piecing together stuff they did after the war and just finding something to do that kinda makes sense for Denmark. Anyways, I’m digressing again…

Do you remember that Neglected Military spirit I mentioned way back when we started this dev diary (feels like ages to me who’s been writing this dev diary for several days now, but for you, it’s been like… what? 5 minutes? 10?)? Yeah, this is where you work to improve it and completely remove it through various focuses, including Stockpile Oil


But let’s take a closer look at the Army branch. This is where you receive the Hæren spirit and improve it throughout the branch. You will also be able to improve your MIO’s here. It’s mainly defensive in nature, while the more aggressive stats can be found in the political branches.


The first Focus will see you take your first step in reorganizing the army after almost a century of peace and lack of actual combat experience.


Then you can choose between investing in your MIO’s, namely Hærens Tekniske Korps, and Dansk Industry Syndikat


With Hjemmeværnet you get the decision to activate the Home Guard during wars, but also the Hæren spirit.


I could go on about each individual focus here, but it’s mostly about improving Hæren, research bonuses, and increasing funds for the various MIO’s. Let’s instead take a look at what Hæren yields after completing these focuses instead!


These stats can be improved even further in the political branches - which will add entirely new modifiers as well.

Now, let’s turn our attention to the Naval Branch, where you’ll get the Søværnet spirit. Here you have a few choices to make, depending on where you want to take your navy. You can refit old ships, or modernize the navy. You can try to dominate the Baltic Sea with smaller ships or try to rule the North Sea with carriers and capital ships.


Going with the Refit Old Ships will improve the Danish Industrial Capabilities spirit and unlock two decisions to get access to ships fast.


If you on the other hand Modernize The Navy you will get the Søværnet spirit. This will give you two ship variants in production; one for a Coastal Defense Ship and one for a Destroyer. These variants are actually based on designs the Danish navy had but were abandoned due to budget constraints. There are actually different variations of these variants depending on the tech level.


Towards the end of the branch, you face the second choice you will have to make; do you aim for Baltic Sea Domination or do you have North Sea Ambitions? The Baltic Sea Domination is the more straightforward of the two;


Having completed this focus and the Generalkommandoen in the army branch will open up the Frømandskorpset, which might be helpful for naval invasions…


The North Sea Ambitions is a bit more complicated though, since it’s affected by what choice you made between Refit Old Ships or Modernize the Navy (and I know the tooltip is egregious, but it’s necessary to show off the effects):


And finishing off this focus will also open up the Torpedofly focus in the Airforce Branch;


Before we leave the Navy Branch and take our first look at how the International Market can interact with the Focus Trees, let’s see what the Søværnet can look like after completing the Naval branch. After completing the Baltic Sea Domination:


And after completing North Sea Ambitions;


Now, let’s fly over to the Airforce Branch - where you’ll have to decide between Domestic Designs or Foreign Designs for your aircraft straightaway.


What you’ll get by completing Domestic Designs is two aircraft variants which are actually based on historical designs Denmark were working on when they got invaded.


But if you on the other hand opt to go for Foreign Designs you’ll receive something called a Subsidy, which will make you as a buyer pay off your purchase faster. As a seller, you’re receiving the full payment with the only difference that the deliveries will go faster. So it’s kind of a win-win situation. You can read more about the International Market in the this dev diary.


This specific Subsidy is for airplanes, but others can be for tanks, trucks, infantry equipment or what have you. If you look closely you’ll also realize that this Subsidy is only eligible for airplanes purchased from the Netherlands, The UK, Germany, or Sweden. That’s pretty cool, huh? I know you wanna know more about all of this, and we’ll talk more in-depth about it in an upcoming dev diary, so don’t you worry! Anyways, let’s move on with the Airforce Branch.

The next focus is Unify Flyvevåbnet, where you’ll get the Flyvevåbnet spirit. Denmark used to have two different airforces; the Army’s and the Navy’s, but they were eventually unified in the 50s. You don’t have to wait that long though!


After that, you improve the Flyvevåbnet even further before choosing how you want to specify your Airforce; do you want to focus on fighters, close air support, or bombers? It’s really up to you and how you want to play the game. After completing the Airforce branch and having done the Jagerfly focus, the Flyvevåbnet spirit would look like this:


Political Path
Now we’ve come to the Political branch, where we’ll only take a look at a small part of it, and leave the rest for the alt-history dev diary (because this is getting long). The left part of the branch is accessible after completing the Policy of Disarmament, which will see you enhancing your industrial capabilities even more.


And in the end, you'll be able to complete Full Employment


But before getting this far you have to first Reaffirm Neutrality as your very first focus in the political branch. Yeah, yeah I’m doing this backward; finishing with the beginning - but there’s good response for that! You see, when you have taken Reaffirm Neutrality you’ll get the Declaration of Neutrality spirit which will give you the option to fight or fold when attacked.


Historically, Denmark surrendered after two hours of the German invasion (even though fighting took place up to four more hours). The Danes had a very different experience as an occupied country from everyone else that got invaded; they got to keep their government and even had elections during the occupation. And that’s what you’ll get too if becoming a puppet while having the Declaration of Neutrality spirit.


And to be honest, this is the true historical path. Let me introduce to you the resistance, or as they say in Denmark; velkommen til modstanden!

Occupation
This is what you have to work with as a subject; the Industrial Branch and the Occupation Branch. But don’t think for one moment that you’ll be a good little puppet that will do your master's bidding. No no, this branch is all about gathering foreign support and building up a Resistance so you can topple your overlord! There are also plenty of International Market Subsidies throughout the branch, to build up your forces even more.


With Align with Foreign Powers you’ll seek out support that can provide you with weapons and support during the occupation, but once you declare independence you’ll also be able to join their faction - gaining an ally in your war for freedom.


Historically, Denmark set up an exile force in Sweden. They were training to help in the liberation of Denmark under the guise as “military police”. This is of course something you’ll be able to do as well! Having gained a host for your Danish Brigades, you’ll also get a new division template that you can improve through focuses.


To help you resist your overlord you have the Motstandsbevægelsen spirit which you have to improve to stand a chance against Germany.


Balance of Power Redux
As a subject you’ll also get a different Balance of Power which will be crucial to regaining your freedom. All of these decisions are unlocked through various focuses and will help you in your struggle against your overlord.


And that’s about it for me this time around. Who knew there was so much to say about such a small country? It’s barely more than a suburb of Sweden, but there are surprisingly many interesting things going on in Denmark during this time period. I hope you enjoyed the (looong) read! And if you don’t want to become a puppet of the Germans - don’t fret! There are ways to resist an invasion, but those will have to wait until another time.

Farvel!


Hearts of Iron IV - PDX Chakerathe
The year is 1936. After 30 years since gaining their independence from Sweden, things in Norway finally seem to be looking up: Its enormous merchant marine continues to be a steady source of wealth, the meager industrial base is starting to recover from the ravages of the Hard Thirties, and there’s finally a majority government, led by Johan Nygaardsvold, who is in the process of enacting sweeping progressive reforms and will bring political stability to this young nation.

The wind may seem to be on Norway’s back, but it is merely the harbinger of the storm to come.


Hey everyone! I’m Carlo, Content Designer for Hearts of Iron 4, and in charge of the Norwegian content. I’m really excited to present to you how we’re depicting Norway in this period; It’s a fascinating country that played a huge and exciting role during World War II, and I’m sure you’ll all have a lot of fun trying to defend it. Let’s get to it. Disclaimer: All of this is Work In Progress and subject to change.

As I was saying in the prologue, the political situation of Norway is getting better, but they have let their armed forces languish, and not only for budgetary reasons: You see, Norway had declared themselves neutral, and while Switzerland hoped to stay out of the war by making itself be as annoying to conquer as possible, Norway hoped to achieve the same result with the opposite method, trying to appear so harmless and accommodating that nobody would think of invading.

I don’t think I need to tell you, dear reader, this plan failed miserably.

They made themselves so damn harmless, that when the war started, BOTH sides were making plans to invade preemptively before the other one had a chance to do so, and when it finally happened, they were caught completely off guard.

And why did both sides want to keep Norway out of the hands of the other? Well, the main reason I presume you read in Sweden’s Dev Diary, Narvik was where iron from Sweden was shipped to Germany when the Baltic ports were frozen. The second one is simply that Norway is very well positioned to launch aerial and naval operations against Britain.

This is why, if you want to change the course of history and defend democratic Norway against the German threat, it will be a challenge. Here are the starting National Spirits:


Complacent Cabinet is meant to represent the unduly confidence the Nygaardsvold government had in a future smooth sailing, and how unprepared it was for a swift reaction to war. It basically makes it harder for you to switch laws and to change the terrible Theorist you start with. Why is he so bad? Well, to represent the infamous miscommunication that occurred when the cabinet found out about the invasion. TL;DR: The government asked for a Partial Mobilization, but unbeknownst to everyone except Birger Ljunberg, this meant sending the conscription orders by post, a terrible idea when you know the enemy is at the gates. Instead of, you know, telling this to the rest of the cabinet and asking if they were sure, he just went ahead and instructed to send the orders by post [Clownemoji].


Obsolete Armed Forces to represent the sorry state of the Norwegian army at the time, ESPECIALLY the forts. That’s why we added two new modifiers so we can make a country’s forts worse than usual. Don’t worry, you can remove this National Spirit later.


The Hard Thirties: AKA country coming out of the great depression starter pack, it makes it slower for you to build and increases your consumer goods usage.


Anti-communist Sentiment increases fascism because there wasn’t a massive communist or fascist presence in the country, but the fear towards communism was one avenue fascists used to recruit.


These are just the starting National Spirits, through the Focus Tree you will be able to remove some of them, and add some new ones. Here’s the political branch for Historical Norway:


As you can see, most of the starting focuses will be geared towards building up civilian industry and improving the political situation, ignoring military buildup.


In fact, if you want to develop Norway properly, you’ll have to complete the focus Broken Gun Policies, which will lock you out of most of the military focuses, but gives you access to the central decision system for Historical Norway:


The idea is that you can develop each state individually so you can get civilian benefits out of them, at the cost of military readiness for that state. You can Develop a state up to 3 times, with increasing civilian benefits and harsher military penalties. As I said, Norway’s focus before the war was civilian development rather than military preparedness, if you started building up the military right away it wouldn’t be historical would it?


Don’t fret though, once the war starts, you’ll be able to leverage this development into military benefits to properly defend against the incoming Fascist bully. It won’t only cost you development and political power, you will also spend convoys; after all, Norway had one of the largest merchant marines in the world, so shedding it represents the economic cost of shifting towards military power.


When you convert the development of a state into military military effects, the state will go one level down in development and you will get a different benefit based on the development level:
At level 1 you will get a dynamic modifier in that state to defend it better.
At level 2 you will get a free military factory in that state
And in level 3 you get two militia divisions, plus a dynamic modifier for the resistance on that state when it is conquered.


This means that which states you develop, and up to what level, matter a lot if you hope to have a chance against Germany.

Now back to the Focus Tree!


Now you might be asking yourself “What’s the deal with this “Fascist Invasion of Norway focus to the side?”, and I say, don’t worry about it… Nothing to see here.


I told you already, nothing important is happening over there. Here, have this focus with a doggo.


This is the focus Preparing the Return to Norway, and it features Bamse, the San Bernard mascot of the Norwegian Free Forces. He was a crew member of the NoHMS Thorodd, he broke up fights, saved people from drowning and even a stabbing. A true, certified good boy. The focus is meant to…

Alright, alright. You win….


When the… inevitable happens, and Germany decides to invade Norway, two things will happen(Besides getting invaded). First, that focus completes and then you get an event about Quisling’s historical coup, which gives you three choices:
Try your luck. If you trust your preparations then you shouldn’t have much trouble fighting against Germany and Norway’s evil twin.
Delay the coup, at a cost that you can reduce depending on Oslo’s Development level. You’ll get the coup without the possibility of delaying it further once you hit more than 50% Surrender Progress, but if you do well enough you won’t see it ever again. Or…
You can take the coward’s way out, and betray everything you’ve been doing so far to fight on the side of the fascists. Congrats! You’re a Quisling!


Look… Listen, jokes aside, it happens to the best of us; you’re on your ironman campaign, distracted building toaster factories and reorganizing your navy and suddenly you realize you’re totally not ready for what’s about to come. If it happened to the Norwegian Government in 1940, it can happen to you. With this, you have the option of salvaging your campaign without having to go into exile, and if you prefer to go into exile there’s a small sub branch for that too; Norway has both a Historical Democratic and a Historical Fascist focus branches.


Now that the Oslo shuffle is done, let’s take a look at the Historical Fascist Branch:


I’m saving it for the alt-history dev diary but there are fascist focuses before this one, and they allow you to lay the groundwork for a fascist civil war, where you’ll be better prepared and potentially have control of more states than just Oslofjord.

If you’re going fascist from the getgo, or delayed the coup, you can complete this 7 day focus at any time and start playing as fascist (It autocompletes if you switch sides). It also adds the National Spirit Contested Leadership, to represent that Quisling, despite being liked by Hitler and some other inner circle Nazis, was not meant to be the ruler of Norway, it was just a temporary stopgap, and an overeager fascist.


That’s no problem though, because soon enough you get to make this choice between going alt-history by keeping Quisling in power, or continuing the historical path by getting rid of him, replacing him with Josef Terboven, the German administrator of the Reichskommisariat.


The difference between the two, is that Quisling’s path leans more independent, but lacks the industrial and military cooperation of the Terboven path. You’ll have another chance to bring him back later though, which is what happened historically. But you can choose to put Quisling’s rival, Jonas Lie in power, who will bring Norway closer to Germany, since Quisling wanted to emulate the German Reich but didn’t want to be a puppet of the Germans, while Jonas Lie was called at the time ‘Germany’s man’ and might’ve been content with being a puppet of the Reich.


You might be wondering, though, why would anyone not take the independent Fascist Norway path, and the answer is that Quisling has terrible modifiers:


And he gets worse:


AND EVEN MORE WORSE:


But hey, at least you get some troops and viking claims!


Besides those two branches, every ideology will have access to the common branches to build up industry and improve the armed forces. They have some light overlap, but in general they are divided between: Rearmament Branch, with general army and industrial focuses; the Independent Norway Branch, with civilian industry and tech; the Airforce branch, with bonuses to all things flying; and finally, the Navy branch, which will help your efforts trying to defend your comically long coastline.


It is important to note, that if you’re playing Historical Democratic, you will have the Broken Gun national spirit at some point, which will block you from all of those focuses except for the ones in the Independent Norway branch, so you might be a bit delayed in getting to them if that’s the case.


Now, let me go on a tangent for a bit. This is the story of Norway’s first, and for our period, only tank.


In 1937 the Norwegian government realized that they needed to start thinking about armored warfare, to prepare to fight with tanks, and against tanks, so after some thought, they approached the Swedish company Landsverk to buy a tank. The thing is, they realized tanks were expensive, and way outside their budget, so they just ordered an L-120 Light Tank Chassis, no armor, no turret. Kinda like ordering just the fries and soda, no burger. After it finally arrived, they fitted it with metal sheets as armor, and a “turret” that was basically a cylinder with a hole for a heavy machine gun. People nicknamed Norway’s only tank, ‘Rikstanken’ (The Realm’s Tank), and ‘Kongstanken’ (The King’s Tank). The whole thing is even funnier when you learn that ‘tank’ in Norwegian is the word for ‘thought’, so Rikstanken becomes a metaphor for the idea of Norway itself.

For comparison, this is what a Landsverk L-120 looks like:


And this is what the Rikstanken looked like:


Granted, that’s a particularly bad picture, but I recommend researching a bit more for yourself. It really was a wonderfully bad tank, so bad that they didn’t even use it when the country was being invaded. It’s ok though, we still love you just the way you are, Rikstanken.

Of course I wouldn’t be talking about this if there wasn’t content for it. By completing the Rikstanken focus, you’ll start an event chain that will let you buy a single tank from Sweden. Or if you want to go wildly ahistorical, you can spend a little more and buy a bunch of tanks from them, or from the Soviet Union. Another option will be accepting some political influence from Germany or the Soviet Union in exchange for a bunch of tanks, or even starting a tech exchange for developing your own tanks from scratch.


And when you do get that tank, you’ll be able to enjoy it in all its 3D glory:


Of course, this beauty will be able to tour the whole kingdom, all 11 states:


  • Oslofjord
  • Telemark
  • Opplandene
  • Agder
  • Vestlandet
  • Trøndelag
  • Helgeland
  • Nordland
  • Troms
  • Finnmark
And, if you have the boats, Jan Mayen.


With that, I conclude this Dev Diary, feel free to ask any questions. Now go and wishlist Arms Against Tyranny and stay tuned to learn all about Denmark’s historical content, it might take you longer to read it than what it took Germany to invade it, but it will surely be an interesting read!


Hearts of Iron IV - PDX Chakerathe
Generals!

Word has just reached us from the Requisitions office - The Grandest Lan tickets are now available!

Make sure to grab yours to join in on all the action, to view the castle, and to have a great time.

Get yours here!

Hearts of Iron IV - PDX Chakerathe
Välkommen!

That is of course not English, but rather Swedish which will be today's dev diary. This DD will talk about the branches for the military and industrial branches, as well as democratic branches.

This tree has been a collaboration between me and AveeBee. We have had a longstanding rule in the HoI team that no Swede is allowed to touch a Swedish focus tree, but apparently that rule flew out of the window as long as the Swede in question was supervised by an adult.

Normal caveats apply, there’s work in progress stuff in here, and things might change before release.

Historical Context

As most of you already know, Sweden was the only Nordic country that was not invaded during WW2, but in a similar way to Switzerland was pressed by both the allies and the axis which led to some dubious concessions, but Sweden remained neutral through it all.

While Sweden arguably had the superior military capabilities compared to its Nordic neighbors, it was woefully unprepared for war and was caught with its proverbial pants down on the eve of WW2 with its government preferring to focus on the welfare state rather than its military, something that would change as the war progressed. This will be a major theme for the focus tree in large.

As you might have noticed I keep saying Democratic, not Historical. That is of course because historically Sweden did not join any wars. Me and Amy decided early on that we assume that players _will_ want to get into a war sooner or later, (which is after all a key tenet of the game), which is why even under the Democratic paths you will eventually join the war. (of course the AI will have guardrails against this on historical)

While there are a lot of historical references to things that actually happened, we are assuming that the player wants to engage in the warfare part sooner or later.

Start

At the start of the focus tree you will have the choice to pick from a total of 4 leaders. Historically this was Axel Pehrsson-Bramstorp which only ruled for a few months until Per-Albin Hansson came back in the 1936 election, called the Summer Government.

You can try to keep Per-Albin which will result in a Vote of No Confidence, or you can pick Gösta Bagge which is the right leaning option


Don’t worry about losing out on Per-Albin Hansson though! After the summer is over another election will happen, and you can return him to power. If you went through the hassle of having a Fallen Riksdag you get an additional option of appointing Ernst Wigforss as a Per-Albins successor, or if you want you can continue with the leader you have.


Hungershield and Folkhemmet
Before I continue I need to bring up the issue of stability, or rather Hungersköld (Hungershield). During the first world war Sweden was embargoed by the entente due to iron ore trade with Germany, leading to domestic protests, riots and eventually the ousting of the current Swedish government.

The Swedish PM at the time, Hjalmar Hammarskjöld was nicknamed “Hungerskjöld”, hence the wordplay. At the onset of WW2 the fear of food shortages again loomed large for Sweden, and drove both domestic policies and was a great fear for the populace.


In the game this is represented with stability acting as a shield against such hunger strikes. Being above a % of stability protects the player against those adverse effects, and being below that threshold opens you up to the risk of getting strikes.


Riots can happen if you are at a very low stability. . While they are temporary you will not want to get stuck in an endless cycle of these. There are a few safeguards that we have put in place to make sure that players that temporarily dip under these thresholds will not immediately get these strikes instantly due to a bad RNG roll, but you do not want to stay under the limit for very long.

That leads us to another concept, Folkhemmet (The People's Home). While you might know it as the name of communist Sweden, it was actually a set of social-democratic policies that paved the way for the welfare state that Sweden has today.

The focus on this welfare state was partially why the government at the time was hesitant to spend a lot of the budget on the military, as these programs were very popular. In game this is represented with the Folkhemmet spirit.


As long as the welfare state is intact it acts as a buffer against the risk of getting strikes, but as you can see it also drastically reduces the military capabilities of Sweden.


As you progress through the focus tree key focuses will start to orient the Swedish industry towards war, but the Folkhemmet shield that is protecting you from strikes will be chipped away.


To demonstrate this is what a fully degraded Folkhemmet looks like at the moment.

To counter this there's a mix of things the player can do, such as employing advisors, picking focuses that add stability, picking decisions that add stability and so forth. We don’t specifically dictate how you handle this system, but rather hope that players will handle it differently depending on playstyle and how aggressive they want to be.

In a nutshell it is a question of “when do I rearm” and “how do I avoid the adverse consequences of those decisions”, and make sure you also do not get caught with your pants down. With those main themes explained, let's look at the actual tree

Industrial Branch


This is the entrypoint for the focus tree. The Defense Act is where you pick your leader, and just below it is the industrial branch. As you can see there's a clear divide between the focuses, and that you can mix and match some of them.


These are two examples, and as you might glean the left side is more aligned with social-democratic policies, while the right one is more aligned with right leaning policies. The right side generally leans more towards ratcheting up the defense industry, while the left one focuses more on the internal stability of the state.

Putting this into context, if you amass a larger pool of stability from these focuses, you might be able to offset the dip in stability from Folkhemmet, but on the other hand it might take longer to do so.


If you really do not want to deal with this at all you can lean heavily into the right and remove it completely.


You can also leverage your ball-bearing trade (the things that make other things spin). Something that Sweden smuggled to both the axis and allies.

Flashpoints
As the events of history unfolds events will happen that put Sweden into contact with the great powers of the war. These are events that we nicknamed Flashpoints, which are historical contextual events that happened to Sweden during the war.


Here Sweden gets accidentally bombed by the USSR


The USSR can apologize or deny this. In this case they deny it, allowing Sweden to respond


Sending military aid to Finland as a response will escalate tensions with the USSR


If the chain of tensions reaches a boiling point it will boil over, dragging Sweden into the war as well, or not depending on how Stalin responds


This is one example of one of these events where tensions might lead to war.

Military Branch


Scrolling right we find the 3 military branches of the focus tree which will be shared between all the paths of the focus tree


What is a bit special though is that part of the tree is locked behind war support (or military factories if you get that far). Instead of providing stuff like military factories these focuses augment the military directly, think of them as a miniature doctrine tree.

The focus behind this “war support gate” is intended to put some additional pressure on the player to want to get war support up, tying back to the interplay of the Folkhemmet and Hungershield.


These are generally divided into a defensive and offensive play style with the left one being more oriented towards defensive oriented players, and the right one being more oriented towards offensive offensive players. (pictured above is the panic button focus)
As you progress through the focuses these spirits grow in strength as you invest more resources into them


While these cornerstone focuses are strong, they require investment in both time, and being gated behind war support. How quick you get to them is decided by how fast you rearm.


You might recognize Bofors in this example which made the popular 40 mm Anti Air gun. In this case Bofors gets a unique trait and funds for the MIO
The military branch of the focus tree is where a lot of Folkhemmet is going to be changed via focuses. It also provides some much needed funds for the Swedish MIOs


Navy Branch


Sweden's navy tree is mainly divided into whether you want to contest the Baltic directly via capital ships or if you prefer to go the German route and focus on submarines and light surface fleet for harassment.

The top shared part deals mainly in expanding the output of the domestic industry, as well as the option to buy older ships from other countries.


As happened historically, the Italian destroyers might take a roundtrip through the world and end up in Iceland, so be aware :D


Of course we couldn’t resist making a Vasa focus, however we hope that it is slightly more successful than its predecessor.


While its a powerful battleship it deploys at 60% complete, so you’ll need to finish the other 40%.

Winter War


When Finland was invaded by the USSR it reverberated through Sweden. Finland was seen as a first line of defense against the Russian threat, which has been a historic adversary of Sweden.

You are given a choice of whether to go the historic route and send volunteers, try and claim the Åland islands when Finland is weak, or get actively involved in the war. Getting involved in the war will give you a mission of taking Leningrad, and if you or Finland manages to take it the Soviet Union will either be forced to sign a white peace, or face massive unrest. Both Sweden and Finland also get the avatars of their nation to help out, for a while.


If Leningrad is lost the USSR will either be forced to revoke their claim, or face embarrassment.

Democratic Branch
As you probably know Sweden did not enter the war. But in HoI all the preparation and buildup, and later on the war itself is a key component of the core game loop. Aveebee and I decided to take an early design decision to work under the key assumption that players who play Sweden will want to get into the war.

Meaning that we have had to modify the historical path to work with the plan that Sweden will enter the war at some point. Of course the historical Swedish AI will not enter the war unless provoked.

In practice that means that the historical branch will have focuses related to events that did happen in real life, but they work under the thesis of Sweden eventually getting involved as well.


A lot of refugees from other Nordic countries fled to Sweden and were secretly trained as “police forces”. Some of these would later help liberate Norway. In game this focus puts these police forces in a separate pool that grows as more Nordic countries capitulate.

On the onset of war this banked manpower will be unlocked and transferred into the normal manpower pool. You can also expand the facilities to raise the training cap for

Beep Beep

Most important of all is the Per Albin Bus (pictured above). This is a mobile headquarters that the Swedish government planned to run away into the forest with in case of invasion. In game the bus is a state modifier that can be moved to adjacent states, reducing the surrender limit. If the bus gets captured the country leader dies. (We actually got to see this bus when we visited the Army Museum last summer)


You can move the bus as long as you control an adjacent state,which means that you can take Per Albin all the way to Moscow if you really want to for some reason.


Sweden also has access to Rangers, which are special forces that send out undercover troops to sabotage vital infrastructure behind enemy lines. Use it wisely as the casualties of these can be quite high. Very useful to blow up enemy ports in Norway.


As you eventually enter the war by trying to either Save Denmark or Norway Sweden gets a goal to liberate every occupied Nordic country. The more occupied countries the stronger this bonus becomes, with an additional bonus once those countries are liberated.

Nordic Defense Council


If the more careful path of building up your defensive capabilities is a bit too conservative for you there's always the option of forming the Nordic Defense Council. This involves more aggressively tackling the threats around you with the other Nordic countries' help.


It invites every Nordic to become a member state of the council, and you get to pick whether to centralize its command at the cost of its member states not being able to defend themselves as well,


Or decentralize its command into its member states


Here is an example of a centralized command, with Mannerheim and Helge Ljung working side by side


In the end you can opt out of picking either Death or Dishonor, growing stronger the more member states you have.

Late Game Focuses


We also put in some late game focuses, mainly for those that want to continue the campaign after WW2 has concluded. These tie into late game technologies, the new special forces rework and finally dealing with the threat of the iron curtain.


This Lion looks a bit more majestic than the Gripsholm Lion. A frequent on r/badtaxidermy


Advisors, Military and States
As always we have new awesome advisors. Here are the ones available to Sweden.


My favorite one in Sweden is Ebba Margareta, which does not cost anything to hire but can get traits depending on how the player chooses to invest.


We also have the couple Myrdal which feeds off of each other if they are both in the Cabinet.


As for the new generals here they are. Most of their experience came as a result of being in the Finnish civil war.


And the Admirals! Charles de Champs is definitively winning the style competition here.


And these are the new Swedish states! My pet peeve of having Norrbotten and Lappland on the map as two separate entities has finally been solved! (sorry for the weird slicing of the image Sweden has a…weird shape). Åland now also starts demilitarizing at the start of the game (which it still is to this day).

And finally, some nice 3D models!


I call this one the Sardine deathtrap (The engine is in the front....)


The Resource redistribution
Finally there’s the question of resources. During WW2 Germany was partially reliant on Swedish iron ore, especially before the fall of France. Arguably the reason why the Narvik campaign happened at all was Germany's desire to secure the Gällivare mines, and the allies desire to blow it up (under the pretense of helping Finland).

We have tried several ways to model this in game but it has been hard for several reasons. The trade algorithm runs the shortest route capital to capital, while the actual resources are located in the north of Sweden. The algorithm also really prefers land routes, which would go across Denmark, or if by sea through the Baltics and not through Narvik as was historically. Changing this is outside the scope of this expansion and while we tried other adding content driven systems on top of this nothing worked satisfactorily up to this point.

I don't rule out some abstraction for Germany controlling Narvik gaining them some IC boost, but currently we decided to sidestep it in another direction, by making Germany a bit more reliant on imports.

Germany has in game had more domestic resources than it actually had in game, leading to a problem of it never really having issues with resources, especially steel. Whatever steel it needed was either in Germany proper, or soon to be taken from France, leading to the “Free Trade Meta” we often see these days.

Part of the issue is the abstraction of coke, ore grade, steel mills into the single encompassing iron which makes this hard to properly represent. All in all Sweden provided around 43%, German domestic production 28.2% and France 12.9% to the German war effort between 1933-1943. Having buildings such as steel mills was also outside the scope of this expansion.

This resulted in an overall reduction in iron for specific countries, main targets were Germany which overall had poor iron ore quality, and France which Germany will gobble up. Germany starts with 2 civilian factories more than before to use for import as needed. Portugal also got some tungsten shifted to Sweden. Below are the main changes, with no changes in trade law from 1936 starting dates, accounting for starting infrastructure and no equipment lines active.

Germany
AAT


PRE-AAT


France
AAT


PRE-AAT


Portugal
AAT


PRE-AAT


SWE
AAT


PRE-AAT


These numbers are not final and might change depending on balance and how the AI performs.


Whole Focus Tree Above

I don't have any good ways to end this, so I'll just stop by saying-
...