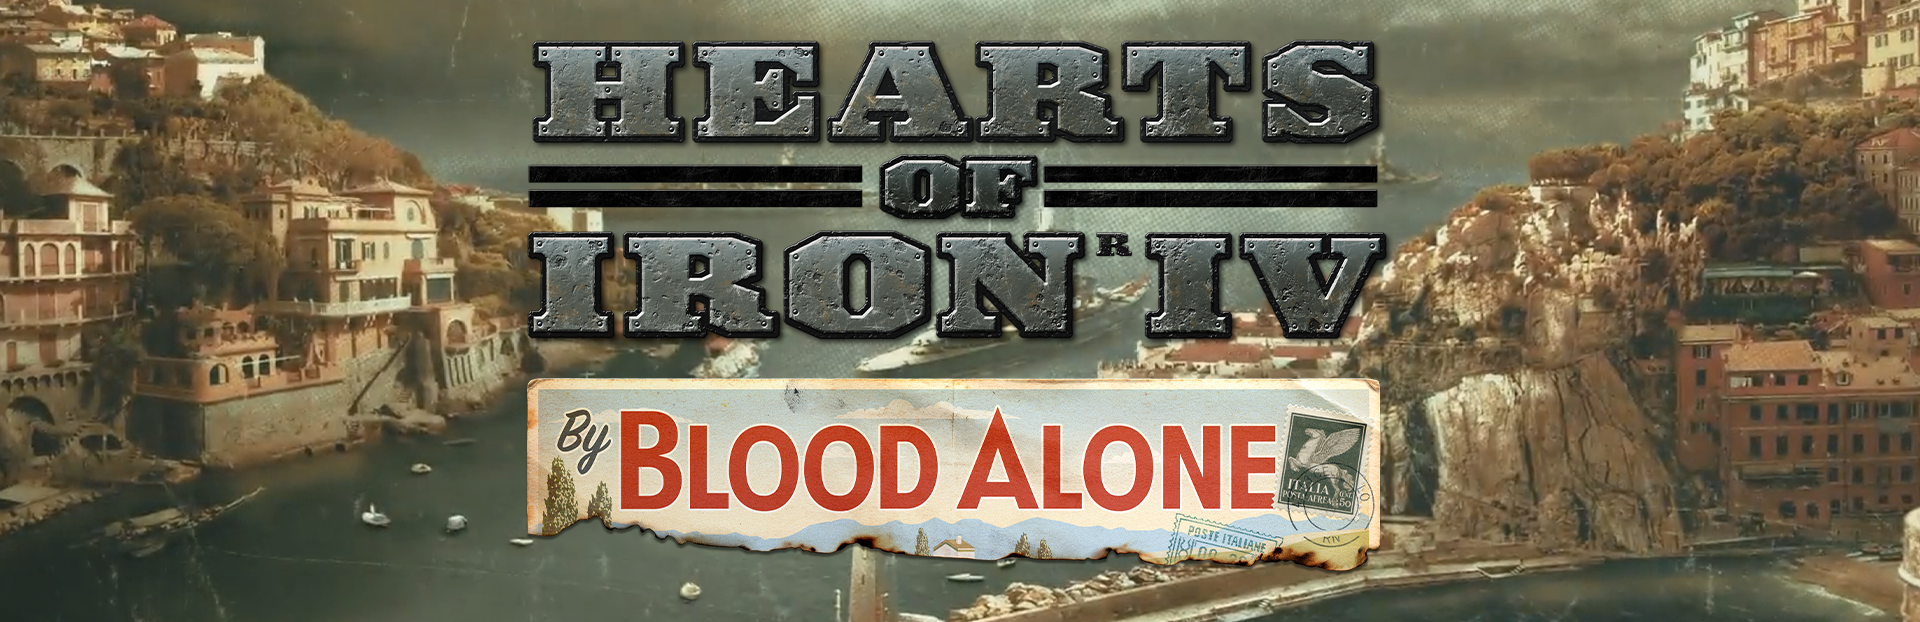
Join Game Director Peter Nicholson, UX Designer Peter Johannesson and Game Developers Robert Dotson & Bradley Faithfull-Wright as they detail the coming developments with the avalanche update that accompanies the By Blood Alone expansion.
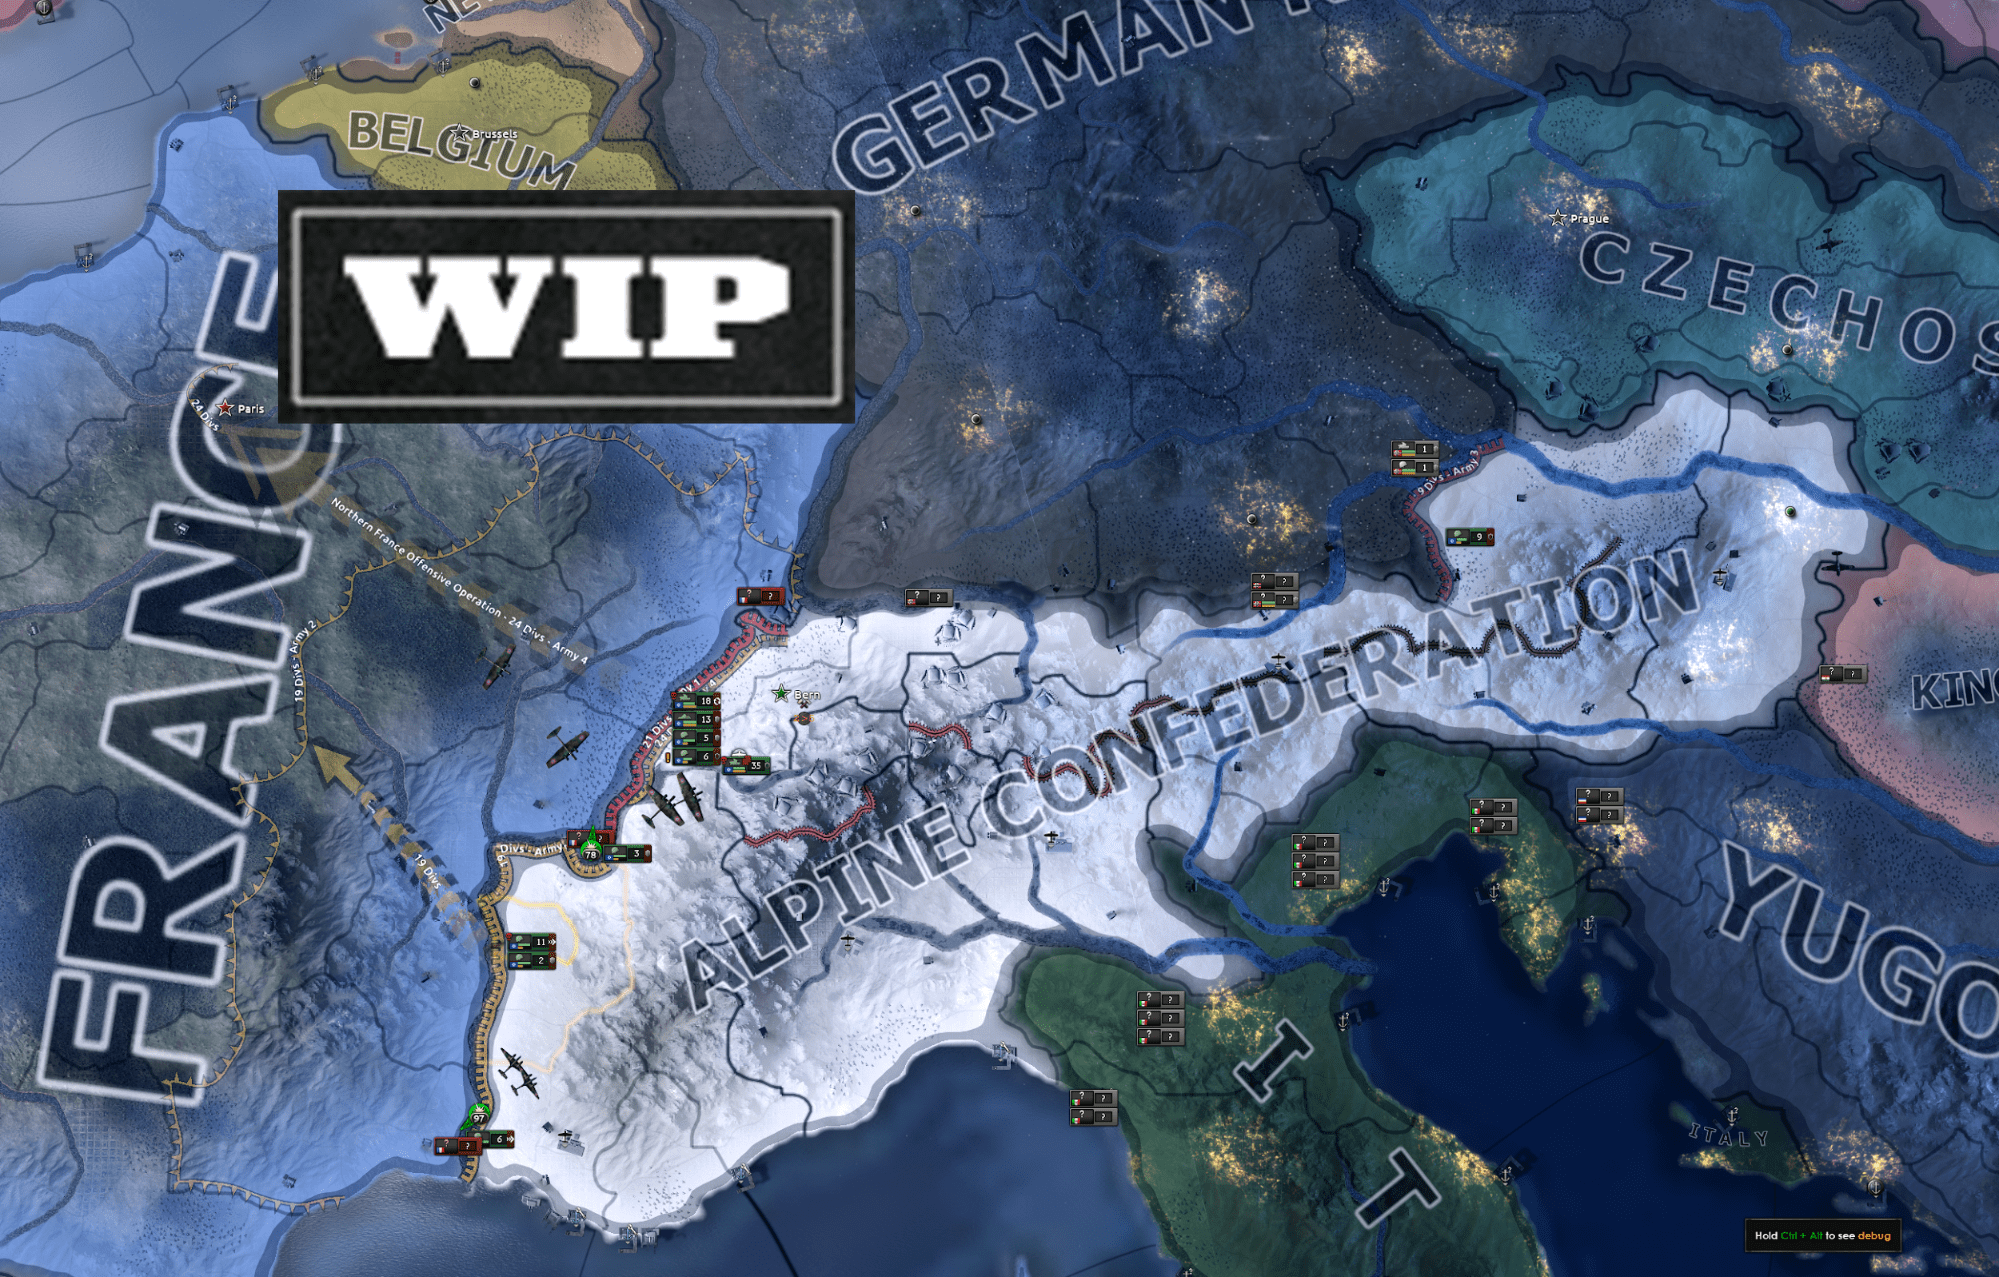
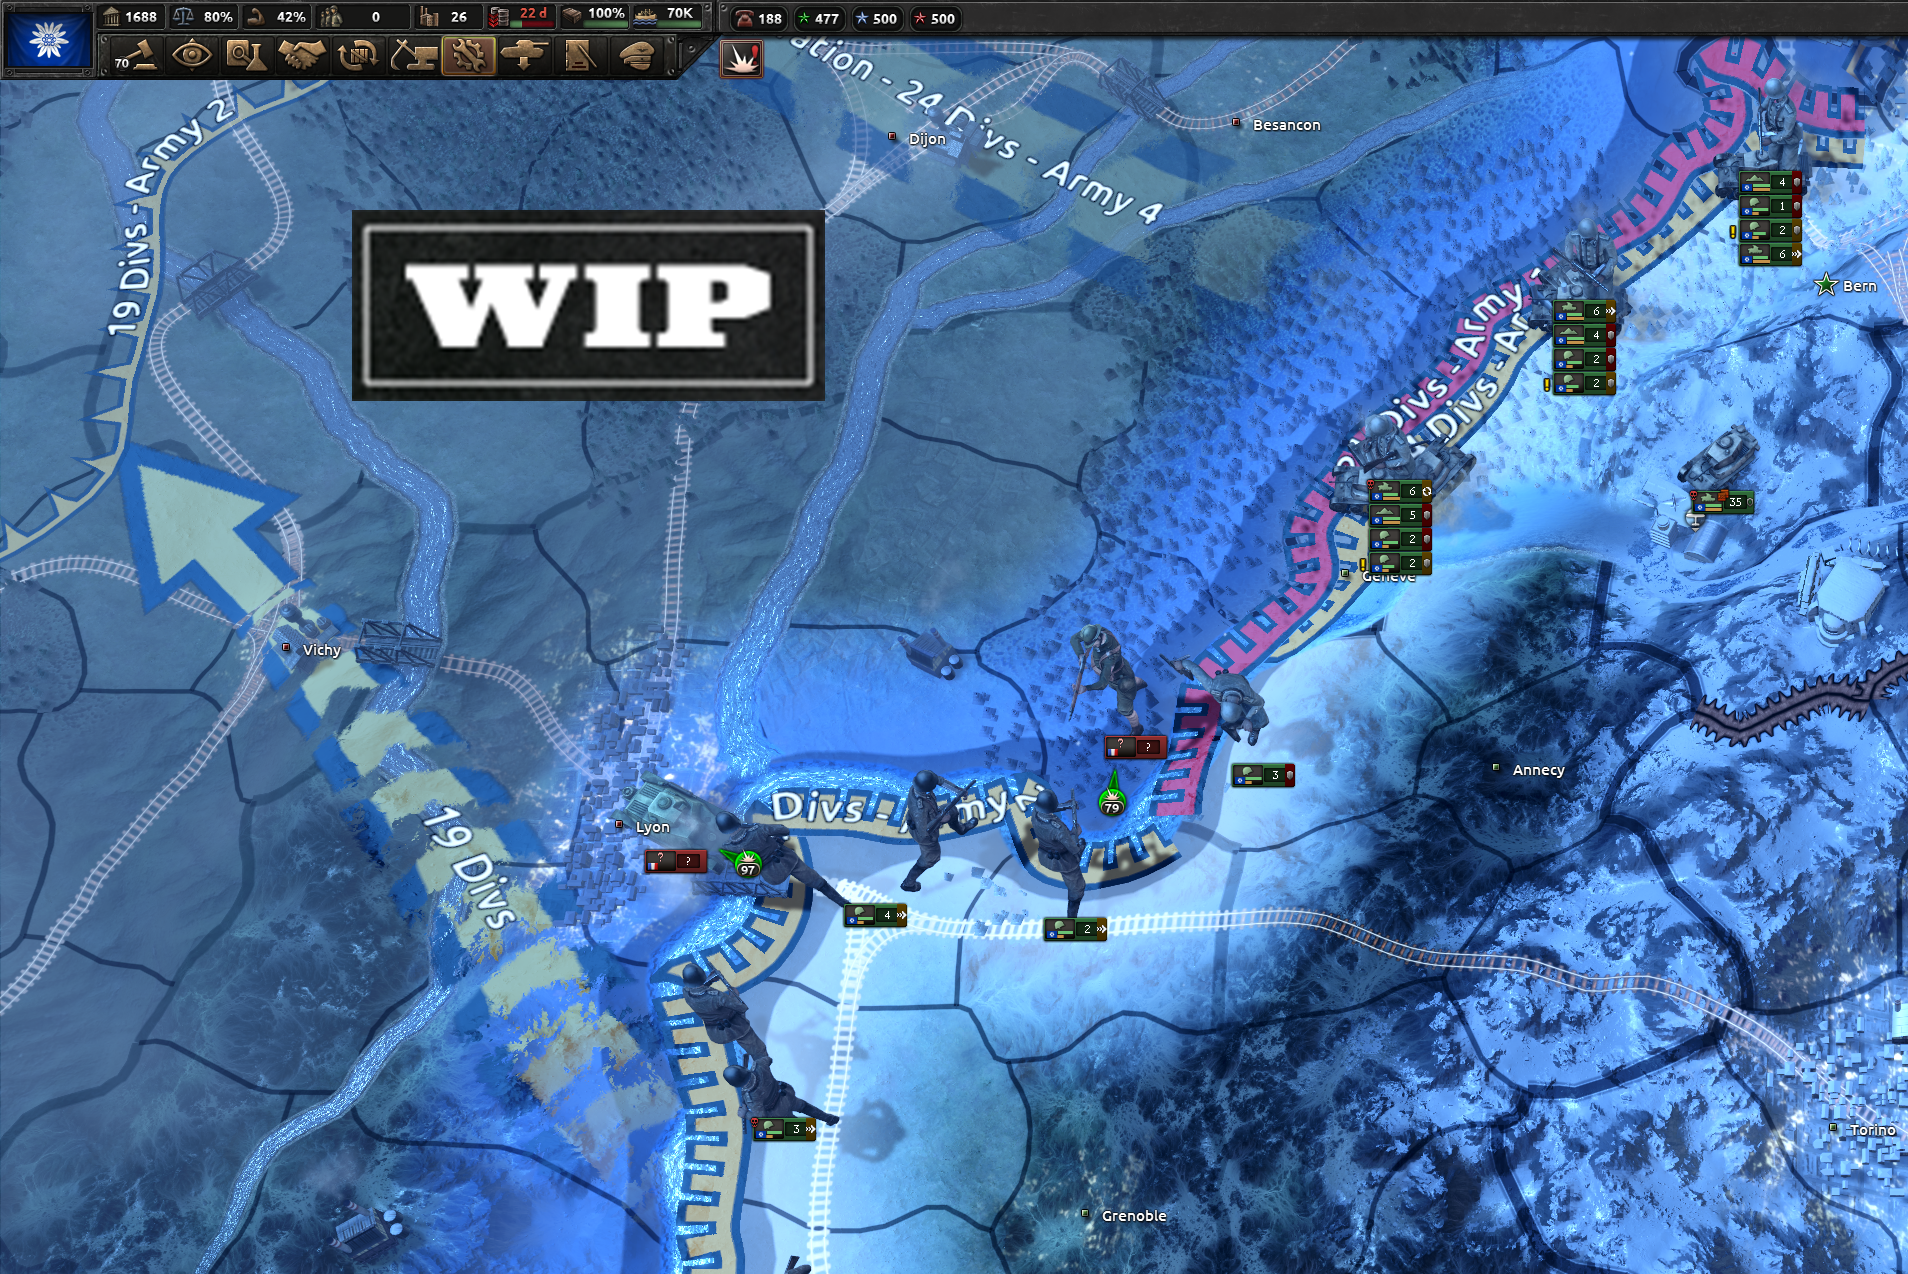
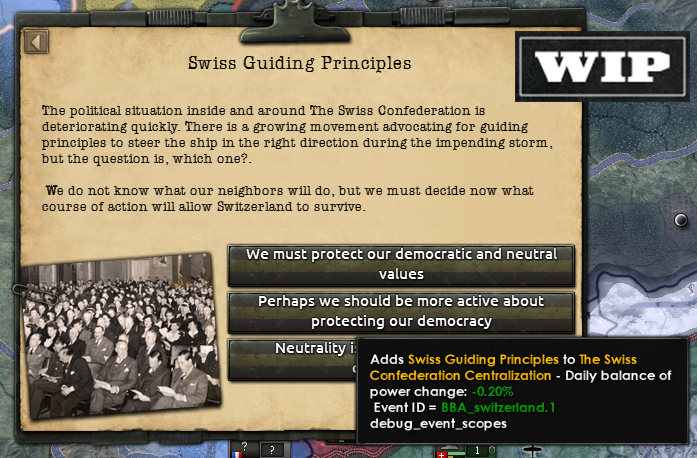
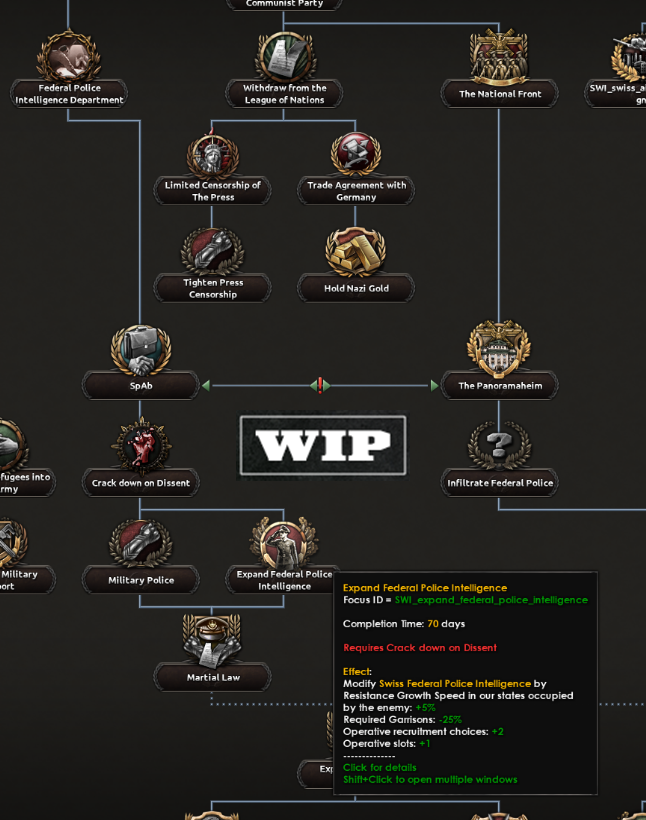
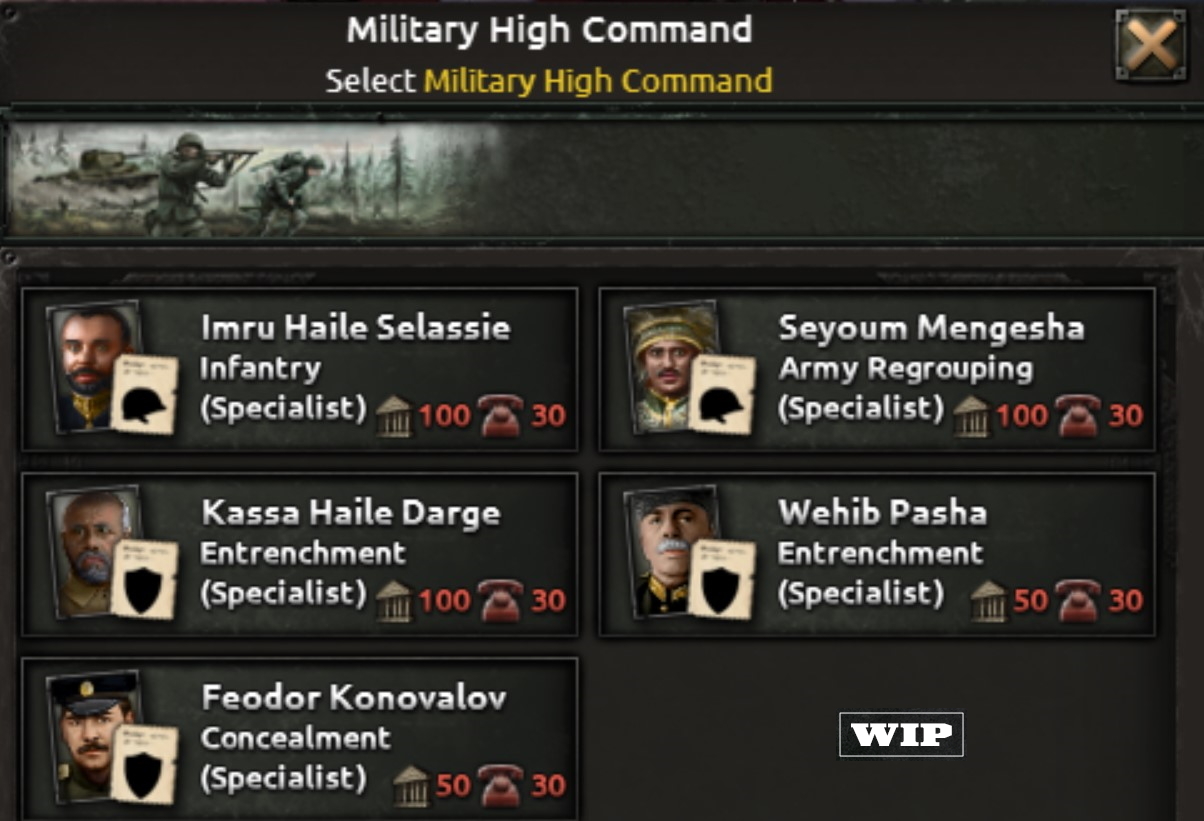
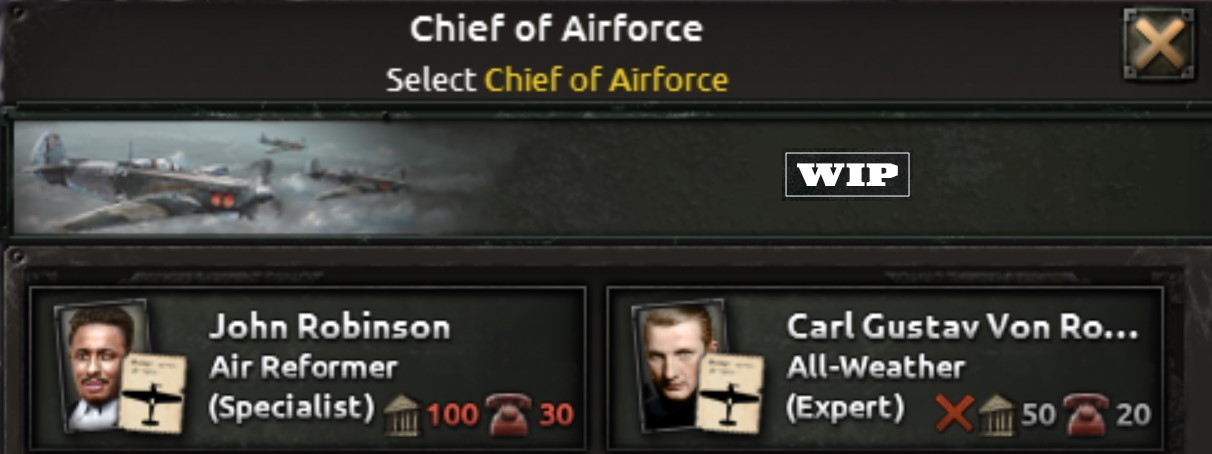
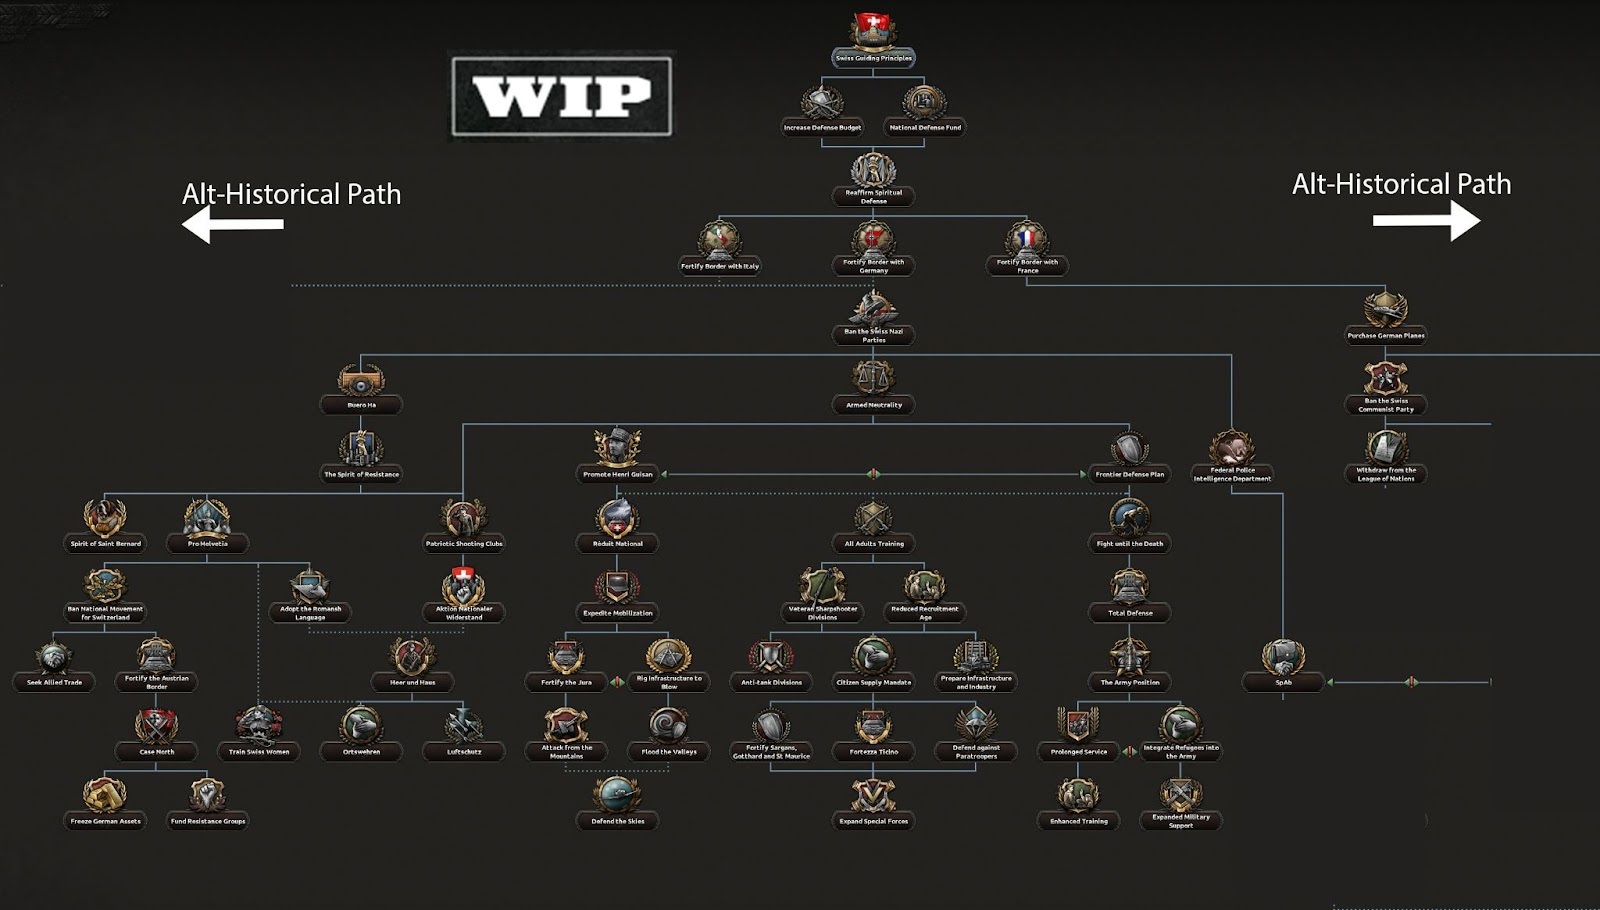
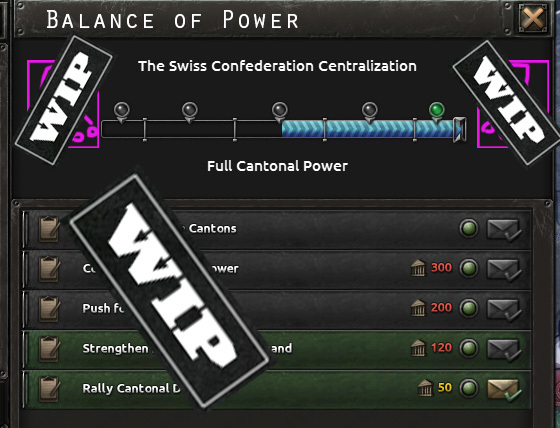
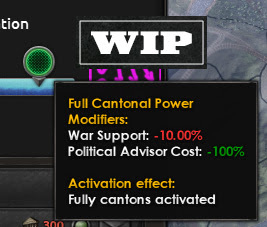
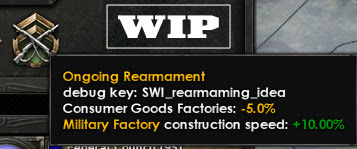
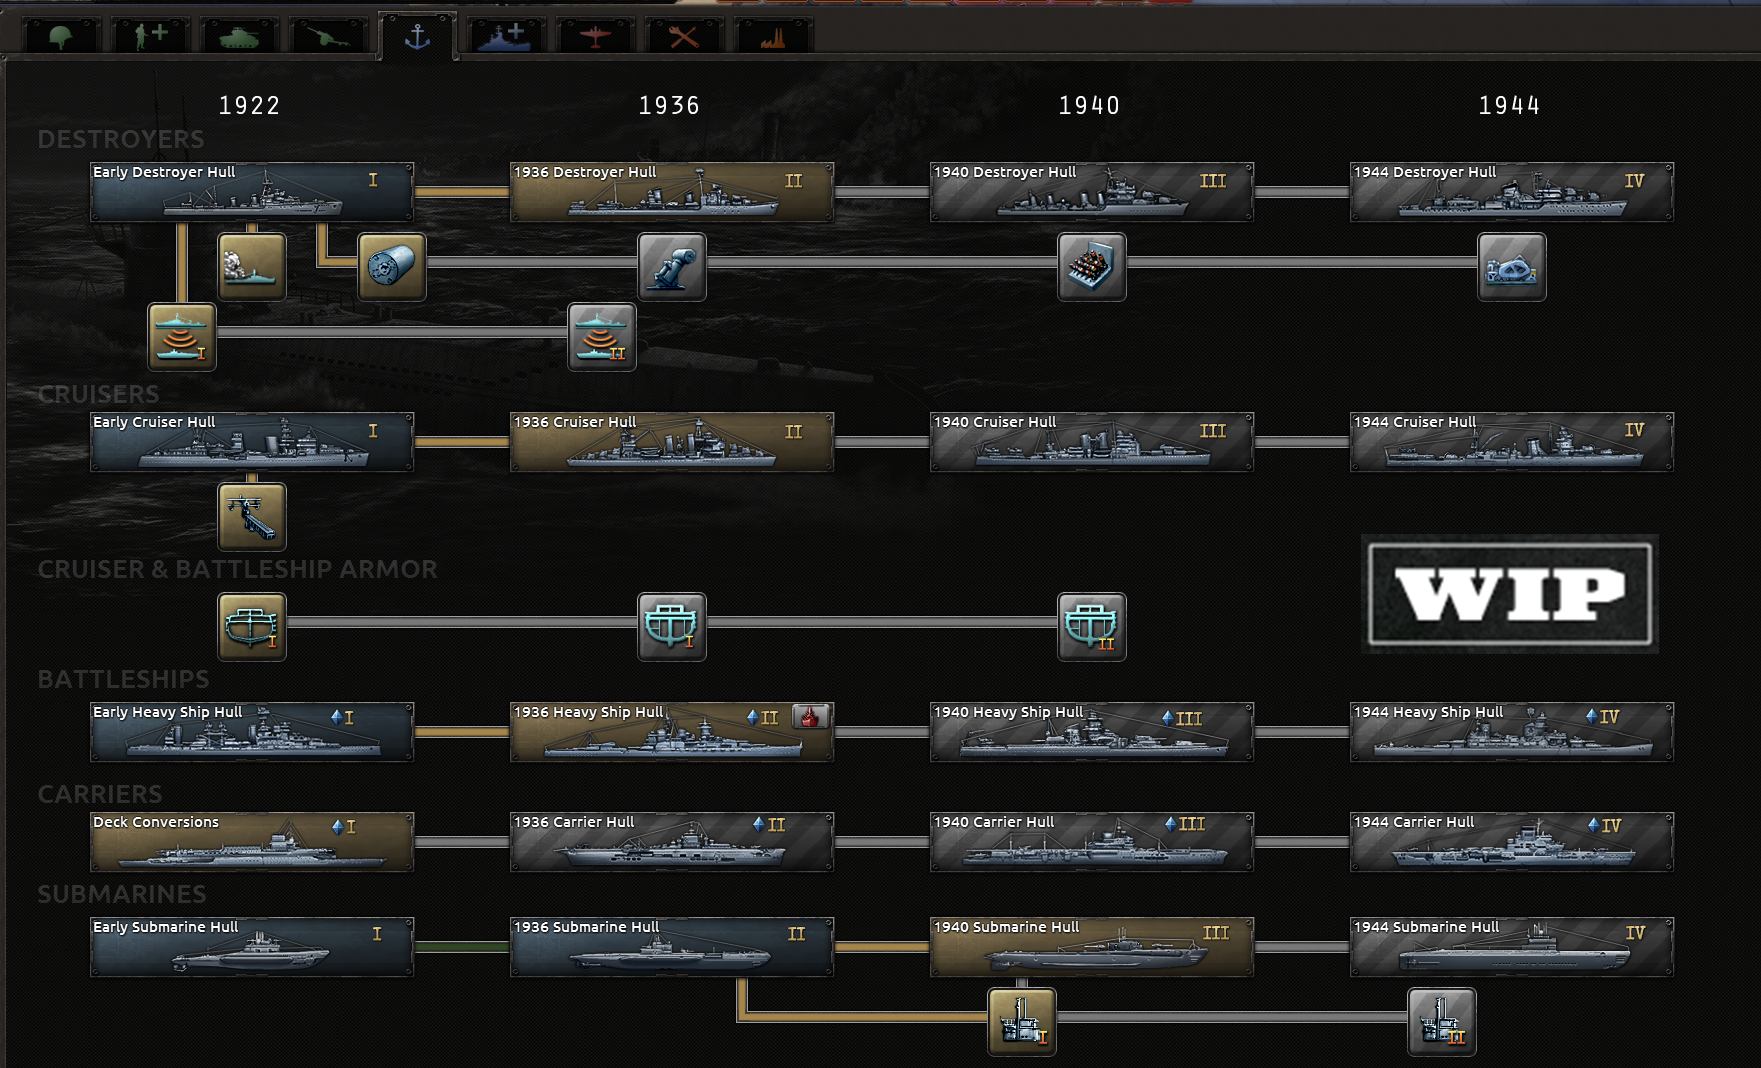
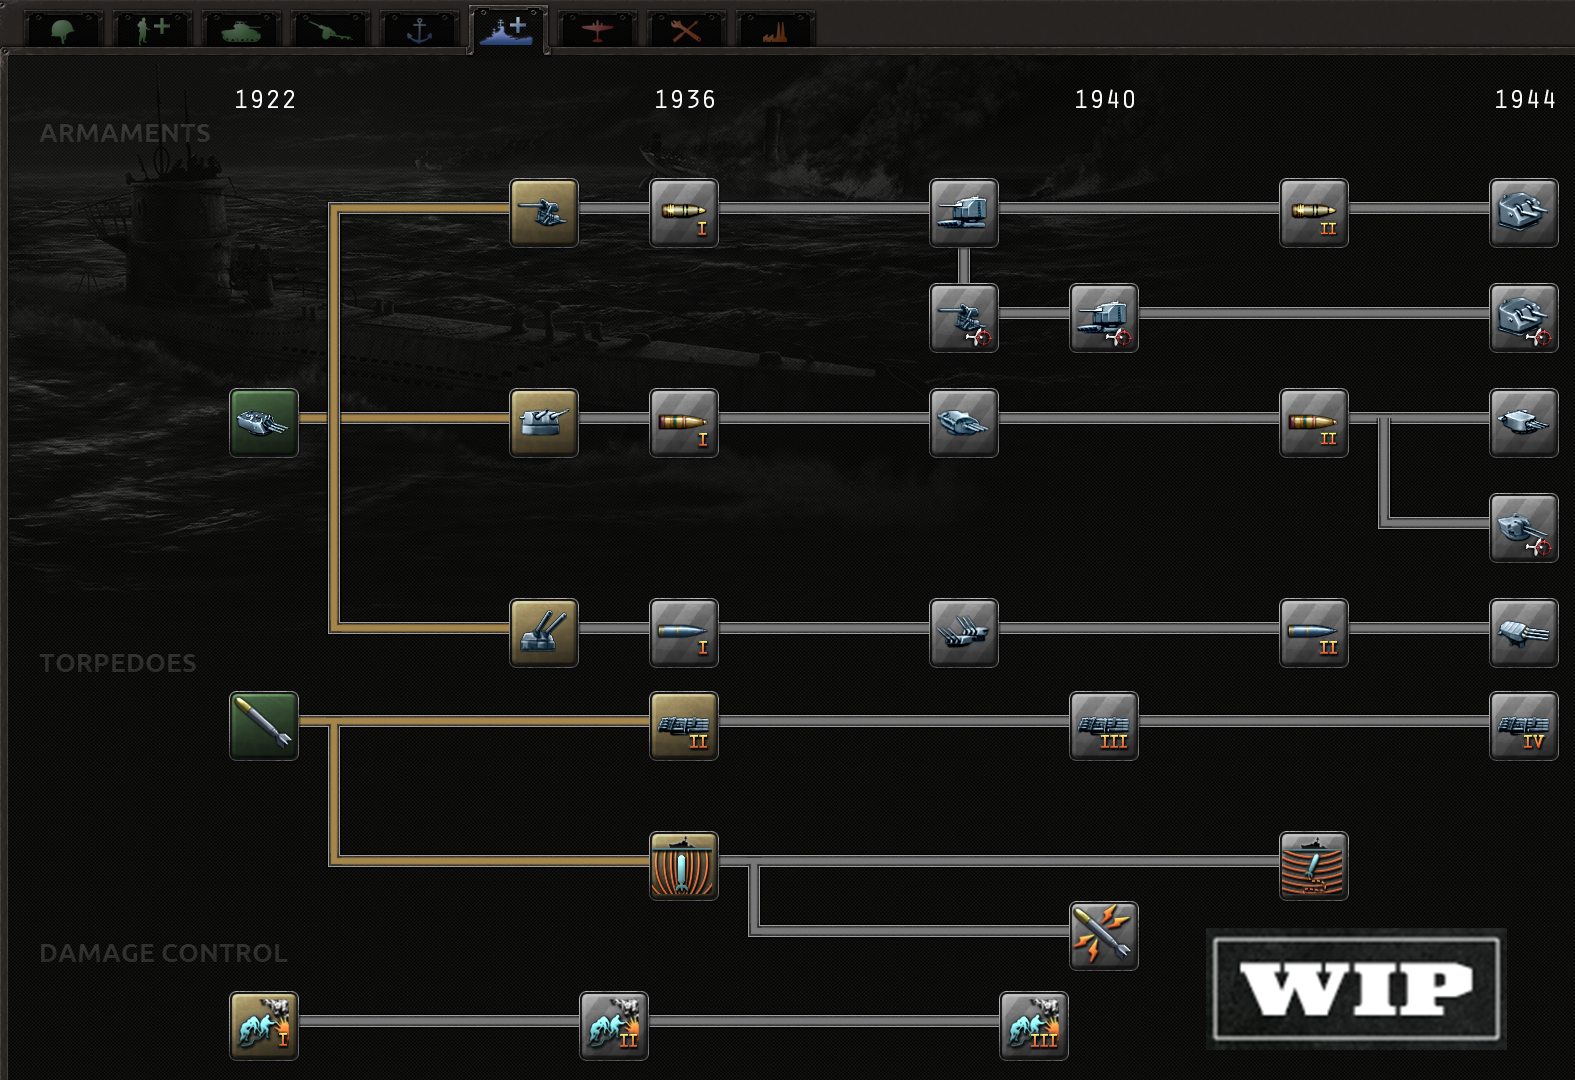
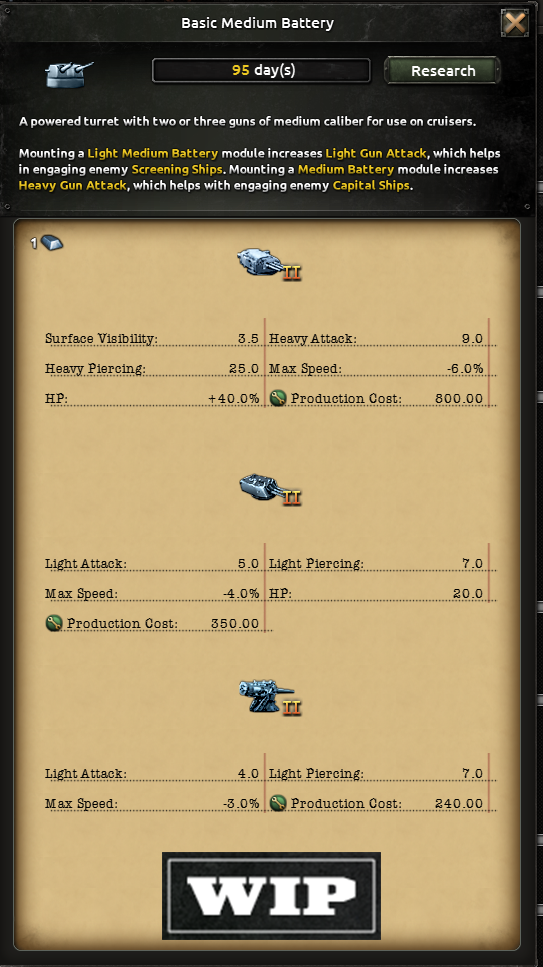
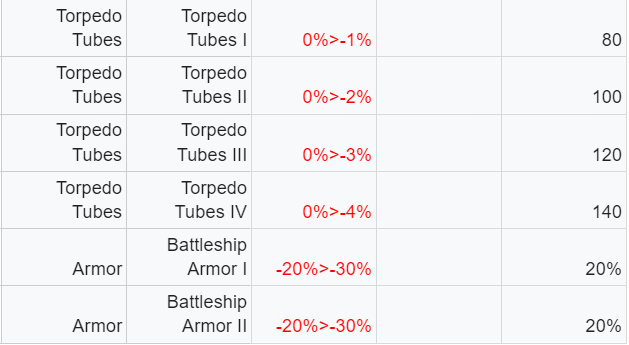
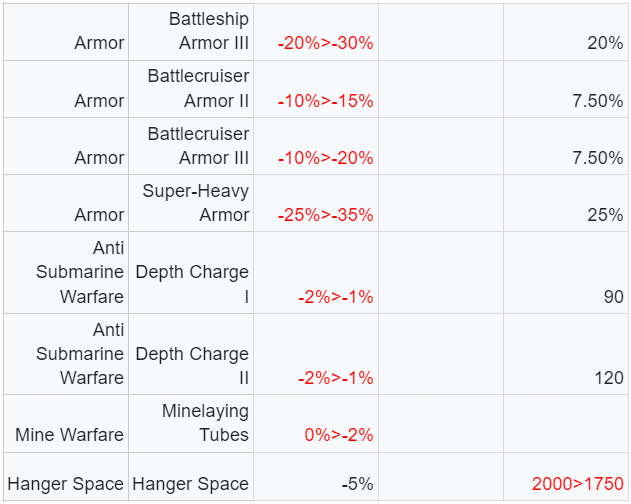
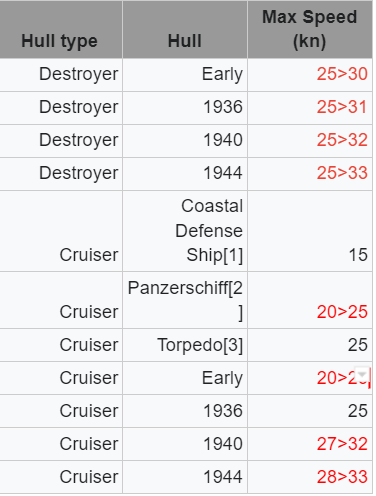
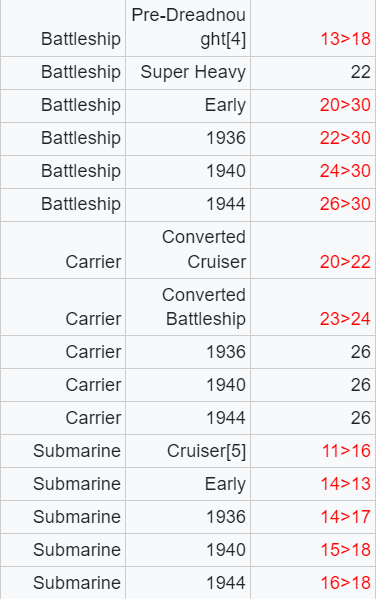
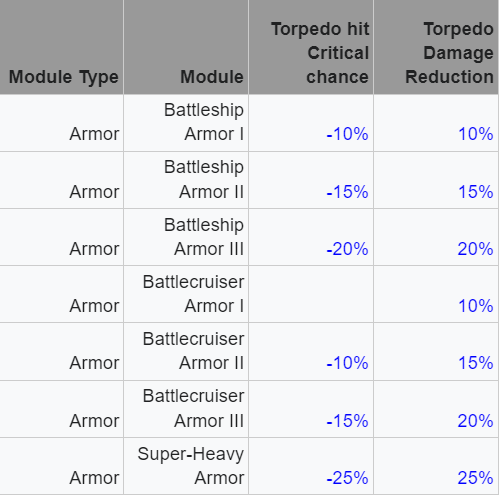
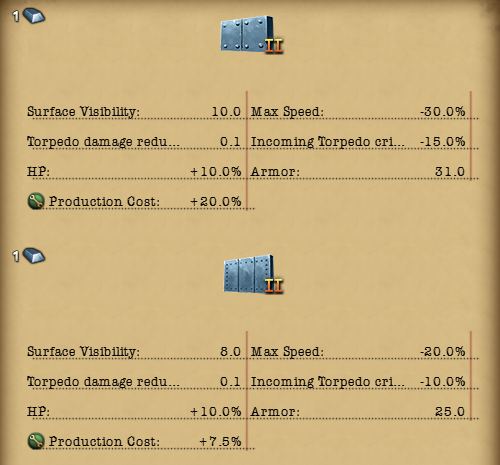
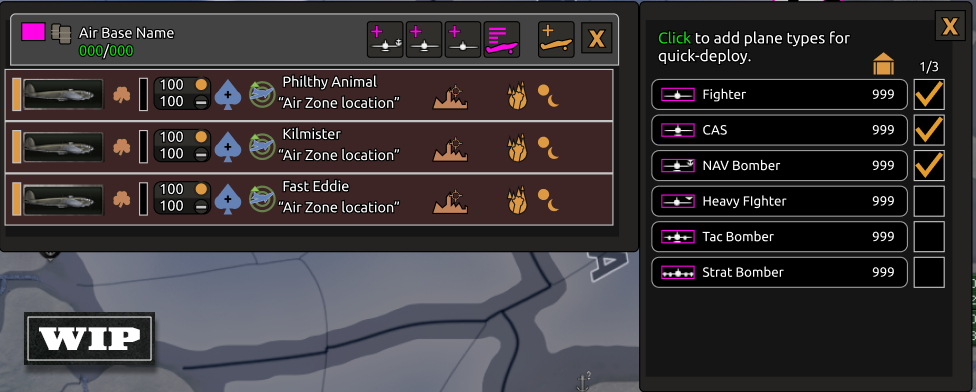
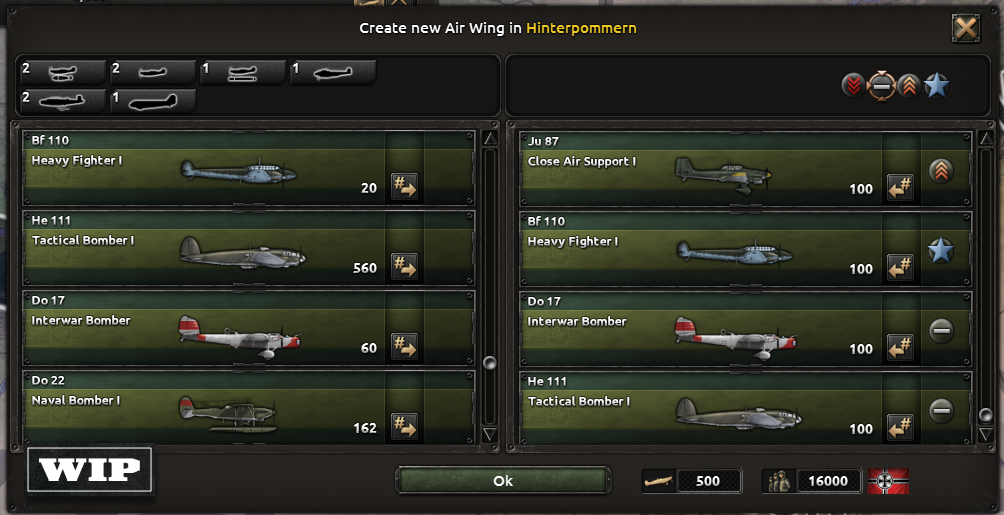
In this video they will cover the changes to Peace Conferences and Naval Combat as well as discuss the reworks to the Air systems.
--------------------------------- Paradox on YouTube: --------------------------------- ParadoxInteractive - http://youtube.com/ParadoxInteractive Trailers, Feature Breakdowns, Dev Diaries, and more.
The year is 1944, the future (If you live in 1936), you may find yourself in the middle of a war against France, as the Alpine Confederation, with a beautiful flag, the sound of gunfire off in the distance
You may find yourself behind the wheel of a large army, composed of regular troops, marching through mountains and plains. You may tell yourself, This is not my Guisan, this is not my neutral and democratic Switzerland. And you may ask yourself, how did I get here?
Hey there, it’s Carlo again, to update you on the alt-history paths of the Swiss Focus Tree! Now let’s go back a bit. To the present, 1936. It all started with the focus Swiss Guiding Principles, which triggered an event for you to proclaim the overall direction of the Balance of Power for the rest of the game. Should Switzerland continue with their policy of devolved power to the Cantons? Or is the current world situation too tense to go ‘business as usual’? Picking any will not block you from going one way or the other in the BoP, but it will certainly help getting to where you want to be more easily.
By keeping the balance of power in the Cantons for enough time, you are able to complete some focuses in the historical path, giving you bonuses to militias and recruitable population, and allowing you to build up a large militia army. You might think it’s not worth the time considering you want to go alt-history, but you’ll see the reasoning later.
A bit afterwards you can go down the Federal Police Intelligence Department focus, which unlocks a series of focuses that give you bonuses for managing resistance in occupied states (And your own states if they are occupied, just in case), and more importantly, a military sub-branch, to develop your war capabilities further. This sub-branch is shared with the fascist path, but you don’t need to go fascist to access it.
Then Allied Gold, GotthardBund and where things really start to diverge; Press for Vorarlberg.
Remember the last Switzerland Dev Diary where I stopped to give historical context? Well this is one of those. In 1919 the very rural Austrian region of Vorarlberg held a referendum to decide if they would join the Swiss Confederation, and the vote actually went towards uniting with Switzerland. Unfortunately for them, neither Austria or Switzerland wanted this to happen. Austria because, well, governments tend to prefer to keep their territory and Switzerland because, among other reasons (Including World War I), they already had a majority of their population speaking German, so they didn’t want to increase that gap further. In a Switzerland that seeks to defend their democracy by projecting power and growing in military might, this is not as important, so Vorarlberg is the first stepping stone on their quest to expand.
When you complete that focus, an ultimatum is sent to Austria (Or Germany if you let the days go by), demanding that they hand over Vorarlberg, or else. Hopefully it doesn’t get to the “or else”, and if that’s the case, congratulations, you’re the proud owner of Switzerland’s newest canton!
After this you’re confronted with another fork in the road. You can go the fully autocratic way, and Pre-empt Anschluss, allowing you to annex the rest of Austria; or you can go slightly more democratic, with The New Eidgenossenschaft. They both allow Switzerland to expand. With the Preempt Anschluss path, you’ll be able to core all of the alps, finally becoming the Alpine Empire of your dreams, and if that’s not enough for you and you’re ready for a real challenge, you can bring the fight to Germany, Italy and France, in the name of Democracy and peace of course. After all, how dare these psychos keep fighting amongst themselves for centuries, someone ought to bring a stop to that.
Now it’s not all fun and empires on this side of Vorarlberg, when you go for The New Eidgenossenschaft you find a more civilized form of conquest, with Expand the Federation. It’ll unlock decisions to spread democracy in your future cantons neighboring states, and claim them afterwards. If their current owner decides to let you take them peacefully will depend on your military might and how many other states of theirs you’ve influenced. Unfortunately, this time, France wasn’t very keen on you bringing democracy to Rhone, so that’s how you find yourself with no other choice than to declare war on them.
Before going further let’s briefly talk about the military branch they share. The focus Switzerland on the Offense, right under GotthardBund, will surely come in handy: It’s one of the focuses that allows Switzerland to train regular troops, edit templates, and notably, it’ll turn all the militias into regular troops, including all their upgrades. Suddenly, your citizens become full time soldiers, just doing their part
This is why it can be beneficial to beef up your militias before going fully alt-history, you can train cheap troops, with a template you upgrade without spending Army XP, with a large manpower pool that comes with no downsides most of the time, and then they can become regular infantry. It’s mutually exclusive with The Neutral Entente focus, which allows you to invite other Neutral and Non-Aligned countries to your faction. Under those two, you get to upgrade your military and even prepare Switzerland for a real navy!
After Expand the Confederation and completing some very necessary military focuses, you go Empower the Council, putting the Balance of Power squarely on the council, and getting rid of the Cantons vs Council struggle, this gives you more War Support, Political Power among other things.
Now that the council has consolidated power, it’s time to use it and make the president of the council the true leader of the Swiss government, granting some bonuses but more importantly, making the president of the Council Switzerland’s Country Leader forever! (These portraits are not ready so not showing it yet)
You can continue your war as you are, in either the Eidgenossenschaft or Anschluss branch, but there’s a man that’s not happy with where Switzerland is at the moment, and that’s our guy Henri Guisan. As far as I can tell he was not that much of a radical democrat, after all he was a professional soldier, and those tend to favor rigid hierarchies, but despite that he was also a Swiss patriot who praised the Swiss tradition of Armed Neutrality and Independence, so he would definitely not be happy with a Swiss-led empire, regardless of name. This is why on this timeline, you can nudge him towards a coup, and with his popularity both in the Military and civilian populations, resistance to him is very limited. Of course, as much as he is committed to traditional Swiss values, he is a soldier, and he will finish the fight with his military bonuses as a Country Leader and General, like a Cincinnatus once in a lifetime kind of thing.
And that’s how we got where we are. The rest is up to you; you can take the war to other countries, or simply finish the war and then complete the focus Return to the Old Switzerland which allows Switzerland to neutrality and democracy. Same as it ever was.
Before giving you a taste of the other alt-history paths, I think it’s important to take a look at the full focus tree (Please note it’s a work in progress and a lot can change. Also, still waiting on some icons, as you can see).
Now that’s not the only alt-history path for Switzerland. You also have the option of taking a stance to help the Allies win their war against the fascist powers of Europe. After you complete Closer Democratic Ties you have 3 different ways of joining the war as an ally:
First one is through Join France, which makes Switzerland into a French Puppet and later, into the Second Helvetic Republic, a successor of the Napoleonic Republic I was talking about in the olden days of the first Swiss Dev Diary. The advantage of this path is that Alpine Aspirations allows you to core some alpine states, handy for the peace conference at the end of the war.
The middle one, Join the Allies, as it says in the name, allows you to join the United Kingdom as an ally. It’s a relatively pain-free way of joining the war, but it also doesn’t offer additional rewards.
The last one is through the Secret Pact with the Allies focus. You get to this one from a different part of the tree, by completing some focuses on the Buero Ha branch and three focuses directed at supporting the Allies’ espionage efforts: Support Allied Espionage unlocks a decision that allows Switzerland to give itself and their secret ally (In most cases the leader of the biggest democratic faction) a timed National Spirit with bonuses for espionage. Expand Spy Network gives Switzerland an extra Operative Slot, and increased Intel Network Gain. Share Spy Network unlocks a decision to send an event to your secret ally, and they can choose to get either a Swiss-German, Swiss-Italian or Swiss-French operative, the best part is that you get one too! Then in Secret Pact with the Allies itself, you unlock a decision to support your secret ally, giving them a percentage of your military and civilian production in exchange for Command Power, Army, Air and Navy experience.
After that you still have more to unlock, and eventually you can choose when to complete Jump into Action and join the war at the most opportune moment.
All of these paths have a shared industrial and military branch to get you ready, ending on Weapons of Democracy. Aaaand these are the Democratic-ish paths for Switzerland! Hope you at least enjoyed reading about them.
The left-side paths are the ones I thought plausible for Switzerland keeping their democracy (At least for a little bit) while still joining the war. They’re about Switzerland using its past and tradition to justify joining the war, either against fascism, or as a preemptive defense. While Switzerland in this period did have a fascist movement, it was always very small and on the fringes, for example, there was only one member of parliament elected under a Fascist party; Robert Tobler. This small minority quickly faded once it was obvious to them where it would lead, and especially so after Anschluss. This is why the right side of the focus mountain is not as much a story of Swiss Fascism rising to take over the government, but a scenario where Switzerland sees the power of Fascism rising in Europe and is slowly coerced into reluctantly joining it.
The start of the fascist side is populated by focuses about events that actually happened, but often did not end up going further, or were historically rejected. Purchase German Planes, Ban the Swiss Communist Party, Withdraw from the League Of Nations, Limited Censorship of the Press, The National Front, and The Petition of the 200 are based on real events, policies or organizations in Switzerland at the time that ended up not affecting the Democratic system of Switzerland enough to topple it, but because this is a fascist path, in this timeline they will have repercussions, and will tighten the grip of fascism over Switzerland.
Unlike the alt-democratic branch, this one’s not as focused on espionage, but instead, focuses on becoming closer to Germany and developing the military industry. After Abandon Neutrality, which does exactly what you think it does, you have a choice between 2 leaders: Robert Tobler and Rolf Henne.
They were both leaders of The National Front at different points, and while they were both Fascists, they diverged in key ways. Rolf Henne was closer to the German Nazi party and more openly wanted for Switzerland to join Germany, while Robert Todler wanted Switzerland to have its own form of fascism, achieved by working with the government and slowly changing it, without burning down the house. Despite this, they were both directly or indirectly supported by the German Reich.
Tobler’s path will lead to a slower and more stable transition to fascism, until you centralize Switzerland and join the Nazis. Henne’s path on the other hand allows you to become a German Puppet almost immediately, but with the advantage that you can ask Germany for territory, including Vorarlberg and Austria, and if you’re lucky enough, the alps in France and Italy.
Both of them have access to the Professionalize Militias focus, which is another one of those that convert your militias into professional soldiers, very handy for the conquest of Europe. Besides this, there’s a military branch that is shared with the Federal Police Intelligence Department branch, which allows you on one side to mechanize your army, and in the other to improve special forces, planes and ultimately, give you Mountaineer Paratroopers, which give Swiss paratroopers bonuses in mountains.
Lastly, there’s an elephant in the Dev Diary I would like to address. Many countries in Hearts of Iron feature civil wars when they change political parties, and that’s a very cool mechanic because it allows you to have a combat snack before the main course. In Switzerland, that’s not the case, when the government changes, it does so progressively but peacefully. The main reasons are:
Switzerland is mostly mountains and forests, leading to a slow and grinding war.
A lot of the content centers around building fortifications, and improving defense, because that was Switzerland’s focus at the time, and even before that. It would’ve led to an even slower and grindier war.
I felt the territory was way too small to have any sort of interesting war in it.
Those were the reasons we decided not to have government changes through civil war.
Oh, and one more thing, I felt like Brandy the St Bernard wouldn’t stay for the fascist path, after all Brandy is a good doggo, so we managed to find an evil timeline version, doubt it will make the cut, seeing as my photoshop skills are not up to par. Ok I’ll end this Dev Diary now before I stop making sense. Come back next time for the Ethiopian Alt-history Dev Diary! I think you’re in for a treat.
Buongiorno! And welcome to not only my first post here on the forums, but also to Italy’s Alternative History Dev Diary! I know that a lot of you folks out there have been looking forward to Italy’s re-work, and I bet that a bunch of you have already read Mano de Zombi’s absolutely gigantic Dev Diary for Italy’s Historical path. (If you haven’t, it might be worthwhile to do so before continuing here, since he explains new features that will pop up here too.) Well, today it’s time to look at what could have been if only history had turned out slightly (or sometimes wildly) different.
And please remember that all of this is still very much a work in progress; a lot of things might and will change from here until we release in- oooops, no spoilers ;)
Due to Steam post limitations and the length of this diary, we can only host the publication on our own forums.
MAJOR DISCLAIMER - This dev diary is written before the majority of art has been delivered, so it features a lot of placeholder graphics - you have to imagine really cool focus icons, and a lot of characters with hats that are beyond fabulous, for example
But we have some cool art coming! Work in progress image of Ethiopian Irregular Infantry
So, I was asked to write a dev diary about the development of a focus tree and related stuff for Ethiopia. Mainly because I was the one asked to do Ethiopia in the first place*, I guess. It would probably have felt weird to do a dev diary on something else then…
Anyway, Ethiopia. I wanted to make playing Ethiopia a somewhat different experience than the average game of HoI. It has to be, right? For one, Ethiopia starts at war, which puts some constraints on the design. Also, it is a war that they historically lost. After the initial invasion in October 35 they more or less managed to push the Italians back to their starting positions in what became known as the christmas offensive, but by the time we are entering the scene the Italians were preparing to once again go on the offensive. And historically this time Ethiopia didn’t stand a chance. However, in 1942 Ethiopian units such as the Gideon force and the Arbegnoch were fighting alongside the Allies to retake their country. So the design had to feature that as well.
But enough of that - lets take a look at Ethiopia and what we did with it for the DLC:
The Themes
The theme of the design for Ethiopia was actually twofold. Firstly it is about survival. As mentioned, you start under attack from Italy. Outgunned and outmanned. So initially you will mainly focus on finding a way to survive. There will be a few different options there, some that will be discussed today, and some that will be discussed later. Secondly, it is about modernization. Ethiopia was not industrialized at all, and the army was in many ways still partly feudal; and as such you will need to work hard to improve the country and the armed forces if you are to compete with the rest of the industrialized world.
Country set up
Now then, let’s take a look at how Ethiopia looks in-game in 1936: First you might have noticed, that Haile Selassie has himself a new trait - with one of the cooler names so far in HoI history
And the country also starts with a set of national spirits (compared to before where it was severely lacking on that front): Not all of which are entirely positive however….
The map
One of the first things you will see is that what used to be a single state called Ethiopia is now split up into a bunch of new ones. Some of the extremely large provinces have been split into smaller ones as well, to allow for a more interesting gameplay and more realistic combat and supply-lines. While doing that I also added a few victory points to make the map look a bit more interesting, and to give the players something more concrete to fight over. Finding the right level when doing this is always a bit of a balancing act between gameplay, consistency with other things, and what you would ideally want. Sacrifices were made, but this is what we ended up with:
Additionally, the Ogaden desert is now classed as - well, yes - desert:
Starting at War
As mentioned above, Ethiopia starts at war with Italy. To simplify things a little bit when you start up the game, all units start within their own borders, just like before. It is not too far from the truth as the Christmas offensive of 35 had basically pushed the Italian army back all the way, so I feel it works (even though technically some parts of Tigray and some areas in the south were occupied by Italy at this point in time).
The thing is, Haile Selassie really hoped the International Community would do something to stop Italy. After all, both nations were part of the League of Nations. We decided against doing a full scale League of Nations feature, so instead it is tied to the Ethiopian focus tree, and a small mechanic that affects both Italy and Ethiopia. (After all the LoN was mainly active before 36, so it makes sense I think)
There were numerous reasons why the League didn’t act against Italy, who in turn tried to play down their invasion as something of a border dispute in one of their colonies. But the longer Ethiopia holds out and the more Italy commits to the war, the harder it will be for Mussolini to downplay the conflict and for the LoN to turn a blind eye.
So to simulate this we have a ticking “War Escalation” that affects both sides in the war.
The higher it ticks, the more focuses you unlock for Ethiopia - should you decide to go to the League to plead your case - and additionally both sides will get events that affect their ability to continue the war.
We’ll get back to that stuff further down the line…
Modernizing the Industry
Before we look at the war and foreign politics part of the tree, we will need to look at the prospect of modernization
The entire industrial tree for Ethiopia.
In 1936, Ethiopia starts without any major industrial capacity. It has 2 military factories, and 2 civilian ones, one of which goes to consumer goods, and one is needed to fulfill trade requirements in order to produce the weapons needed for the war. Some more factories can be acquired through the focus tree, but many focuses are also about different bonuses and removing debuffs etc.
All Ethiopian states also start with this modifier, which is -30% in all states except for the capital shown here. “Develop the Capital Region” as well as other focuses in the right-most part will unlock decisions to eventually remove this modifier. Ethiopia doesn’t start with a plethora of designers and companies like other countries, but will instead have options to invite off-shoots of companies from other nations through the “Invite Foreign Industrialists” focus.
Also I cannot stress enough how good the 2D art is looking.
The designers and industrial concerns native to Ethiopia or unlocked through ways other than the “Invite Foreign Industrialists” focus.
What about the army?
The Ethiopian army has been revamped a bit in BBA. It is larger than in vanilla, and it now consists of two main parts, the regular Mehal Sefari and the irregular forces raised and paid for by the various lords and regions of Ethiopia. The irregulars are fast to raise, have some bonuses in certain types of terrain, but are generally weaker than regular units. You have a limited amount of them as well.
The fact that Ethiopia has a different system for raising units than other countries is represented by a recruitment law unique to the country. In peacetime it allows for a rather small recruitable population, but in wartime it is increased automatically, but incur penalties to production etc.
Playing Ethiopia, you will be given the choice to expand on the irregular system, or instead move towards the more “regular” system employed by other HoI countries.
The focuses in this branch will let you specialize your army to some extent, and also helps a little bit if/when you decide that an airforce and/or navy could be good things to have.
Here you can see the military branch in all its glory:
Balance of Power
Ethiopia will start with an active balance of power, similarly to how Switzerland and Italy have one, which is a connecting thread between the nations in By Blood Alone. Ethiopia’s BoP will focus on the power of the Mekwanint on one side (the centrally appointed officials) and the Mesafint on the other (the hereditary nobility of Ethiopia). Pushing towards one side or another will bring different benefits as well as penalties, as well as both having potentially catastrophic effects if one side gets absolute power over the other, but more on the details of the BoP system for Ethiopia in its next dev diary!
The Second Italo-Ethiopian War Branch
As Italy and Ethiopia start at war, Ethiopia gets a number of (mostly 35 day) focuses to help them customize how they want to run the war. These are all blocked once the war is over one way or the other.
Should I go or should I stay? The first decision you will need to take when playing as Haile Selassie's Ethiopia is if you want him to stay in Africa and attempt to beat the Italians back the hard way (that is, without any foreign aid, which will be required for certain cult of personality-esque focuses later down in the tree) or if you want to get on the train and go to Switzerland to address the League of Nations and utilize the different focuses tied to them, which all get unlocked through different levels of war escalation.
If you decide to go for the historical option, and have Haile Selassie leave the country you get access to this subset of the tree:
The section serves the dual purpose of giving you access to focuses that can help you, if you get the war escalation up high enough, and allowing you to continue the fight in exile, should Ethiopia capitulate while the Emperor is away. The focus chain that starts with Addressing the League of Nations culminates in the “International Mediation” focus which sees the LoN pressure Italy for a white peace. (Doing this will not be able to gain you any immediate territory from them, so you will have to get to that later in the post war tree)
Additionally, the International Brigades focus is very useful, as well as fun and flavorful, as it allows you to send events to LoN members asking for volunteers, making it to where about 4-8 random minors send you a division each, becoming very colorful very quickly.
Going into exile and Coming back
After having done the focus “Boarding the Train” and having found a host nation to flee to, Haile Selassie will go there to continue the fight if and when Ethiopia capitulates to Italy, just like he did historically. Due to the LoN resolution however, he cannot ask his host to join the conflict before completing the focus “Reclaiming Ethiopia” at the end of the exile branch, and they also cannot ask him to let them join the war.
Many of the exile focuses unlock various decisions to do, in order to make a playthrough at least somewhat interesting to a player. Some focuses such as “The Patriots” and “Anti-Italian Propaganda” also unlock new unique continuous focuses for Ethiopia to do, such as increasing resistance growth and lowering compliance gain in areas occupied by Italy. This is because the only way for Italy to get rid of you once you have gone into exile is for them to get enough compliance in your states to take a decision that gives them ownership of it, eventually creating the Africa Orientale Italiana to completely erase you if you do not oppose them enough.
And as you can see, hiring the Abuna (leader of the Ethiopian Orthodox Tewahedo Church), Qerellos IV will grant you some bonuses which are going to prove very useful when in exile.
Different host-nations also means different extra focuses (all require a certain level of legitimacy to do).
As you can see in these images, your focuses and campaign will be quite different depending on what nation you send Haile Selassie off into exile to. (Be aware that you will have to ask the country for permission first, which will be very hard if they do not have good relations with you) Also, can you guess what nations these might be? (Yes, they are very obvious, aren’t they?)
Staying to fight
Now you might be wondering, what happens if I choose to refuse outside help? Well first of all, it is much harder to win. Below you can see the entire pre-peace branch for choosing to stay:
When getting peace with Italy through this branch however, you can in fact gain territory from them, as long as you control it when you complete the focus “Fait Accompli”. What makes this branch harder is not only the lack of support from the West, but also the fact that you need to at a bare minimum control all of your core provinces to do the focus that grants you peace with Italy. The focuses here do however give some nice bonuses both to Haile Selassie as a Field Marshal, but also to the troops and generals of Ethiopia.
Here is the full “war with Italy” part of the Haile Selassie focus tree.
But once the war is done, what’s next?
As you can see here, there are two sub-branches to choose from following the end of the Italo-Ethiopian war ; “The King of Kings” sub-branch and the “Rebuilding the Country” sub-branch. The latter one is accessible through any of the war with Italy branches. The King of Kings branch is however only available to you if you managed to win the war without foreign help, cementing Haile Selassie as the true ruler of Ethiopia. Here you can upgrade his ruler trait, and get decisions to restore the long-gone Empire of Axum, gaining cores and wargoals on many of the kingdom’s historical claims.
You can then also choose between a couple of different end-game options, such as taking advantage of the Rastafari movement, and requesting overlordship of Jamaica from the British to expand your influence in the Americas, or embrace the Solomonic dynasty’s legacy and attempt to reclaim king Solomon’s lands from it’s occupiers, eventually coring it and moving your capital there. However, to do either of those you must have defeated the Italians without going into exile, and built the cult around the Emperor. If you didn’t, you still have two choices open to you, which both focus on Africa.
Some more stuff
Actually, take a look at these new advisors Ethiopia has before you leave, because they have quite a few: And this guy: Military Personnel: And some Swedes and an American:
But those aren’t all the advisors, as some of the ones available to the alt-hist branches are not shown here, but they can be a fun surprise for the next Ethiopia dev-diary.
That was all for this time, as I didn’t want to make this dev diary as long as the Italian one, but in a couple of weeks Ethiopia will return to showcase its BoP in more detail, as well as its a-historical paths.
* Tbh - asked is a bit of an oversimplification. It was decided that Ethiopia would feature in this expansion - I was (figuratively) jumping up and down saying equivalents of pretty please… So in the end arheo et.al. caved in and gave it to me
Hey everyone! You probably don’t know me, but I’m Carlo, the Content Designer in charge of Switzerland for BBA. I’m very excited to present to you all, the Swiss Focus Tree, our first circular focus tree, allowing Switzerland to go back and forth between the Make Fondue and Stay Neutral focuses. Through the power of Fondue and Chill, plus all that Nazi gold, Switzerland will prevail over its rivals by completely staying out of the war in absolute comfort and safety.
[Record Scratch Sound] If that’s how you imagine Swiss life during World War II, I got news for you buddy, that is far from how it went.
Yes, Switzerland is not a country most people associate with World War II games, but that doesn’t mean it doesn’t have a place in HoI, and in this Dev Diary I hope to bring you to my side of the Alps and show you how interesting and unique Switzerland can be in Hearts of Iron IV.
First, it’s always a good idea to have a bit of historical context. Switzerland was founded in the late Middle Ages and from the start, it was a loose confederation of small territories near the alps (3 at this point). They pledged to help each other militarily and economically. This oath, or Eidgenossenschaft as it’s lovingly abbreviated, kept growing while always maintaining a decentralized government centered on the cantons, and with a strong military reputation (Despite their current neutrality). Then Napoleon forced Switzerland into a centralized ‘Helvetic Republic’, which didn’t last long. Swiss Neutrality was established after the fall of Napoleon and of this Helvetic Republic, and then finally, in 1848 they became the Switzerland we know and love after adopting the 1848 Constitution following a short revolution (Revolutions were all the rage that year).
So what’s the Switzerland we know and love? A country with 4 different populations living as one in a period of rising ethno-nationalism. The oldest continuous democracy in Europe, second in the world only to the United States, and arguably, the most direct democracy in our times, and even more so in the 1930s. Each canton and the confederation itself decide most of their laws through referendums and a limited representative body. If you’ve ever wondered why the Country Leader of Switzerland is a building, that’s not because it gained sentience, but because there is no Swiss President/Dictator/Regent as other countries have; The Swiss confederation is led by the bi-cameral Federal Assembly and a Federal Council of 7, with a mostly ceremonial ‘First among equals’ Presidential role; only the whole Federal Council can act as the Head of State, not a single member.
Switzerland in 1936 is a country gripped by the fear of war breaking out. Thanks to Germany going through Belgium during The Great War, they know that their status as a neutral country is not sacred, and when their two biggest neighbors, the Third Reich and France inevitably clash, there’s a real possibility one of them will stomp through Switzerland to avoid the other's defenses. How to avoid this, while keeping Swiss Democracy alive, and being ready in case it actually happens are the main pillars of playing Historical Switzerland in Hearts of Iron IV.
So what does the Swiss Focus Tree look like? Well like this: Because this one’s more of a focus mountain than a focus tree, you always start at the peak, with the center being the historical path, and the sides the two planned alt-history branches, but it always starts with the Swiss Guiding Principles focus. This will initiate the Balance of Power system for Switzerland and trigger an event where you can choose the general direction Switzerland will take. Let’s stop to talk a bit about the Swiss version of the Balance of power:
If you don’t know what the Balance of power is, make sure to read Mano de Zombi’s amazing and gargantuan Dev Diary.
Switzerland’s path through the Hearts of Iron period will depend heavily on where the power lays. Is the power mostly on the cantons? That means it will go the way it went historically, with local citizen militias and limited council power, which made it hard for the country to ally with a foreign power, but at the same time, prevented a central government from being intimidated into capitulation. If instead, the Balance of Power is in the council, you’ll be locked out of part of the Historical Path in the middle, but when the BoP closes a door, it opens a window into the two alt-history paths. That’s a topic for my next dev diary though.
Each side and segment has its advantages too, the more cantonal power, the cheaper assigning advisors will be, and moving it to the council will grant you War Support. Some of the decisions in the other systems will depend on it, and others will affect it, so keeping an eye on it will be vital to your survival.
Now let’s keep going down the slope. These two focuses will kickstart the rearmament of Switzerland, giving you a National Spirit that will be helpful for you no matter which path you choose and can be upgraded later.
Switzerland had committed to defending their country both physically and spiritually in 1935; we saw the beginning on the physical part with the rearmament focuses, and now it’s time to recommit to the spiritual bit. This will unlock the Spirit of Helvetia National Spirit, in its passive mode.
As you progress through the Historical path, it will change to a defensive stance, an aggressive stance if you go alt-history or it might just stay in the passive stance. Each one also has an “at war” variation, and different modifiers for the six of them. This is fine… In case you’re wondering who this Helvetia person is, I must take you back to the Helvetic History Hole(tm): Back in Roman Empire times, a tribe called the Helvetii lived in what we now know as the Swiss Plateau, so people since have used the adjective “helvetic” to define confederations, republics and organizations in and around this area, specially after Napoleon created the “Helvetic Republic''. Due to the multilingual nature of Switzerland, its official name in Latin is Confoederatio Helvetica (Yes, that’s where the font name comes from) and its internet domain is “.CH”. From this root, in the 17th century Helvetia is popularized, the personification of Switzerland and the Swiss people, featured in coins, statues, stamps and World War II Grand Strategy games. That’s who Helvetia is.
Ok, so far, I haven’t given you much of a chance to deviate from history, and that’s because up to this point, this is a nation very committed to Democracy, Neutrality and Grassroots Defense, and even the alt-history paths will stem from the desire to keep these. Here is where the slope starts to open up: Historically, Switzerland fortified their borders with its three biggest neighbors, and the three countries it shares languages with, and with good reason, they all wanted to walk through Switzerland towards their enemy, and thought their shared language would serve as an excuse to annex it, or a possible door to friendly relations and taking them from neutrals to allies. Naturally though, fortifying against a country can be seen as suspicious, and that’s why this triggers the start of a very important system: Absolute Neutrality.
As a small neutral nation, you want to keep a balance between all countries around you so none of them feel like you’re favoring one over the other, otherwise, they could use it as a way to argue that you’ve broken your neutrality, and prompt them to invade. This system keeps track of your biggest neighbors’ opinion of you, and allows you to appease them or antagonize them; most actions will have repercussions to the other countries' perception of you. If one of the countries considers you in grave violation of your neutrality, and has a very negative opinion of you, it’ll trigger a timer, at the end of which they’ll get a wargoal against you and likely invade Switzerland, so you better scramble and do anything in your power to calm them, or it’s game over.
This system is pretty flexible and can keep track of up to 4 majors around Switzerland, and even adjusts if one or more are in a faction. Also, many focuses will have negative and positive effects on this system, and others will require you to reach a certain opinion of them before starting them, so it’s integrated into how you play as Switzerland.
After Ban the Swiss Nazi Party (Which does what it says on the tin, plus some negative opinion modifiers), we have the Armed Neutrality branch. This is the central defensive branch of the Swiss tree, and unlocks another system we need to talk about: The Swiss Citizen Militias.
Going back to the Helvetic History Hole now. Because of Switzerland’s political system, there’s no centralized government powerful enough to conscript a large standing army, but on account of where Switzerland is located, it needs to have the ability to defend itself, or at least deter other countries from invading. This is why historically, the Swiss Army relied on training their population and giving them the required equipment to keep at home, so when needed, they would take up arms and form local militias. This means that they could have up to 20% of their population ready to be deployed in as quickly as 24 hours to stand up to any invaders. This is why Historical Switzerland’s military needed its own system. Switzerland will start with a unique Recruitment Law giving it 10% recruitable population, and no negative effects, that’s because the enlisted population is still participating in the economy. The downside is that you cannot train regular troops, only some mountaineers, to represent their small professional army, whose purpose was holding out for 24 hours until the civilian militias were ready.
To make up the bulk of the army, you can train Militias (Italy’s DD also explains this new battalion type). There is a cap to how many divisions you can train, it’s a locked template and on top of that, the Dormant Citizen Militias National Spirit makes them very weak, but that’s ok, you can deal with these issues by earning, and spending Military Readiness.
You can find this system in the Decisions panel, and it lets you use Political Power, Command Power and other resources to gain Military Readiness, and then you can spend it to improve the Militias Template, increase the amount you can train, expand the Military Readiness cap, even increase your military production; but most importantly deploying your Citizen Militias, which removes Dormant Citizen Militia and adds Active Citizen Militia, allowing them to perform at their true level, but giving your economy some penalties, which grow the longer you keep them active.
Back to the Focus tree, under Armed Neutrality you’ll find three branches; The Promote Guisan Branch, the Frontier Defense Plan Branch and a shared one in between. The Frontier Defense Plan was Switzerland’s old strategy of fortifying the borders, and not giving any ground to the enemy, so this sub-branch focuses on improving divisions, and fortifying the borders. Historically, this plan was abandoned when Guisan was promoted to General and Commander-In-Chief. Another of the many quirks of the Swiss military and political systems, is that their military ranks only go up to Corps Commander, and there can only be a single General (Who also acts as Commander-In-Chief) when the country is at risk of, or at war. Only 4 people have been assigned this role, and the last was our guy Henri Guisan in 1939, who brought the strategy the Promote Henri Guisan sub-branch focuses on. Broadly speaking, the Réduit National approach consisted in letting the enemy advance through the Swiss Plateau and systematically retreat the armed forces to well fortyfied and supplied forts along the alps. Once there, they could maintain their extremely favorable positions and wreak havoc on the enemy, stuck on the exposed Swiss Plateau. The expectation was not necessarily to liberate the rest of the country, but to make it clear taking Switzerland wouldn’t be easy, and thus deterring any invaders. This is why this sub-branch focuses on making it easier for you to hold out in the mountains for as long as possible, and even adds the Gotthard Pass victory point, which becomes the capital once Bern is lost. Ok, that’s the Armed Neutrality branch done, now on to the rest!
Switzerland’s neutrality and proximity to the conflict made it a prime stage for espionage, for both the Allies and Axis, so of course, the Swiss government also needed to keep up with it, often collaborating with the Allies, and, sometimes unknowingly, with the Soviet Union through the Lucy Spy ring. On the historical part of this focus tree, you have two ways of getting a free Intelligence Agency:
Federal Police Intelligence establishes the agency of the same name, an extension of the existing Federal Police, and gives you a National Spirit with a bonus to counter intelligence, and opens the door SpAb to further counteract foreign intelligence efforts, and other fun militaristic alt-history stuff I won’t talk about today. On the other side we have Buero Ha, which focuses on building spy networks in other countries and opens up a bunch of defensive, cultural and resistance oriented focuses. Ha History Hole: The Swiss government couldn’t risk other countries finding out they were gathering intelligence on them, so to keep it under wraps and have a measure of deniability, they established a covert pseudo-independent intelligence office; Hans Hausamann’s Büro Ha (The “Ha” part comes from his name). It was an office in a hotel in Teufen with a couple of desks, and they gathered and reported on intelligence from different sources, including the Lucy Spy Ring, which deserves its own historical rabbit hole but not today. And that, in very broad strokes, is the Swiss Focus Tree, but there’s still some important things to talk about.
I’ve babbled on about Switzerland’s unique political system in real life, but now it’s time to explain how it’s being represented in HoI4: Switzerland will start with 3 assigned political advisors, and these represent the ‘leading’ Federal Councilors (Out of the 7 on the real council), plus a President of the Confederation. Each advisor has one of the new traits unique to Switzerland, most of which correspond to the advisor’s role and/or political position during the period. Each year, starting from 1937, you’ll get an event prompting you to elect a new president from your active advisors, this advisor will be removed, and retired forever, but for the next year you’ll get a powerful decision based on the trait they had when they were advisors. After that you better assign a new advisor quickly, or you’ll suffer the consequences of an empty seat. In total there will be at least 25 Political Advisors to choose from with at least 10 different traits, that I hope will make for an engaging and unique system, and a key to the Alternate paths through its interactions with the Balance of Power. More about that on my next Dev Diary. At this point you’ve probably noticed that the map has changed a bit in and around the Alps, let me explain what we’ve done: The most important change is that we reshuffled the states in Switzerland, it now has five states: The Swiss Plateau, Western Swiss Alps, Eastern Swiss Alps, Ticino and Jura Mountains (Fun fact, this is where the term Jurassic comes from), there’s also some new Victory Points. On top of that, Austria did get something after all, Voralberg, a new state I might talk about in the next Dev Diary. The other change you might’ve noticed is that a lot of the provinces along the alps now have impassable borders, helping represent how much of an obstacle the alps were in moving troops and attacking (Unless you happen to have elephants), and showcasing one of Switzerland’s bargaining chips during this period: the Saint Gotthard Pass. This route was vital as a fast passage between Germany and Italy, and the possibility of its destruction was a major deterrent against Invasion. HoI4’s Switzerland now has 2 out of the 3 connections through the alps, making it a more tempting prize for anyone playing one of its neighbors; German command even considered invading Switzerland as a way of retreating from Italy in the late stages of the war. And that’s about it. If these 2800+ words didn’t at least pique your interest in the Swiss Focus tree, well… We do have one extra card up our sleeve:
Switzerland will feature the first dog in a Focus Icon, also featured as a National Spirit: Brandy the St Bernard. The focus Spirit of Saint Bernard will give bonuses for Field Hospitals, slightly ahistorical, but worth it. Hope this Dev Diary helped you understand all the ways the real Switzerland was and continues to be fascinating, and how it serves as a great base for unique gameplay for Hearts of Iron IV, or at the very least provided some mild entertainment and a nice dog picture.
And if you won’t have to wait too long for another super interesting country, because next week, it’s Ethiopia time! A country that has always been pivotal to World War II, now gets to have its moment to shine in Hearts of Iron IV.
Formazione Generali! The wait is over. In this gigante developer diary we explore the majority of the Italy focus tree! Of course, we’ll save some secrets for later down the line.
Due to Steam post limitations and the length of this diary, we can only host the publication on our own forums.
Balance: - Improved tank conversion costs for tank modules - Limited Stabilizer tank module to one per vehicle - Armor stat ARMOR_VS_AVERAGE changed from 0.3 to 0.4 to patch piercing - Reduced resource costs of tank upgrades, armor upgrades improved - Reduced high velocity gun piercing - Reduced tech piercing bonus for tank destroyers and motorised AT - Adjusted flame tank terrain modifiers - Recon tank stats are now proportional to unit size (including armor) - Equipment conversion speed bonuses unlocked by tech is no longer applied to tank production lines when NSB is active. Instead the bonus reduces the base cost of the conversion, which now is 90% of the chassis cost up from 20%. The techs will reduce the cost to 50% and 10% respectively. - Motorised equipment is now essential for motorised arty/AT/AA battalions
UI: - Changed the icons for the techs Improved Equipment Conversion and Advanced Equipment Conversion to better communicate their effects.
Database: - Fixed an issue where the only available 3d model for modern German tanks was an AA vehicle if axis armor pack DLC is enabled
Bugfix: - Soviet Atomic Bomb Project focus is now properly tracking the current number of academies built and will now be unlocked when appropriate. - Fixed issue in which Invaders Must Die state modifier was not properly removed after the propaganda campaign finished. - Soviet focus Modernize the Far Eastern Fleet will now grant a different National Spirit if DLC Man the Guns is not active, using modifiers that work without MtG. - Small fix to a Bulgarian news event so that if Bulgaria is already in the Comintern the text makes sense - Turkish focus Align Bulgaria will now get bypassed if Bulgaria is a subject of any country (not only Turkey), so that the rest of the branch does not become inaccessible if Bulgaria is a subject of another country. - Fixed Issue in Soviet decision category Middle Eastern Diplomacy in which there was a non-existent tag being checked against. - Doctrine bonuses to tank max speed will now be taken into account when determining if a tank design's max speed is too low making it invalid. - When calculating total trucks needed at country level, take into account all controlled nodes and not just owned ones. - Added the missing sound effects for alert_doctrine_unlock, alert_officer_corps and alert_losing_trains. - Fixed equipment conversion resource cost calculation to prevent resources from sometimes being counted twice.
The long tradition of HoI anniversary surprises, while slightly delayed, has not been forgotten.
Today, we have the pleasure of announcing to you the next milestone in the Hearts of Iron story: By Blood Alone. Over the coming months, we’ll be revealing more on what each of these features consists of, but for now enjoy a snapshot of the future for Hearts of Iron.
In By Blood Alone, you will chart the course of Mussolini’s regime in Italy or subvert Italy’s historical path in one of many new alt-historical paths in the new Italian focus tree, driven by the constant involvement in war from the beginning to the end of the game.
Choose to take on the task of resisting the Italian colonial occupation as Ethiopia in their new, expansive focus tree. Will you go into exile only to return stronger than ever when the greater conflict ignites, or can you beat the ultimate challenge and evict Italian troops from your land before forging a new path for your country in the prosperous Horn of Africa?
Experience the true meaning of ‘building tall’ by balancing your precarious situation as Switzerland, sandwiched between an ever-growing array of totalitarian regimes. Will you succumb to their pressure, or stand as a shining beacon of democratic ideals in the face of greater odds?
Alongside a number of changes to the air warfare system, take advantage of a comprehensive Plane Designer feature, as well as numerous quality of life improvements and new functionality for owners of La Resistance and the intel system. Accompanying the plane designer, we’ll be adding a whopping 67 new 3d plane models including a wide array of new Italian planes as well as going back and adding models to many important planes currently lacking them.
In By Blood Alone, you will be able to make use of a variety of new demands in the overhauled peace conference feature. Demand the demilitarization of states, the dismantling of military industry in defeated foes, civilian factory war reparations, and access to resource rights in addition to the expected array of peace conference actions. Of course, we can’t forget that navies played an important part of post-war negotiations - augment your victory by partitioning the navies of defeated foes, and put these behemoths of the sea to good use as you look towards the next conflict.
Divisional Commanders will now be the bread and butter of your future officer candidates. Grow their skills passively as they perform their duties in command of divisions, reward their actions in combat with country-unique medals, and see their persistent achievements follow them as they are promoted to higher positions over the course of a game.
Encounter up to 20 new unit models and associated SFX, 12 new radio-integrated music tracks, and new diplomatic actions as well as many more quality of life and functional improvements to HoI in By Blood Alone.
As mentioned above, we’ll be delving much deeper into what each of these features will consist of in the coming weeks and months leading up to release. Stay tuned for more information!
Hello there, C0RAX here. Welcome aboard to my dev corner, in this thread I'll be going over the core introduction of the planned changes to naval gameplay.
Why? The Live System:
Good ship design is unintuitive.
Combat revolves around exploiting oversights
Ahistorical meta
Goals
Clearer design process
Meta based upon good structure and multiple key values
Making historic choices in naval design and composition work well in game
Rebalance Overview
Tech Tree
Ship Designer
Hit profiles
Spotting
Fleet composition
Tech tree
The most obvious change is our first port of call today, this is the tech tree. There are a number of changes here that will be explained in further detail further to the aft of the dev corner.
So firstly the naval tech tree has been split into 2, the naval tab contains hulls and tech directly linked to hulls. Let's take a look at what that looks like.
As you can see it's much more concise than before, armor techs have been combined so each level will unlock both heavy and cruiser armours and are not linked to any specific hulls. SH armor still remains part of the super heavy battleship.
Moving on to the new “Naval Support” tab.
Here you will see quite a difference from the old tech tree. Gone are the secondary battery techs as they are now research via the medium gun techs
Additionally the naval shell upgrades are now part of the gun lines acting as an intermediary tech between new modules. But don't worry about having to research more techs, XP reductions are gone but base research times are down.
Dual Purpose Guns
And let's finally address that big elephant in the room… Dual purpose guns now branch off the light gun line. They are a 1939 onward tech, with the UK,USA,Japan & France starting with the Basic dual purpose Battery Researched and historic ships starting equipped with dual purpose Batteries and dual purpose Secondaries. Dual purpose guns lack the piercing of regular guns but make up for it by also providing AA.
The current values for the dual purpose batteries are not final and are currently aligned with their non AA equivalents.
Finally we have the 1944 Advanced medium dual purpose battery which packs a punch both to ships and planes, which should you reach it could wreak havoc for enemy aircraft and destroyers alike.
Hit profiles & damage ("well the front fell off")
Quick primer on hit profile in case you don't know what they are. A Hit profile is the calculation used to determine how easy it is to hit a ship. This hit profile is then divided by the accuracy of the weapon type a ship is firing (10 * (Hitprofile/weaponaccuracy)^2).
Any other effects that affect hit chances such as weather/time of day are applied to the final value. Currently the live game calculation for a hit profile is the ( (visibility * 100) / speed) .
So a ship with a high hit profile will be easier to hit than one with a small hit profile.
A change to the hit profile calculation is aimed to reduce the impact of speed on hit chance and should flatten the effect of speed for much slower ships. The current but not final working formula is:
( (visibility * 100) / ( (speed/2) + 15) )
In addition to this there have been some other changes for hit chance
New hit chance modifiers that affect hit chance in the same way that weather affects hit chance. The new modifiers replace existing stat modifiers for modules/tech.
Radar and fire control increase light and heavy guns hit chance
homing torpedoes now increase torpedo hit chance
Base critical chance is reduced
Spotting
Spotting is now min capped at 0.01% progress per hour, so you will always spot a task force after 10,000 hours (417 days)
Random chance to instantly spot (encounter) equal to your hourly progress, so if you have a 4% hourly progress you also have a 4% chance to “encounter” a task force.
Sub and surface detections for a task force are now listed in the task force information tooltip.
Fleet Composition
First joining an ongoing battle was very painful and making strike forces much less useful this should be much less of an issue with much lower and shorter lived penalties for positioning.
Additionally SUPREMACY_PER_SHIP_BASE has been reduced from 100>75 so that IC and manpower have a greater impact on naval supremacy.
Ship Designer
The ship designer has some of the most major changes to existing ships and modules. Let's go through them by groupings..
Firstly I want to say that you can no longer have both medium cruiser and light cruiser guns on the same design, fitting both will invalidate the design. This will eliminate one of the largest exploits in current ship design and should prevent ships being unintentionally protected by screening.
Now we will get into some gritty details of the current value changes for the rebalance.
(RED=changed values, BLUE=New values and BLACK=unchanged)
Changes to speed,reliability and Production cost.
Changes to speed for hulls
On speed it should be much harder to get 40kt ships now - faster ships hover around ~35kt with slower ships being in the 30kt range. Some older ships and submarines remain well below 30kt and will need upgrading if you want their speed to match modern ships.
Submarine Visibility
Now these are the normal changes to modules and ships, but that's not all we have some new modifiers that are replacing or adding to existing modules too.
Fire control/Radar
Torpedoes
Armor
In addition to the new modifiers below for armor a review of armor values and piercing is planned, but I don’t have a completed set of changes for that yet so you will have to wait for future announcements on how that looks.
As always If you have any questions feel free to ask here.
Hey Everyone! I am back this week to talk to you a bit about some changes we are making to air management and combat. The first thing I want to get out of the way is that this is not a “Man the Guns” style rework of combat and management systems. Our focus on air changes have mostly revolved around quality of life and balance changes to existing systems, while largely maintaining the structures people are familiar with (with a couple of exceptions). So, let's get into it!
Starting off with a QoL change I am very happy about: Simplified Wing Deployment. Anyone who has experience with managing air wings probably has some complaints about how deploying wings works. The live system requires three clicks in the best case (four if you include choosing a base) to deploy a single wing into an empty airbase. In the worst case this requires more clicks and doing some math for creating a large wing that can later be divided evenly. Now, we are adding quick deploy buttons to the air base UI to allow deployment of a wing in a single click. We are also keeping the old deployment menu for more advanced deployment options. Also, in this menu, we have simplified the flow for deploying single and multiple wings at once.
WIP UI design of simplified wing deployment tools. Note the art style here is not indicative of a change in art direction for our UI. In the first image we see the setup that can be done to select fast deploy options from any air base.
In the second Image we see the newer version of quick deploy within the advanced deployment menu. You now have a set of filters to only show planes of a specific type, and you can now set the reinforce preference on all of the wings you are about to deploy, or individual ones.
One of the most visible changes to air management, and hopefully a big quality of life improvement for most people, is the addition of Air Groups. The first thing I want to say is this is not Army Groups or Fleets. For now, and the foreseeable future, we are not adding Air Marshals or any sort of mechanical impact to using Air Groups. Air Groups are an organizational structure and nothing more. What it will do is enable the grouping and selection of multiple air wings across multiple locations bases for easier management. These groups will be displayed when in the air map mode so that you do not have to hunt down your wings on the map when you want to interact with them.
A very much WIP view of our current air groups
Of the changes we are making, one of the most notable is moving to standardized/fixed wing sizes. This change comes with a loss of flexibility in some situations and makes managing smaller numbers of airplanes a bit more complicated. However, I think that real air combat in HoI4 is measured in thousands of airplanes and not dozens. We are currently looking at 100 sized wings for most aircraft, with size 10 wings for a few specific equipment types(scout plans, CV planes, ect). This allows us to streamline wing deployment and some other management stuff such as not having AI take up weird percentages of air bases. It also makes balance easier and fixes a few exploit cases. This may take some getting used to but I feel it improves the overall experience of managing large numbers of aircraft.
The final change I want to discuss today is an addition to the combat system. We are adding a new mechanic for intercepting planes in regions enroute to their target. In most cases, engaging planes in their target region will still be most effective. But in others, such as when range is a factor, the region being crossed has a bunch of engagement and spotting bonuses, and in a few other cases leaning into combat in an intermediary region can be a good idea.
Beyond these more concrete changes we are doing a balance pass on existing air combat mechanics. A lot of this is still too WIP to discuss, but I would like to highlight one of our objectives which is decoupling agility and speed with more impact given to speed in later air superiority fighter designs, but more on that at a later date.
As always, I wish you all the best and don't hesitate to tell us how these changes make you feel. Until next time o7