Command: Modern Operations - Roby7979
Countdown to War Planner: Simulation Additions & Improvements
Simulation Additions & Improvements
NEW FEATURE: ENERGY-BASED FLIGHT MODEL FOR BOOST-COAST MISSILES
Boost-coast anti-air missiles (ie. most tactical missiles that are not powered continuously) now use a much more realistic flight model that distinctly models the initial boost-sustain and post-burnout regimes, and takes into account the effects of gravity (shedding speed while climbing and regaining it when diving) and aerodynamic drag. The drag changes with altitude, built-in drag coefficient and whether the weapon is maneuvering (pitching/turning) or not. This change makes it possible to apply real-life “exhaust the threat” tactics and further constrains edge-of-envelope shots.
The onboard fuel (and thus boost duration) varies with the type of missile propulsion. Most AAW missiles (e.g. Sidewinder, Sparrow, all Standards, pre-D AMRAAMs etc.) still rely on the “traditional” boost-(optional sustain)-coast sequence, in which case the rocket motor is active usually for a few seconds. Some missiles (SA-4, SA-6, Sea Dart, Meteor etc.) use ramjet propulsion to provide for a much longer burn duration, and this allows them both a much higher average speed-to-target but also a higher energy state on the terminal engagement, which increases their chance of impact. Other new systems like the AIM-120D use “dual-pulse” rocket motors to again achieve a substantially higher overall energy state.
(NOTE: On missiles that use this model, the “fuel bar” indicator now represents only the remaining boost-sustain fuel, NOT to the total remaining energy. After burnout, the fuel bar is removed and the weapon will coast until it reaches its stall speed.)
SIGNIFICANT CHANGES IN DEFAULT AIRCRAFT DEFENSIVE MANEUVERS
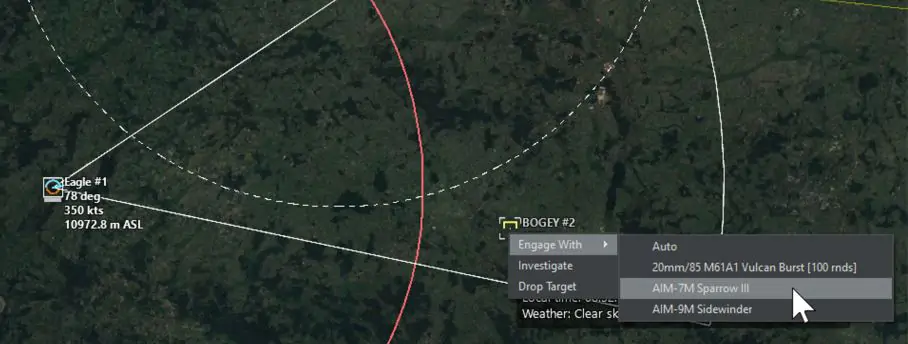
Instead of beaming and diving to the deck by default, now they will first try to outrun an incoming missile while matching its relative pitch (i.e. climb if the missile is below them, or dive if it’s above them), and if the missile closes the distance they will then attempt to beam it (or its parent guidance) while also reversing their climb/dive.
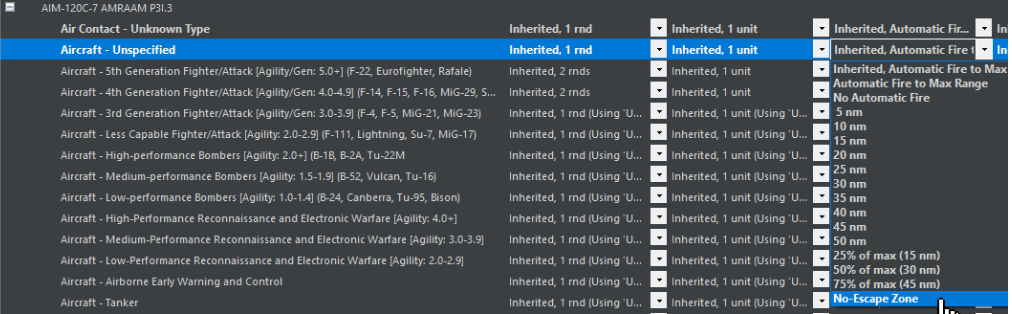
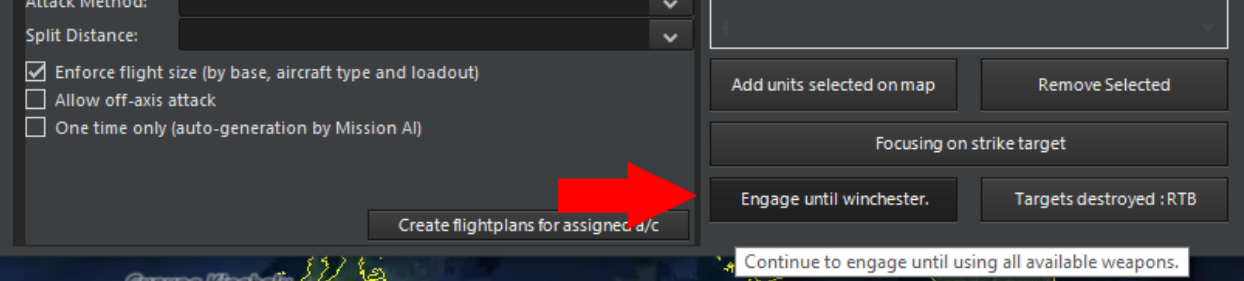
To counter these counters, new additional WRA firing-range settings (including “No-Escape Zone”) are available, offering a much more comprehensive set of range options (see the UI improvements article). A2A and S2A missile engagements are, as a result, both more dynamic and far more realistic now.
(NOTE: These two changes have been arguably the most controversial ones during the public beta of the War Planner. The typical complaint by many players is “My AMRAAMs are now useless unless if fire them almost at point-blank range”. Our response to this is: EXACTLY. Welcome to the real-world kinematic limitations of most AAW missiles. This part of the reason that most (all?) real-life BVR kills have been achieved at significantly less-than-maximum launch ranges. Watch this BVR tactics video from F4 BMS and note how on each case the missiles are dragged-out rather than outmaneuvered. WRAs and configurable firing ranges are a thing – and with the new percentage-based settings and NEZ they are more powerful than ever. Learn them, practice with them and use them. Or get used to becoming your adversary’s chew-toy, first by the enemy AI and later by other human players as MP comes to commercial CMO.)
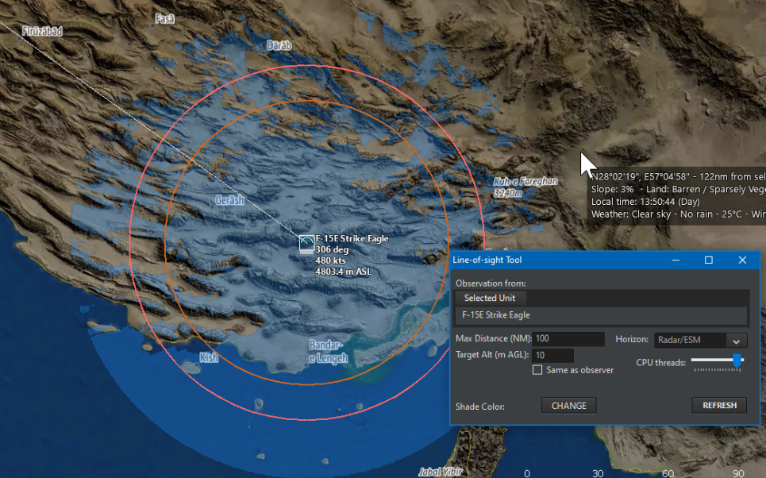
NEW FEATURE: PASSIVE COHERENT LOCATION SYSTEM (AKA “PASSIVE RADAR”)
The term “passive radar” has grown to broadly encompass two significantly different concepts; one is ESM/SIGINT-based air-surveillance systems and the other is multistatic radars with third-party emitters. The latter is called Passive Coherent Location System, and for a general background on the technology and CONOPS see here: https://en.wikipedia.org/wiki/Passive_radar
PCLS systems can be very capable against VLO targets (if the geometry is right), and their passive nature makes them inherently less vulnerable to SEAD attacks (although of course the emitters-of opportunity may themselves be targeted). On the other hand the geometry restrictions can be a tough taskmaster (the emitter, the receiver and the target must form a clean-LOS triangle otherwise there is no detection) and the signal propagation geometry sharply reduces the effective detection altitude. Therefore such systems are most effective when combined with other traditional active & passive surveillance sets rather than operating completely on their own.
The v488+ releases of the DB3000 database contain several “non-detecting emitter” platforms such as radio, TV, and cellular antennas or navigation beacons such as LORAN. It also contains a prototype PCLS vehicle that can be used in testing and as the basis for operational variants.
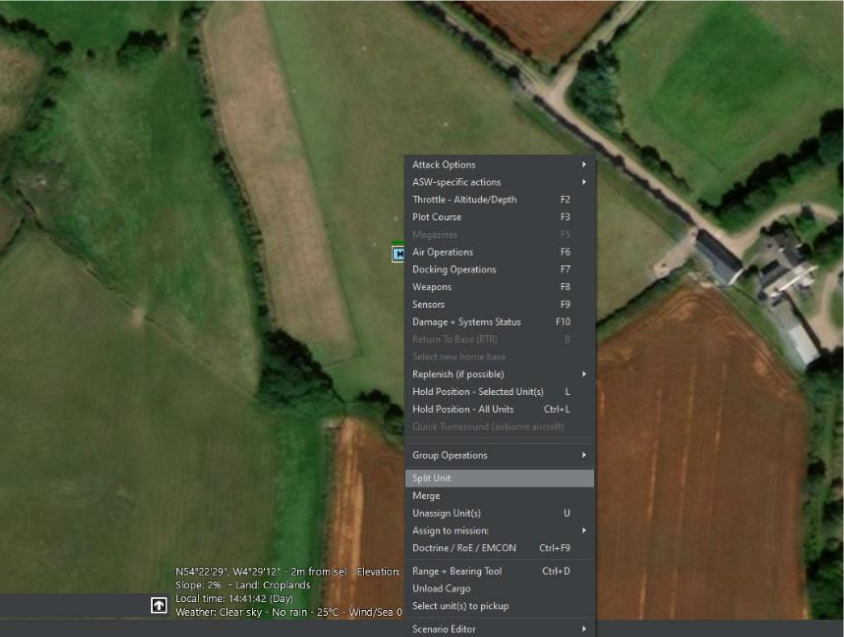
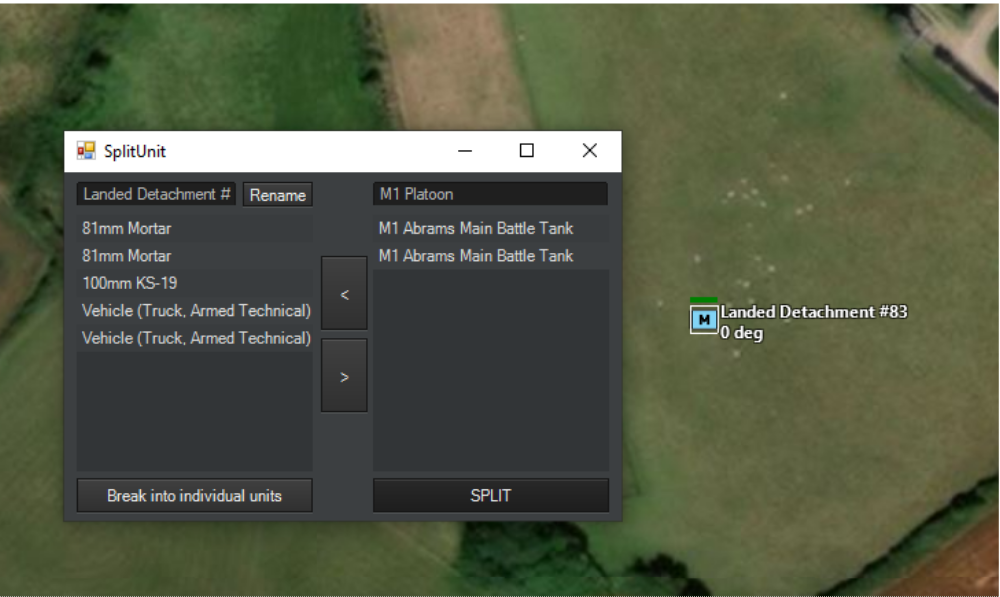
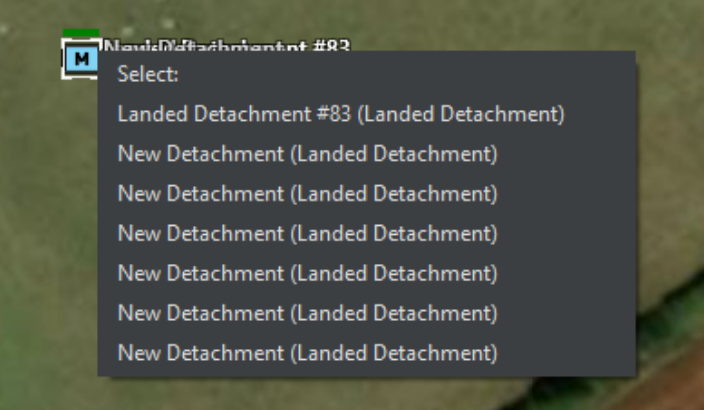
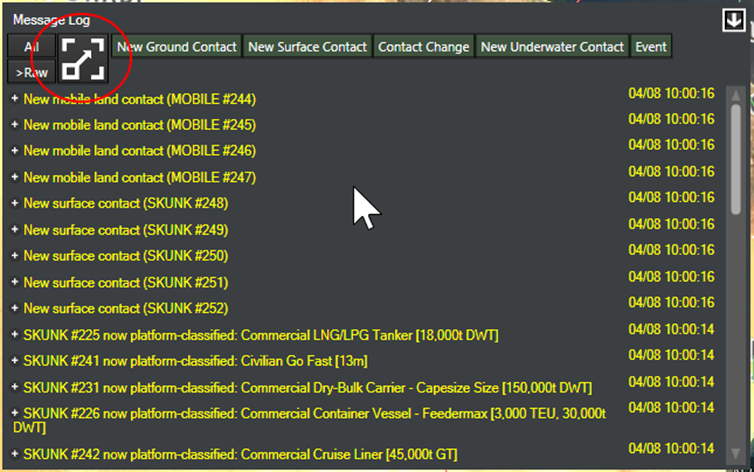
NEW FEATURE: DISTINCT MOBILE GROUND UNITS
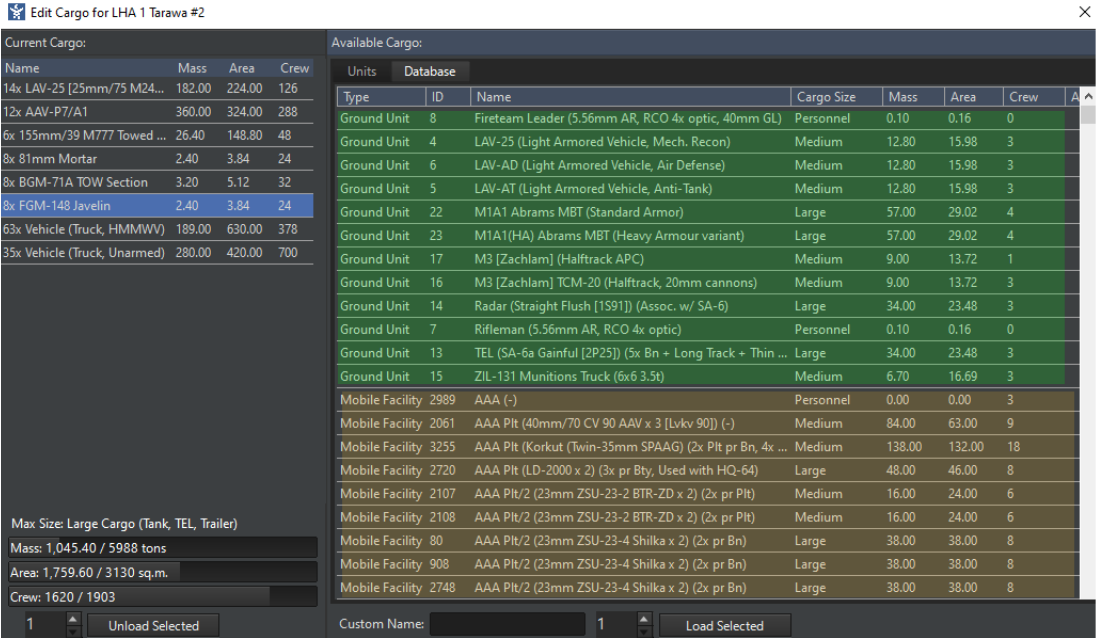
In addition to modelling mobile forces as “aimpoint facilities” (see: https://www.warfaresims.com/?p=1159 ), it is now possible to explicitly model individual vehicles with their own customized properties such as armor, propulsion, mounts, sensors etc.
The new-style ground units have unlocked certain brand-new capabilities, such as true amphibious vehicles (with distinct speed & fuel consumption properties overwater and on land).
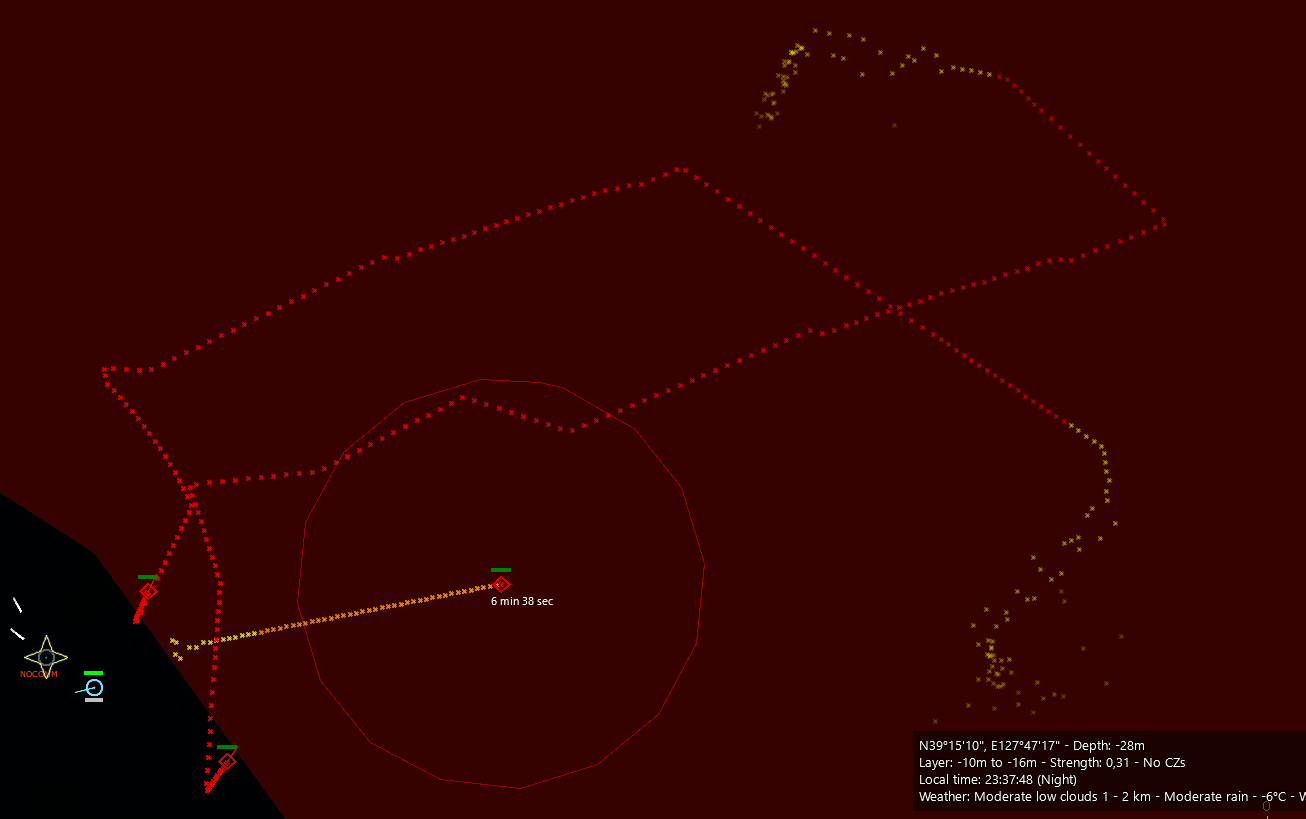
NEW FEATURE: INTERMITTENT EMISSIONS
This band-new feature allows to control the behavior of emitting sensors so they emit in intervals instead of only continously or never.
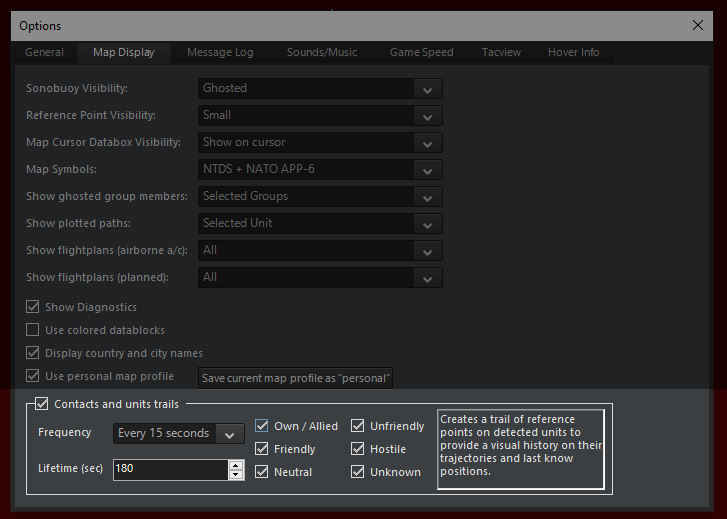
Alert levels
The first thing to do is to configure a unit’s interval according to the alert level. The alert level is set in the EMCON setting of any unit and affects the whole side. Below, in the “Active Emission Interval” we have the intermittent emission configurations for each alert levels. The side’s alert level will determine which intermittent emission configuration to use:
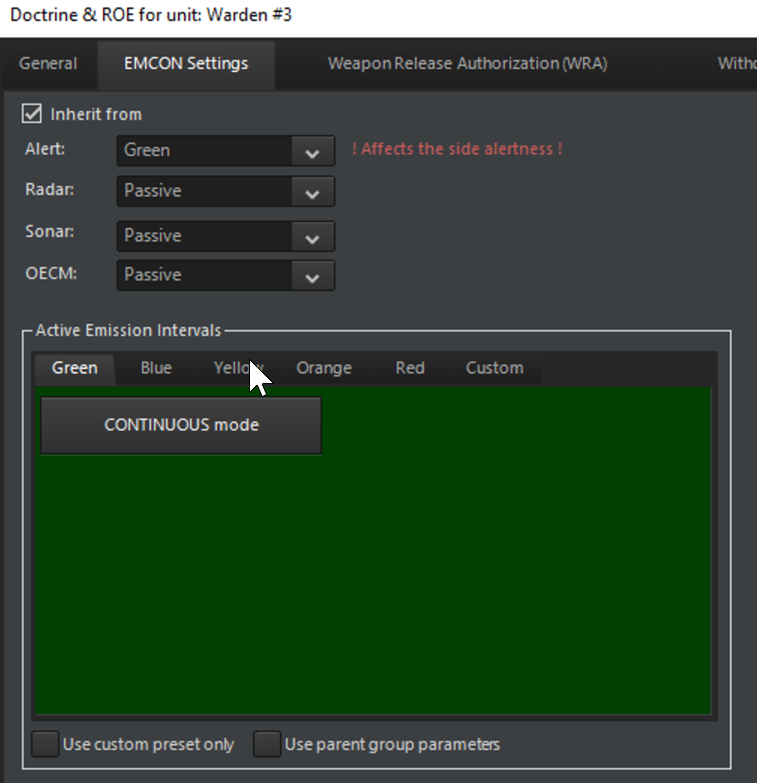
Emission Intervals
Let’s configure an EMCON behavior for the yellow’s alert level. By default, the interval type is set to continuous, this is the usual behavior in command where an enabled sensor will emit continuously. Emission Duration is the duration in seconds of an emitting phase. Interval is the duration in seconds of a silent phase between 2 emitting phases. Interval random variation is the random duration in seconds we add to an interval. This allows unpredictability of the cycle and is particularly useful to disrupt the enemy’s plan:
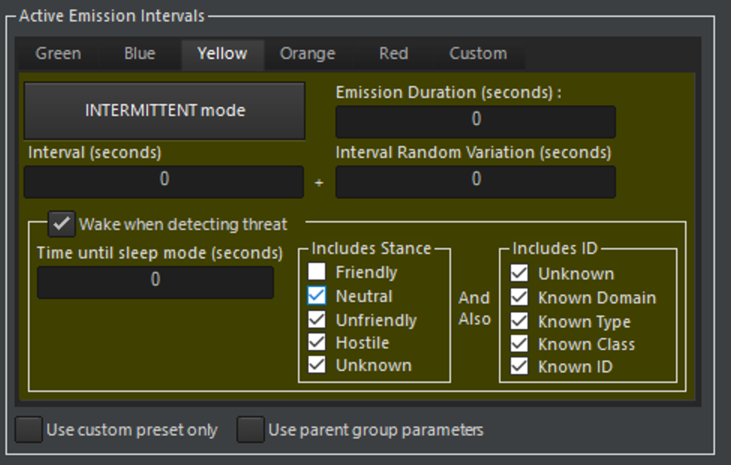
The action of waking up mean that the radar will temporarily turn into continuous and ignore intermittent behavior, until time until sleep mode is elapsed. The Wake when detecting threat checkbox controls this behavior, a threat is a unit defined by the checkboxes group includes stance and includes ID. If the radar detects an unfriendly or hostile or unknown contact with any identification level, then we wake up the radar.
If you want a unit to inherit all configuration from its parent check Use parent group parameters:

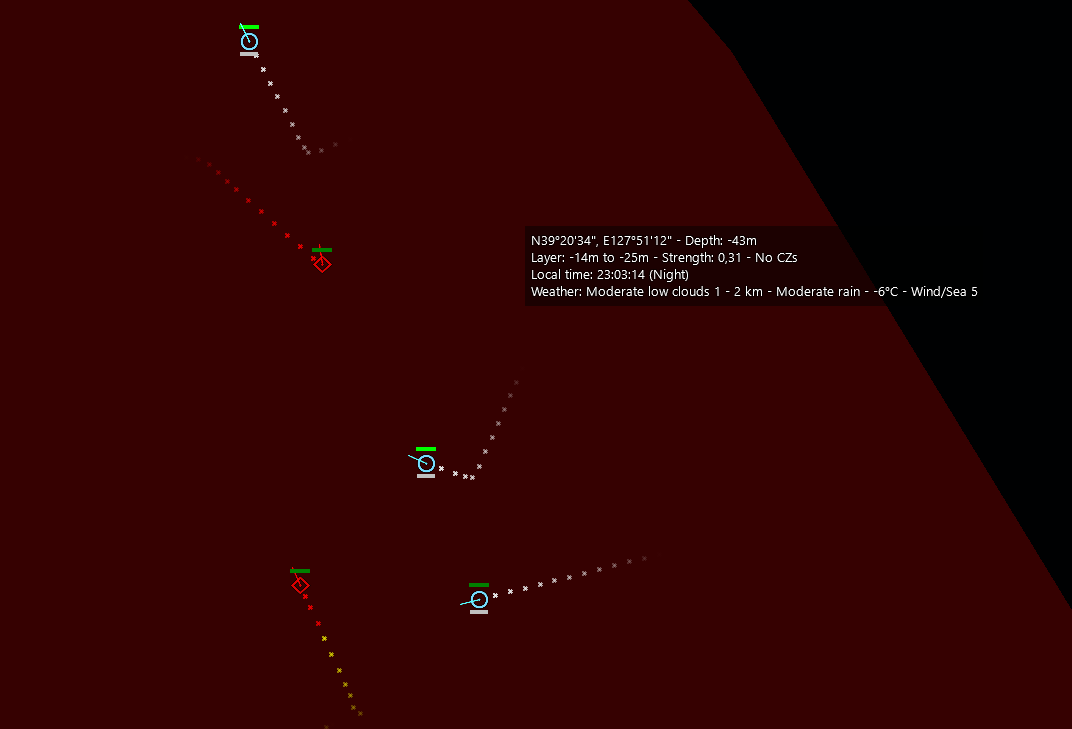
NOTE: intermittent emission will NOT make a radar active or inactive as depicted below:

Intermittent emission controls whether or not an active radar will be silent or emitting at a given moment.
Custom emission intervals configuration
If you want to use all alert level, you will need to define each interval configurations, and perhaps you want a way to override the alert level and have some units feel special and use their own rules:
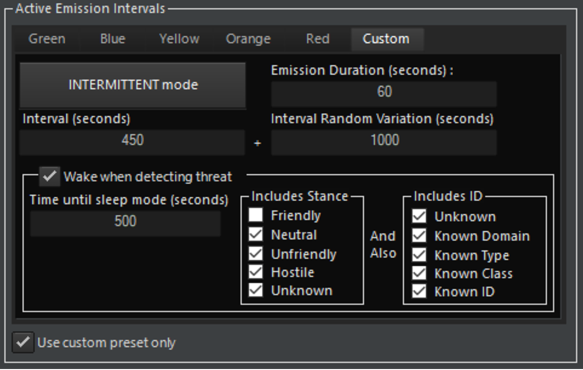
To do this, populate the Custom interval tab as you will and make sure the Use custom preset only checkbox is checked.
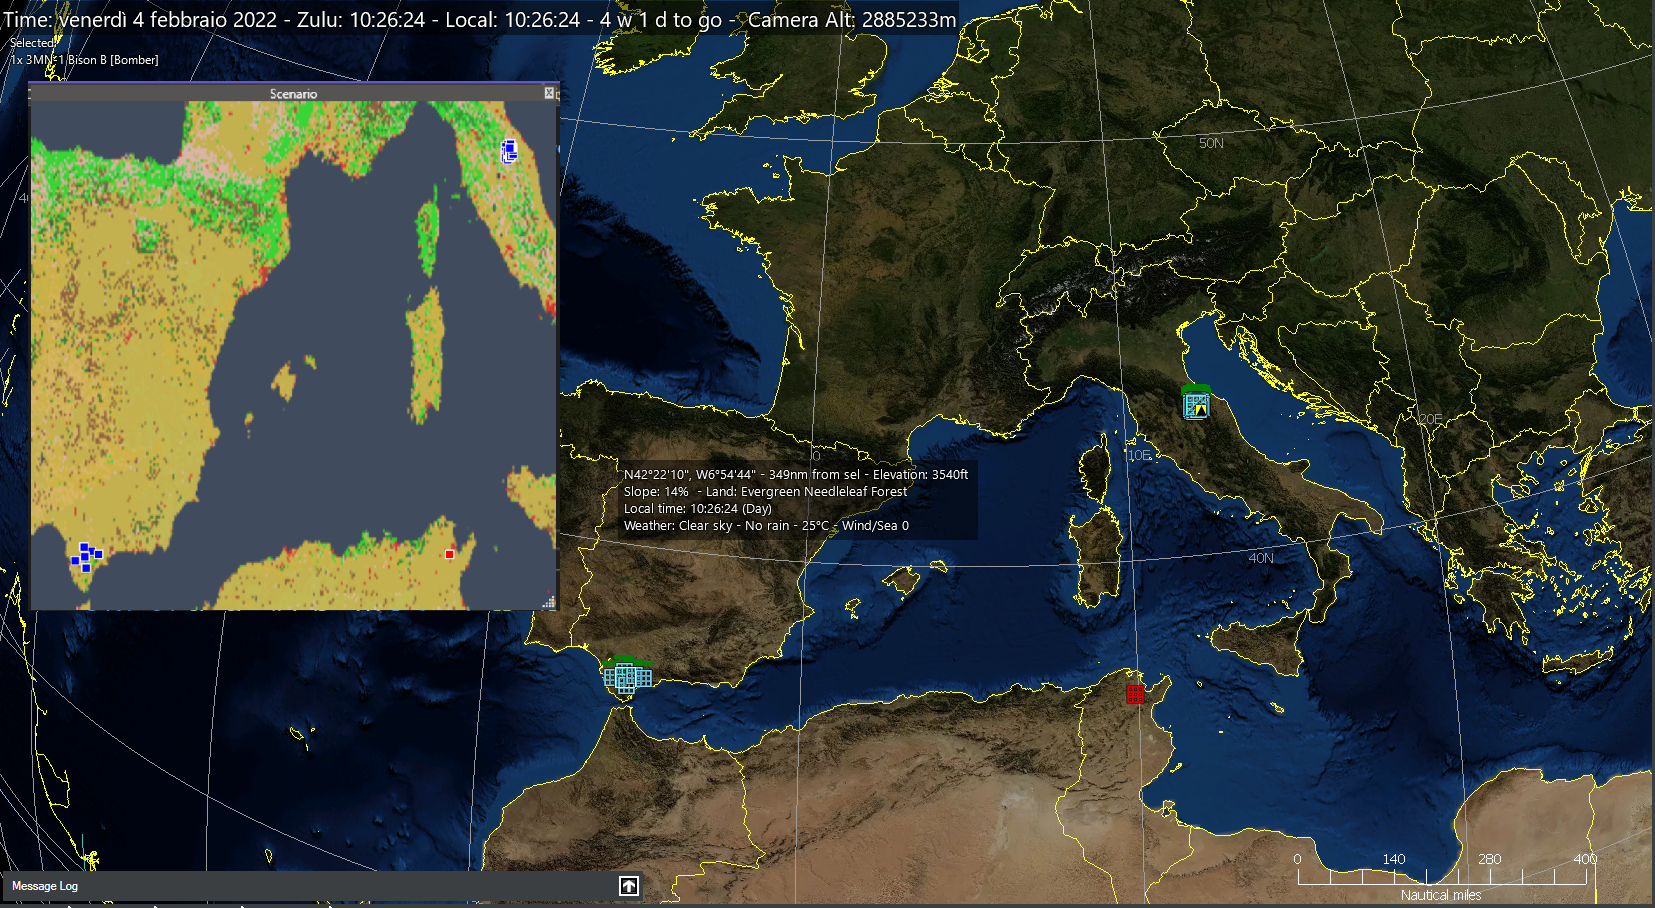
NEW FEATURE: CUSTOM ENVIRONMENT ZONES
Multiple & moving weather fronts? Check. Bend the laws of physics on a localized area? Can do. Specify carefully hand-picked weather, terrain and other environmental properties in order to test or compare sensors and other environment-dependent components? Yup. Unleash your inner nature wizard with this puppy.
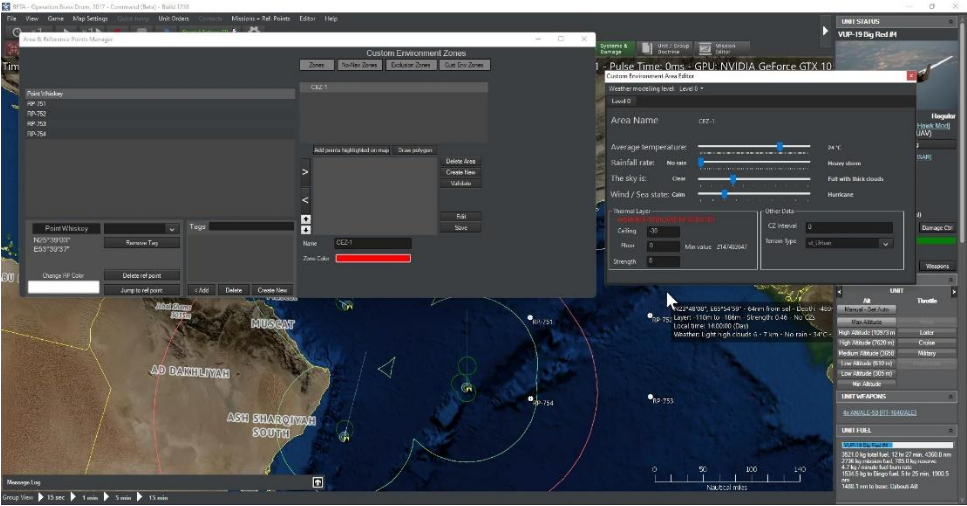
Using this new feature, you can define a zone where you can tailor the environment & weather properties. This can be useful if you want a “controlled environment” for sensor checks, mobility & damage tests etc., but can also be used as a localized “weather override” for scenario purposes.
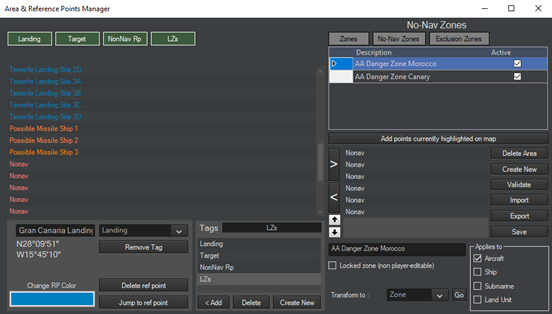
To create a CEZ, bring up the Refpoint Manager and switch to the “Cust Env Zones” tab. Create a zone as usual, and then click on “Edit”. A new window should appear, in which you can define the weather & environment properties:
NEW FEATURE: PALLETIZED WEAPONS AND OTHER STORES
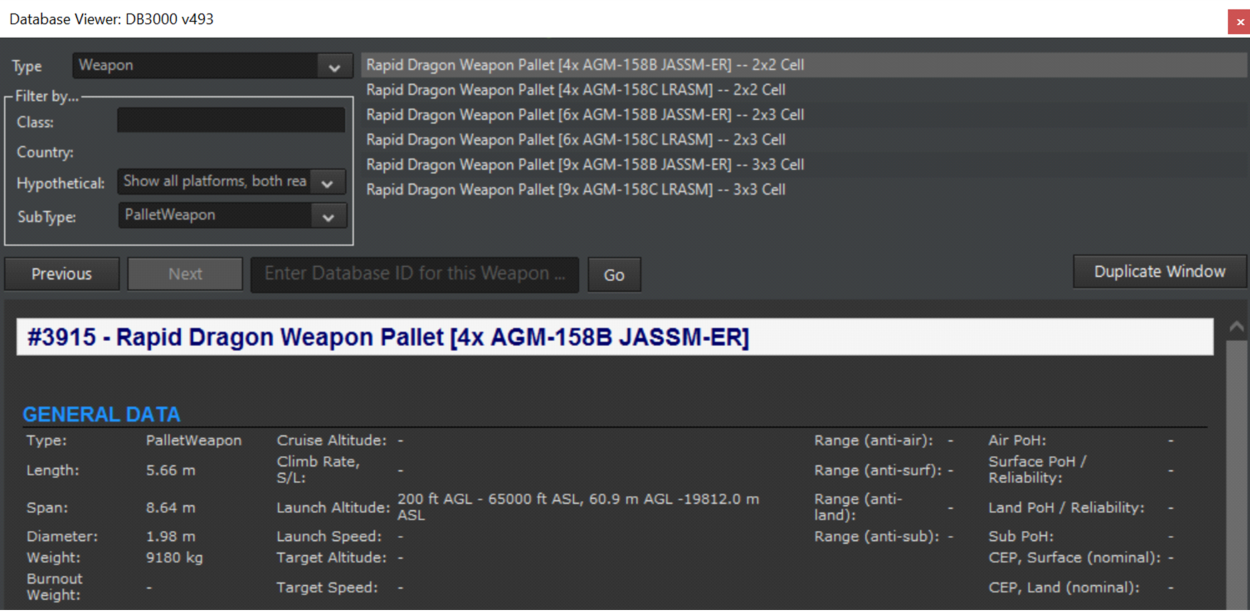
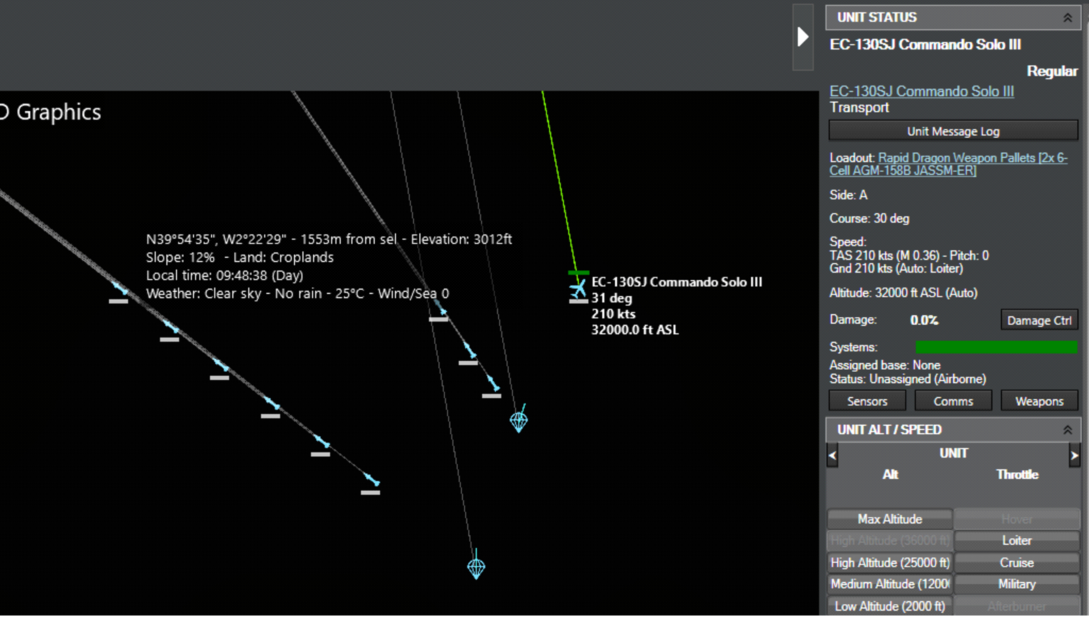
This is a new capability that has been making the public rounds lately, as a result of a series of videos by AFRL on the Rapid Dragon concept. using pallets packed with guided weapons, aircraft not usually associated with frontline attack operations (such as transports) can contribute to the firepower volume allocated at enemy forces.
As usual, there are caveats. The fact that weapons are fired from released pallets, rather than individually fired from the parent platform, means that weapon allocations must happen in batches; if a single missile in say a 12-pack is allocated, the full dozen has to be allocated either on the same target or others. (There exists of course the theoretical option of allocating only the desired amount of weapons and just sacrificing the rest of the pack, but the cost of the majority of modern weapons makes this an unlikely scenario).
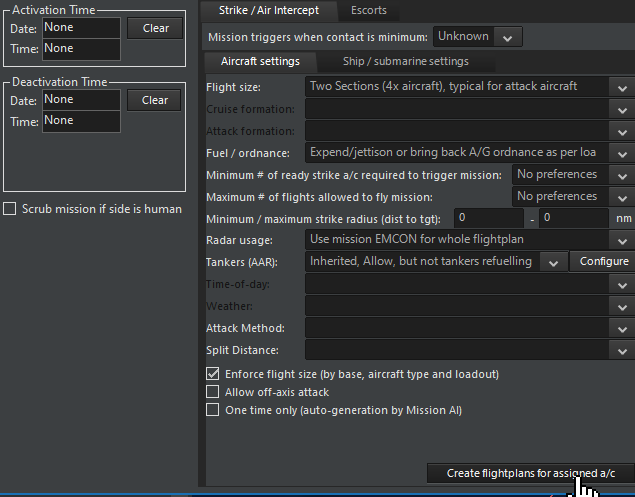
Therefore, accurately modelling this new capability (and the decisions & restrictions it enforces) to Command has been a lot of work. Here’s what we’ve come up with:
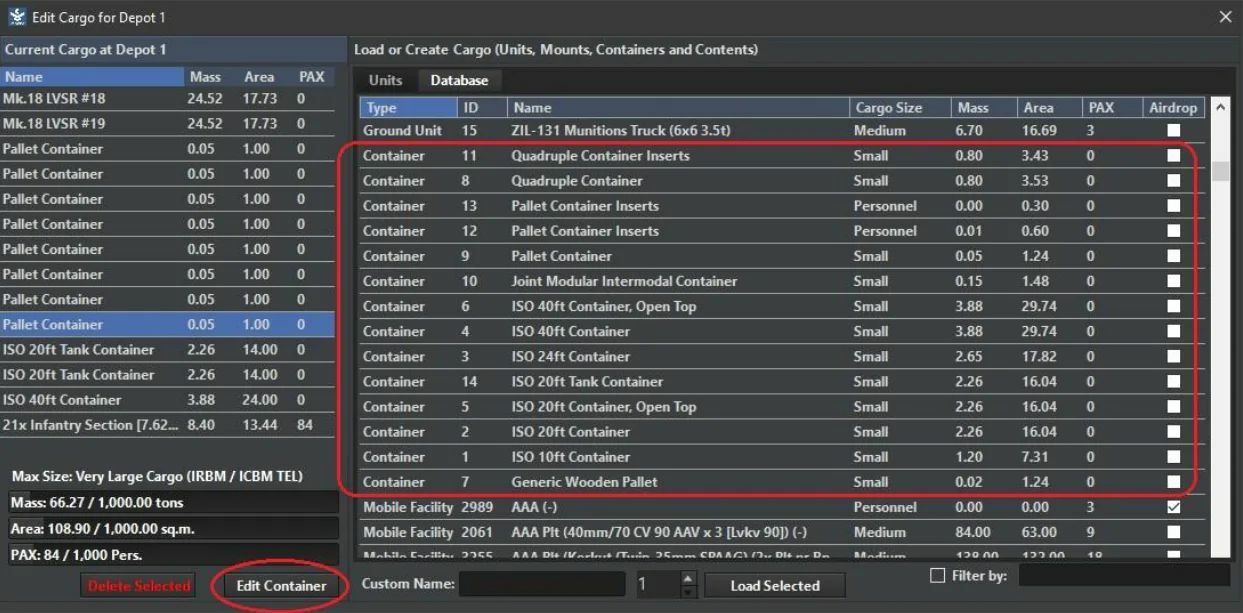
Pallet Weapon: the paradroppable system (usually a pallet, but may also be a container etc.) containing the payload
Pallettized Weapon: the content of the pallet, the actual weapon that will be delivered
Pallet Weapons can be fired by specific aircraft that are equipped with suitable loadouts (C-130, C-17 etc.). Several new representative loadouts have been included in the DB3000 database:
Pallet and Weapon Allocation
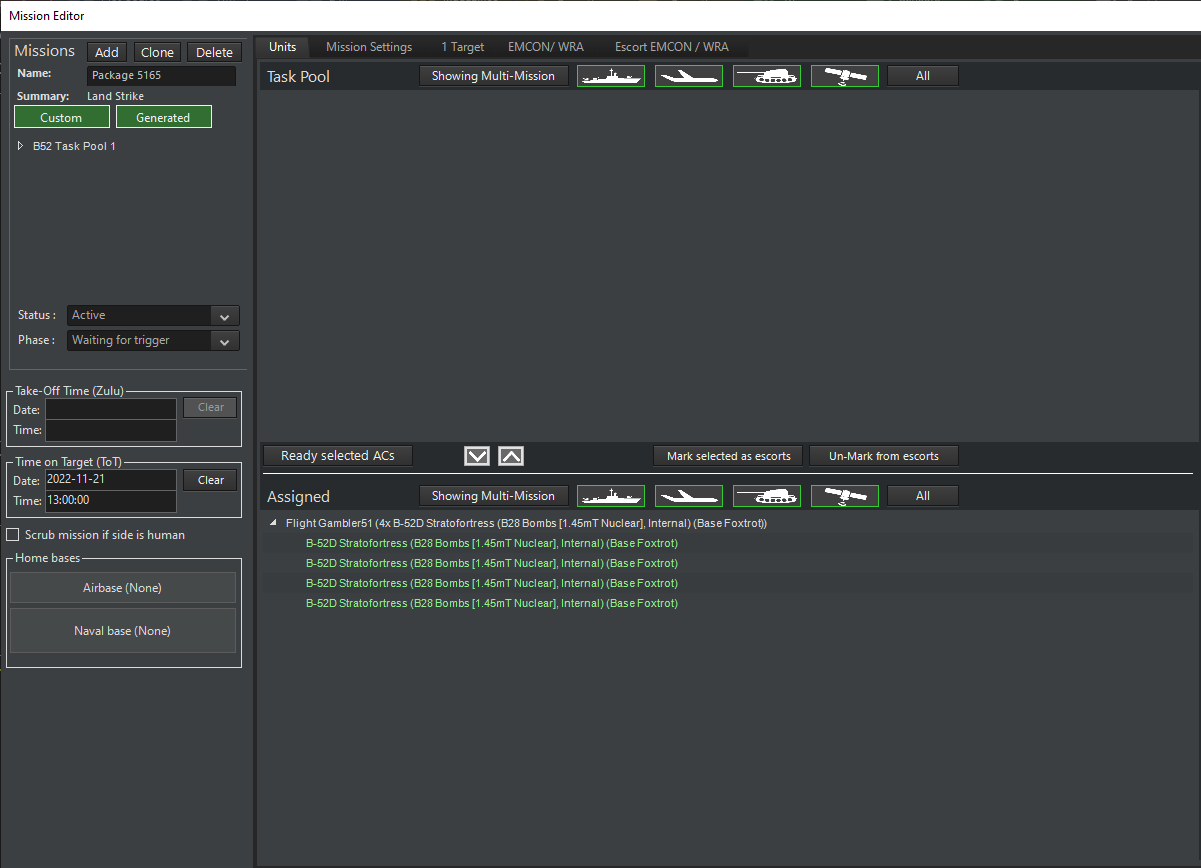
Pallet Weapons can be allocated to a target both as a Pallet or by assigning a single target for every Palletized Weapon in the aircraft Loadout. When allocating a whole Pallet, all the weapons within it will be added to the salvo, and all of them will share the same target as the Pallet:
Single (individual) Pallettized Weapons can also be allocated clicking on the relative node in the tree:

NOTE: As mentioned, due to the nature of the weapon system the whole Pallet is dropped even when some of the weapons within are not allocated. So take care to allocate the full pack! A message will serve as a reminder in order to avoid wasting weapons:
When the Pallettized Weapons are allocated separately, the system will recognize how many Pallets are needed to fill the requested salvo quantity and will drop the appropriate amount of Pallets:
Pallet and Weapons Behavior
When dropped from an aircraft, the Pallet will align itself following the correct loitering pitch, and after reaching that pitch it will deploy the parachute and start to loiter. After the Pallet starts to loiter, all the allocated weapons are fired from the Pallet:
Example with multiple Pallets:
Pallets have one more tick up their sleave: Because they remain in coms (datalink) with their parent aicraft, you can allocate additional weapons remaining in them while they are para-dropping. Obviously this can be very useful for delayed fires against targets as the tactical situation evolves. This can be done simply by clicking on a Pallet and then allocating its hosted weapon(s) as usual:
Effect on WRAs
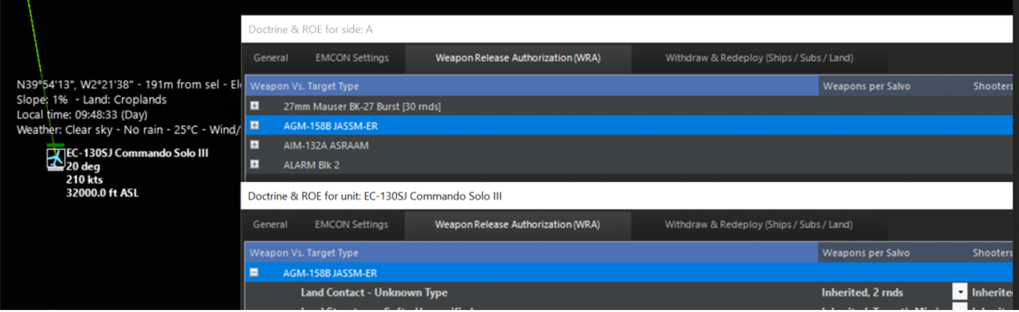
All the WRA will now include the weapon info for the Pallettized Weapons. Since the Pallet itself is just a carrier, it is not subjected to any WRA and will follow the WRA of its hosted Pallettized Weapons:
NEW FACILITY CATEGORY: SURFACE + UNDERGROUND
This new facility category represents facilities that are buried underground but also have major access from the surface in order to operate. Examples are all ballistic missile silos, some command bunkers, retractable coastal-defense turrets like ERSTA etc. These facilities are vulnerable to damage/destruction both from direct weapon impacts on their surface area and also from underground shock from near misses by penetrator weapons (or exceptionally powerful surface detonations e.g. from a multi-megaton warhead or asteroid impact).
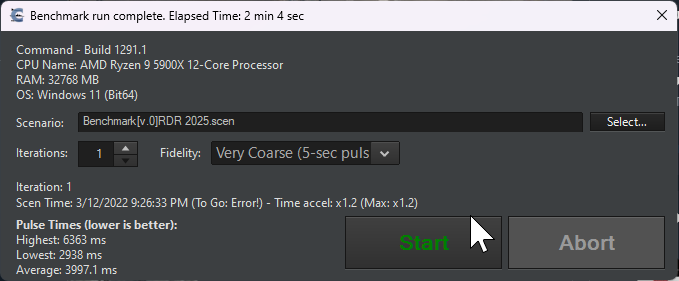
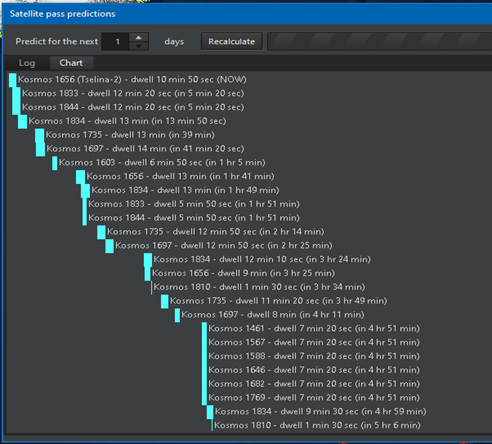
SIGNIFICANT IMPROVEMENTS ON BALLISTIC MISSILE KINEMATICS
Ballistic trajectories have been reworked from the ground up, using true Kepler equations to reflect the movement of planetary bodies. This produces true-to-life boost-phase profiles and overall trajectory parameters (this is important in order to more faithfully model the abilities & limitations of BMD systems).
IMPROVEMENTS IN ABM DLZ CALCULATIONS
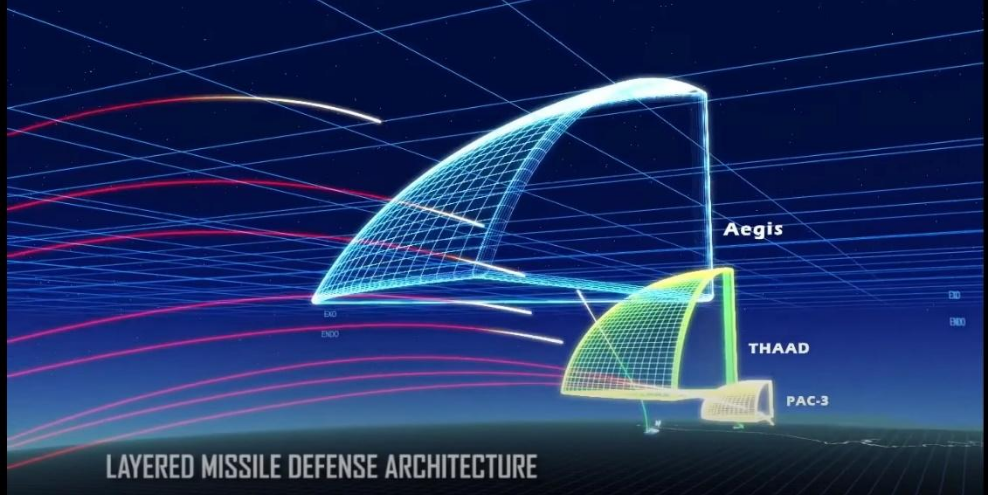
ABM systems have additional fail conditions in their DLZ evaluations compared to normal SAMs. A prime example is the intercept “hard floor” for exo-atmospheric systems. For instance, SM-3 cannot make intercepts under 100km in altitude (because its “warhead”/kill-vehicle is effectively a miniature spacecraft with a very sensitive IR seeker and no aerodynamic control, and thus cannot function within the atmosphere). This factor severely restricts the system’s intercept window: If the estimated intercept point is within the atmosphere, it is already too late to shoot. This screengrab from a LM THAAD-ER promo video illustrates this well:
In addition, the case of “intercept will happen within weapon minimum range” has been added as a fail condition to DLZ checks.
OVERHAULED REACTION TIMES
The differences in reaction times, and their effects, are now more critical than ever. All units use common-reference “Combat System Generation” (“Cockpit Generation” for aircraft) to model the modernity of their combat systems, combined with an “Ergonomics” value to handle intra-generation differences (the atrocious switchology on early missile-age aircraft will most definitely get you killed now). Older, WW2-era ships may take up to 5 minutes to engage a target, while Aegis cruisers fire in <20 seconds. Cold War fighters will be beaten to the draw by modern, fifth-generation fighters. Overmatch, that ever-elusive dream, is now possible – but beware, it goes both ways.
Until now, the existing OODA model was hobbled by two major problems. First, most values were way too fast. Detection, targeting, and/or evasion usually took less than 20 seconds. This works for ships equipped with modern combat systems, e.g. upgraded Aegis; not so for Cold War clunkers (or, heaven forbid, a pre-WW2 battleship). Second, having to manually set OODA values per-ship meant inconsistent reaction times across combat system generations.
For the revised model, we’ve added a new component to ships: the Combat System Generation (CS Gen), which can range from Gen 1 (1945-1950) to future Gen 7 (2030+). Whether you’re plotting contacts on a plotting board, federated CPUs, or an integrated system – and the age of the components making up those systems – will have a huge effect on your ability to quickly react to and engage targets. A modern Aegis ship can spot, track, and engage a contact in about 20 seconds; for a ship with a WW2-vintage CIC, the process balloons upwards to almost five minutes. If your first detection of an incoming missile comes from your own radars, it may not be enough.
There is an exception for small craft, which regardless of age generally have extremely fast reaction times (this is because their targeting process essentially consists of shouting at the guy on the MG to “shoot that guy over there RIGHT NOW”). However, this is mitigated by their comparatively less powerful sensors and weapons: being quick on the draw doesn’t help much when the Mk1 Eyeball on your RHIB spots a Hellfire inbound.
“But wait,” we hear you object. “Doesn’t this mean that, given an especially old ship and a modern threat, I may find myself completely helpless against an incoming missile?” The answer is yes: those Final Countdown scenarios are going to play out very differently now. This was a major concern for naval planners during the Cold War (the development of NTDS, the US Navy’s first automatic data-exchange system, was driven by classified exercises & wargames in which USN ships were consistently sunk before they could react to incoming air & missile strikes).
For aircraft, the flying equivalent to the “Combat System Generation” for ships, the “Cockpit Generation” is a way for us to approximate pilot load – and subsequently reaction times – based on cockpit design. Aircraft can be assigned one of six cockpits: “Basic Instruments Only,” intended for the simplest aircraft; “Steam Gauges, ” as for WW2-era fighters; “Complex Steam Gauges,” for the nightmarish mid-Cold War fighters; “Partial Glass Cockpit,” for transitioning aircraft of the ‘70s-90s; “Glass Cockpit,” for most modern aircraft; or finally a “Panoramic Cockpit Display,” representing the new single-screen touch displays coming to a fifth-generation fighter near you.
Just as a ship is only as good as its CIC, your aircraft are only as good as their cockpits – and whether your pilots are forced to fiddle with a forest of knobs, switches, and dials or able to glance at an easy-to-read LCD will affect their performance. Of course, the difference between aircraft cockpit generations is far less than the difference between ship CS generations, measured in seconds rather than minutes – but in an aerial engagement, seconds do count.
For submarines, facilities and mobile ground units, we have followed a similar path. We split submarine combat systems into six distinct “generations,” ranging from the early Mk1/3/4 TDC used in WW2 to the modern AN/BYG-1 and future witchcraft as featured in SSN(X). Facilities and ground units required a slightly different system: rather than using multiple “generations” as with ships and subs, these annexes distinguish between fixed and mobile systems and whether said system uses manual or assisted guidance. For example, radar-assisted AAA (e.g. Skyshield) will be faster to engage than a manual gun (ZSU-57); both (towed) systems will be slower at evasion than a SPAAG. The same is true for manually laid artillery vs. those with digital fire control, towed artillery vs. SPGs, etc. While less detailed than our system for ships, subs, and aircraft, we felt this was “good enough” for the level at which these platforms are simulated in Command. (And, of course, we always have the manual override for when we have specific platform data.)
This is obviously is a major set of changes and potentially game-breaking for older scenarios. For this reason, the SBR tool now also includes the ability to preserve “legacy” OODA values when migrating scenarios to v494+ databases. For pro users, the DB Editor also offers the ability to explicitly set custom values and selectively override the generation-derived ones.
Extra wrinkles: Ergonomics
Not every aircraft built with steam gauges was equally difficult to fly; not every ship built in a certain decade could react with identical speed. Certain platforms gained a reputation for being especially easy to operate (the Viggen, for example, had a remarkably well-designed cockpit); others, like the Komar-class missile boat, were the bane of their operators. Much of this can be ascribed to ergonomics, the consideration (or lack thereof) of human factors in design.
The new “ergonomics” field – ranging from “Awful” to “Excellent” – is intended to reflect these intra-generation differences, acting as a sort of OODA “buff/debuff” and giving the ability to adjust values to reflect upgrades, etc. without needing to take the drastic step of upgrading the combat generation.
And, of course, you still have proficiency in the mix. Players now have an interesting mix of factors to consider:
– “Tech generation,” e.g. CS/cockpit generation: when was your platform designed/built, and what sort of tech was in play at the time? Are you working with ancient WW2 plotting boards or Aegis?
– Usability/ergonomics/design: are you working with beautiful, top-of-the-line COTS human interface tech or the nightmare that was mid/late-Cold War Soviet systems?
– Proficiency: Do you have well-trained, well-rested/motivated crews, or are you dealing with bottom-of-the-barrel conscripts?
Those three factors will all have to play into your operational planning.
RADAR & IR STEALTH MODIFIER IMPROVEMENTS
Sensor improvements come coupled with a massive overhaul of signature modifiers in the DB, which significantly improve the realism of our stealth model by drawing clearer distinctions between shaping and RAM generations.
Prior to the v494 DB releases, we could classify an aircraft as having “light,” “medium,” or “heavy” stealth shaping … and that was it. These modifiers were applied always in all aspects (no ability to define e.g. a frontal-only reduction modifier). Modeling of IR signature suppression (IRSS) techniques was even more limited.
In v494+ we completely overhauled our existing VLO modifiers to account for shaping and RAM generations. In addition we also added several special flags to indicate the presence (or lack thereof) of certain stealthy design features. This allows us to model not only general, whole-craft stealth but also context-specific or aspect-specific features such as S-shaped intakes, exposed fan blockers, active cancellation, and stealth pylons. For example, S-shaped intakes reduce the likelihood of being detected head-on, while LO pylons reduce the impact of externally-carried stores.
This overhaul also extends to IR modifiers. As with radar stealth, we completely rewrote our “general” modifiers to represent whole-aircraft IR signature suppression techniques (distributed vs. conventional fuel tanks, low-E coatings etc.) and added several additional aircraft codes to represent specific IRSS features. These codes include shielded “anti-Strela” exhausts, masked exhausts, heavily masked / slit-shaped exhausts, and peak temperature reduction or “cool-air mixing”. Note that certain IRSS features come with downsides and limitations: slit-shaped exhausts, for example, will make you harder to spot but paradoxically easier to lock on to with IR weapons due to back pressure penalty; in another example, anti-Strela exhausts are most effective against someone trying to get a lock from below.
The full list of added signature modifiers is:
We’ve backfilled all LO/VLO aircraft in both DBs with these features as best as we could determine. (Naturally, in many cases and especially with contemporary stealth fighters, exact details are sometimes hard to come by.) These changes mean that various LO/VLO aircraft are now much harder (or easier) to detect than you may be used to. We have solid confidence in the results; comparisons with known real-world RCS & IR data yield accurate numbers. However, we’re also open to feedback: expect tweaks in future DB releases as we hone the new values. Pro users can of course manually input their precise classified figures as before.
Read more here
https://www.matrixgames.com/news/countdown-to-war-planner-simulation-additions-and-improvements
Simulation Additions & Improvements
NEW FEATURE: ENERGY-BASED FLIGHT MODEL FOR BOOST-COAST MISSILES
Boost-coast anti-air missiles (ie. most tactical missiles that are not powered continuously) now use a much more realistic flight model that distinctly models the initial boost-sustain and post-burnout regimes, and takes into account the effects of gravity (shedding speed while climbing and regaining it when diving) and aerodynamic drag. The drag changes with altitude, built-in drag coefficient and whether the weapon is maneuvering (pitching/turning) or not. This change makes it possible to apply real-life “exhaust the threat” tactics and further constrains edge-of-envelope shots.
The onboard fuel (and thus boost duration) varies with the type of missile propulsion. Most AAW missiles (e.g. Sidewinder, Sparrow, all Standards, pre-D AMRAAMs etc.) still rely on the “traditional” boost-(optional sustain)-coast sequence, in which case the rocket motor is active usually for a few seconds. Some missiles (SA-4, SA-6, Sea Dart, Meteor etc.) use ramjet propulsion to provide for a much longer burn duration, and this allows them both a much higher average speed-to-target but also a higher energy state on the terminal engagement, which increases their chance of impact. Other new systems like the AIM-120D use “dual-pulse” rocket motors to again achieve a substantially higher overall energy state.
(NOTE: On missiles that use this model, the “fuel bar” indicator now represents only the remaining boost-sustain fuel, NOT to the total remaining energy. After burnout, the fuel bar is removed and the weapon will coast until it reaches its stall speed.)
SIGNIFICANT CHANGES IN DEFAULT AIRCRAFT DEFENSIVE MANEUVERS
Instead of beaming and diving to the deck by default, now they will first try to outrun an incoming missile while matching its relative pitch (i.e. climb if the missile is below them, or dive if it’s above them), and if the missile closes the distance they will then attempt to beam it (or its parent guidance) while also reversing their climb/dive.
To counter these counters, new additional WRA firing-range settings (including “No-Escape Zone”) are available, offering a much more comprehensive set of range options (see the UI improvements article). A2A and S2A missile engagements are, as a result, both more dynamic and far more realistic now.
(NOTE: These two changes have been arguably the most controversial ones during the public beta of the War Planner. The typical complaint by many players is “My AMRAAMs are now useless unless if fire them almost at point-blank range”. Our response to this is: EXACTLY. Welcome to the real-world kinematic limitations of most AAW missiles. This part of the reason that most (all?) real-life BVR kills have been achieved at significantly less-than-maximum launch ranges. Watch this BVR tactics video from F4 BMS and note how on each case the missiles are dragged-out rather than outmaneuvered. WRAs and configurable firing ranges are a thing – and with the new percentage-based settings and NEZ they are more powerful than ever. Learn them, practice with them and use them. Or get used to becoming your adversary’s chew-toy, first by the enemy AI and later by other human players as MP comes to commercial CMO.)
NEW FEATURE: PASSIVE COHERENT LOCATION SYSTEM (AKA “PASSIVE RADAR”)
The term “passive radar” has grown to broadly encompass two significantly different concepts; one is ESM/SIGINT-based air-surveillance systems and the other is multistatic radars with third-party emitters. The latter is called Passive Coherent Location System, and for a general background on the technology and CONOPS see here: https://en.wikipedia.org/wiki/Passive_radar
PCLS systems can be very capable against VLO targets (if the geometry is right), and their passive nature makes them inherently less vulnerable to SEAD attacks (although of course the emitters-of opportunity may themselves be targeted). On the other hand the geometry restrictions can be a tough taskmaster (the emitter, the receiver and the target must form a clean-LOS triangle otherwise there is no detection) and the signal propagation geometry sharply reduces the effective detection altitude. Therefore such systems are most effective when combined with other traditional active & passive surveillance sets rather than operating completely on their own.
The v488+ releases of the DB3000 database contain several “non-detecting emitter” platforms such as radio, TV, and cellular antennas or navigation beacons such as LORAN. It also contains a prototype PCLS vehicle that can be used in testing and as the basis for operational variants.
NEW FEATURE: DISTINCT MOBILE GROUND UNITS
In addition to modelling mobile forces as “aimpoint facilities” (see: https://www.warfaresims.com/?p=1159 ), it is now possible to explicitly model individual vehicles with their own customized properties such as armor, propulsion, mounts, sensors etc.
The new-style ground units have unlocked certain brand-new capabilities, such as true amphibious vehicles (with distinct speed & fuel consumption properties overwater and on land).
NEW FEATURE: INTERMITTENT EMISSIONS
This band-new feature allows to control the behavior of emitting sensors so they emit in intervals instead of only continously or never.
Alert levels
The first thing to do is to configure a unit’s interval according to the alert level. The alert level is set in the EMCON setting of any unit and affects the whole side. Below, in the “Active Emission Interval” we have the intermittent emission configurations for each alert levels. The side’s alert level will determine which intermittent emission configuration to use:
Emission Intervals
Let’s configure an EMCON behavior for the yellow’s alert level. By default, the interval type is set to continuous, this is the usual behavior in command where an enabled sensor will emit continuously. Emission Duration is the duration in seconds of an emitting phase. Interval is the duration in seconds of a silent phase between 2 emitting phases. Interval random variation is the random duration in seconds we add to an interval. This allows unpredictability of the cycle and is particularly useful to disrupt the enemy’s plan:
The action of waking up mean that the radar will temporarily turn into continuous and ignore intermittent behavior, until time until sleep mode is elapsed. The Wake when detecting threat checkbox controls this behavior, a threat is a unit defined by the checkboxes group includes stance and includes ID. If the radar detects an unfriendly or hostile or unknown contact with any identification level, then we wake up the radar.
If you want a unit to inherit all configuration from its parent check Use parent group parameters:
NOTE: intermittent emission will NOT make a radar active or inactive as depicted below:
Intermittent emission controls whether or not an active radar will be silent or emitting at a given moment.
Custom emission intervals configuration
If you want to use all alert level, you will need to define each interval configurations, and perhaps you want a way to override the alert level and have some units feel special and use their own rules:
To do this, populate the Custom interval tab as you will and make sure the Use custom preset only checkbox is checked.
NEW FEATURE: CUSTOM ENVIRONMENT ZONES
Multiple & moving weather fronts? Check. Bend the laws of physics on a localized area? Can do. Specify carefully hand-picked weather, terrain and other environmental properties in order to test or compare sensors and other environment-dependent components? Yup. Unleash your inner nature wizard with this puppy.
Using this new feature, you can define a zone where you can tailor the environment & weather properties. This can be useful if you want a “controlled environment” for sensor checks, mobility & damage tests etc., but can also be used as a localized “weather override” for scenario purposes.
To create a CEZ, bring up the Refpoint Manager and switch to the “Cust Env Zones” tab. Create a zone as usual, and then click on “Edit”. A new window should appear, in which you can define the weather & environment properties:
NEW FEATURE: PALLETIZED WEAPONS AND OTHER STORES
This is a new capability that has been making the public rounds lately, as a result of a series of videos by AFRL on the Rapid Dragon concept. using pallets packed with guided weapons, aircraft not usually associated with frontline attack operations (such as transports) can contribute to the firepower volume allocated at enemy forces.
As usual, there are caveats. The fact that weapons are fired from released pallets, rather than individually fired from the parent platform, means that weapon allocations must happen in batches; if a single missile in say a 12-pack is allocated, the full dozen has to be allocated either on the same target or others. (There exists of course the theoretical option of allocating only the desired amount of weapons and just sacrificing the rest of the pack, but the cost of the majority of modern weapons makes this an unlikely scenario).
Therefore, accurately modelling this new capability (and the decisions & restrictions it enforces) to Command has been a lot of work. Here’s what we’ve come up with:
Pallet Weapon: the paradroppable system (usually a pallet, but may also be a container etc.) containing the payload
Pallettized Weapon: the content of the pallet, the actual weapon that will be delivered
Pallet Weapons can be fired by specific aircraft that are equipped with suitable loadouts (C-130, C-17 etc.). Several new representative loadouts have been included in the DB3000 database:
Pallet and Weapon Allocation
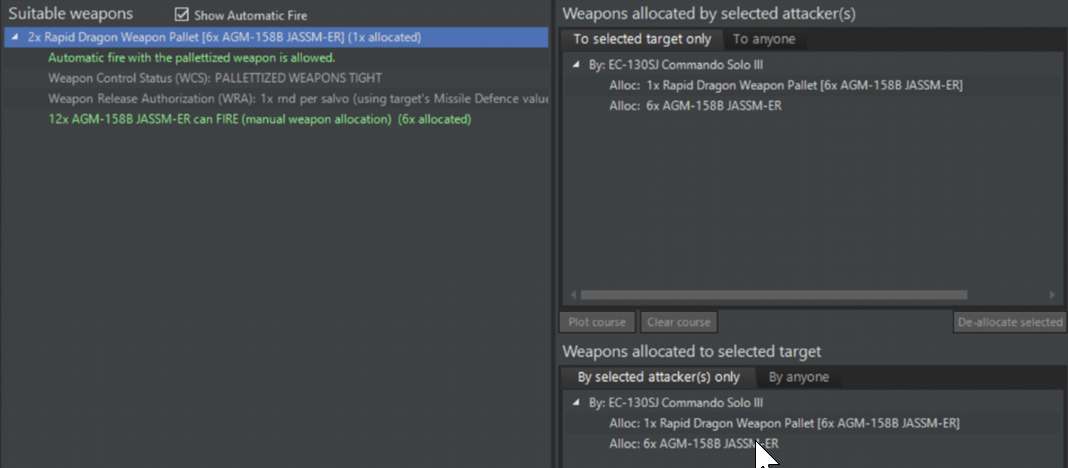
Pallet Weapons can be allocated to a target both as a Pallet or by assigning a single target for every Palletized Weapon in the aircraft Loadout. When allocating a whole Pallet, all the weapons within it will be added to the salvo, and all of them will share the same target as the Pallet:
Single (individual) Pallettized Weapons can also be allocated clicking on the relative node in the tree:
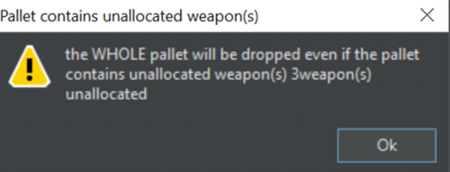
NOTE: As mentioned, due to the nature of the weapon system the whole Pallet is dropped even when some of the weapons within are not allocated. So take care to allocate the full pack! A message will serve as a reminder in order to avoid wasting weapons:
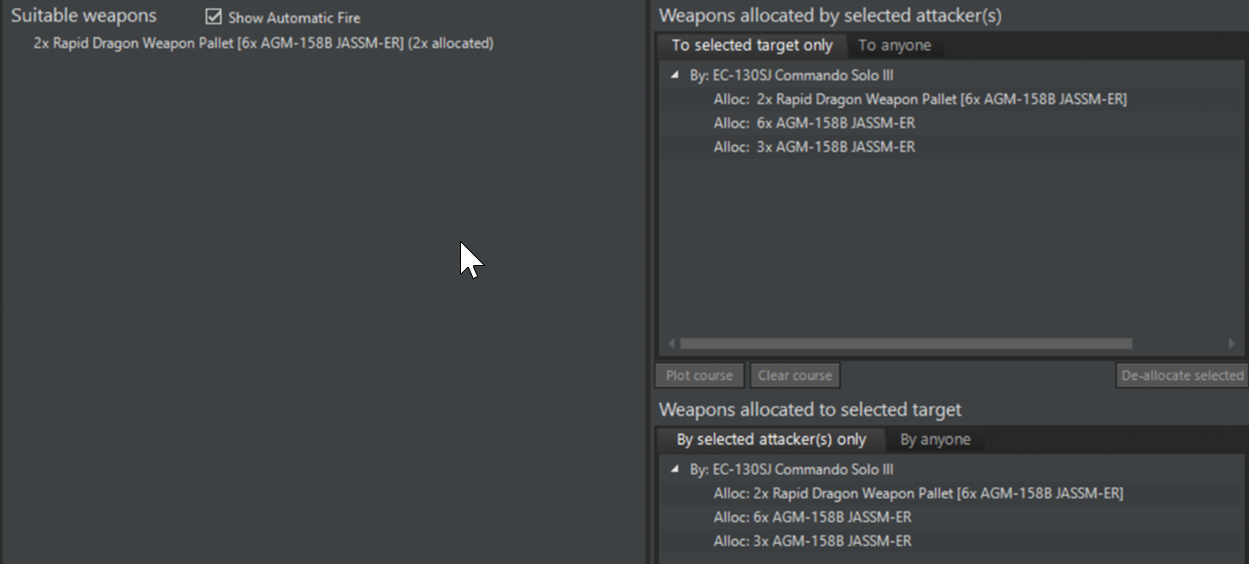
When the Pallettized Weapons are allocated separately, the system will recognize how many Pallets are needed to fill the requested salvo quantity and will drop the appropriate amount of Pallets:
Pallet and Weapons Behavior
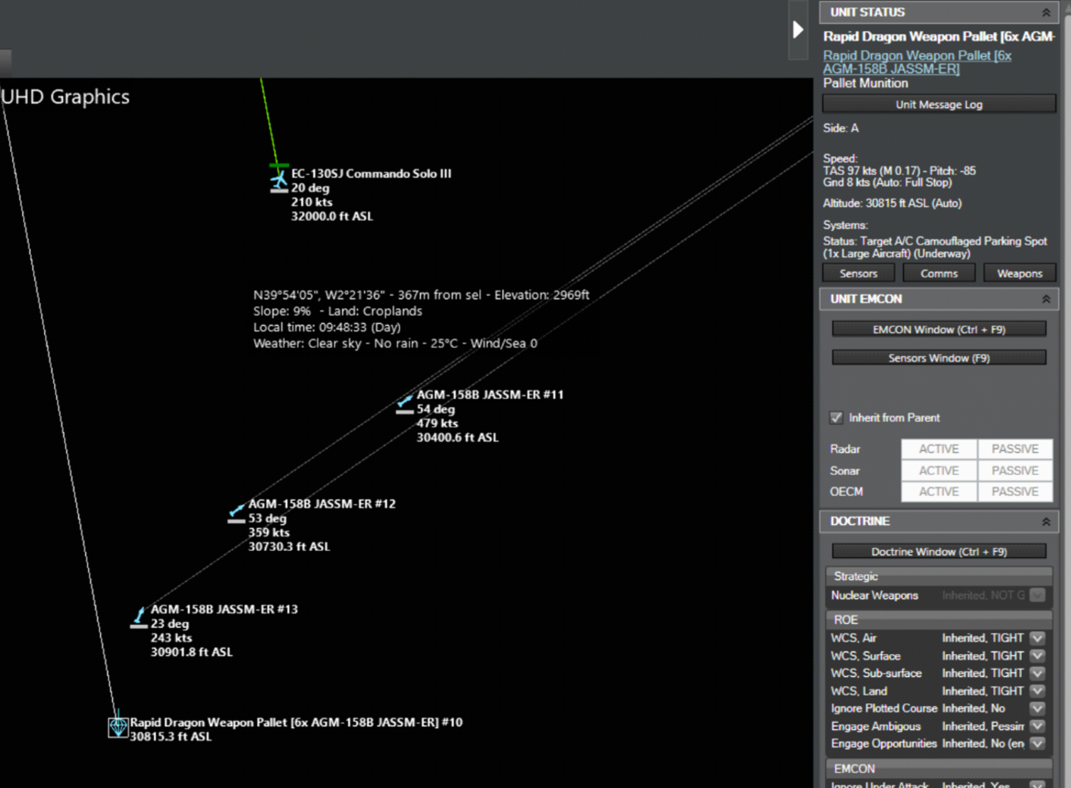
When dropped from an aircraft, the Pallet will align itself following the correct loitering pitch, and after reaching that pitch it will deploy the parachute and start to loiter. After the Pallet starts to loiter, all the allocated weapons are fired from the Pallet:
Example with multiple Pallets:
Pallets have one more tick up their sleave: Because they remain in coms (datalink) with their parent aicraft, you can allocate additional weapons remaining in them while they are para-dropping. Obviously this can be very useful for delayed fires against targets as the tactical situation evolves. This can be done simply by clicking on a Pallet and then allocating its hosted weapon(s) as usual:
Effect on WRAs
All the WRA will now include the weapon info for the Pallettized Weapons. Since the Pallet itself is just a carrier, it is not subjected to any WRA and will follow the WRA of its hosted Pallettized Weapons:
NEW FACILITY CATEGORY: SURFACE + UNDERGROUND
This new facility category represents facilities that are buried underground but also have major access from the surface in order to operate. Examples are all ballistic missile silos, some command bunkers, retractable coastal-defense turrets like ERSTA etc. These facilities are vulnerable to damage/destruction both from direct weapon impacts on their surface area and also from underground shock from near misses by penetrator weapons (or exceptionally powerful surface detonations e.g. from a multi-megaton warhead or asteroid impact).
SIGNIFICANT IMPROVEMENTS ON BALLISTIC MISSILE KINEMATICS
Ballistic trajectories have been reworked from the ground up, using true Kepler equations to reflect the movement of planetary bodies. This produces true-to-life boost-phase profiles and overall trajectory parameters (this is important in order to more faithfully model the abilities & limitations of BMD systems).
IMPROVEMENTS IN ABM DLZ CALCULATIONS
ABM systems have additional fail conditions in their DLZ evaluations compared to normal SAMs. A prime example is the intercept “hard floor” for exo-atmospheric systems. For instance, SM-3 cannot make intercepts under 100km in altitude (because its “warhead”/kill-vehicle is effectively a miniature spacecraft with a very sensitive IR seeker and no aerodynamic control, and thus cannot function within the atmosphere). This factor severely restricts the system’s intercept window: If the estimated intercept point is within the atmosphere, it is already too late to shoot. This screengrab from a LM THAAD-ER promo video illustrates this well:
In addition, the case of “intercept will happen within weapon minimum range” has been added as a fail condition to DLZ checks.
OVERHAULED REACTION TIMES
The differences in reaction times, and their effects, are now more critical than ever. All units use common-reference “Combat System Generation” (“Cockpit Generation” for aircraft) to model the modernity of their combat systems, combined with an “Ergonomics” value to handle intra-generation differences (the atrocious switchology on early missile-age aircraft will most definitely get you killed now). Older, WW2-era ships may take up to 5 minutes to engage a target, while Aegis cruisers fire in <20 seconds. Cold War fighters will be beaten to the draw by modern, fifth-generation fighters. Overmatch, that ever-elusive dream, is now possible – but beware, it goes both ways.
Until now, the existing OODA model was hobbled by two major problems. First, most values were way too fast. Detection, targeting, and/or evasion usually took less than 20 seconds. This works for ships equipped with modern combat systems, e.g. upgraded Aegis; not so for Cold War clunkers (or, heaven forbid, a pre-WW2 battleship). Second, having to manually set OODA values per-ship meant inconsistent reaction times across combat system generations.
For the revised model, we’ve added a new component to ships: the Combat System Generation (CS Gen), which can range from Gen 1 (1945-1950) to future Gen 7 (2030+). Whether you’re plotting contacts on a plotting board, federated CPUs, or an integrated system – and the age of the components making up those systems – will have a huge effect on your ability to quickly react to and engage targets. A modern Aegis ship can spot, track, and engage a contact in about 20 seconds; for a ship with a WW2-vintage CIC, the process balloons upwards to almost five minutes. If your first detection of an incoming missile comes from your own radars, it may not be enough.
There is an exception for small craft, which regardless of age generally have extremely fast reaction times (this is because their targeting process essentially consists of shouting at the guy on the MG to “shoot that guy over there RIGHT NOW”). However, this is mitigated by their comparatively less powerful sensors and weapons: being quick on the draw doesn’t help much when the Mk1 Eyeball on your RHIB spots a Hellfire inbound.
“But wait,” we hear you object. “Doesn’t this mean that, given an especially old ship and a modern threat, I may find myself completely helpless against an incoming missile?” The answer is yes: those Final Countdown scenarios are going to play out very differently now. This was a major concern for naval planners during the Cold War (the development of NTDS, the US Navy’s first automatic data-exchange system, was driven by classified exercises & wargames in which USN ships were consistently sunk before they could react to incoming air & missile strikes).
For aircraft, the flying equivalent to the “Combat System Generation” for ships, the “Cockpit Generation” is a way for us to approximate pilot load – and subsequently reaction times – based on cockpit design. Aircraft can be assigned one of six cockpits: “Basic Instruments Only,” intended for the simplest aircraft; “Steam Gauges, ” as for WW2-era fighters; “Complex Steam Gauges,” for the nightmarish mid-Cold War fighters; “Partial Glass Cockpit,” for transitioning aircraft of the ‘70s-90s; “Glass Cockpit,” for most modern aircraft; or finally a “Panoramic Cockpit Display,” representing the new single-screen touch displays coming to a fifth-generation fighter near you.
Just as a ship is only as good as its CIC, your aircraft are only as good as their cockpits – and whether your pilots are forced to fiddle with a forest of knobs, switches, and dials or able to glance at an easy-to-read LCD will affect their performance. Of course, the difference between aircraft cockpit generations is far less than the difference between ship CS generations, measured in seconds rather than minutes – but in an aerial engagement, seconds do count.
For submarines, facilities and mobile ground units, we have followed a similar path. We split submarine combat systems into six distinct “generations,” ranging from the early Mk1/3/4 TDC used in WW2 to the modern AN/BYG-1 and future witchcraft as featured in SSN(X). Facilities and ground units required a slightly different system: rather than using multiple “generations” as with ships and subs, these annexes distinguish between fixed and mobile systems and whether said system uses manual or assisted guidance. For example, radar-assisted AAA (e.g. Skyshield) will be faster to engage than a manual gun (ZSU-57); both (towed) systems will be slower at evasion than a SPAAG. The same is true for manually laid artillery vs. those with digital fire control, towed artillery vs. SPGs, etc. While less detailed than our system for ships, subs, and aircraft, we felt this was “good enough” for the level at which these platforms are simulated in Command. (And, of course, we always have the manual override for when we have specific platform data.)
This is obviously is a major set of changes and potentially game-breaking for older scenarios. For this reason, the SBR tool now also includes the ability to preserve “legacy” OODA values when migrating scenarios to v494+ databases. For pro users, the DB Editor also offers the ability to explicitly set custom values and selectively override the generation-derived ones.
Extra wrinkles: Ergonomics
Not every aircraft built with steam gauges was equally difficult to fly; not every ship built in a certain decade could react with identical speed. Certain platforms gained a reputation for being especially easy to operate (the Viggen, for example, had a remarkably well-designed cockpit); others, like the Komar-class missile boat, were the bane of their operators. Much of this can be ascribed to ergonomics, the consideration (or lack thereof) of human factors in design.
The new “ergonomics” field – ranging from “Awful” to “Excellent” – is intended to reflect these intra-generation differences, acting as a sort of OODA “buff/debuff” and giving the ability to adjust values to reflect upgrades, etc. without needing to take the drastic step of upgrading the combat generation.
And, of course, you still have proficiency in the mix. Players now have an interesting mix of factors to consider:
– “Tech generation,” e.g. CS/cockpit generation: when was your platform designed/built, and what sort of tech was in play at the time? Are you working with ancient WW2 plotting boards or Aegis?
– Usability/ergonomics/design: are you working with beautiful, top-of-the-line COTS human interface tech or the nightmare that was mid/late-Cold War Soviet systems?
– Proficiency: Do you have well-trained, well-rested/motivated crews, or are you dealing with bottom-of-the-barrel conscripts?
Those three factors will all have to play into your operational planning.
RADAR & IR STEALTH MODIFIER IMPROVEMENTS
Sensor improvements come coupled with a massive overhaul of signature modifiers in the DB, which significantly improve the realism of our stealth model by drawing clearer distinctions between shaping and RAM generations.
Prior to the v494 DB releases, we could classify an aircraft as having “light,” “medium,” or “heavy” stealth shaping … and that was it. These modifiers were applied always in all aspects (no ability to define e.g. a frontal-only reduction modifier). Modeling of IR signature suppression (IRSS) techniques was even more limited.
In v494+ we completely overhauled our existing VLO modifiers to account for shaping and RAM generations. In addition we also added several special flags to indicate the presence (or lack thereof) of certain stealthy design features. This allows us to model not only general, whole-craft stealth but also context-specific or aspect-specific features such as S-shaped intakes, exposed fan blockers, active cancellation, and stealth pylons. For example, S-shaped intakes reduce the likelihood of being detected head-on, while LO pylons reduce the impact of externally-carried stores.
This overhaul also extends to IR modifiers. As with radar stealth, we completely rewrote our “general” modifiers to represent whole-aircraft IR signature suppression techniques (distributed vs. conventional fuel tanks, low-E coatings etc.) and added several additional aircraft codes to represent specific IRSS features. These codes include shielded “anti-Strela” exhausts, masked exhausts, heavily masked / slit-shaped exhausts, and peak temperature reduction or “cool-air mixing”. Note that certain IRSS features come with downsides and limitations: slit-shaped exhausts, for example, will make you harder to spot but paradoxically easier to lock on to with IR weapons due to back pressure penalty; in another example, anti-Strela exhausts are most effective against someone trying to get a lock from below.
The full list of added signature modifiers is:
- RCSS – Active Cancellation
- RCSS – S-Shaped Intake(s)
- RCSS – Exposed Fan Blocker(s)
- RCSS – Stealth Pylons
- IRSS – Shielded Exhaust (Anti-Strela)
- IRSS – Masked Exhaust
- IRSS – Heavily Masked / Slit-Shaped Exhaust
- IRSS – Peak Temp Reduction (Cool-Air Mix)
We’ve backfilled all LO/VLO aircraft in both DBs with these features as best as we could determine. (Naturally, in many cases and especially with contemporary stealth fighters, exact details are sometimes hard to come by.) These changes mean that various LO/VLO aircraft are now much harder (or easier) to detect than you may be used to. We have solid confidence in the results; comparisons with known real-world RCS & IR data yield accurate numbers. However, we’re also open to feedback: expect tweaks in future DB releases as we hone the new values. Pro users can of course manually input their precise classified figures as before.
Read more here
https://www.matrixgames.com/news/countdown-to-war-planner-simulation-additions-and-improvements
Share: