Röki - HighStaccato


Hey Everyone!

Last week we started to look at ‘The Anatomy of a Walk Cycle‘ and some of the important aspects to consider when animating locomotion. If you missed the first part no need to fret, you can read it here. This week we’ll dig in a little further.

Step Impact/Taking the weight

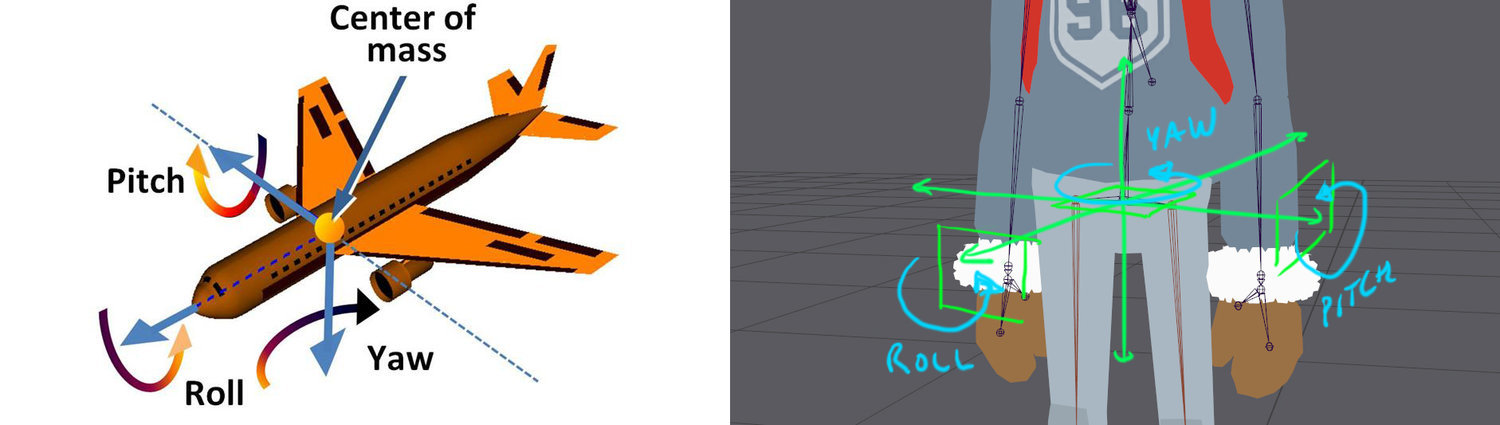
The moment when a character shifts to take the weight on a new footstep is a big moment in the walk cycle. It is essentially the point at which all the weight of the body is transferred from one foot to the other and it should have a large impact in the animation. Examine Henrik’s animation below, there is a great deal happening when the step impacts and the weight is transferred from foot-to-foot. As well as being evident in the hip side-to-side motion (as the center of gravity moves over the new standing foot) and impact ‘roll‘ rotation (covered last week) the hips also descend as the weight is taken. This produces the up/down motion of a walk.

The impact of this up/down hip motion is also felt elsewhere on the body.

You notice in the animation below that the step impact is the point at which Henrick has a head nod. This is a slightly delayed 'follow on' motion to the hips descending vertically suddenly as the weight is taken. You can also see the 'step impact' in the motion of his chest, mustache and even belly! When the weight is taken and the hips descend suddenly to take the weight, all these areas 'feel' the impact, and should respond to it in their animation.

Which all in fact brings us onto another important point, offsetting motion, but more on that later!


Foot Squish

Another neat thing you can do in your walk cycle to sell the impact of a leg/foot taking the weight is ‘foot squish‘. If you examine the far right version of Henrick above and take a close look at his feet you’ll see they ‘spread‘ or ‘squish‘ under the impact of his body weight when the weight is transferred over to them.

This was something I learned doing an Animation Mentor course whilst at Sony. We were animating lions and were examining how their paws spread when they take the weight of their bodies. This is also evident in humans (and most other creatures with feet TBH). Don’t believe me? As an artist it’s always good to examine the real world and have some reference. Here is a lovely before-and-after shot of my delicate (definitely non hobbit-like foot) before and after taking the weight of my body.


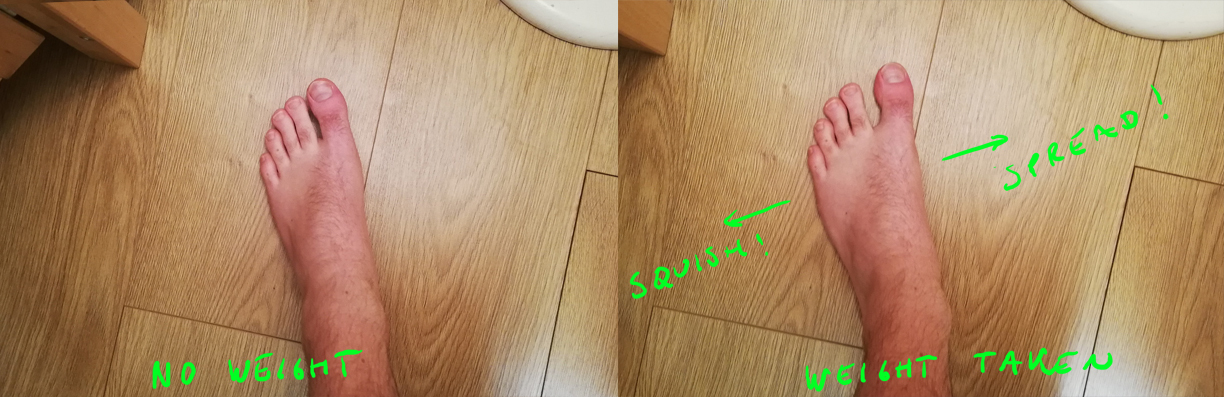
Apologies if you're foot squeamish or eating breakfast

You can hopefully see clearly the foot spread in the above images.

Now this does take a bit of consideration when setting up your character’s skeleton and rig but adds a really nice subtle cue to show when the weight is taken.

Transfer of Weight and Character Design

So we’ve looked above about some of the impacts on the body’s motion when the weight is transferred. However, this is not a uniform impact for all characters!

Some characters are heavier and bulkier, consider the differences in size and body shape in Tove and Henrik below.

When characters are heavier this transfer or weight and its impact on the body will be more pronounced. This is one of the things that makes heavier characters appear heavy! If you examine Tove and Henrik you can see that the transfer of weight when he walks and the impact on his body is much more pronounced than on the much slighter Tove.

It’s important to reinforce your character design in animation. You should make sure that your characters don’t just look heavy, they also ‘animate heavy‘.


Offset Stuff!

We looked last week at some of the key poses in a walk cycle that are used as the foundation when blocking out your walk animation (we’ve included them again below for reference).


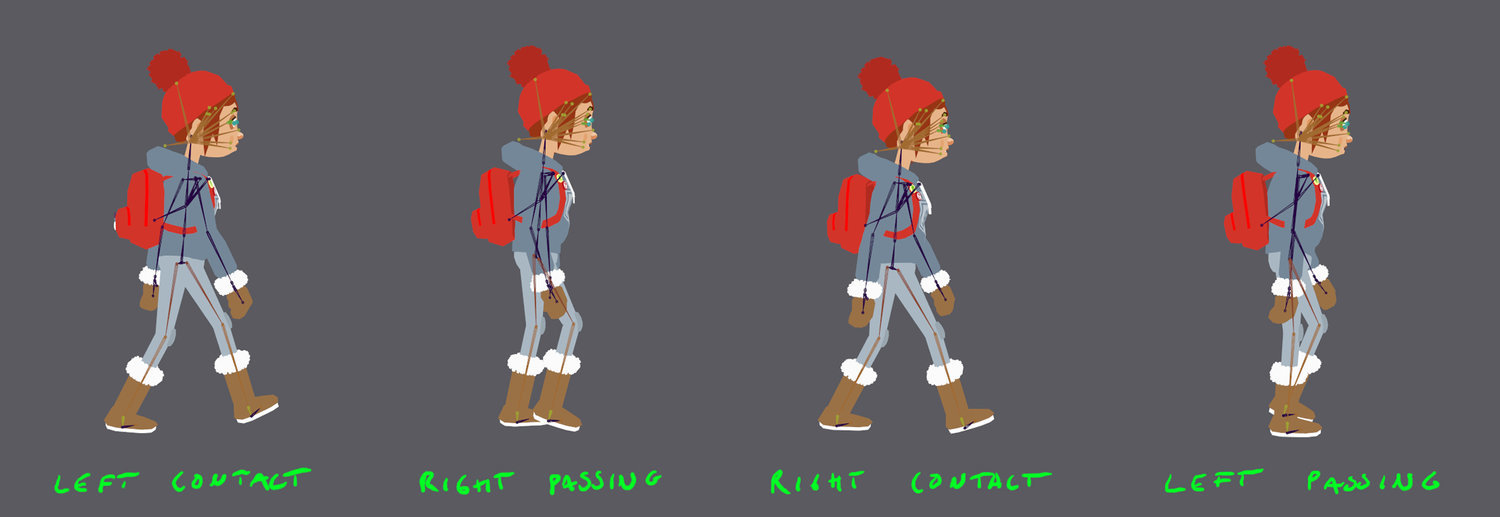
However, one of the key things when it comes to the later stages of animating your walk cycle is to offset some of the elements in the above poses.

Without any offset the both arms and legs (left and right) will be hitting these key poses at exactly the same point in time. This can look unnatural and a little robotic. To combat this, you can try offsetting or delaying some of their motion in time so the body parts are no longer hitting their key pose at exactly the same time.

It doesn’t take much, an offset of a frame or two is often enough to get away from the robotic feel of all the elements being perfectly aligned.

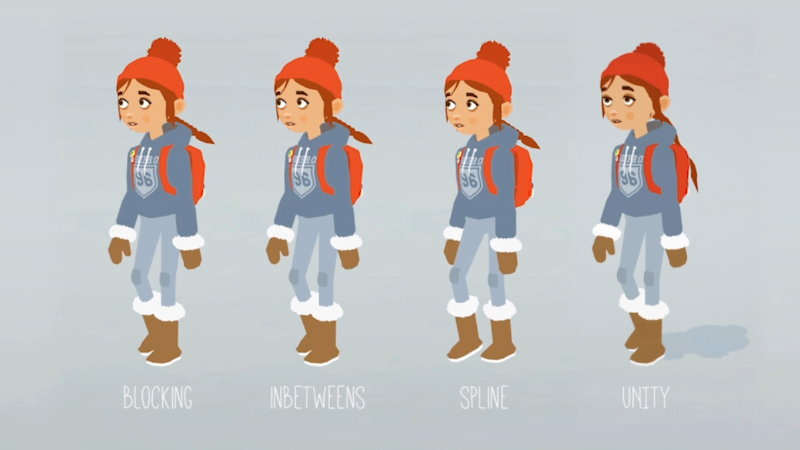
If you look at the breakdown of Tove’s walk cycle below it feels quite natural, this is partly due to offsetting elements of her key poses.

A clear example of offsetting animation can be seen in her forearms. Offsetting the lower arm’s motion from the upper arm is what is producing the natural drag feel. The arm is not a solid unit and in this case the lower arm is being dragged around by the upper arm, lagging being its parent motion.


Right that’s about it for this week!

Hopefully you found that interesting :)

Have a good one,
Alex & Team Röki


RÖKI: A game about monsters that shouldn’t exist

https://store.steampowered.com/app/1067540/Rki/
Röki - HighStaccato


BIG NEWS EVERYONE!

We’re excited to announce that Röki has been nominated for 'Best Debut Game' in The Game Awards! We are honoured and very happy! 😃

Congratulations to the other nominees! 👏

Now, we need YOUR help to make even bigger dream comes true. Cast your vote for Röki:
https://thegameawards.com/nominees/best-debut-game

Have a great day!
Polygon Treehouse Team


RÖKI: A game about monsters that shouldn’t exist

https://store.steampowered.com/app/1067540/Rki/
Röki - HighStaccato


Hi everyone!

Last time we posted a whole devblog about Footprints. And from here we are pretty close to the subject of the character's movement. To be specific - to a walk cycle. So, sit, let your legs rest and read a long (but I hope also fascinating) text… about walking ;)

A walk cycle is a nice animation task to examine because:

❄️ You see it a lot, over and over again in fact, so it’s a good thing to lavish attention on;
❄️ It’s a nice contained animation (time duration wise) to examine body mechanics;
❄️ It’s often one of the first things people attempt when starting out, certainly it was for me.

So we’ll step through some of the key aspects (as far as I’m concerned) today and on the next week. It’s not going to be exhaustive, but an overview. I’m sure there are some things I’ll miss but hey, nobody’s perfect right! Today, we’re mostly gonna be looking at the key poses and the role of the hips.

Key Poses (Contact Poses & Passing Poses)

At the top level there are four key poses in a walk cycle. There are as follows:

❄️ Left Foot Contact Pose - Left foot forward & right foot back. Right arm forward & left arm back (opposing legs);
❄️ Right Foot Passing Pose - Right foot passes the standing left foot as it moves forward;
❄️ Right Foot Contact Pose - Left foot forward & right foot back. Right arm forward & left arm back (opposing legs);
❄️ Left Foot Passing Pose - Right foot passes the standing left foot as it moves forward.

You can see these base poses below in Tove’s walk cycle.


Transferal of Weight

When a human walks they are constantly falling forward but are catching themselves with each step. With each step the weight of the body transfers from one foot to the other. This frees the other foot to move forward, unencumbered by the need to bear the body’s weight. The ‘free‘ foot will then make contact with the floor as the next step is made and the weight of the body will begin to transfer to this foot subsequently freeing the other foot from supporting the body so it can make its step forward.

This transferal of weight is critical to creating a convincing walk cycle.

How does this transfer of weight make itself know in the key poses? Well there are two key elements, both concern the hips of the character.


The Hips’s Side-To-Side motion & Center of Gravity

When the weight of the body is on a particular foot the hips will move over to that side to balance the body’s center of gravity. Without this movement you’d simply fall over. It’s something we do without thinking, try standing on one leg and see what happens to your hips. They move over to the standing leg right, that’s what we’re talking about.

This side-to-side motion produces the ‘sway‘ you see when people walk.


The side-to-side movement of the hips from the center line

Hip Rotation

One common mistake when people attempt their first walk cycles is to ignore the rotation of the hips. There are two important hip rotations to be aware of:

❄️ Yaw rotation of the hips
❄️ Roll rotation of the hips


For the hip’s yaw rotation the important consideration is that your legs do not flip-flap on the end of static hips they are a unit! If you stand up and approximate a contact key pose (one leg forward, the other back) you will notice that your hips are not straight, they will have twisted to extend your stride and the reach of your foot. Not utilising the yaw rotation of the hips means your character will be taking tiny steps (as their stride will be reduced) and it will look very mechanical, as the legs and hips are not working together as a unit.


The hip’s YAW rotation

The hip’s roll rotation also plays an important role in the walk cycle, specifically to do with the transfer of weight.

When standing on a single leg the hips/pelvis will roll up on that side as the full weight of the body is taken. Animation wise this is a great way to sell the transfer of weight in your animations and give a clear indication when the weight is passes and the hips roll one way and then the other.


It’s also important to note that this hip movement can be adjusted for the weight of your characters. If your character is heavier (like Henrik) then this transfer might be more sudden and less smooth then for a lighter character. In fact this motion is a great way to sell a heavier character.


Phew, this is a lot of stuff! I had to divide this devblog on two parts to not torment you to death. Next part on the next week!

Cheers,
Alex & Team Röki


RÖKI: A game about monsters that shouldn’t exist

https://store.steampowered.com/app/1067540/Rki/
Röki - HighStaccato


Hi, folks!

We’re excited to announce that Röki is nominated in three (!) categories for Pixel Awards Europe 2020!

❄️ Indie Grand Prix
❄️ Best Art
❄️ Best Design


Pixel Awards are given as part of the Pixel Heaven games festival. It’s the 8th edition of Poland’s largest indie gamedev competition. The winners will be announced on December 5.

Congratulations to the other nominees 🙂
You can see the full list of them HERE.

Keep your fingers crossed and stay tuned!

Cheers,
Polygon Treehouse Team


https://store.steampowered.com/app/1067540/Rki/
Röki - HighStaccato


Hi everyone!

Today we're going to be looking at Tove's fancy pants... footprint!. Previously she cast a shadow which grounds her in the scene nicely, but as she's going to be spending a great deal of time in the snowy wilderness, we thought it's be super neat if she left a trail of footprints in the snow - and maybe throw in some footfall particle effects whilst we were in the neighbourhood!

In fact, once we got something up and running we decided to use the effect to varying degrees in all our scenes. We put in variables so that the footprints colour and intensity can be set on a scene by scene basis, so we could even use them in a subtle fashion in the interior scenes.

Anyway, that's the overview. We're gonna take a step-by-step look at how we created them. We're not going to be going into super tetchy details so hopefully it'll still be an interesting read for the non gamedev folks!

Unity Projectors

Unity's projects are the base building block that we built up from. They're essentially project an image onto a surface, in our case the flat shape of a boot-print! This is neat as they can work on different terrain, it doesn't matter if you have slopes or steps in your environment they still work as the footprint is projected down from above. You can read more about them here if you like.

Custom Footprint Shader

So you can use the basic multiply projector shader than is in Unity's standard assets and it will project your image onto your scene. It works well but we needed to add some more functionality to make it work how we wanted, so we created a custom footprint shader using the standard one as a basis.


First thing was we wanted to add was the ability for the footprint to fade out over time so there is no noticeable 'POP!' when we kill it.

The second thing we wanted was a tint colour. We'd worked out early on that the effect would add a nice touch to most of our scenes but would need to be adjusted to suit. It might be quite dark and blue tinged in the snowy exteriors but more subtle and warm when used in dusty interior spaces.

That was all the functionality we needed, pretty simple really.

How do we Trigger a Footprint?

The next question was how are we gonna tell the game when to place one of these things on the ground? We'd need to know when the foot had planted and we might not want it for all animations (for example we wouldn't want it for when Tove climbs a ladder).

The answer was actually pretty straight forward, we used animation events. These are triggers you can add to an individual animation's timeline, when the animation is playing and hits the trigger/anim event you can make it do STUFF!


In our case that 'STUFF' would be to trigger a 'footprint function' that would place our footprint for us.

The nice things about using animation event's for this is that it's not automated, you can use your judgement to say which anims you want to have footprints, they will only trigger on animation you add the events to so there's a great deal of control.

As well as triggering functions this way you can also pass them bits of extra info in the anim event which is nice. In this case we decided to pass either the string "Left" or "Right" along with the function call.

Footprint Function

So we have this function that slaps a footprint down, but what does it actually do? Handily I remembered to capture some video footage as I was implementing the footfall VFX, so let's have a look at what it does step by step...


- At the point the anim event is triggered it gets the position of Tove's foot and uses its TX and TZ to position the footprint projector in the first place beneath her planted foot.

- It also gets her foots rotation and used that to rotate the projector so the footprint will match the rotation of her foot (you can see this below).


- Remember that string ("Left" or "Right") we passed to the function from the anim event? If you look at the above video you can see that all the footprints are shaped for the left foot! So to fix that we now we use the passed string ("Left" or "Right") to pick which image we want to project down onto the ground, the left or the right foot (we probably could have got away with having a generic footprint that was used for both feet but what the hell I was feeling fruity so I added it in). You can see this update below:


- In the above examples you can see that once it reaches a limit of 6 footprints it kills the oldest one and creates a new one in the fresh footfall position. In order to make that look nice we use fades, so by the time we need to kill a footprint it was already conveniently faded from sight! We records the game time that the foot landed on (from when the anim event was triggered) and then works out how much time has past so it can calculate how faded out the footprint should be.


- Finally, once the footprint has faded out completely we kill it and it goes to footprint heaven.

Footfall Particles

The last ingredient was the footfall particles to simulate snow or dust that is getting flung up with the impact and wake of each footstep. As we now had all this info about where the footfall was and what rotation it was it was a simple case of moving a particle emitter to the foot once it had landed and have it play it's particle 'POOF'

The only extra condition we added was that we didn't want this particle 'POOF' to trigger for any old footfall, just when Tove is running (it was a bit overkill for when she is just walking about). In order to do this when the foot lands we check one of her animation parameters in her animation network which tells us preciesly that.

Simple, if the check says she's not running, don't trigger the particle 'POOF', if she is then fill your boots!


Projector Ignore Layers

Another neat thing about projectors in Unity (versus the real world) is that you can set them to ignore certain parts of your scene. As you can imagine we don't want the footprint to be projected on Tove, so we set it to ignore our Character Layer. In fact we wanted to ensure that only the elements we absolutely required to receive footprints were the once that were considered. So we created a new layer 'Receive_Footprints' and added any floor meshes and terrain we wanted to get the footprint treatment in there pronto.


As well as making it more efficient it also cuts down on the amount of visual artifacts you'll get. The projector isn't particularly smart and just projects an image down so you can sometime get footprints appearing where you don't want them, smeared down the vertical part of a step or even appearing on the roof mysteriously above where Tove is running (kinda creepy)! So yeah, using those ignore layers is a double win.

ANNNND...That's your lot, you can look again at the top image to see it all working together in a scene! We hope you found that interesting, it's quite cool how you can layer up lots of simple steps and get something that's pretty effective!

Until next time,

Cheers,
Alex & Tom

RÖKI: A game about monsters that shouldn’t exist

https://store.steampowered.com/app/1067540/Rki/
Röki - HighStaccato


Hi everyone!

We’re happy to announce that Röki Deluxe Edition is now available! This bundle, of course, is something more than just the game. By purchasing this edition you get access to 40 tracks from Röki original soundtrack composed by the irreplaceable Jason “Aether” Taylor AND a unique art book, which will reveal many secrets of our adventure game.

What if I already have Röki, but would like to purchase soundtrack and artbook?
That’s not a problem at all! You can buy Deluxe Upgrade that will give you all the features included in Deluxe Edition.
❄️ You will find it HERE.

So, Scandinavian wilderness dwelvers - are you ready for yet another adventure with Tove? 😉

RÖKI: A game about monsters that shouldn’t exist

https://store.steampowered.com/app/1067540/Rki/
Röki - HighStaccato


Hello everyone,

Last week we gave an introduction to animation networks, what they are, where they came from and what they're used for. If you missed it or fancy a refresher, you can catch up here!

Last week we didn't really dig into how they're used, it was more of an overview, so this week we'll delve a little deeper. Again we'll be keeping it as a pretty simple overview, so it's accessible to all. Apologies in advance if you're expecting a super detailed technical breakdown!

So, by the end of last week we'd established that there was this big map of all of a characters animations. The game can pick and chose from this depending on the player input or scenario. This week we'll look at some of the other key elements of a character's animation network.

Current Location = Current Animation

Our current position or location within the animation network dictates what animation is playing at any one time, to play a different animation we have to move from our current animation state to a different position (and therefore animation) in the network. When we create the network we can specify what our starting position in the animation network is. Usually this is the character's idle wait animation as it's the one we want to play when there is no player input at the start of a game or scene.


So our current position in the network picks what animation we're playing, but how do we move our position to a new animation state and play a new anim?

Transitions

So the blocks in the network are the individual animations (or possibly groups of animations, we'll come to that later). The transitions are the lines in between the blocks. These transition lines essentially dictate which animations we can choose to move to from our current position, if there is no transition line connecting nodes then we cannot go there.

Think of these transitions as a cross-fade between records; we fade one animation down as we fade the other animation up, blending between them.

Default Blend/Into and Out anims

Now sometimes a default transition may look a little weird. There is nothing intelligent about it, it's literally blending from one animation to the next. It has no insight into how the human body works or what looks realistic. Usually if the animations we are blending to/from are similar it looks fine, but if the difference between the anims we're blending is considerable, then the default transition may look weird. To solve this we can add 'Into' and 'Out' animations. There are essential bridge animations we author to have more control over the transition and make sure it blends in a believable way.


As we have complete control over the animation network we can simply plug these new states in and change the path from one animation node to the next. Simple!

Transition Properties

Each transition line has properties that we can set to dictate the specifics of how the transition from one animation to another works. For example, you can say whether the transition should trigger immediately, breaking out of the current animation, or wait until the current one has finished.

You can also set the duration of the blend - is it quick or slow?

You might notice that sometimes there are multiple transition lines leaving a single node, meaning that we have multiple animation options to choose from. How does the game pick which transition path to take? Well, a key part of transitions are conditions and animation variables.

Animation Varaibles/Parameters

So how do we pick? One of the key properties a transition can have is a condition, only if the condition is true will the transition path be taken! So what are we testing for in these conditions? We're testing for animation parameters.


These are simple booleans variables (although you can use different parameter types), essentially an 'on' or 'off' switch, that we set in the game that tells the animation network which transition paths to take and determine what animation we will play next. For example in the game if we set the variable 'Skip_Trigger' to be true, the network knows to take the transition path to the 'Skip' animation.

Groups and the Noddle Monster

As you add animations to your game the network can quickly become messy and unreadable, a giant spaghetti junction of nonsense that will fry your brain when you return to look at it after a break. One good way of sorting this out is by encapsulating multiple animation states within groups (called sub-state machines in Unity).


By grouping animation states in this way you also cut down on the number of individual transitions. Rather than transitioning from one individual anim to another individual anim, we simply transition out of our current parent group. From this point we pick the next parent group to move to (in this instance 'Kinematic Anims') then once we hit that group we choose the specific Kinematic Anim to play. The original animation we came from doesn't need to know the details of all the different Kinematic anims, it just needs to get to the parent animation group as instructed, then the network can pick for itself.

This makes adding new animations into the network much easier as there are less transitions to set up and less visual noise and noodle mess when trying to read it at a glance… DOUBLE WIN.

So that's it for our two part look at character's animation networks, we might return to look at more specifics but hopefully that has given you a good peak behind the wizard's curtain.

Until next time,
Cheers,
Alex & Tom

RÖKI: A game about monsters that shouldn’t exist

https://store.steampowered.com/app/1067540/Rki/
Röki - HighStaccato


Hi everyone!

It has been over two months since Röki came out on PC. But we are not ready yet to definitely end this adventure. We present you our next dev blog. Take a trip to the past with us and find out What the Flip is an Animation Network in Röki. By the way, don’t hesitate to check our previous dev blogs about References, Non-Linear Music and Shadow Volumes. Now, let’s cut to the chase… the animation network!

That may mean very little to you, so we'll be discussing what an animation network is, and what it's used for. For seasoned video game animators this may bring no new info (apologies) but hopefully for everyone else it will be an interesting insight into game animation, it's certainly an area of animation we find fascinating.

Video Game vs Feature Film animation

Before we get started on animation networks for games there is an important distinction to make between video game animation and film/TV animation, as they are two very different beasts indeed! Whilst some of the building blocks may be similar (placing down key-frames and whatnot), quite a big chunk of the animation process is very different indeed.

Film/Feature animation is done on a per-shot basis, an animator is given a specific shot to work on. That shot or sequence may only be a few seconds long but they will work on it for a very long period of time. They will iterate on their shot over and over for weeks, if not months, finessing it to the Nth degree until it is signed-off and they move on.

In short, it is a linear peace of animation done for a specific shot and certain viewing angle.


Animating for Video Games

Animating for games is a whole different ball game. Rather than a one-time linear shot from a fixed angle, video game characters have entire collections of shorter animations, or clips, that can be viewed from any angle. This collection of animation clips is chosen from, sequenced and blended in real-time, on the fly, in the game. Which animations are chosen depends on the input of the player on the controller or mouse and the game scenario.

These animations may be cycles that loop (walks or runs) or one-shot animations designed to play a single instant (such as opening a door or climbing a ladder).

This clever bit of animation magic that defines how this collection of animations link and work together is called the animation network (phew, I knew we'd get there eventually!).

A Character's Animation Network

Now what is it? Think of it like a network or map of all of a character's different animations. It defines how the game navigates between the different animations to sequence and build that character's performance.

These animation networks can be shared or can be set up to be bespoke for each individual character.

In modern video games development the animation network is created and maintained by the animators (at least from my experience). Unity (and I imagine Unreal and other engines as well) both have very user friendly visual GUIs to now allow animators to have control over how the animation networks.

To give you a better idea here are a couple of grabs from Tove's animation network. Each grey box is an animation or a group of animations. The lines that connect them are transitions, but more on that next week!


Power to the Animators

Getting my mitts on an animation network has actually been pretty exciting for me (I am a bit of a nerd though). During my 14 years at Sony I spent the initial few years working as an animator before specialising as a character artist. At this point (showing my age here) the platform we were working on was the PS2 and the animators had very little input and control on how their animations were implemented as the animation network was not exposed, it was hard-coded by the gameplay programmers.

That meant that as an animator at the time you would author the individual animation clips, but then have no control on how they were linked together. That was done by the programmer. Now, we were fortunate to have some awesome gameplay programmers, but it's still better to give that control to the animator; to allow them to pull the strings and levers themselves.

In modern game-engines the animation network is exposed giving the control back to the animators as to how and when animations transition. So when we started developing Röki it was one of the first things I was looking forward to rolling up my sleeves and having a play with.

So that's a bit of a heads up on what an animation network is and what it is used for. Next time we'll dig a bit deeper into the detail of how they work and how we're using them on Röki.

Until next time!

Cheers,
Alex & Tom

RÖKI: A game about monsters that shouldn’t exist

https://store.steampowered.com/app/1067540/Rki/
Röki - HighStaccato


Hi Scandinavian wilderness dwelvers!

With today’s update, we’re bringing some few adjustments and improvements, listed below.

Fixes & Improvements:
❄️ Improved Tove’s ponytail physics
❄️ Fixed an issue that could occur with V-Sync
❄️ Fixed an issue that could occur with the logo starting sequence during game launch
❄️ Fixed a visual glitch that could occur during the Stag Trial in Act 2
❄️ Fixed an issue that could occur during the Rampart puzzle in Act 3

Please don’t hesitate to keep sending us comments on the Steam forum, or messages at support@unitedlabelgames.com.

Thank you again for playing!

RÖKI: A game about monsters that shouldn’t exist

https://store.steampowered.com/app/1067540/Rki/
Röki - HighStaccato


Hi everyone!

Straight from PAX Online - the United Label Showcase 2020. If you missed the presentation, then you need to see it.

Have a coffee, grab some snacks and enjoy 😉


RÖKI: A game about monsters that shouldn’t exist

https://store.steampowered.com/app/1067540/Rki/
...